Understanding Groups and Access Policies
NetBird's access control system is built on Zero Trust security principles, ensuring that no device or user has access to network resources by default. Instead, access must be explicitly granted through carefully designed policies. This guide will help you understand how NetBird's policy system works, clarify the important distinction between user groups and peer groups, and provide step-by-step instructions for implementing secure access control in your network.
NEW: For a visual overview of your access policies and how peers, groups, and their relationships connect, check out the Control Center feature in NetBird. The Control Center provides an interactive graph view that makes it easy to understand your network's access structure at a glance.
Zero Trust Principles and NetBird
Zero trust networking operates on the principle of "never trust, always verify." Unlike traditional perimeter-based security models, zero trust assumes that threats can exist both inside and outside the network. NetBird implements this through:
- Deny-by-default behavior: Without policies, no peer can communicate with another peer
- Explicit access grants: Every connection must be explicitly allowed through a policy
- Identity-based access: Access can be tied to authenticated identities, not just resources.
- Least privilege access: Users and devices should only have access to resources they specifically need
- Dynamic posture checks: Access can be conditional based on device security posture
Default ALL to ALL Policy (Not Recommended)
TLDR: NetBird automatically creates a Default policy that allows all devices to communicate with each other. While this helps with onboarding, the Default policy completely undermines zero trust principles and should be removed once you create proper access control policies. Make sure to have replacement policies ready before deleting it, or all peer communication will stop.
When you first create a NetBird account, a Default policy is automatically created that allows all peers to communicate with each other using any protocol. This policy exists because early NetBird users were confused and frustrated when their devices couldn't communicate—NetBird's deny-by-default security model meant nothing worked without policies defined, and users thought the platform was broken.
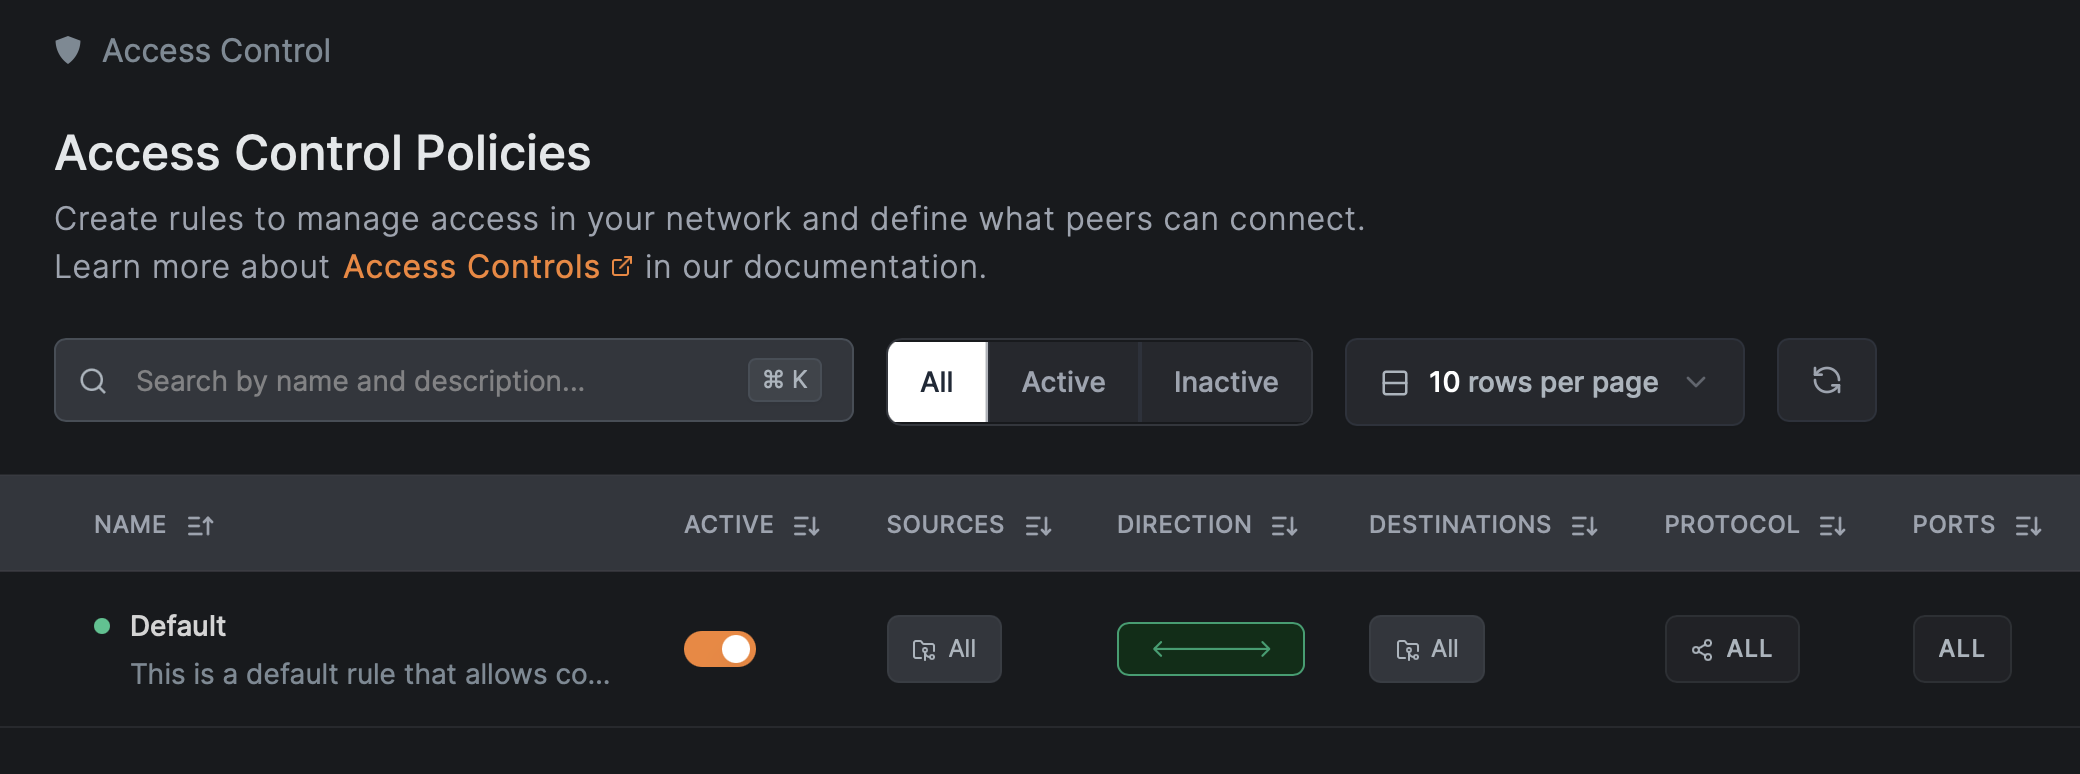
The Default policy, which uses the special All group as both source and destination, solves this onboarding friction by letting new users immediately see NetBird working while they learn the platform.
However, the Default policy completely undermines zero trust security principles and should be removed as soon as you're ready to implement proper access control. It violates the principle of least privilege, provides no network segmentation (a compromised device has direct access to everything), and allows all-to-all communication even after you create restrictive policies. Think of it as training wheels: helpful for getting started, but you should remove it when moving to production.
Understanding Groups
What Are Groups in NetBird?
Groups in NetBird function similarly to tags or labels in other platforms. They're collections of peers (devices running the NetBird client) and resources (internal network resources that don’t run the NetBird client) that can be used in policies to control network traffic. Every peer in your network can belong to one or more groups, and these group memberships determine what resources that peer can access.
User Groups vs. Peer Groups: A Critical Distinction
This is one of the most important concepts to understand when configuring NetBird access control. It's important to note that NetBird doesn't technically differentiate between "user groups" and "peer groups" in the interface—all groups appear together in the Groups page. However, understanding this conceptual distinction is crucial for implementing secure, well-organized access control.
The distinction is based on how groups are used and assigned, not on any technical difference in NetBird:
User Groups
User groups are groups that are assigned to user accounts and automatically inherited by any device that user logs into. These are designed for client-side devices used by human users—laptops, workstations, mobile devices, and tablets.
How user groups work:
When a user signs into NetBird on a device (such as a Windows computer using the desktop client or a smartphone using the mobile app), that device automatically receives all group memberships assigned to that user account. This typically happens manually on invite or through your Identity Provider (IdP) integration.
- IdP Integration: User groups are defined in your identity provider (such as Okta, Azure AD, Google Workspace, etc.)
- Automatic Assignment: When a user signs into NetBird with SSO on their device, that device (peer) automatically inherits the user's group memberships
- Dynamic Updates: If a user's group membership changes in the IdP, their device's access permissions update accordingly
Methods for assigning user groups to peers:
- Automatic via SSO: The recommended method. When users authenticate through your IdP, their device automatically receives the appropriate group assignments
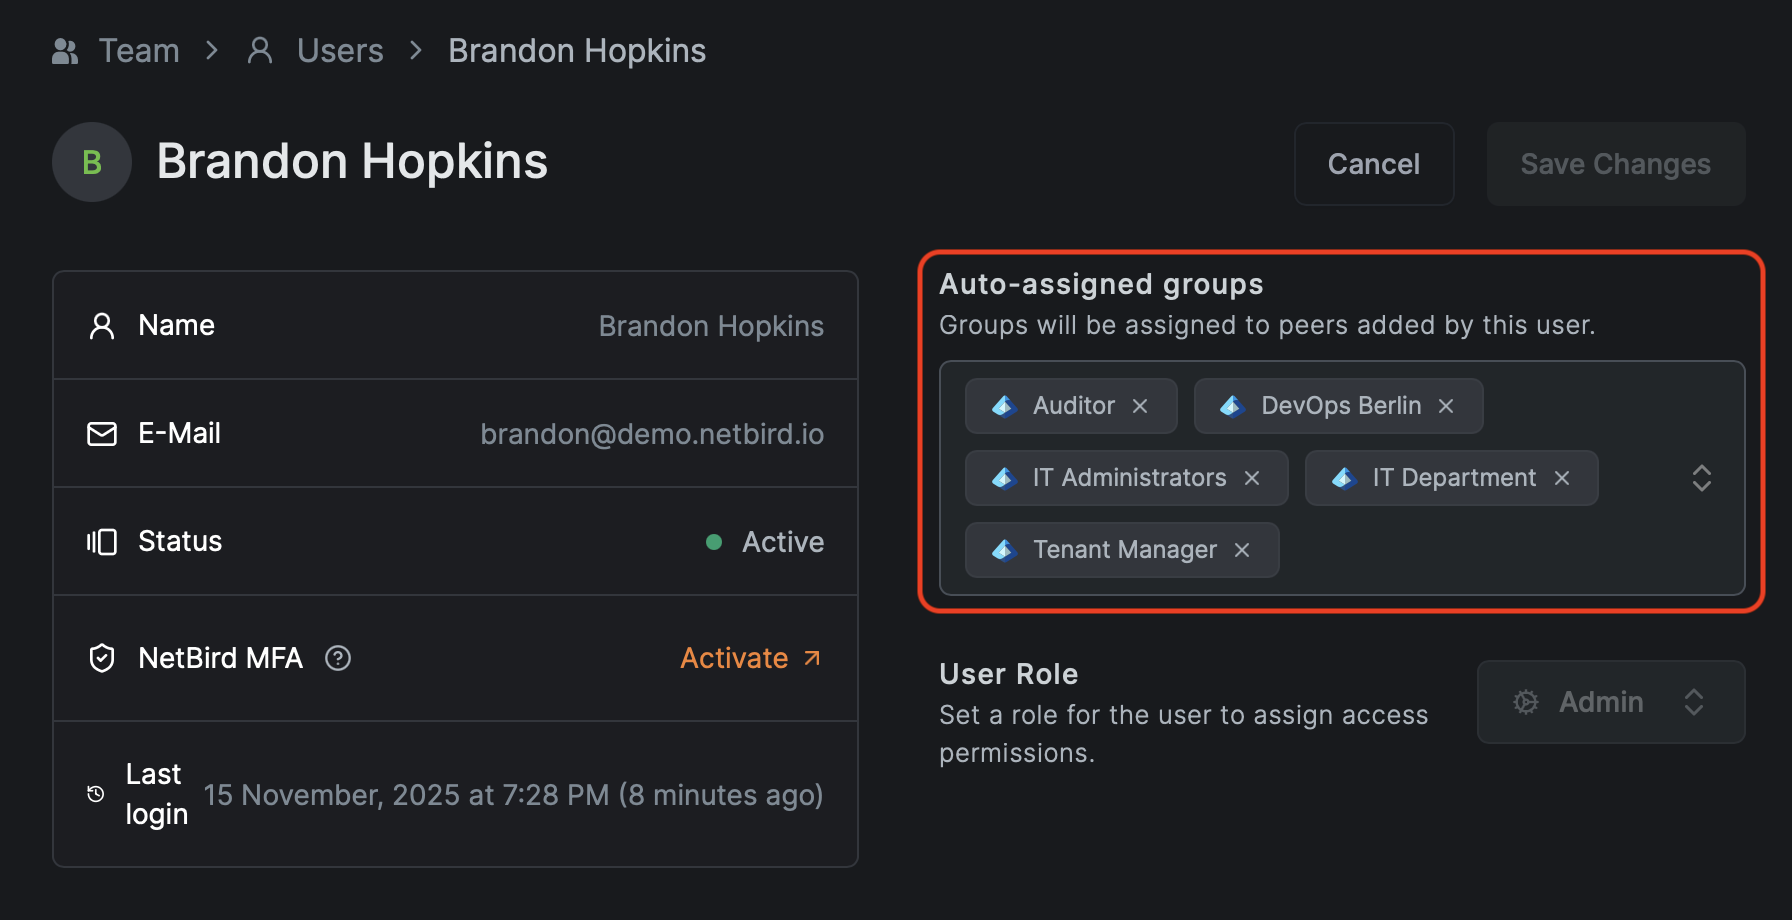
- Manual assignment to users: Add groups to a user's account in NetBird, then any device that user signs into will inherit those groups
- Direct peer assignment: You can manually assign user groups directly to specific peers in the Peers section
Examples of user groups:
engineering-teamsales-departmentcontractorsexecutivesremote-workers
Peer Groups
Peer groups are groups that are assigned directly to infrastructure resources—servers, databases, network appliances, backup systems, and other non-user devices. These resources don't have users logging into them, so groups are assigned either through setup keys or manual assignment.
How peer groups work:
- Manual Creation: Groups are created explicitly in the NetBird interface
- Setup Key Assignment: The most common method - when creating a setup key, you specify which groups should be auto-assigned to any peer that registers with that key
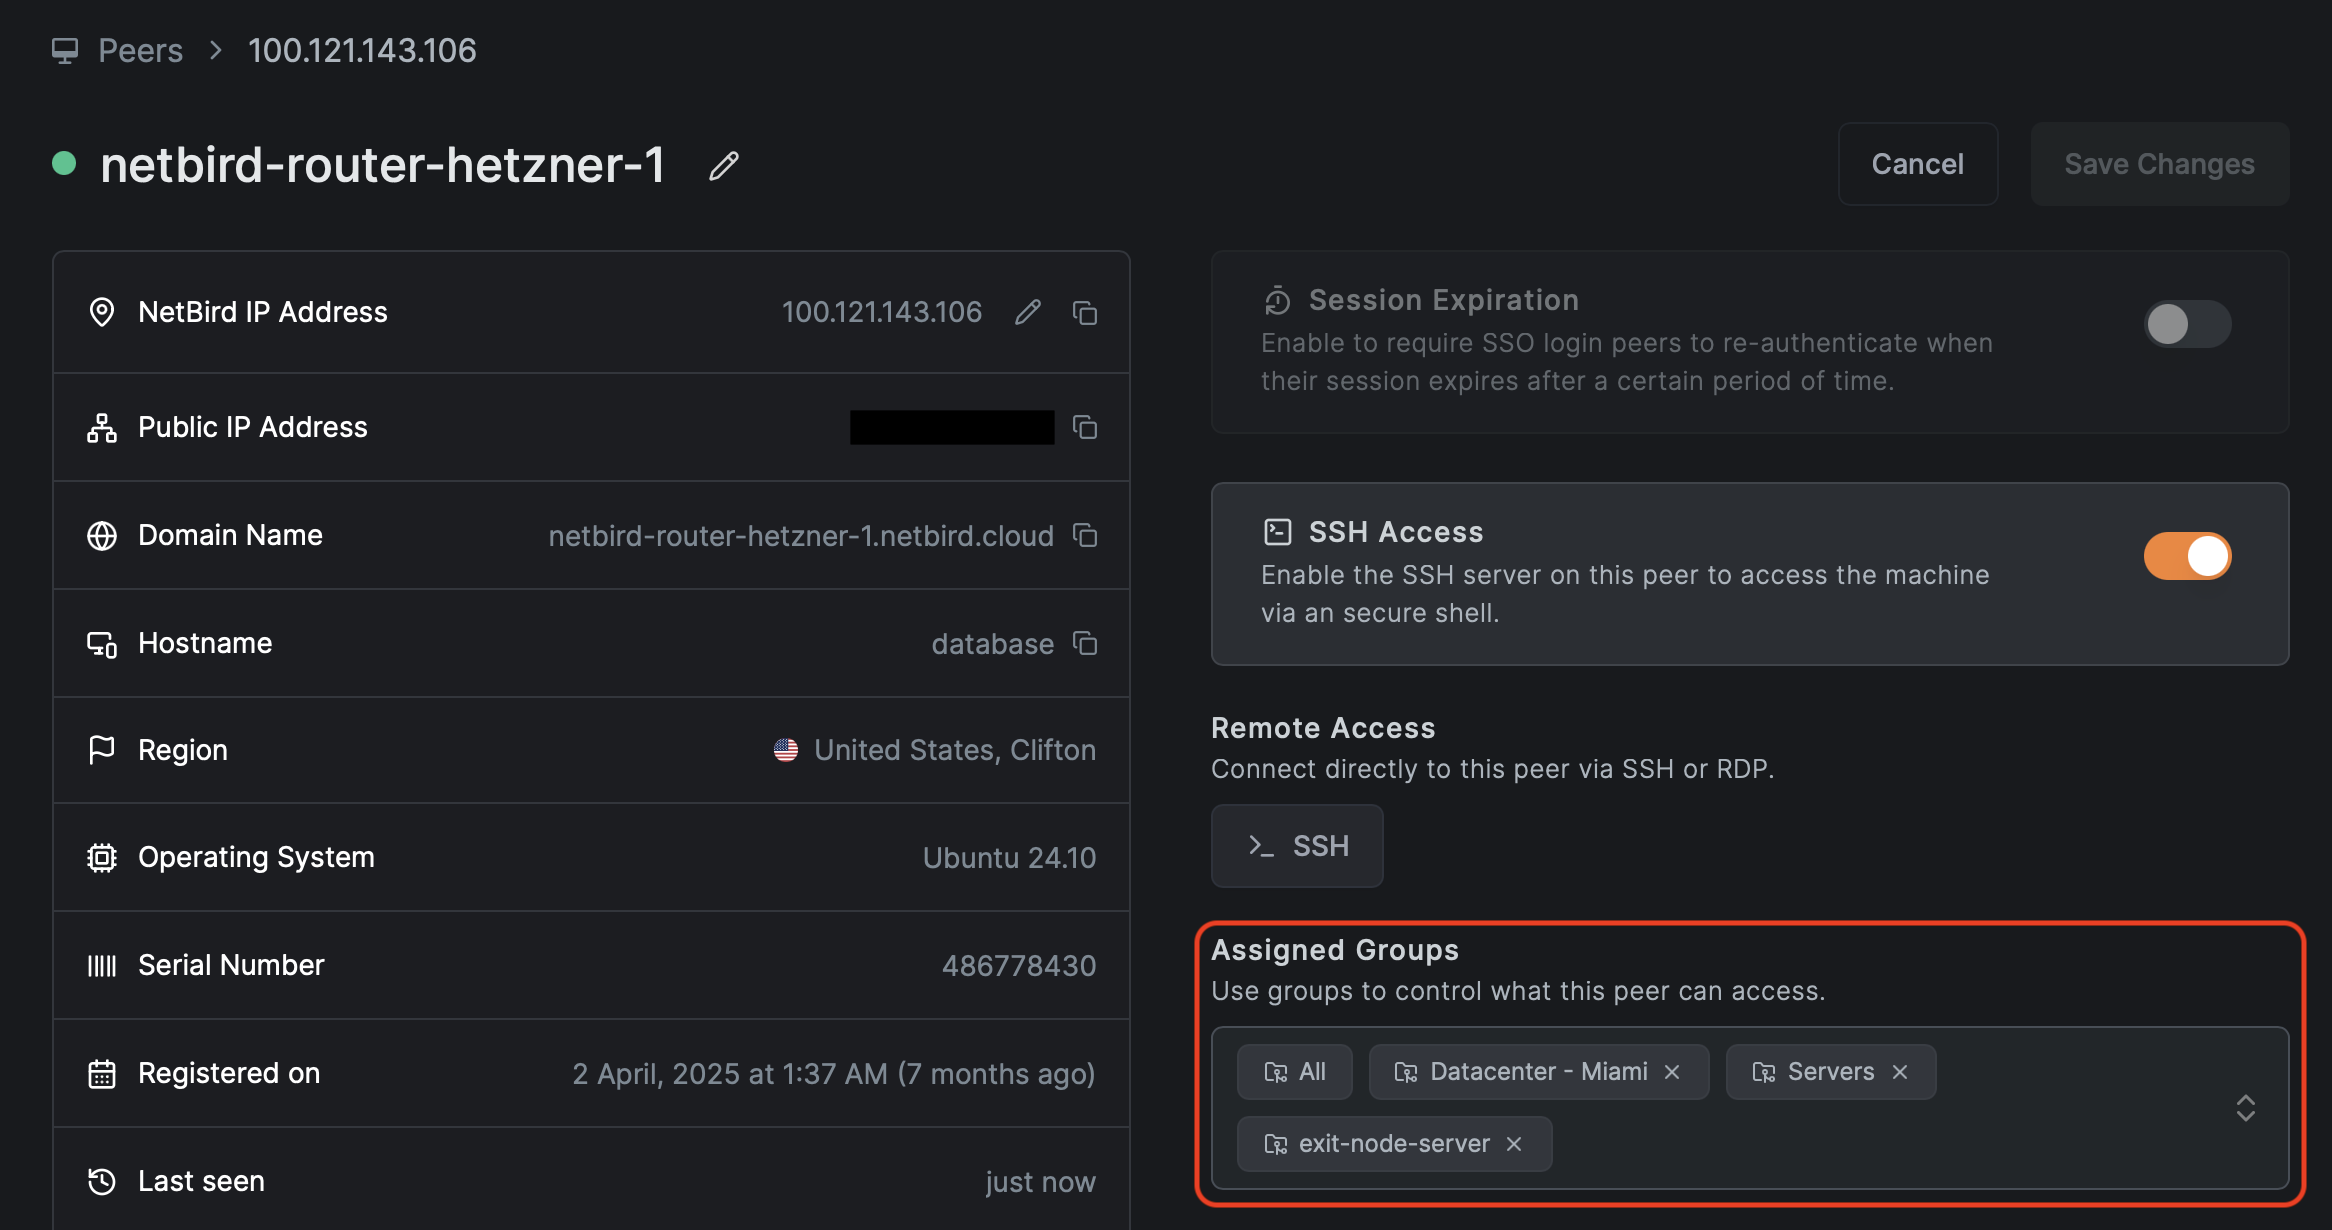
- Manual Assignment: Administrators can also manually assign groups to specific infrastructure peers after they're connected
What are Setup Keys?
Setup keys are pre-authentication keys that allow servers and headless devices to register with your NetBird network automatically, without requiring interactive SSO login. When you create a setup key, you can specify which groups should be automatically assigned to any peer that connects using that key.
Examples of peer groups:
production-databasesweb-serversbackup-serversdevelopment-environmentsproxy-hostsnetwork-routers
Why Think of User Groups and Peer Groups Separately?
Even though NetBird treats all groups the same way technically, maintaining this conceptual separation in your mind and in your naming conventions is crucial for several reasons:
- Security clarity: Clearly distinguishes between "who" (users) and "what" (resources)
- Principle of least privilege: Makes it easier to grant users access only to the specific resources they need
- Audit and compliance: Simplified tracking of which users can access which resources
- Operational clarity: Prevents confusion about whether a group represents users or infrastructure
- Policy clarity: Keeps your access policies clean and easy to understand
Anti-pattern to avoid:
❌ Creating a group called engineering and adding both engineering team members' laptops AND engineering servers to the same group. While this doesn't automatically grant access between devices (you still need a policy), it creates several problems:
- If you create an
engineering→engineeringpolicy to allow access, you've now granted all devices in that group access to each other, creating an unclear mesh where laptops can access servers AND servers can access laptops - It makes your access control messy and difficult to audit
- You lose clarity about which devices are users vs. infrastructure
- It violates zero trust principles by not maintaining clear source and destination boundaries
Correct approach:
✅ Add engineering team users into a engineering-users group and set machines or resources to a engineering-servers group. Create a setup key with engineering-servers as an auto-assigned group, then use that key when deploying servers. Finally, create a policy allowing engineering-users (source) to access engineering-servers (destination). This keeps your access control clear: users access servers, not the other way around.
Policy Direction: Source and Destination
The Source-Destination Model
NetBird policies control network traffic by defining:
- Source: The group of peers that initiate connections
- Destination: The group of peers that receive connections
Important: Simply being in a group doesn't grant any access. You must create a policy that includes those groups. However, how you organize your groups significantly impacts how clear and secure your policies become.
Best Practice: Users as Source, Infrastructure as Destination
Following zero trust principles, your policies should generally follow this pattern:
✅ Recommended Pattern:
- Source: User groups (client devices)
- Destination: Peer groups (servers/infrastructure)
This ensures that:
- Users can reach the resources they need
- Your policies clearly show the direction of access
- Resources cannot initiate connections back to user devices (when using specific ports)
- It's easy to audit who has access to what
Example:
Policy: Engineering Database Access
Source: engineering-users
Destination: production-databases
Protocol: TCP
Ports: 5432 (PostgreSQL)
Direction: One-way
This policy clearly states: engineering users can access production databases. If you had mixed both users and databases into a single engineering group and created an engineering → engineering policy, it would be unclear what's accessing what, and you'd be granting unnecessary bidirectional access.
Peer-to-Peer Policies
There are legitimate cases where infrastructure resources need to communicate with each other:
✅ Valid Infrastructure-to-Infrastructure:
Policy: Backup Server Access
Source: proxmox-ve
Destination: proxmox-backup-server
Protocol: TCP
Ports: 8007
Direction: One-way
This allows proxy hosts to initiate connections to backup servers for data replication or backup operations.
Anti-Pattern: Infrastructure to Users
❌ Generally Avoid:
Policy: Server to User Access (NOT RECOMMENDED)
Source: web-servers
Destination: engineering-users
While NetBird’s peer-to-peer technology allows servers to connect to laptops and even mobile phones, this is not recommended.
Why avoid this?
- Violates zero trust principles
- Increases attack surface
- If a server is compromised, it could initiate connections to user devices
- Doesn't align with typical network communication patterns
When might this be acceptable? In rare cases, such as callback mechanisms or notification systems, you might need servers to reach client devices. In these cases:
- Document the business justification clearly
- Use specific ports and protocols (not "ALL")
- Consider alternative architectures (like webhooks or polling)
- Implement additional posture checks
Policy Directionality
Understanding policy directionality is essential for implementing Zero Trust access control. How policies behave depends on whether you're connecting to peers (devices running NetBird) or network resources (internal systems accessed through routing peers).
Policies Between Peers
When both source and destination are peers running the NetBird agent, you have full control over directionality:
Unidirectional: Traffic flows only from source to destination. In the NetBird UI, this appears as a single arrow (→).
Example:
Policy: Database Access
Source: app-servers (NetBird peers)
Destination: database-servers (NetBird peers)
Protocol: TCP
Ports: 5432
Direction: Source → Destination (unidirectional)
App servers can initiate connections to database servers on port 5432, but database servers cannot initiate NEW connections back to app servers on that port. Return traffic for established connections is handled automatically by NetBird's stateful firewall.
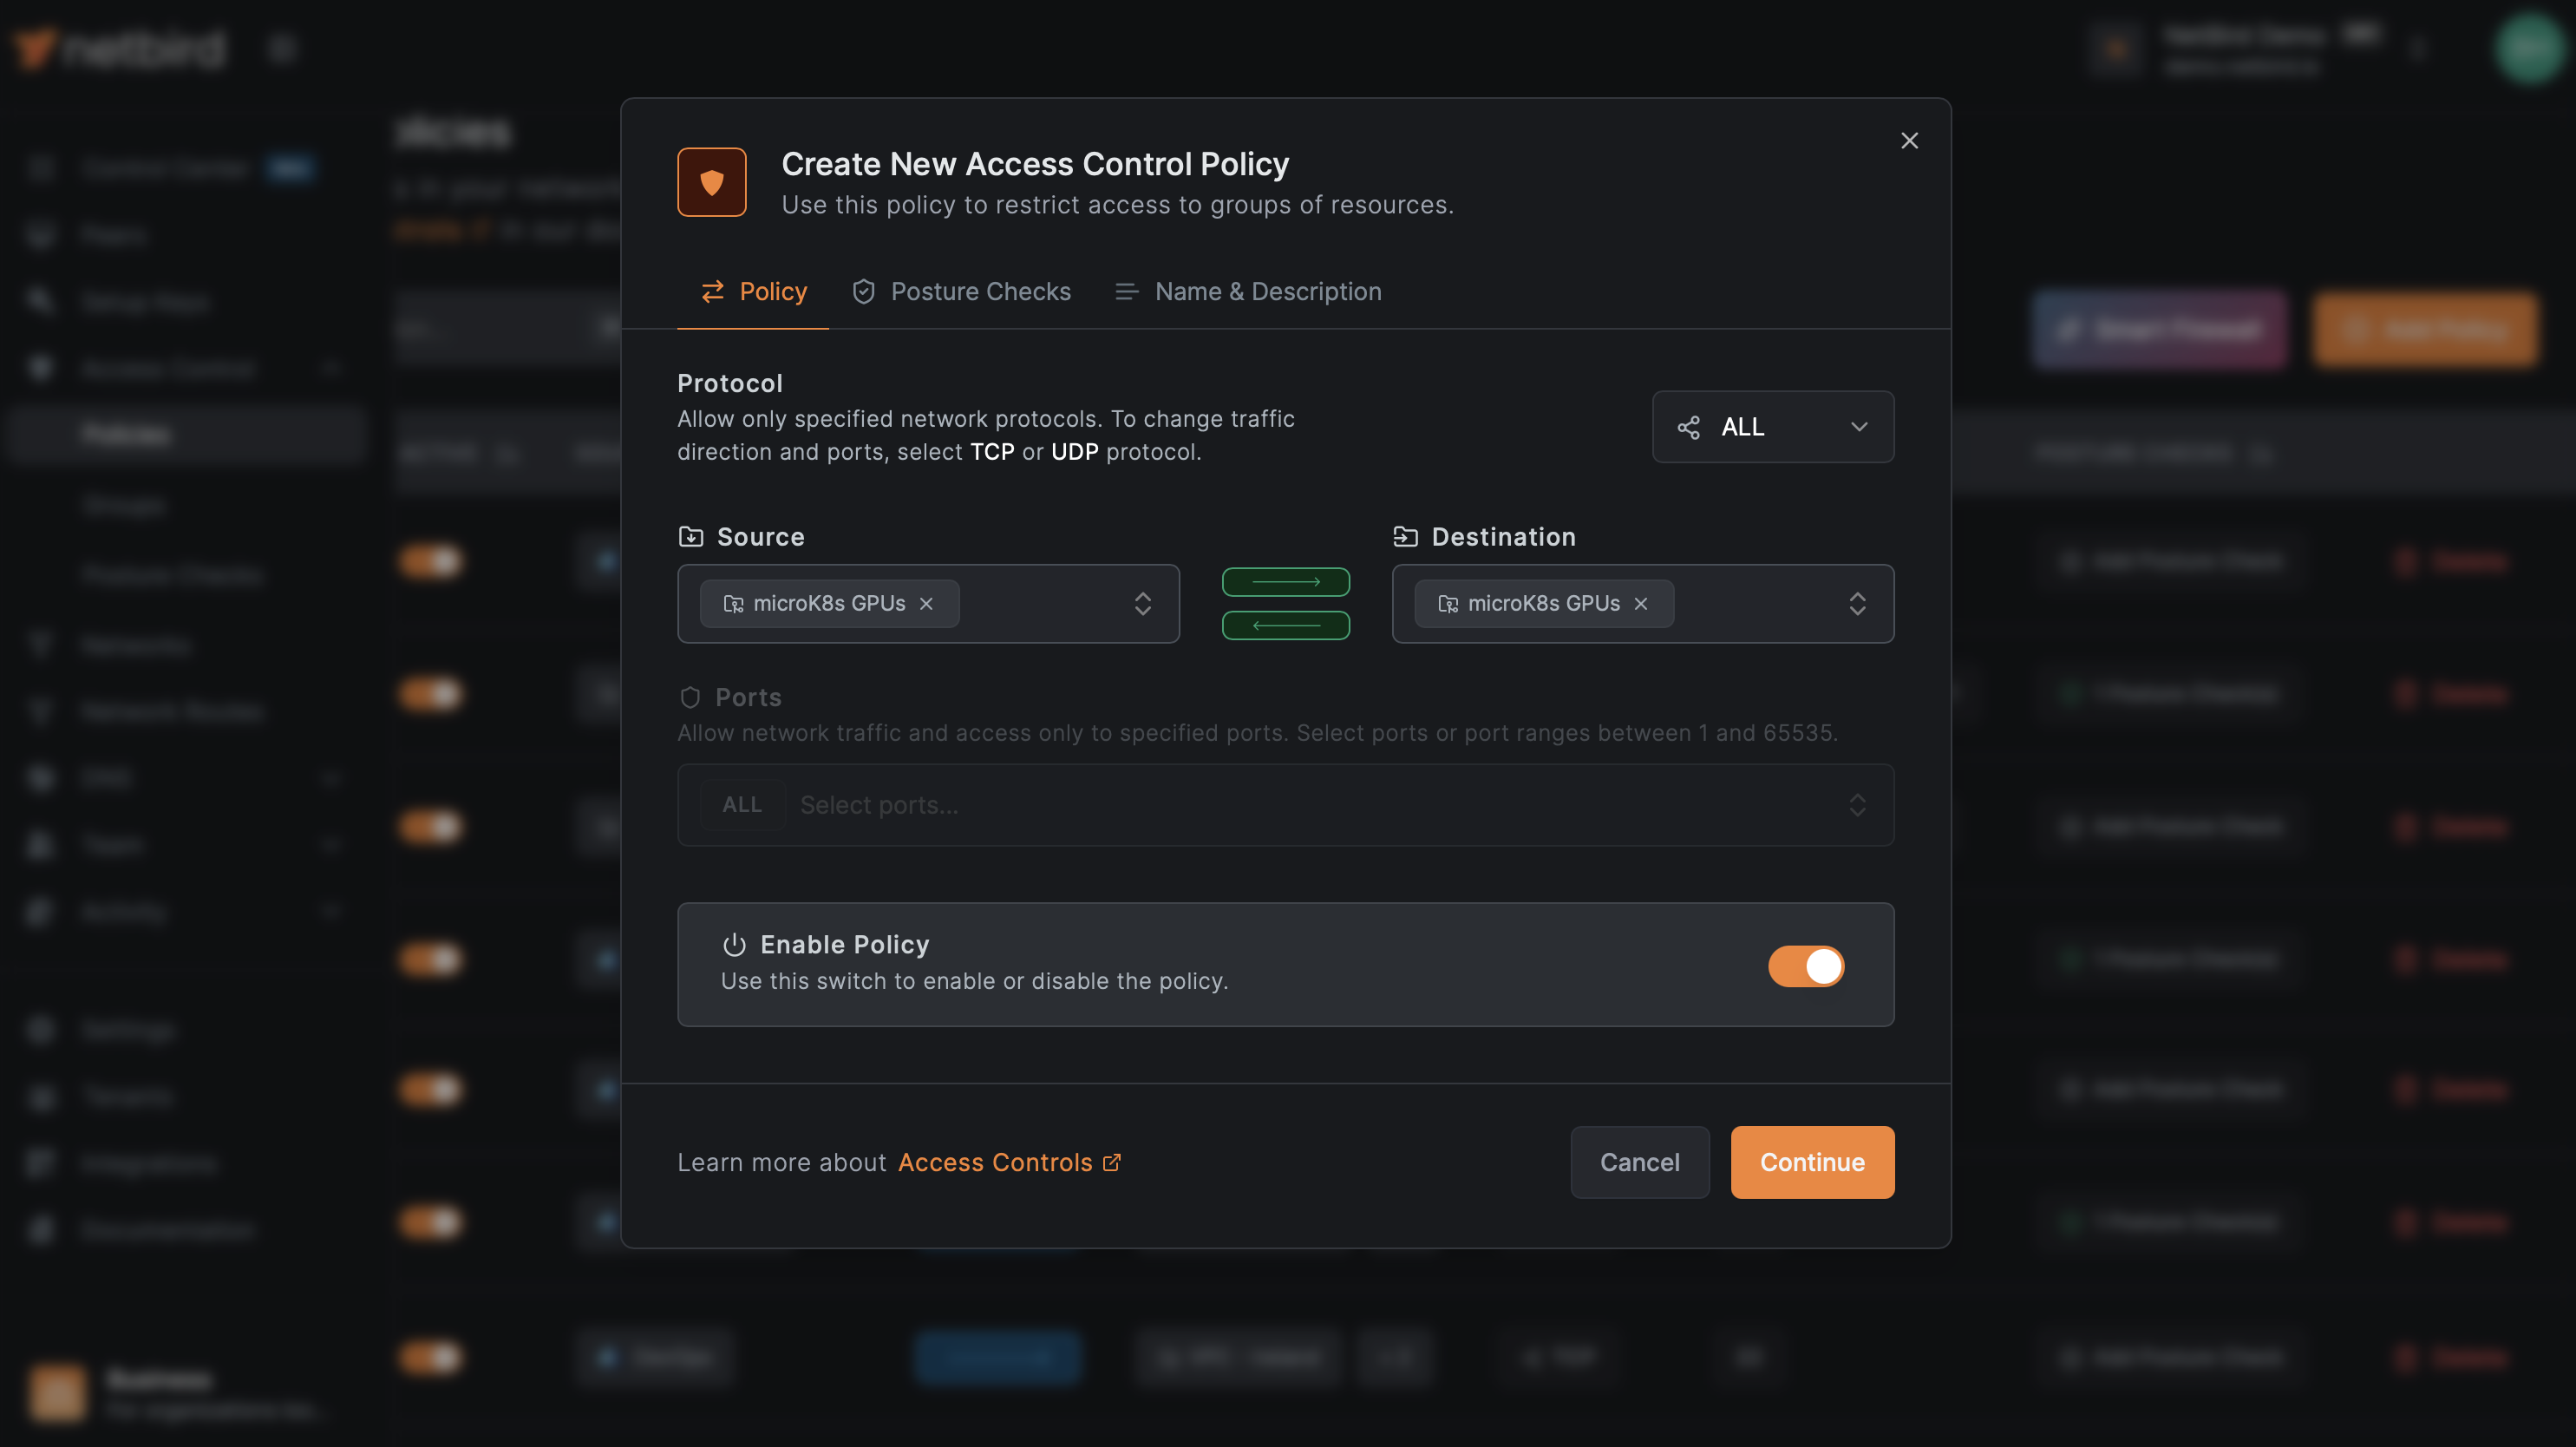
Bidirectional: Both groups can initiate connections to each other. In the NetBird UI, you can enable this by clicking the bidirectional arrows (⟷).
Example:
Policy: Dev Cluster Communication
Source: kubernetes-nodes (NetBird peers)
Destination: kubernetes-nodes (NetBird peers)
Protocol: ALL
Direction: Bidirectional (both can initiate)
All Kubernetes nodes can initiate connections to each other. This is useful for infrastructure components that need to coordinate.
Alternative approach for bidirectional (less common): Instead of using the bidirectional toggle, you could create two separate policies with reversed source and destination. However, using the bidirectional toggle in a single policy is the recommended approach.
Policies to Network Resources
IMPORTANT: When the destination is a network resource accessed through a routing peer (not a peer running NetBird directly), policies are ALWAYS unidirectional and can ONLY flow from source to destination.
Example:
Policy: Access to Private Network
Source: engineering-users (NetBird peers)
Destination: office-lan (Network resource: 10.0.1.0/24)
Protocol: TCP
Ports: 22, 443
Direction: ALWAYS Source → Destination (cannot be bidirectional)
Why is this always unidirectional?
Network resources don't have the NetBird agent installed. They don't know the NetBird network exists. The routing peer acts as a gateway, forwarding traffic from NetBird peers to these resources, but the resources themselves cannot initiate connections back through the NetBird network.
Think of it this way:
- ✅ Your laptop (NetBird peer) → Routing peer → Office printer (network resource) = Works
- ❌ Office printer (network resource) → Routing peer → Your laptop (NetBird peer) = Impossible (printer doesn't know about NetBird)
UI Behavior: When creating a policy where the destination is a network resource, the bidirectional toggle will either be disabled or attempting to enable it will have no effect, because bidirectional communication is not possible in this scenario.
Policies to network resources control access to the network behind the routing peer, not the routing peer itself. To access services running on the routing peer, create a separate peer-to-peer policy with the routing peer's group as the destination. See Routing Peers for more information.
Protocol-Specific Behavior
The data-plane honors the policy's direction flag for every protocol — ALL, ICMP, and TCP/UDP with or without specific ports.
Example:
Policy: Web Application Access
Source: users
Destination: web-servers
Protocol: TCP
Ports: 443
Direction: Unidirectional (users → web-servers on port 443)
Even though this is unidirectional, return traffic (HTTPS responses) is automatically allowed because NetBird implements a stateful firewall that tracks established connections.
Platform-Specific Implementation
Linux Platforms: NetBird integrates with native Linux firewall capabilities using connection tracking rules (ct state established,related accept). The kernel's connection tracking handles reply traffic automatically.
Non-Linux Platforms: NetBird implements a stateful firewall in userspace with a connection tracker that dynamically creates temporary rules for reply traffic:
- TCP: Full state machine tracking
- UDP/ICMP: Session tracking using timeouts
This replicates Linux firewall connection state handling in userspace.
Multiple Mesh Networks
As mentioned above, policies define how your network behaves as a mesh network, but only when you create the policies. Without policies, peers cannot communicate even if they're in the same group.
There is a Default policy, which configures a default mesh connection between all peers of your network using the All group. With custom policies, you can define smaller, more controlled mesh networks by grouping peers and adding these groups to Source and Destination lists.
Example of an intentional mesh:
Policy: Dev Cluster Communication
Source: kubernetes-nodes
Destination: kubernetes-nodes
Protocol: ALL
Direction: Bi-directional
This creates a mesh where all Kubernetes nodes can communicate freely with each other. This makes sense because these are all infrastructure components that need to coordinate.
Why you wouldn't want a user-infrastructure mesh:
Policy: Engineering Mesh (NOT RECOMMENDED)
Source: engineering-mixed  (contains both user laptops and servers)
Destination: engineering-mixed
Protocol: ALL
This creates an unclear mesh where laptops, servers, and everything else can all access each other bidirectionally. It's impossible to tell from this policy what's actually happening, and you've likely granted more access than needed.
How Policy Changes Are Distributed
When you create or change a policy, group, posture check, DNS setting, route, or network resource, NetBird distributes the updated configuration to all connected peers immediately. Peers receive the change without reconnecting.
Distribution is event-driven. There is no periodic redistribution interval; updates are sent in response to configuration changes, not on a timer. When many changes happen in quick succession, NetBird coalesces them so connected peers receive a single consolidated update rather than one update per change.
Posture checks follow the same distribution model. For how and when a posture check is evaluated for a peer, see When Posture Checks Are Evaluated.
Advanced Patterns and Use Cases
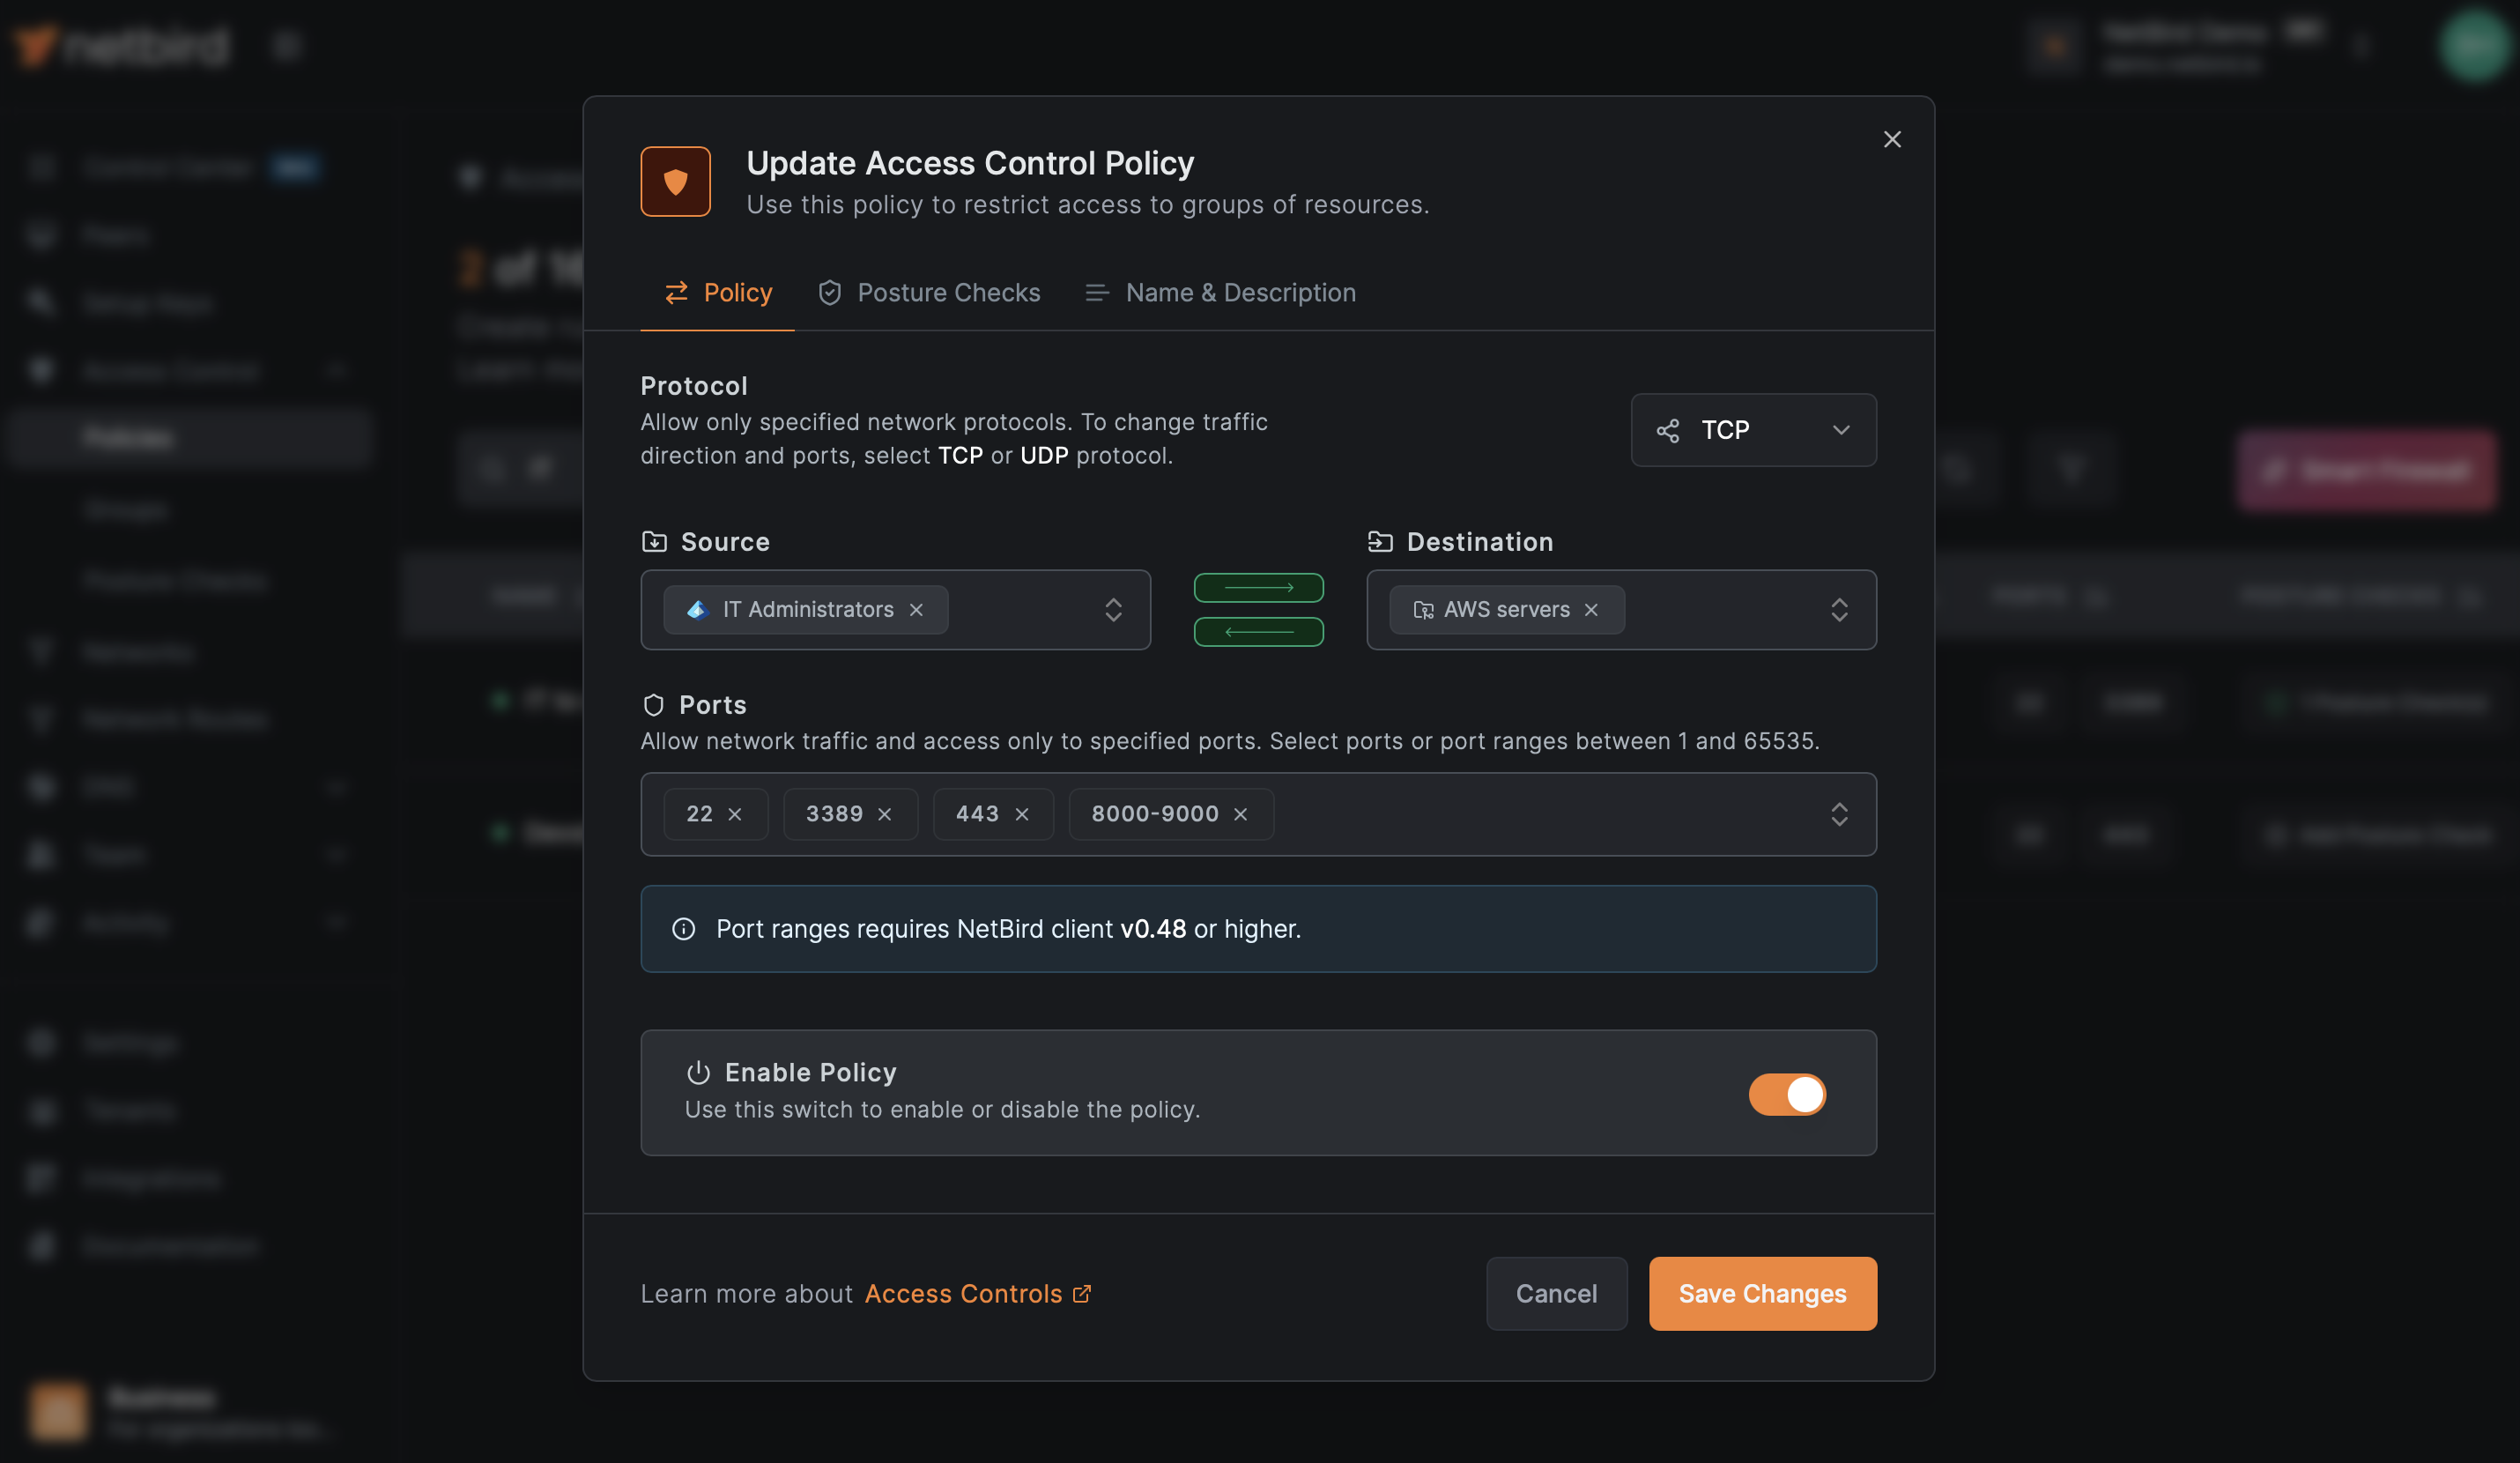
Pattern 1: Port Ranges for Application Suites
When dealing with applications that use multiple ports:
Policy: Engineering Kubernetes Access
Source: engineering-team
Destination: kubernetes-clusters
Protocol: TCP
Ports: 6443, 8080-8090, 10250-10255
Direction: One-way
Pattern 2: Contractor Limited Access
For temporary or limited-access users:
Policy: Contractor Limited Access
Source: contractors
Destination: contractor-resources
Protocol: TCP
Ports: 443, 22
Direction: One-way
Posture Checks: [NetBird Latest Version]
Pattern 3: Management Network Separation
Create a separate management network for administrative access:
Policy: Admin Management Access
Source: admin-team
Destination: management-interfaces
Protocol: TCP
Ports: 22, 443, 3389
Direction: One-way
Pattern 4: Service-to-Service Communication
For microservices or distributed applications:
Policy: API Gateway to Backend Services
Source: api-gateways
Destination: backend-services
Protocol: TCP
Ports: 8080, 8443, 9090
Direction: One-way
Conclusion
NetBird's access control system provides powerful, flexible tools for implementing zero trust networking. By understanding the distinction between user groups and peer groups, following the principle of users-as-source and infrastructure-as-destination, and creating specific policies for each access requirement, you can build a secure, manageable network that follows security best practices.
Key takeaways:
- Remove the Default policy and create specific policies aligned with your access requirements
- Keep user groups conceptually separate from peer groups for clarity and security, even though NetBird treats them the same way
- Generally use user groups as Source and infrastructure peer groups as Destination
- Use setup keys with auto-assigned groups to automate infrastructure deployment
- Use specific protocols and ports rather than ALL when possible
- Implement posture checks for sensitive resources
- Document your policies and review them regularly
By following these principles, you'll create a network that embodies zero trust security while remaining manageable and understandable for your team.