Open Source Distributed AI Stack: ArgoCD, MicroK8s, vLLM, and NetBird
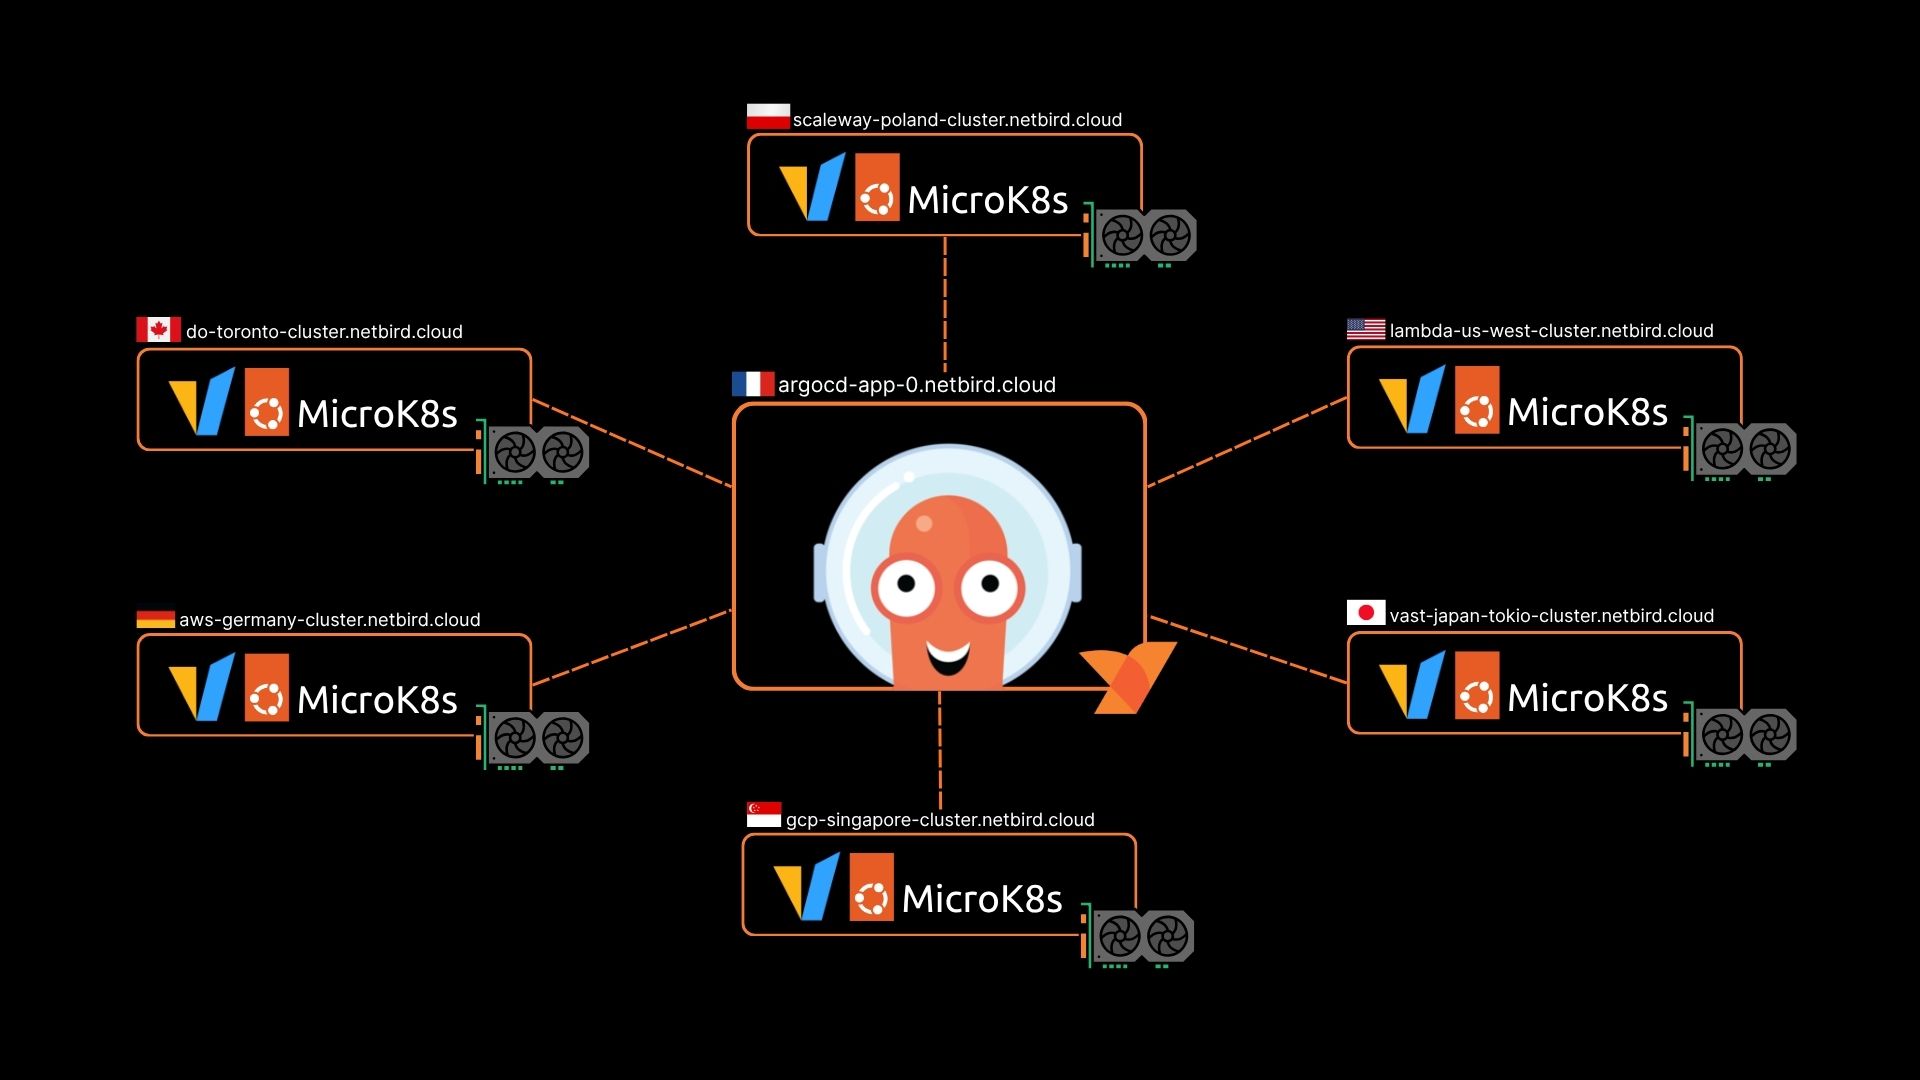
We are building a distributed AI infrastructure project that connects GPU clusters across many different cloud providers using Kubernetes orchestration. After some trial and error we got everything working. If you want to learn more about the process, the why, and how we got here check out our article on the Knowledge Hub. This setup uses ArgoCD as a GitOps control plane to manage workloads across multiple MicroK8s clusters, with NetBird providing secure zero trust networking between all components.
This document is actively being changed and tested. Please see 'Known Issues and Future Improvements' at the bottom of the page.
Architecture Components
- ArgoCD Control Plane: GitOps tool with UI for managing and automatically syncing Kubernetes applications from Git repositories.
- MicroK8s Edge Clusters: Lightweight Kubernetes clusters deployed across multiple cloud providers, each with GPU support for AI workloads
- vLLM Inference Service: AI model serving infrastructure running on MicroK8s deployed to clusters for distributed inference
- GeoLocation DNS: Geographic routing to direct traffic to the nearest available cluster
ArgoCD Control Plane Setup
Create the GKE Cluster
First, we'll create a Google Kubernetes Engine (GKE) cluster to host our ArgoCD control plane. This cluster will be the central management point for all our edge MicroK8s clusters. You don't need to use GKE, but you will need to adapt these step to work with your provider.
export GCP_PROJECT=netbird-demos
export GCP_CLUSTER_NAME=megamesh
export GCP_REGION=europe-west4

gcloud container --project "${GCP_PROJECT}" clusters create "${GCP_CLUSTER_NAME}" \
--no-enable-basic-auth --release-channel "regular" \
--machine-type "e2-standard-2" --image-type "COS_CONTAINERD" --disk-type "pd-standard" \
--disk-size "100" --metadata disable-legacy-endpoints=true \
--num-nodes "1" --logging=SYSTEM,WORKLOAD --monitoring=SYSTEM --enable-ip-alias \
--enable-autoscaling --min-nodes "1" --max-nodes "2" \
--network "projects/${GCP_PROJECT}/global/networks/default" \
--subnetwork "projects/${GCP_PROJECT}/regions/${GCP_REGION}/subnetworks/default" \
--no-enable-intra-node-visibility --default-max-pods-per-node "110" \
--security-posture=standard --workload-vulnerability-scanning=disabled \
--no-enable-master-authorized-networks --addons HorizontalPodAutoscaling,HttpLoadBalancing,GcePersistentDiskCsiDriver \
--enable-autoupgrade --enable-autorepair --max-surge-upgrade 1 --max-unavailable-upgrade 0 \
--enable-managed-prometheus --enable-shielded-nodes \
--region "${GCP_REGION}" --node-locations "${GCP_REGION}-b,${GCP_REGION}-c"
Install NetBird Operator
NetBird provides the secure networking layer that will allow users to connect our GKE control plane without exposing any services to the open internet.
Prerequisites
- Helm version 3+
- kubectl version v1.11.3+
- Access to a Kubernetes v1.11.3+ cluster
- Cert Manager
Add helm repository:
helm repo add netbirdio https://netbirdio.github.io/helms
Install cert-manager for k8s API to communicate with the NetBird operator
kubectl apply -f https://github.com/cert-manager/cert-manager/releases/download/v1.17.0/cert-manager.yaml
Add NetBird API token. You can create a PAT by following the steps here
kubectl create namespace netbirdkubectl -n netbird create secret generic netbird-mgmt-api-key --from-literal=NB_API_KEY=$(cat ~/nb-pat.secret)
Replace ~/nb-pat.secret with your NetBird API key and create a values.yaml file, check helm show values netbirdio/kubernetes-operator for more info
# managementURL: "https://netbird.example.io:443"
ingress:
  enabled: true
  router:
    enabled: true

netbirdAPI:
  keyFromSecret:
    name: "netbird-mgmt-api-key"
    key: "NB_API_KEY"
Install using helm install command
helm install --create-namespace -f values.yaml -n netbird netbird-operator netbirdio/kubernetes-operator
Expose Kubernetes Control Plane to your NetBird Network
To access your Kubernetes control plane from a NetBird network, you can expose your Kubernetes control plane as a NetBird resource by enabling the following option in the operator values:
ingres:
  enabled: true
  kubernetesAPI:
    enabled: true
To learn more please checkout the official docs on our K8s Operator.
Install ArgoCD
ArgoCD is a declarative GitOps tool for managing and syncing Kubernetes clusters. We will be installing on the GKE cluster that we created in the previous step, or your chosen provider. ArgoCD will monitor our Git repository and automatically sync the application state to our clusters.
# argo
kubectl create namespace argocd
kubectl apply -n argocd -f https://raw.githubusercontent.com/argoproj/argo-cd/stable/manifests/install.yaml
kubectl port-forward svc/argocd-server -n argocd 8080:443
# Argo client
brew install argocd
argocd admin initial-password -n argocd
argocd login localhost:8080
# optional (update password)
argocd account update-password
This will deploy all ArgoCD components; API server, application controller, repo server, set up the web UI for visual management, creates the initial admin credentials, and configures CLI access for command-line management.
Configure NetBird Integration with ArgoCD
Now we need to integrate NetBird with ArgoCD and the statefulset service so that:
argocd-server needs to be accessible over the NetBird network as a resource allowing us to access the user interface and manage our clusters. This is done with a annotate command, these are key-value pairs that can store arbitrary, non-identifying metadata about a Kubernetes object.
# Expose service
kubectl -n argocd  annotate svc/argocd-server  netbird.io/expose="true" netbird.io/groups="argo-management-ui"
Next we will enable sidecars. Why Sidecars? The application controller needs to make API calls to remote MicroK8s clusters. The sidecar provides transparent network access to those clusters through the NetBird mesh.
To enable sidecar functionality in your deployments, you first need to generate a setup key, either via the UI (enable the Ephemeral Peers options) or by following this guide for more details on setup keys. We will inject side-cars to ArgoCD application controller so it can communicate with remote MicroK8s clusters.
Note: We recommend checking out the section of our Kubernetes Operator docs on using sidecars for more context and detail.
Next, you'll create a secret in Kubernetes and add a new resource called NBSetupKey. The NBSetupKey name can then be referenced in your deployments or daemon sets to specify which setup key should be used when injecting a sidecar into your application pods. Below is an example of a secret and an NBSetupKey resource:
# secret.yaml
apiVersion: v1
stringData:
  setupkey: EEEEEEEE-EEEE-EEEE-EEEE-EEEEEEEEEEEE
kind: Secret
metadata:
  name: app-setup-key
NBSetupKey:
# nbsetup-key.yaml
apiVersion: netbird.io/v1
kind: NBSetupKey
metadata:
  name: app-setup-key
spec:
  # Optional, overrides management URL for this setupkey only
  # defaults to https://api.netbird.io
  # managementURL: https://netbird.example.com
  secretKeyRef:
    name: app-setup-key # Required
    key: setupkey # Required
Amend the application controller to apply the secrets:
kubectl -n argocd apply -f secret.yaml
kubectl -n argocd apply -f nbsetup-key.yaml
# Inject side-cars
kubectl -n argocd patch statefulset argocd-application-controller --type merge -p '{"spec":{"template":{"metadata":{"annotations":{"netbird.io/setup-key":"app-setup-key","netbird.io/extra-dns-labels": "argocd"}}}}}'
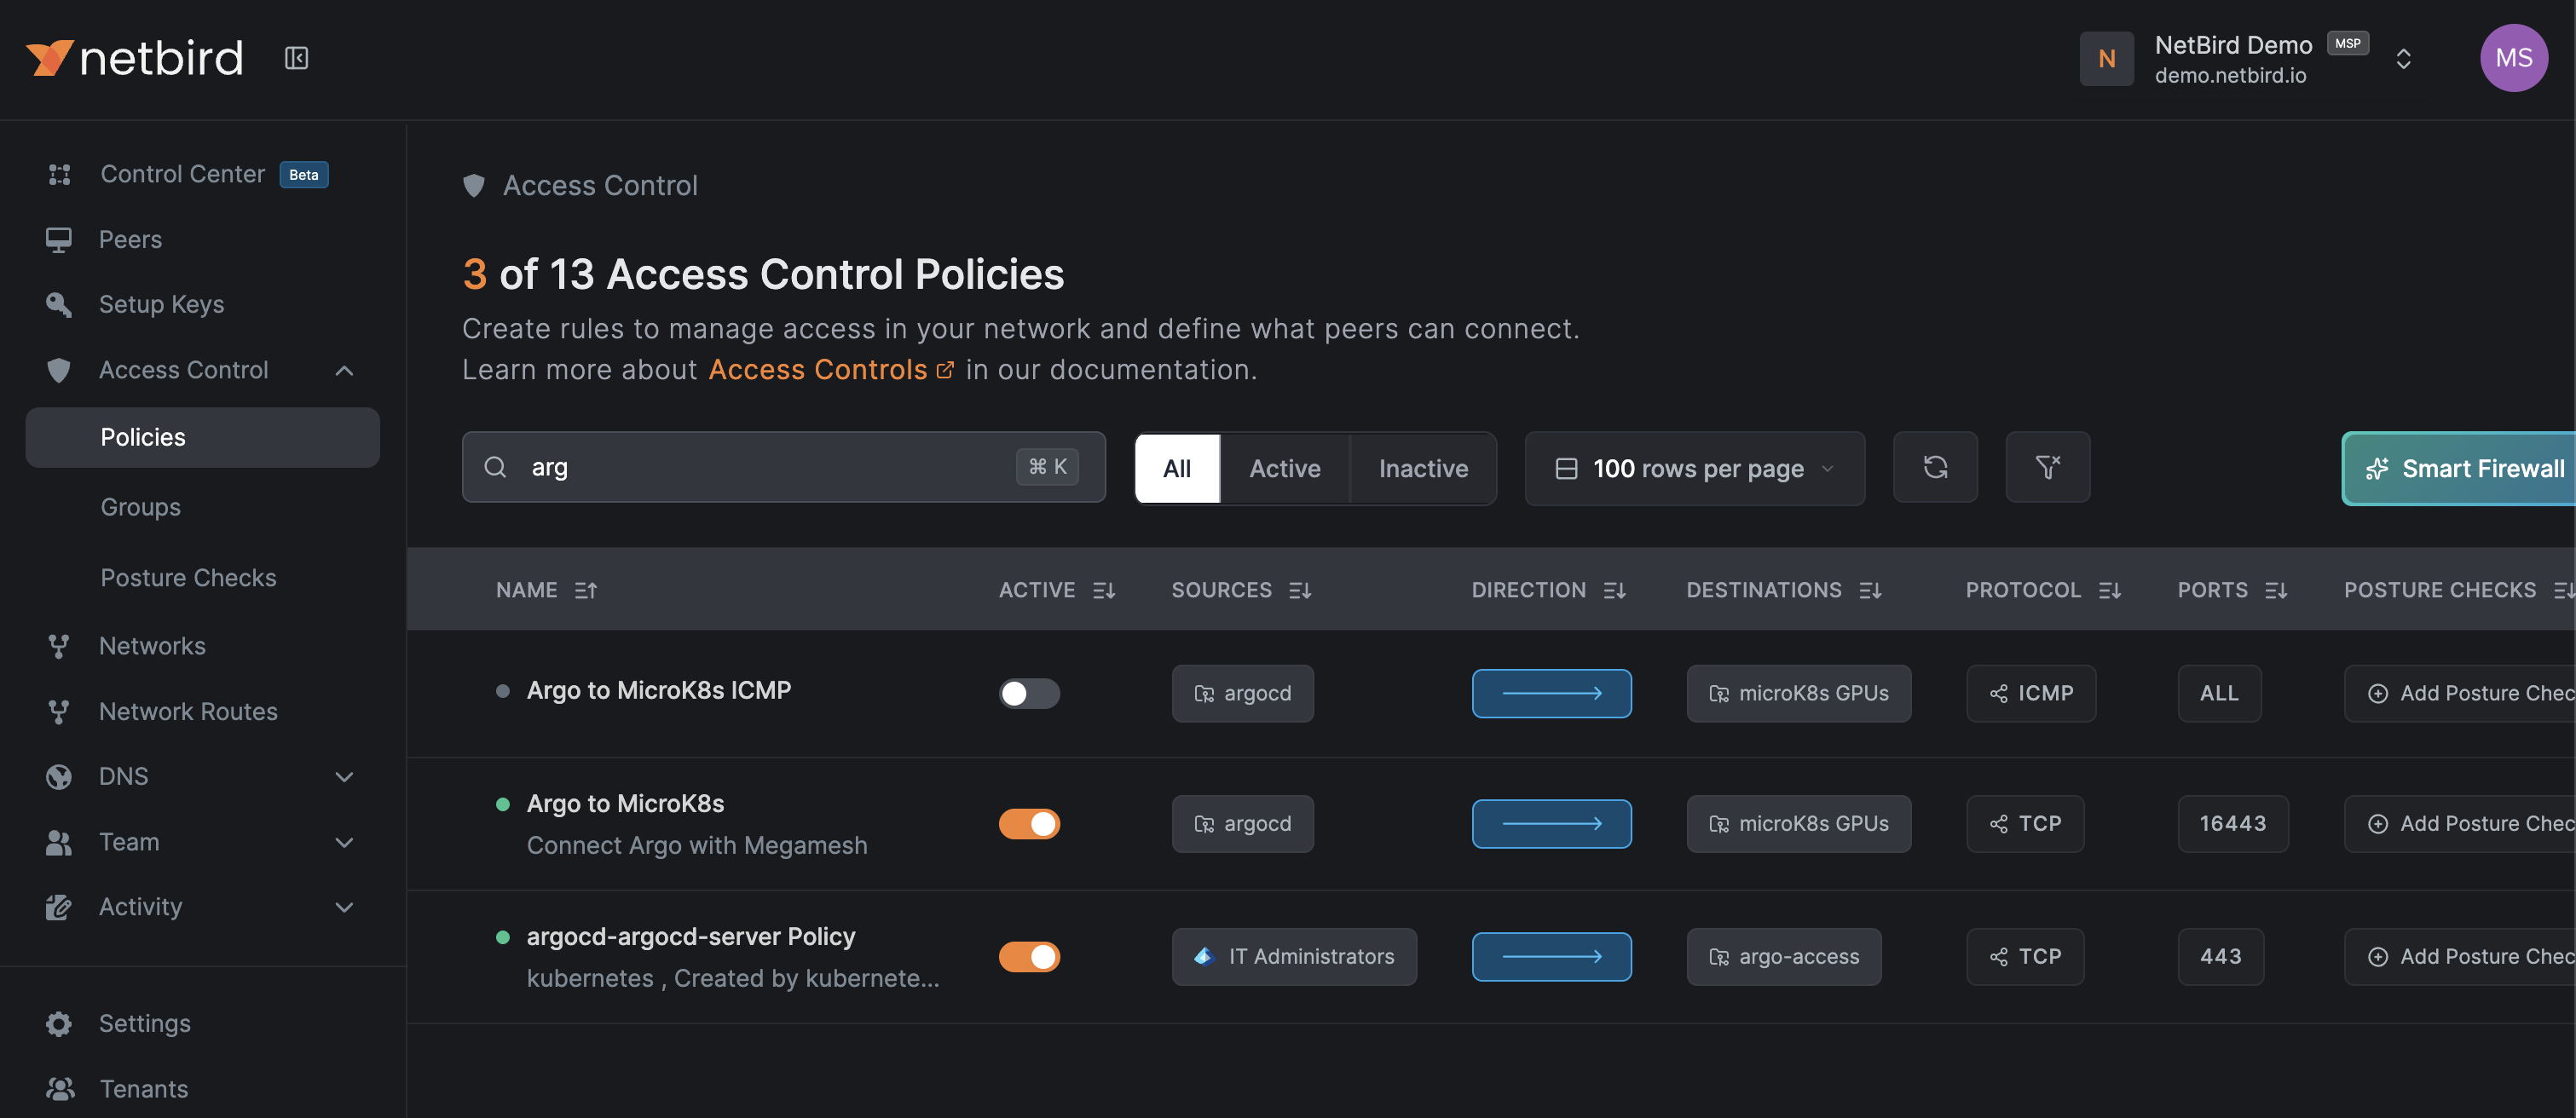
Create NetBird Access Policies
In the NetBird dashboard, create two groups and configure policies:
Example Policy Configuration:
- Policy 1: argocd → microK8s GPUs (port 16443 for Kubernetes API)
- Policy 2: IT Administrators → argo-management-ui (port 443)
Where argocd group is applied to the GKE Cluster running Argo, microK8s GPU is applied to other provider GPU enabled VMs, agro-access is the group created by the operator.
Part 2: MicroK8s Edge Cluster Setup
Understanding the Architecture
Each MicroK8s cluster represents a GPU enabled VM in our distributed AI infrastructure. These nodes are deployed across different cloud providers (AWS, GCP, Digital Ocean, etc.) in various geographic regions. Each node:
- Runs a lightweight Kubernetes distribution (MicroK8s)
- Has GPU hardware for AI inference workloads
- Connects to the NetBird mesh for secure communication
- Is managed by the central ArgoCD control plane
VM Provisioning with User Data
When creating VMs in different cloud providers, use this user data script for automated provisioning. This script runs on first boot and configures everything needed for the node to join the Mega-Mesh infrastructure. Be sure to edit the <SETUP-KEY> variable.
#!/bin/bash
sudo hostnamectl set-hostname telekom-germany-cluster

sudo apt update

sudo DEBIAN_FRONTEND=noninteractive apt install ca-certificates curl gnupg snapd vim ubuntu-drivers-common -y
sudo curl -L https://pkgs.netbird.io/debian/public.key | sudo gpg --dearmor -o /etc/apt/trusted.gpg.d/netbird.gpg
sudo echo 'deb https://pkgs.netbird.io/debian stable main' | sudo tee /etc/apt/sources.list.d/netbird.list

sudo apt update && apt install netbird -y
exec 1>/root/startup.log 2>&1

sudo netbird up --setup-key <SETUP-KEY> --management-url https://api.netbird.io --hostname telekom-germany-cluster --allow-server-ssh

sudo ufw disable || true

sudo snap install microk8s --classic --channel 1.32/stable
sudo microk8s status --wait-ready

sudo usermod -a -G microk8s ubuntu
sudo chown -f -R ubuntu ~/.kube

microk8s disable ha-cluster --force
sudo microk8s status --wait-ready

for addon in dns helm3 hostpath-storage; do
  microk8s enable $addon
done

microk8s enable gpu --gpu-operator-version v25.10.0 --gpu-operator-set toolkit.env[3].name=RUNTIME_CONFIG_SOURCE --gpu-operator-set toolkit.env[3].value='file=/var/snap/microk8s/current/args/containerd.toml'

microk8s status --wait-ready

echo "End of startup.sh"
What This Script Does:
- Hostname Configuration: Sets a descriptive hostname for easy identification
- System Updates: Installs required packages and repositories
- NetBird Installation:
- Adds NetBird's package repository
- Installs the NetBird client
- Connects to the NetBird mesh using a setup key
- Enables SSH access through the mesh
- Firewall Configuration: Disables UFW to prevent conflicts with MicroK8s networking
- MicroK8s Installation: Installs MicroK8s from the stable channel
- Permission Setup: Adds the ubuntu user to the microk8s group
- Essential Addons:
- dns: Internal DNS for service discovery
- helm3: Package manager for Kubernetes applications
- hostpath-storage: Local storage provisioner
- GPU Support: Installs NVIDIA GPU Operator for GPU workload support
Monitoring GPU Setup:
Depending on the provider speed, it might take up to 5 minutes to install the drivers. One can check status with:
microk8s.kubectl logs -n gpu-operator-resources -lapp=nvidia-operator-validator -c nvidia-operator-validator
Manual Cluster Registration (Current Process)
After the VM boots and MicroK8s is running, we need to register this cluster with ArgoCD. This involves creating a ServiceAccount, generating credentials, and registering them with ArgoCD.
Future Optimization Notes:
- Setup keys: Currently using one-shot keys per node; needs automation for scale
- Pre-baked images: Creating custom VM images, with software pre-installed would speed up provisioning significantly
Create Service Account and RBAC
This creates a ServiceAccount that ArgoCD will use to authenticate with the MicroK8s API server.
vim svc.yml
# content
---
apiVersion: v1
kind: ServiceAccount
metadata:
  name: argocd
  namespace: kube-system
---
apiVersion: v1
kind: Secret
metadata:
  name: argocd
  namespace: kube-system
  annotations:
    kubernetes.io/service-account.name: argocd
type: kubernetes.io/service-account-token
---
apiVersion: rbac.authorization.k8s.io/v1
kind: ClusterRoleBinding
metadata:
  name: argocd
roleRef:
  apiGroup: rbac.authorization.k8s.io
  kind: ClusterRole
  name: cluster-admin
subjects:
  - kind: ServiceAccount
    name: argocd
    namespace: kube-system


# Apply with:
microk8s.kubectl apply -f svc.yml
What This Creates:
- ServiceAccount: An identity for ArgoCD to use
- Secret: Automatically generated token for authentication
- ClusterRoleBinding: Grants cluster-admin permissions to ArgoCD (full control)
Note: In production, you should use more restricted RBAC permissions based on the principle of least privilege.
Extract the Authentication Token
microk8s.kubectl -n kube-system get secret argocd -o yaml

# Output sample
apiVersion: v1
data:
  ca.crt: LS0tLS1CRUdJTiBDRVJUSUZJQ0FURS0tLS0tCk1JSUREekNDQWZlZ0F3SUJBZ0lVYnpNOW93RXN2QS8zSXpGc3R5Sm9uMGRUeU84d0RRWUpLb1pJaHZjTkFRRUwKQlFBd0Z6RVZNQk1HQTFVRUF3d01NVEF1TVRVeUxqRTRNeTR4TUI0WERUSTFNVEV3T0RBNU16WXhOVm9YRFRNMQpNVEV3TmpBNU16WXhOVm93RnpFVk1CTUdBMVVFQXd3TU1UQXVNVFV5TGpFNE15NHhNSUlCSWpBTkJna3Foa2lHCjl3MEJBUUVGQUFPQ0FROEFNSUlCQ2dLQ0FRRUF6VFN2eFBkV2N6anRHWlhTMC9VUCtnMjJUK1pNdXVZZnJWY2YKeWtDa0xpRXByeTAxSWFMNU43QUV5Q01tTXNuODE1eE1yWGRyNFhBcFJ6dE1DSTkwWnRBUWJWUnZUS3lmNm9lUApjb1pkYTN3cktoSFpoMGl5U3o2S1pQZTVqbTRGYllTNFhibHA5dTBEaFQyTVdiVCtaTXJmbXh1alYweUR2WHRDCnp2NGplM0Z4NTFlcVNEYTNza1p3UTdqZVpMZFlzNUNsUmVTRi8vbFRIam95WGFvR0I1d1BMcnJ6NmdlZnJLQXoKUU9pUTBsMVJNTG8xOE4rNEhRc2ZjZzVSaXRNVVNJMUFxRjY2dS81ZkVlNXd4S3BTZ2ZFb3ZrOHFmTmY5Ymd6ZgpOYkhzTEN5YmhPWHEyQ1RkMUpOQjFKQURTK2t1RnFrcWtxYVJnejQ3MlBZa0ZqT3NSd0lEQVFBQm8xTXdVVEFkCkJnTlZIUTRFRmdRVStJb3lQQW9lUkN4bEpBOXZiRnhmVjJWTHRRc3dId1lEVlIwakJCZ3dGb0FVK0lveVBBb2UKUkN4bEpBOXZiRnhmVjJWTHRRc3dEd1lEVlIwVEFRSC9CQVV3QXdFQi96QU5CZ2txaGtpRzl3MEJBUXNGQUFPQwpBUUVBY2pwemtpL2owODA3Qk1qZ3JJc011TGdOaHZ0R01ud3lpTGErWHh1cHZVQ3ZGMUt1aUZzVTR4MTV3WCtVCkxJRWdLb3B4QkVlZlNrUkozRDlqbUxyTHVJeHhkWDl4VlpJK0VYM0ZWdzBqTzFGSkJhMmJOcHIzL1U0bXgyRGUKclRQVkdjV09BcGxVTzhveGV4VnRDbDNWTytoWVhTWVk1RVQ4cDlUQWRmeloxcGdWdXVsUVZoSEJOWE8rV1dIbwozMXYwd09BYVA3cURnVTB6NFBYZkxXdFZzK3dnMWxhaUQ5UnptWlQ4WFo3eVZ5Q0hMVXNSZ1lFSE1qWFc4UXE5CkJRdGtNdDF4Rlg3TnJRUEovM2U5ZU9DOVRaTE9MVnpncXRFNDArQ3RoaEt5UklrelZZamRPRUp4Q1RzV3pQUE0KNktFbFJOVjNoM0NRY2JMN3pZdWt4N2R3b0E9PQotLS0tLUVORCBDRVJUSUZJQ0FURS0tLS0tCg==
  namespace: a3ViZS1zeXN0ZW0=
  token: ZXlKaGJHY2lPaUpTVXpJMU5pSXNJbXRwWkNJNkltTjRhRUl3UWtSaFEwTlRTbXhKU1dWQldVSTJUMXBFVlhOTVFXcHFPSEJoVDFkVlZVVmlRekZVUWtFaWZRLmV5SnBjM01pT2lKcmRXSmxjbTVsZEdWekwzTmxjblpwWTJWaFkyTnZkVzUwSWl3aWEzVmlaWEp1WlhSbGN5NXBieTl6WlhKMmFXTmxZV05qYjNWdWRDOXVZVzFsYzNCaFkyVWlPaUpyZFdKbExYTjVjM1JsYlNJc0ltdDFZbVZ5Ym1WMFpYTXVhVzh2YzJWeWRtbGpaV0ZqWTI5MWJuUXZjMlZqY21WMExtNWhiV1VpT2lKaGNtZHZZMlFpTENKcmRXSmxjbTVsZEdWekxtbHZMM05sY25acFkyVmhZMk52ZFc1MEwzTmxjblpwWTJVdFlXTmpiM1Z1ZEM1dVlXMWxJam9pWVhKbmIyTmtJaXdpYTNWaVpYSnVaWFJsY3k1cGJ5OXpaWEoyYVdObFlXTmpiM1Z1ZEM5elpYSjJhV05sTFdGalkyOTFiblF1ZFdsa0lqb2laamt3TURrMk1ESXRNekExTVMwME5URTNMVGd4T1dNdFlqVXdZekprWXpobE4yRmpJaXdpYzNWaUlqb2ljM2x6ZEdWdE9uTmxjblpwWTJWaFkyTnZkVzUwT210MVltVXRjM2x6ZEdWdE9tRnlaMjlqWkNKOS5hd0xIZE9ucWRVM1k1RlVkTHJEdUJJWEo0aThmWkFVNXBzeF9xRWRETUprd2RVOGhlcjRDRGx3dWpIWlU3WjdCZnpsSUNtS0Q2dXVJdkItelhNc1pPQkdRN0lVeDJwZGdobVhxNnIwVEhzcl9fb21RNWppT3pXajVnVzZxRXpKeTV6S0dMSlpxN3JaUjMwM3MydDg1a1BWM1Y3ODNxemxiZ0JjYkk2X3p2TG5vYi1RNVBBbzJxUHRyMDF3WjlqeFBpdlk3dXp1VHVPTVNHeTlVNnRCV244MnltY2RfSXUyQXFlNDVabVhrMDVmdFNCQTZKMkhreEJTTy1OOTNDLWtPU2JKbDh1U1N0ZGZ1ZmR5WVRVdlh4LUc4OUdTUmZIZEpLX1RnU0JYR1JiTGlRVmVhTEhMUkstdGk2UTVjSG9UeFhteDJSNGlpdHU0X0xFSVNCVzNia1E=
kind: Secret
metadata:
  annotations:
    kubectl.kubernetes.io/last-applied-configuration: |
      {"apiVersion":"v1","kind":"Secret","metadata":{"annotations":{"kubernetes.io/service-account.name":"argocd"},"name":"argocd","namespace":"kube-system"},"type":"kubernetes.io/service-account-token"}
    kubernetes.io/service-account.name: argocd
    kubernetes.io/service-account.uid: f9009602-3051-4517-819c-b50c2dc8e7ac
  creationTimestamp: "2025-11-08T10:50:01Z"
  name: argocd
  namespace: kube-system
  resourceVersion: "14797"
  uid: 059cc196-6d16-437a-8aba-6b45a8c1fd60
type: kubernetes.io/service-account-token
Understanding the Secret:
- ca.crt: The cluster's CA certificate (base64 encoded)
- token: The JWT bearer token ArgoCD will use for authentication
- namespace: The namespace where this secret exists
Decode the Token
The token is stored as base64-encoded data. We need to decode it to get the actual JWT token.
echo '<token base64>' | base64 -d
mvlkdsmvlkdf.lnsafkasldnvksjdnvj....kdnvkljsd.dls...knksndkls
This JWT token contains:
- The service account identity
- Expiration information
- Signed proof of authenticity
Create Cluster Registration Secret
Now we create a secret in ArgoCD that contains the connection information for this MicroK8s cluster.
# cluster.yaml
---
# telekom germany
apiVersion: v1
kind: Secret
metadata:
  name: telekom-germany-cluster
  namespace: argocd
  labels:
    argocd.argoproj.io/secret-type: cluster
    megamesh: 'true'
    gpu: 'true'
type: Opaque
stringData:
  name: "telekom-germany-cluster"
  server: "https://100.121.1.222:16443"
  config: |
    {
      "bearerToken": "mvlkdsmvlkdf.lnsafkasldnvksjdnvj....kdnvkljsd.dls...knksndkls",
      "tlsClientConfig": {
        "insecure": true
      }
    }
Key Components:
-
name: Human-readable cluster identifier
-
server: The Kubernetes API server endpoint (this is the NetBird mesh IP)
-
bearerToken: The JWT token we extracted earlier
-
insecure: true: Skips TLS certificate verification (acceptable since we're using NetBird's encrypted mesh)
-
labels:
megamesh: 'true': Used by ApplicationSet to target this clustergpu: 'true': Indicates this cluster has GPU capabilities
Apply the Cluster Secret
kubectl apply -f cluster.yaml
Once applied, ArgoCD can now:
- See this cluster in its cluster list
- Deploy applications to it
- Monitor the health of deployed applications
Verification:
argocd cluster list
You should see your new cluster listed with a "Successful" connection status.
Part 3: SSL Certificate and API Credentials
Create SSL Certificate
For production HTTPS access to the vLLM inference endpoints, we need a valid SSL certificate.
sudo certbot certonly --manual --preferred-challenges dns -d mega-mesh.net
What This Does:
- Uses Certbot (Let's Encrypt) to generate a certificate
- Manual mode with DNS challenge (you'll need to create a TXT record)
- Valid for mega-mesh.net domain
Why DNS Challenge? This allows us to get a certificate without needing HTTP server access, which is perfect for distributed infrastructure.
Create Hugging Face Access Token
vLLM needs to download models from Hugging Face, so we need an access token.
Create one at: https://huggingface.co/docs/hub/en/security-tokens
Create Kubernetes Secret for SSL and Tokens
apiVersion: v1
kind: Secret
metadata:
  name: mega-mesh-tls
  namespace: default
type: kubernetes.io/tls
stringData:
  tls.crt: |
    -----BEGIN CERTIFICATE-----
    MIIDhjC....
    -----END CERTIFICATE-----
    -----BEGIN CERTIFICATE-----
    MIIEVzCCAj....
    +VUwFj9tmWxyR/M=
    -----END CERTIFICATE-----
  tls.key: |
    -----BEGIN PRIVATE KEY-----
    MIGHAgEA....
    -----END PRIVATE KEY-----
This Secret Contains:
- tls.crt: The full certificate chain (your cert + intermediate CA cert)
- tls.key: The private key for the certificate
Apply this to each MicroK8s cluster where vLLM will be deployed:
microk8s.kubectl apply -f tls-secret.yaml
Part 4: Configure ArgoCD Repository and ApplicationSet
Register Private Git Repository
The application manifests are stored in a private GitHub repository. We need to give ArgoCD access to this repo.
Repository Location: https://github.com/netbirdio/megamesh-argocd
Security Note: This repository contains secrets and should NOT be public.
Setup Steps:
- Generate an SSH key or GitHub Personal Access Token
- Follow ArgoCD's guide: https://argo-cd.readthedocs.io/en/stable/user-guide/private-repositories/
- Register the repository in ArgoCD UI or via CLI
Understanding ApplicationSets
ApplicationSet is an ArgoCD feature that automatically generates multiple Applications based on generators. Think of it as a template that creates ArgoCD Applications for each matching cluster.
Why ApplicationSet?
- Automatically deploy applications to new clusters as they're added
- Single source of truth for application configuration
- Reduces manual work when scaling to many clusters
Create the ApplicationSet
# application-set.yaml
apiVersion: argoproj.io/v1alpha1
kind: ApplicationSet
metadata:
  name: megamesh-apps-per-cluster
  namespace: argocd
spec:
  # generators expand configuration with matching rules
  generators:
    - matrix:
        generators:
          - clusters:
              selector:
                matchLabels:
                  megamesh: "true"
          - git:
              # even though the repo is named "megamesh" in Argo,
              # ApplicationSet needs the *repo URL*:
              repoURL: git@github.com:netbirdio/megamesh-argocd.git
              revision: main
              directories:
                - path: "apps/*"
  template:
    metadata:
      name: '{{name}}-{{path.basename}}'
    spec:
      project: default
      source:
        # same repo URL here
        repoURL: git@github.com:netbirdio/megamesh-argocd.git
        targetRevision: main
        path: '{{path}}'
      destination:
        server: '{{server}}'
        namespace: '{{path.basename}}'
      syncPolicy:
        automated:
          prune: true
          selfHeal: true
        syncOptions:
          - CreateNamespace=true
How This Works:
- Matrix Generator: Combines two generators to create applications
- Cluster Generator: Finds all clusters with label
megamesh: "true" - Git Generator: Finds all directories under
apps/in the repo
- Cluster Generator: Finds all clusters with label
- Template Variables:
{{name}}: Cluster name (e.g., "telekom-germany-cluster"){{server}}: Cluster API endpoint{{path}}: Directory path in Git (e.g., "apps/vllm"){{path.basename}}: Just the directory name (e.g., "vllm")
- Applications Created:
- For each cluster with
megamesh: "true"label - For each app directory in the repo
- Creates an Application named like:
aws-germany-cluster-vllm
- For each cluster with
- Sync Policy:
- automated: Automatically syncs changes from Git
- prune: true: Deletes resources not in Git
- selfHeal: true: Reverts manual changes back to Git state
- CreateNamespace: Automatically creates the target namespace
Apply the ApplicationSet
kubectl apply -f application-set.yaml
What Happens Next:
- ArgoCD scans for matching clusters
- Reads the Git repository structure
- Creates Applications for each combination
- Begins deploying to all matching clusters simultaneously
- Monitors health and sync status
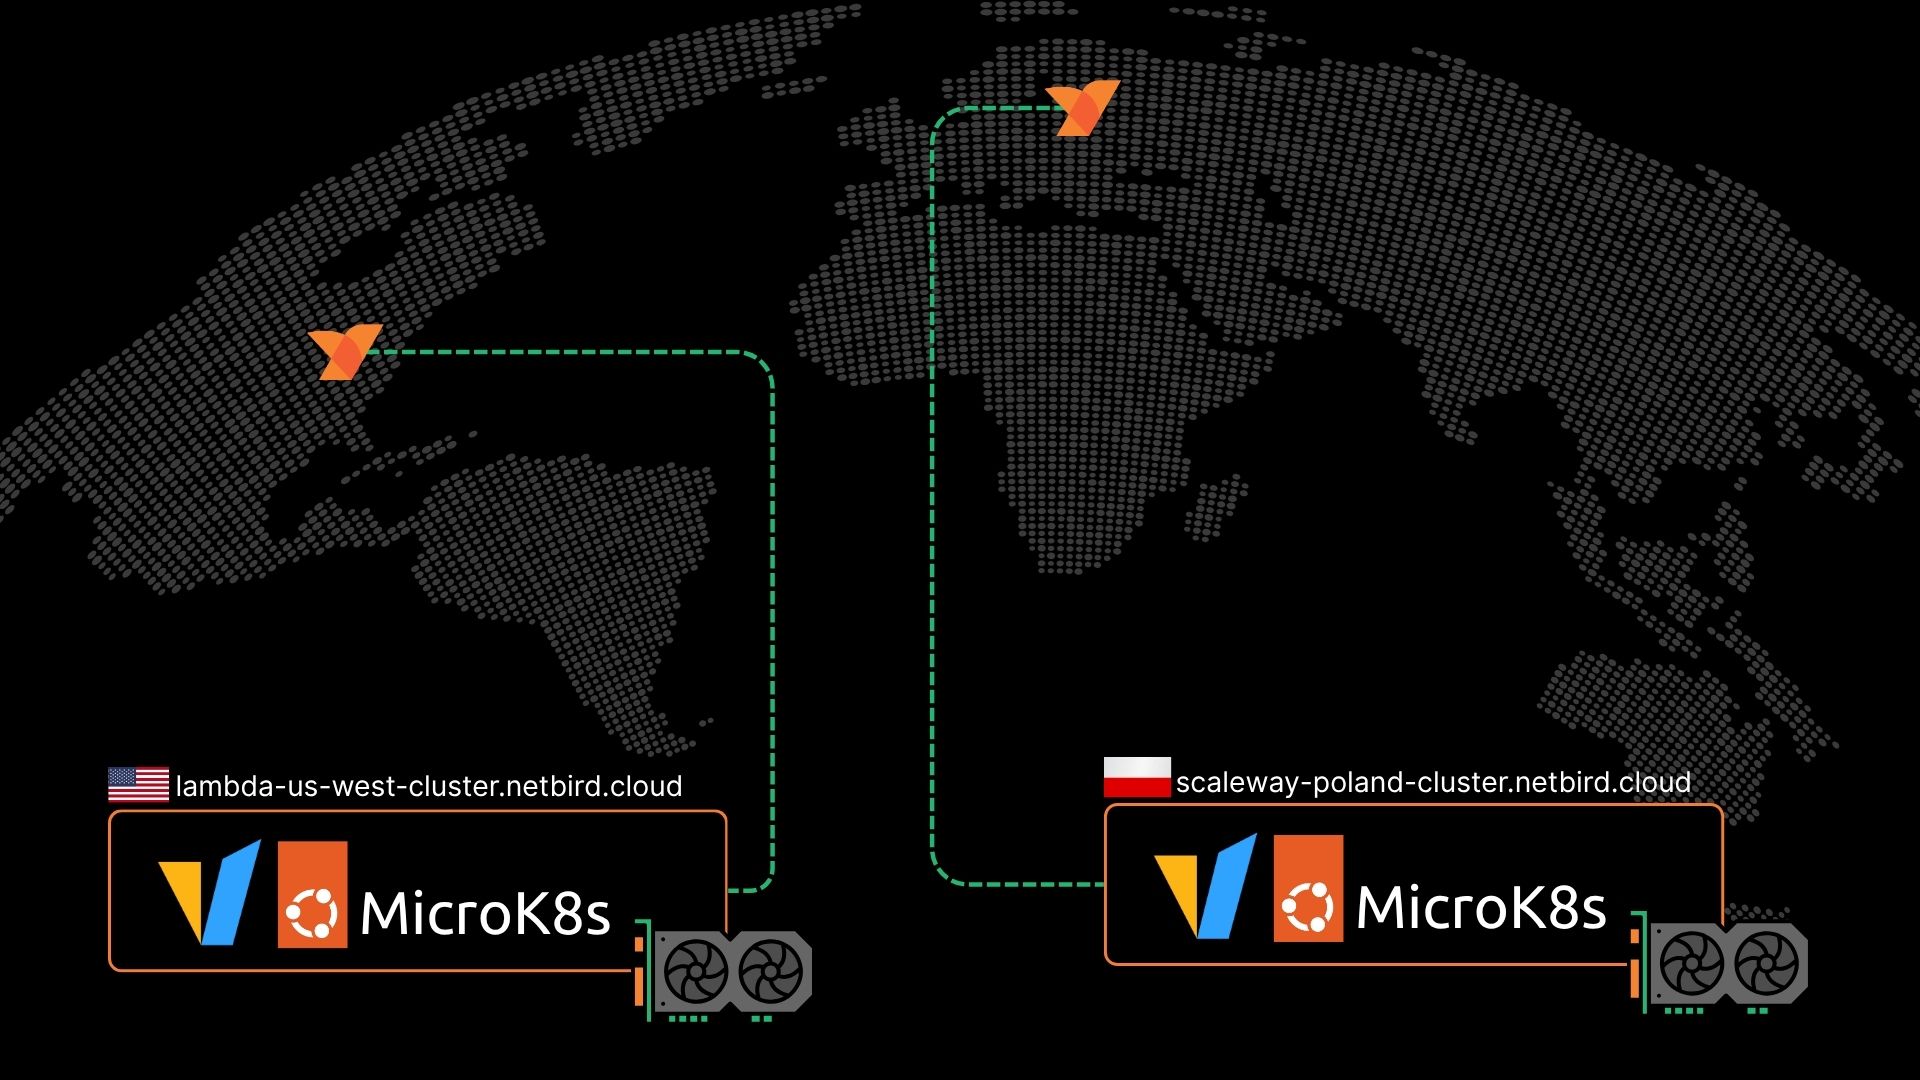
Part 5: Configure Geo-Location Based DNS
Geographic DNS routing ensures users connect to the nearest cluster for optimal latency.
GCP Cloud DNS Configuration
How It Works:
- Multiple A records for the same domain (mega-mesh.net)
- Each record has a geographic region assigned
- GCP routes requests based on user's location
- Health checks ensure only healthy endpoints receive traffic
Configuration Steps:
- Create health checks for each cluster endpoint
- Create DNS policy with geolocation routing
- Add A records for each cluster with region tags
Reference: https://docs.cloud.google.com/dns/docs/routing-policies-overview
Verification Tools
Check DNS propagation: https://www.whatsmydns.net/#A/mega-mesh.net
Global health monitoring: https://www.openstatus.dev/play/checker
Test the Deployed Services
List available models:
curl -H "Content-Type: application/json" https://mega-mesh.net/v1/models
Generate completion:
curl https://mega-mesh.net/v1/completions \
  -H "Content-Type: application/json" \
  -d '{
    "model": "meta-llama/Meta-Llama-3-8B-Instruct",
    "prompt": "Why NetBird rocks?",
    "max_tokens": 500
  }' | jq
Known Issues and Future Improvements
Security Concerns
- Secrets in Git Repository:
- Current: Secrets committed to the repo
- Future: Use sealed secrets, external secret operators, or cloud secret managers
- Certificate Auto-Renewal:
- Current: Manual certificate renewal required
- Future: Integrate with cert-manager for automatic renewal via cloud DNS API
Automation Needs
- Manual Cluster Registration:
- Current: ServiceAccount and cluster secrets created manually
- Future: Automated registration script or operator
- Setup Key Management:
- Current: Single setup key in user data script
- Future: Dynamic setup key generation per node or automated rotation
Reference Documentation
Official Documentation
- MicroK8s GPU Addon: https://microk8s.io/docs/addon-gpu
- ArgoCD with MicroK8s: https://medium.com/@orangecola3/gitops-with-argocd-and-microk8s-4c70a92e43b2
- External Cluster Registration: https://medium.com/pickme-engineering-blog/how-to-connect-an-external-kubernetes-cluster-to-argo-cd-using-bearer-token-authentication-d9ab093f081d
NetBird Resources
- Kubernetes Operator Deployment: /use-cases/kubernetes#deployment
- Service Mesh Sidecars: /use-cases/kubernetes#accessing-remote-services-using-sidecars
ArgoCD Resources
- Private Repository Setup: https://argo-cd.readthedocs.io/en/stable/user-guide/private-repositories/
- ApplicationSet Documentation: https://argo-cd.readthedocs.io/en/stable/operator-manual/applicationset/