pfSense Installation
The NetBird client (agent) allows a peer to join a pre-existing NetBird deployment. If a NetBird deployment is not yet available, there are both managed and self-hosted options available.
This installation is intended for early adopters while the pfSense package is under review and not yet available in the pfSense package manager.
Prerequisites
- Shell/SSH access to pfSense (via Web UI shell or remote SSH)
- A setup key to authenticate and register the pfSense device
- The latest NetBird
.pkgbinary from the GitHub Releases
Installation
-
SSH into your pfSense system
ssh admin@<pfsense-ip>If remote SSH is enabled or use the built-in shell via the pfSense Web UI (
Diagnostics>Command Prompt). -
Download the NetBird packages
Go to the latest pfSense NetBird release. On the release page you will see:
- The release tag at the top of the page (e.g.
v0.1.34) - Two
.pkgfiles for each architecture listed under Assets — the version numbers are embedded in the filenames
Pick the files that match your system architecture:
x86_64— standard Intel/AMD-based pfSense installationsaarch64— ARM-based pfSense installations
For example, a release with tag
v0.1.34might list these assets:netbird-0.69.0-x86_64.pkgpfSense-pkg-NetBird-0.2.2-x86_64.pkg
From a shell on your pfSense system, use
fetchwith the download URLs, replacing the tag, version, and architecture values with those from the release page:fetch https://github.com/netbirdio/pfsense-netbird/releases/download/<RELEASE_TAG>/netbird-<VERSION>-<ARCH>.pkg fetch https://github.com/netbirdio/pfsense-netbird/releases/download/<RELEASE_TAG>/pfSense-pkg-NetBird-<VERSION>-<ARCH>.pkg - The release tag at the top of the page (e.g.
-
Install the packages
Install both packages using the filenames you downloaded:
pkg add -f netbird-<VERSION>-<ARCH>.pkg pkg add -f pfSense-pkg-NetBird-<VERSION>-<ARCH>.pkg -
Verify the installation
The NetBird GUI should now appear under
VPN>NetBirdin the pfSense menu.
Configuration
Authenticate the machine
Fill out the authentication form with the following values and click Save:
- Management URL: Default is
https://app.netbird.io:443. If self-hosting, enter your custom management server URL. - Setup Key: Paste the setup key from your NetBird account. .

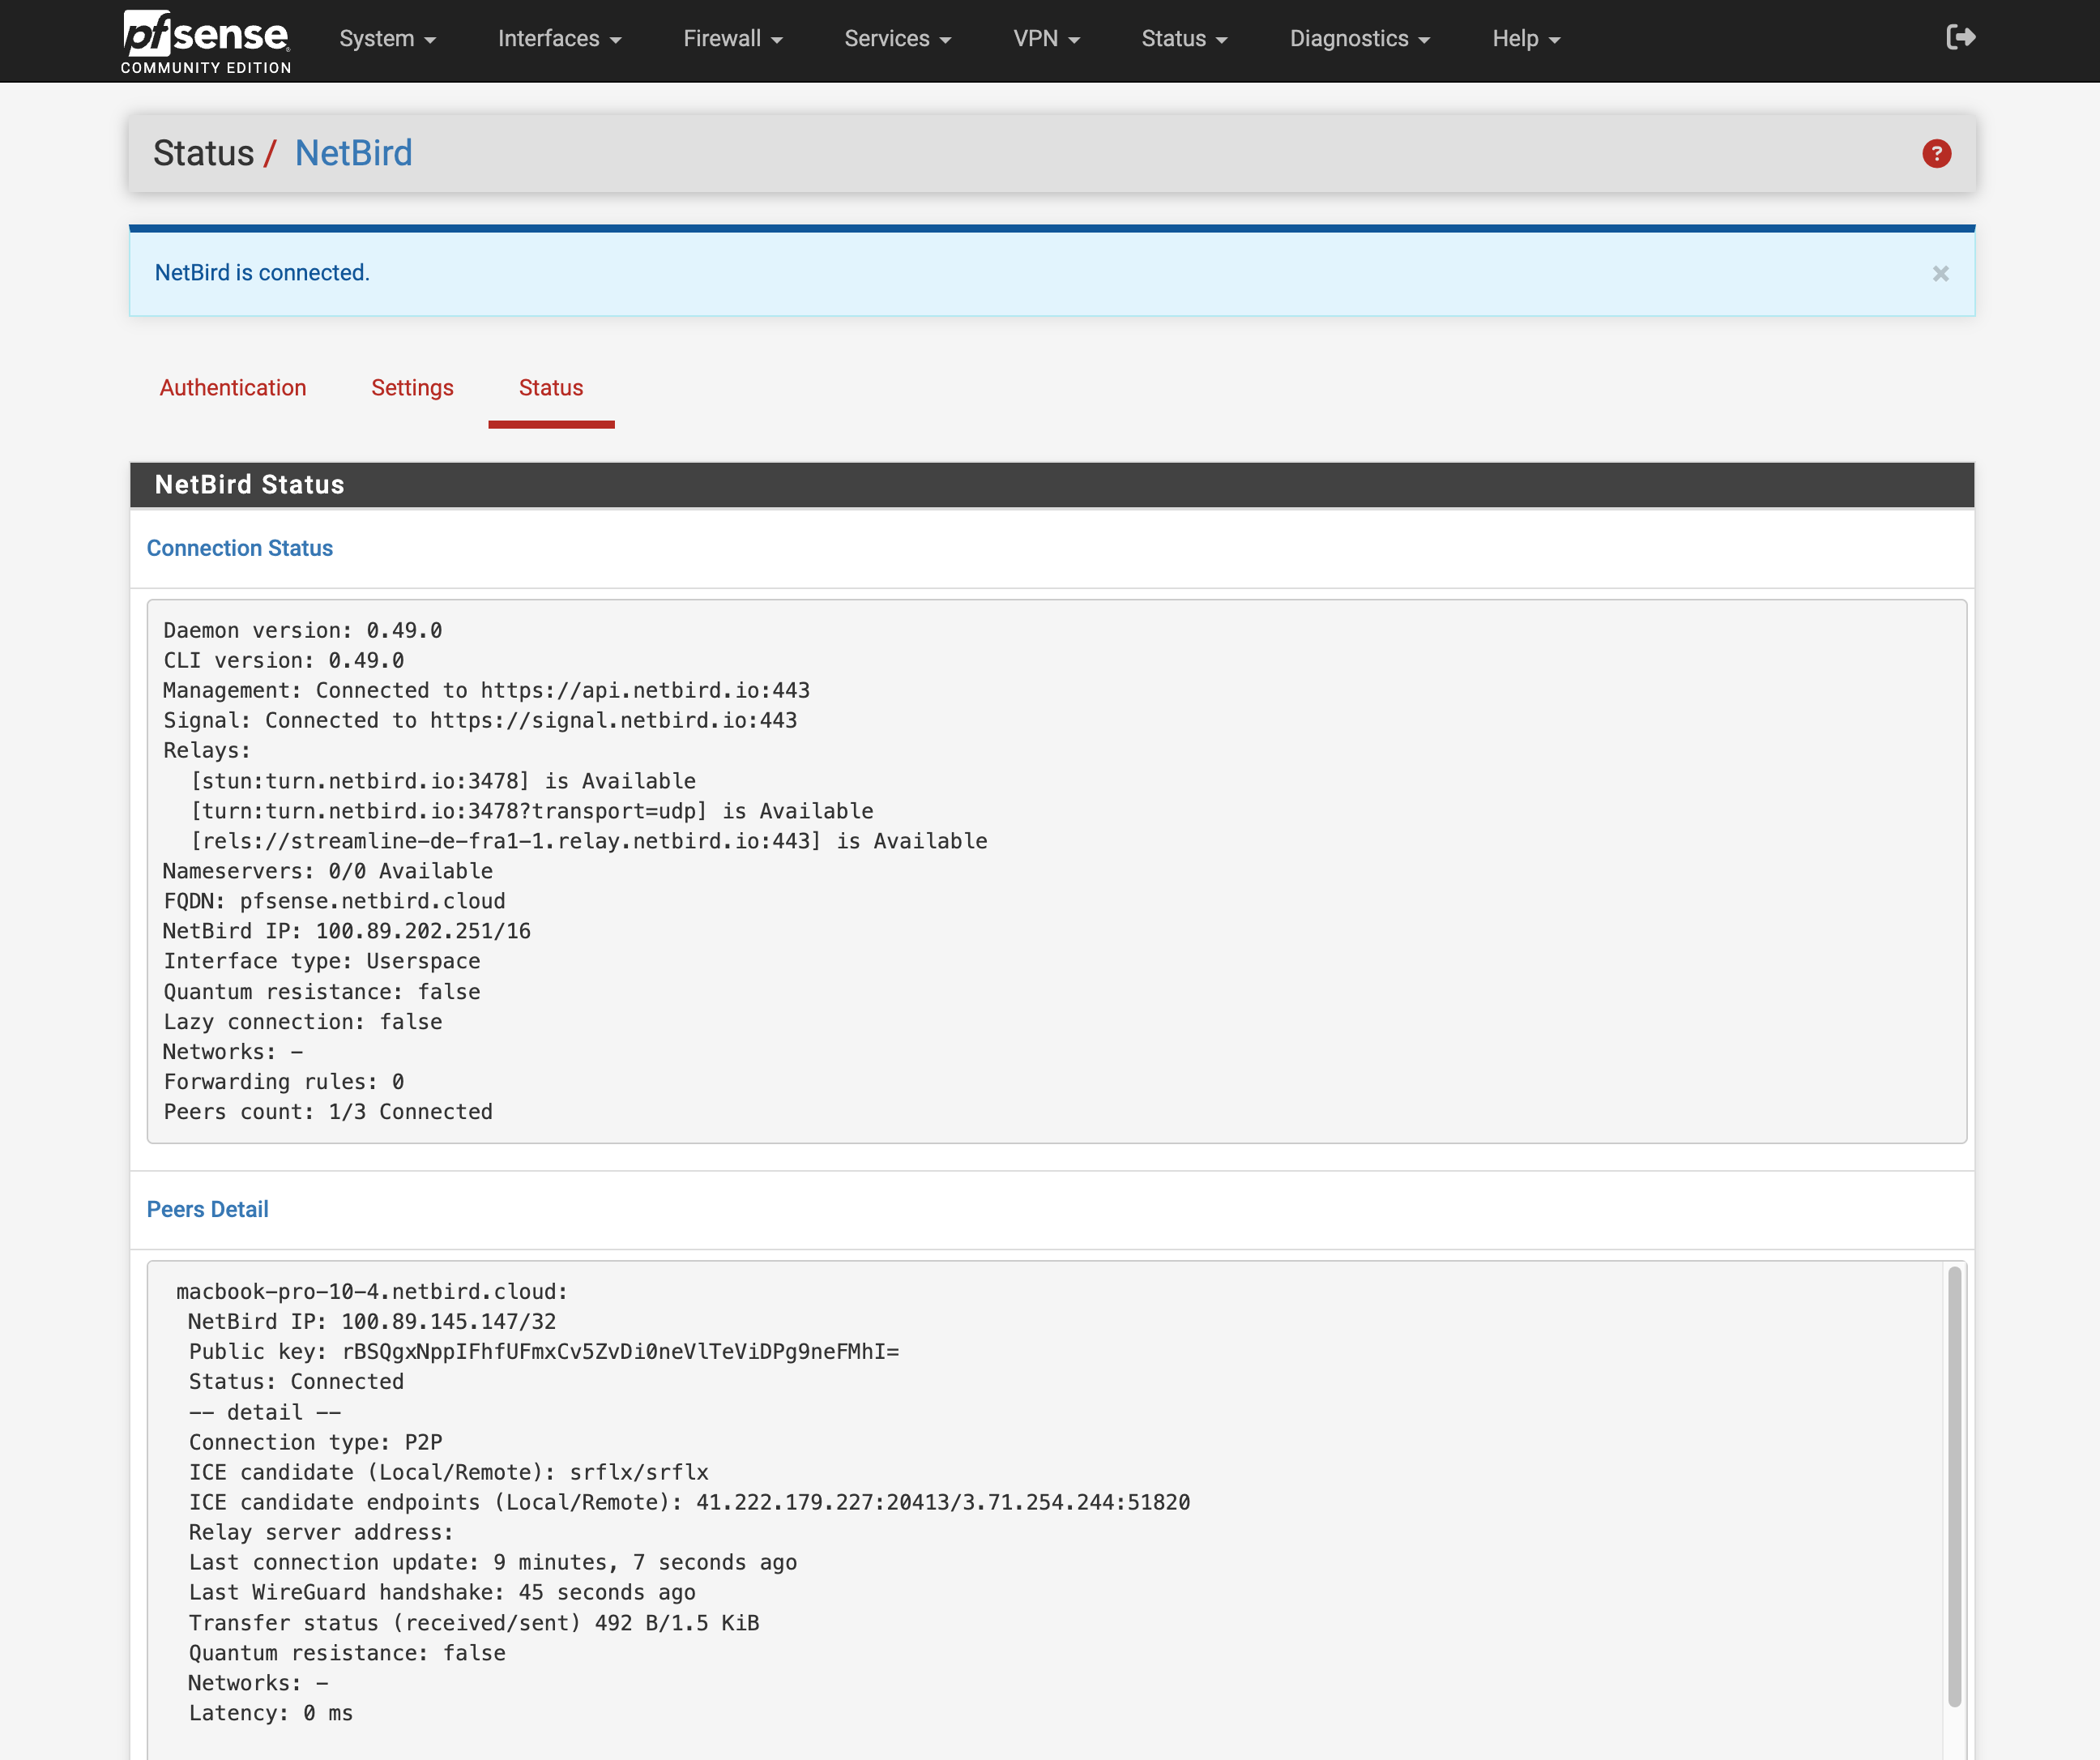
Verify Connection Status
The Status page shows detailed information about connected peers and control services, helping you monitor your deployment.
Access it via Status > NetBird in the pfSense menu.
Use this section for diagnostics and troubleshooting common connection or setup issues.
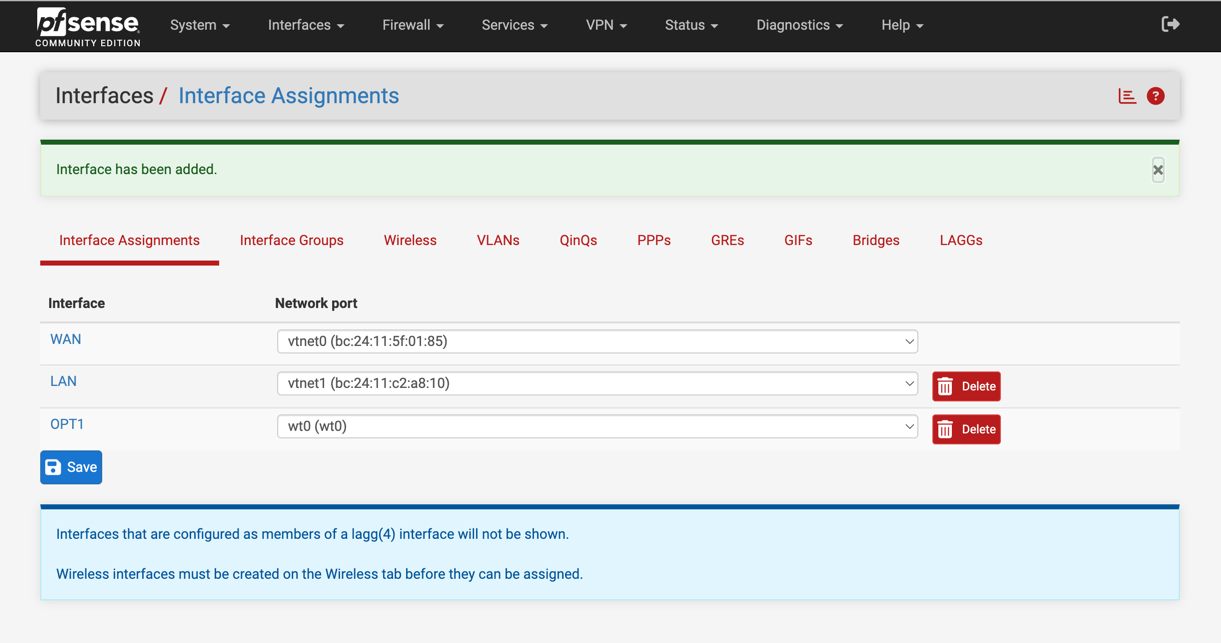
Assign NetBird interface
After authentication, a new interface named wt0(wt0) will be available but unassigned. To assign it go to
Interfaces > Assignments. Under Available network ports, select the NetBird interface wt0(wt0) and click Add.
Enable the NetBird interface
Now that the NetBird interface has been added, you need to enable it. Go to Interfaces > OPT1, then configure
the following options and click Save, then Apply changes to activate the interface:
- Enable:
✓ Enable Interface - Description:
NetBird

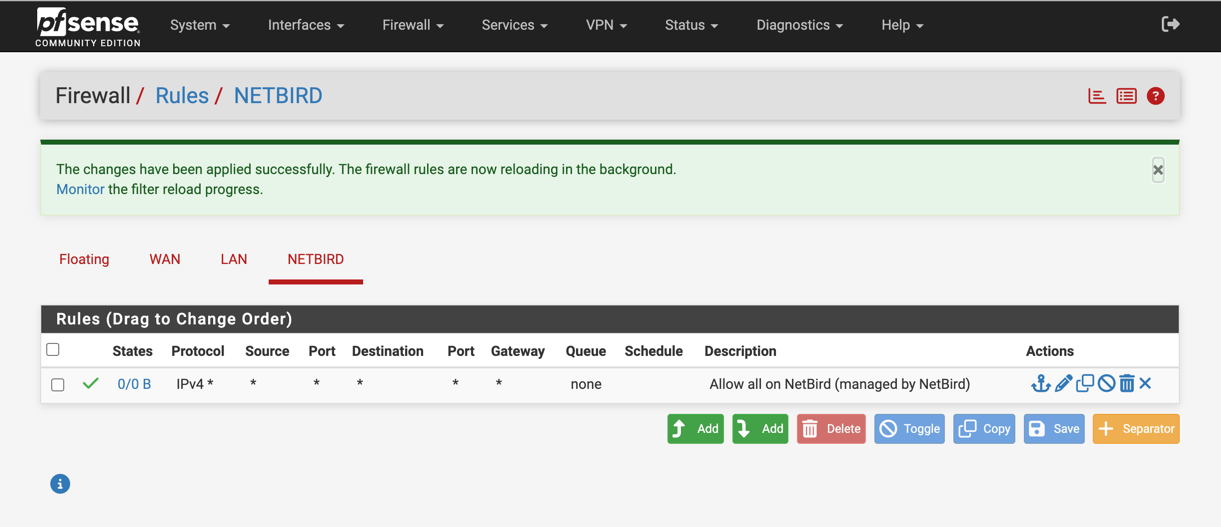
Configure Firewall Rules for the NetBird interface
To allow NetBird to handle all access control, permit all traffic on the NetBird interface in pfSense. This ensures traffic flows freely, while NetBird’s own policies (ACLs) govern the access restrictions.
Create rules to control traffic coming from your NetBird network into pfSense and your local networks:
- Go to
Firewall>Rulesand select theNetBird(interface) tab and clickAddto create rules - Configure the rule:
- Action:
Pass - Interface:
NETBIRD - Address Family:
in - Protocol:
Any - Source:
Any - Destination:
Any - Description:
Allow all on NetBird (managed by NetBird)
- Action:
- Click
Save, thenApply Changes
Config for Troubleshooting Relayed Connections
By default, pfSense uses automatic outbound NAT which randomizes source ports. This can cause issues with NetBird's NAT traversal (hole punching). To ensure reliable direct connections, you must configure a Static Port mapping.
-
Change Outbound NAT Mode:
- Navigate to
Firewall>NAT>Outbound. - Select
Hybrid Outbound NAT rule generation. - Click
Save.
- Navigate to
-
Add Static Port Rule:
- Click
Add(Up arrow) to create a new rule at the top of the list. - Interface:
WAN - Address Family:
IPv4 - Protocol:
UDP - Source:
Network(enter the IP address of your NetBird host) - Destination:
Any - Translation / Static Port: Check
Static Portbox - Description:
NetBird Static Port - Click
Saveand thenApply Changes.
- Click
-
Reset States:
- Go to
Diagnostics>States. - Filter by the NetBird host IP.
- Click
Kill.
- Go to
-
Restart NetBird:
- Run
netbird service restarton the device. - Run
netbird status -dto verify the connection.
- Run
Updating
To upgrade an existing install, fetch the latest packages and re-run pkg add -f over the current ones. There is no need to pkg delete first: the -f flag upgrades the packages in place.
-
Download the latest packages
From the latest pfSense NetBird release, fetch both
.pkgfiles for your architecture, replacing the tag, version, and architecture values with those from the release page (as in Installation):fetch https://github.com/netbirdio/pfsense-netbird/releases/download/<RELEASE_TAG>/netbird-<VERSION>-<ARCH>.pkg fetch https://github.com/netbirdio/pfsense-netbird/releases/download/<RELEASE_TAG>/pfSense-pkg-NetBird-<VERSION>-<ARCH>.pkg -
Upgrade both packages in place
Using the filenames you downloaded, run
pkg add -fon both over the existing install:pkg add -f netbird-<VERSION>-<ARCH>.pkg pkg add -f pfSense-pkg-NetBird-<VERSION>-<ARCH>.pkg -
Restart and verify
netbird service restart
netbird status -d
Uninstallation
From a shell on your pfSense system, run:
pkg delete netbird pfSense-pkg-NetBird
Get started
- Make sure to star us on GitHub
- Follow us on X
- Join our Slack Channel
- NetBird latest release on GitHub