Installation

Linux

Install with one command

curl -fsSL https://pkgs.netbird.io/install.sh | sh

APT/Debian

  1. Add the repository:
sudo apt-get update
sudo apt-get install ca-certificates curl gnupg -y
curl -sSL https://pkgs.netbird.io/debian/public.key | sudo gpg --dearmor --output /usr/share/keyrings/netbird-archive-keyring.gpg
echo 'deb [signed-by=/usr/share/keyrings/netbird-archive-keyring.gpg] https://pkgs.netbird.io/debian stable main' | sudo tee /etc/apt/sources.list.d/netbird.list
  1. Update APT's cache
 sudo apt-get update
  1. Install the package
 # for CLI only
 sudo apt-get install netbird
 # for GUI package
 sudo apt-get install netbird-ui

RPM/Red hat/Amazon Linux 2

  1. Add the repository:
sudo tee /etc/yum.repos.d/netbird.repo <<EOF
[netbird]
name=netbird
baseurl=https://pkgs.netbird.io/yum/
enabled=1
gpgcheck=0
gpgkey=https://pkgs.netbird.io/yum/repodata/repomd.xml.key
repo_gpgcheck=1
EOF
  1. Install the package
 # for CLI only
 sudo yum install netbird
 # for GUI package
 sudo yum install libappindicator-gtk3 libappindicator netbird-ui

Fedora/Amazon Linux 2023

  1. Create the repository file:
sudo tee /etc/yum.repos.d/netbird.repo <<EOF
[netbird]
name=netbird
baseurl=https://pkgs.netbird.io/yum/
enabled=1
gpgcheck=0
gpgkey=https://pkgs.netbird.io/yum/repodata/repomd.xml.key
repo_gpgcheck=1
EOF
  1. Import the file
 sudo dnf config-manager --add-repo /etc/yum.repos.d/netbird.repo
  1. Install the package
 # for CLI only
 sudo dnf install netbird
 # for GUI package
 sudo dnf install libappindicator-gtk3 libappindicator netbird-ui

openSUSE

  1. Add the repository:
sudo zypper addrepo https://pkgs.netbird.io/yum/ netbird
  1. Install the package / GPG key
  • Key Fingerprint: AA9C 09AA 9DEA 2F58 112B 40DF DFFE AB2F D267 A61F
  • Key ID: DFFEAB2FD267A61F
  • Email: dev@netbird.io
# MicroOS (immutable OS with selinux)
transactional-update pkg in netbird
reboot

# Tumbleweed / Leap
zypper in netbird

NixOS 22.11+/unstable

  1. Edit your configuration.nix
 { config, pkgs, ... }:
 {
   services.netbird.enable = true; # for netbird service & CLI
   environment.systemPackages = [ pkgs.netbird-ui ]; # for GUI
 }
  1. Build and apply new configuration
 sudo nixos-rebuild switch

macOS

Install with one command

curl -fsSL https://pkgs.netbird.io/install.sh | sh

Package install

  1. Download the latest MacOS release installer for your processor:
  2. Proceed with the installation steps
  3. This will install the NetBird app into /Applications and add the daemon service
  4. After installing, you can follow the steps from Running NetBird with SSO Login steps.

To uninstall the client remove the app from /Applications

Homebrew install

  1. Download and install homebrew at https://brew.sh/
  2. If netbird was previously installed with homebrew, you will need to run:
# Stop and uninstall daemon service:
sudo netbird service stop
sudo netbird service uninstall
# unlink the app
brew unlink netbird

netbird will copy any existing configuration from the netbird's default configuration paths to the new NetBird's default location

  1. Install the client
  # for CLI only
  brew install netbirdio/tap/netbird
  # for GUI package
  brew install --cask netbirdio/tap/netbird-ui
  1. If you installed CLI only, you need to install and start the client daemon service:
 sudo netbird service install
 sudo netbird service start

Windows

  1. Download the latest Windows release:
  2. Execute the installer and proceed with the installation steps
  3. This will install the UI client in the C:\Program Files\NetBird and add the daemon service
  4. After installing, you can follow the steps from Running NetBird with SSO Login.

Synology

Install with one command

curl -fsSL https://pkgs.netbird.io/install.sh | sh

For NetBird to work on Synology after a reboot, you need to run this script every time you reboot your NAS. To automate this process, you can create a scheduled task in the Synology DSM.

#!/bin/sh

# Create the necessary file structure for /dev/net/tun
if [ ! -c /dev/net/tun ]; then
  if [ ! -d /dev/net ]; then
    mkdir -m 755 /dev/net
  fi
  mknod /dev/net/tun c 10 200
  chmod 0755 /dev/net/tun
fi

# Load the tun module if not already loaded
if !(lsmod | grep -q "^tun\s"); then
  insmod /lib/modules/tun.ko
fi

Android

NetBird has an official Android application that you can download at Google Play Store:

playstore

iOS

NetBird has an official iOS application that you can download from the App Store:

appstore

Binary Install

Installation from binary (CLI only)

  1. Checkout NetBird releases
  2. Download the latest release:
  curl -L -o ./netbird_<VERSION>.tar.gz https://github.com/netbirdio/netbird/releases/download/v<VERSION>/netbird_<VERSION>_<OS>_<Arch>.tar.gz
  1. Decompress
  tar xcf ./netbird_<VERSION>.tar.gz
  sudo mv netbird /usr/bin/netbird
  sudo chown root:root /usr/bin/netbird
  sudo chmod +x /usr/bin/netbird

After that you may need to add /usr/bin in your PATH environment variable:

  export PATH=$PATH:/usr/bin
  1. Install and run the service
  sudo netbird service install
  sudo netbird service start

Running NetBird with SSO Login

Desktop UI Application

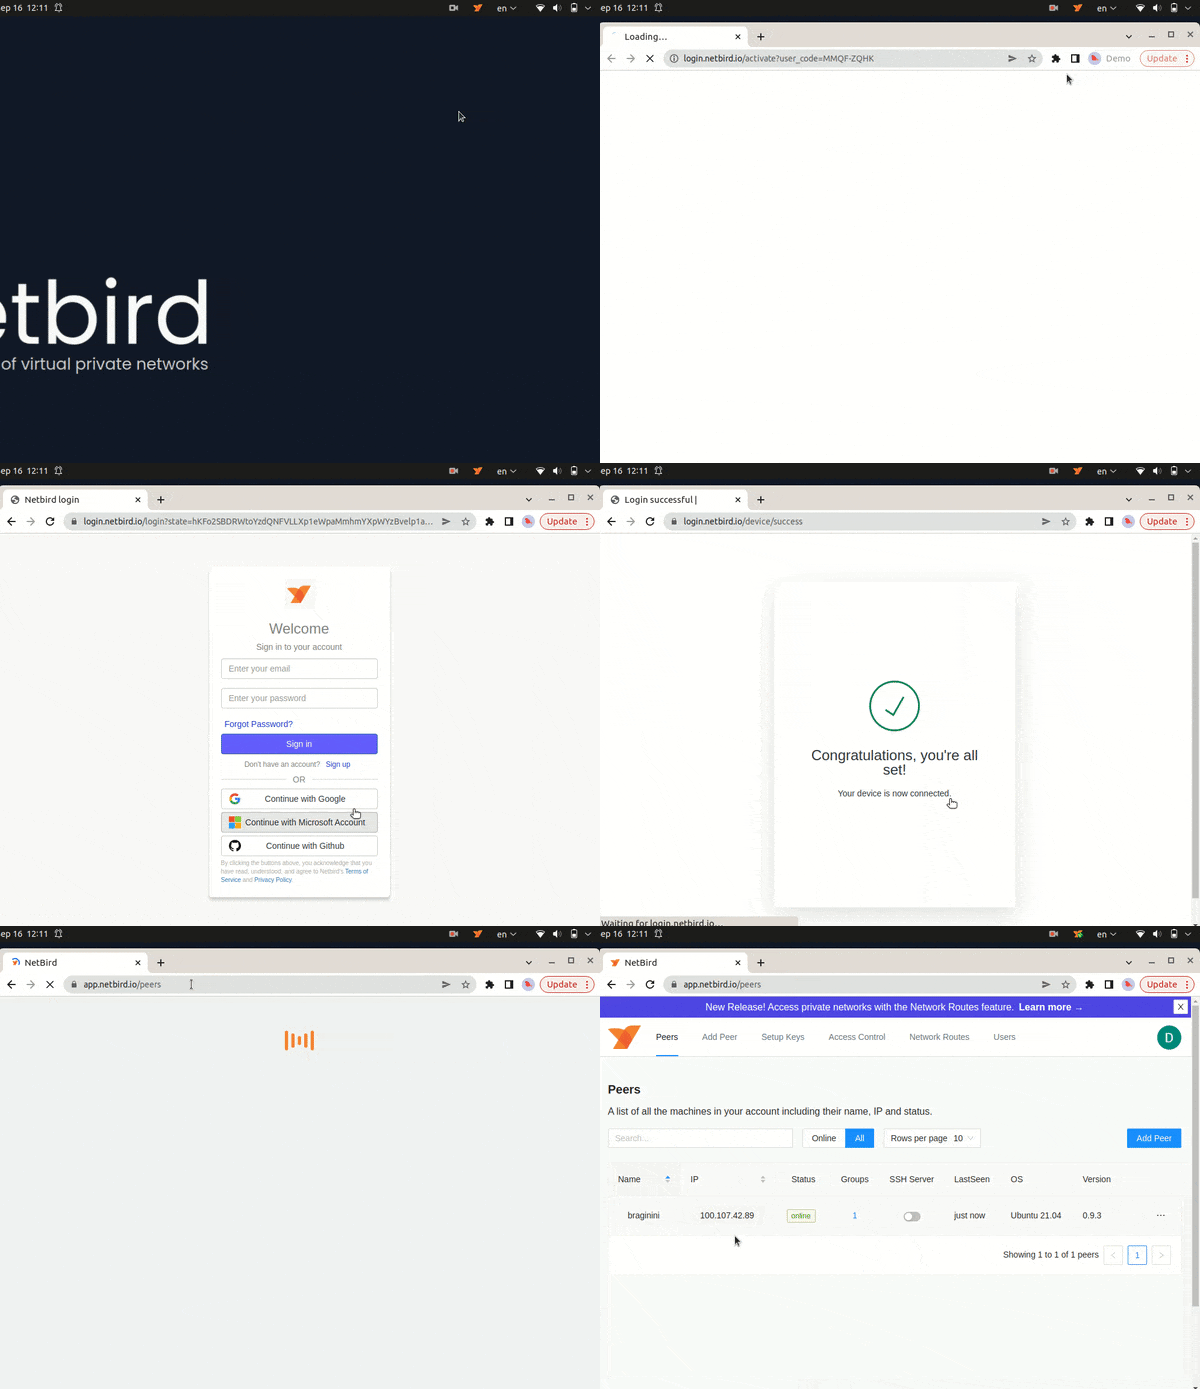
If you installed the Desktop UI client, you can launch it and click on Connect.

It will open your browser, and you will be prompt for email and password. Follow the instructions.
high-level-dia

CLI

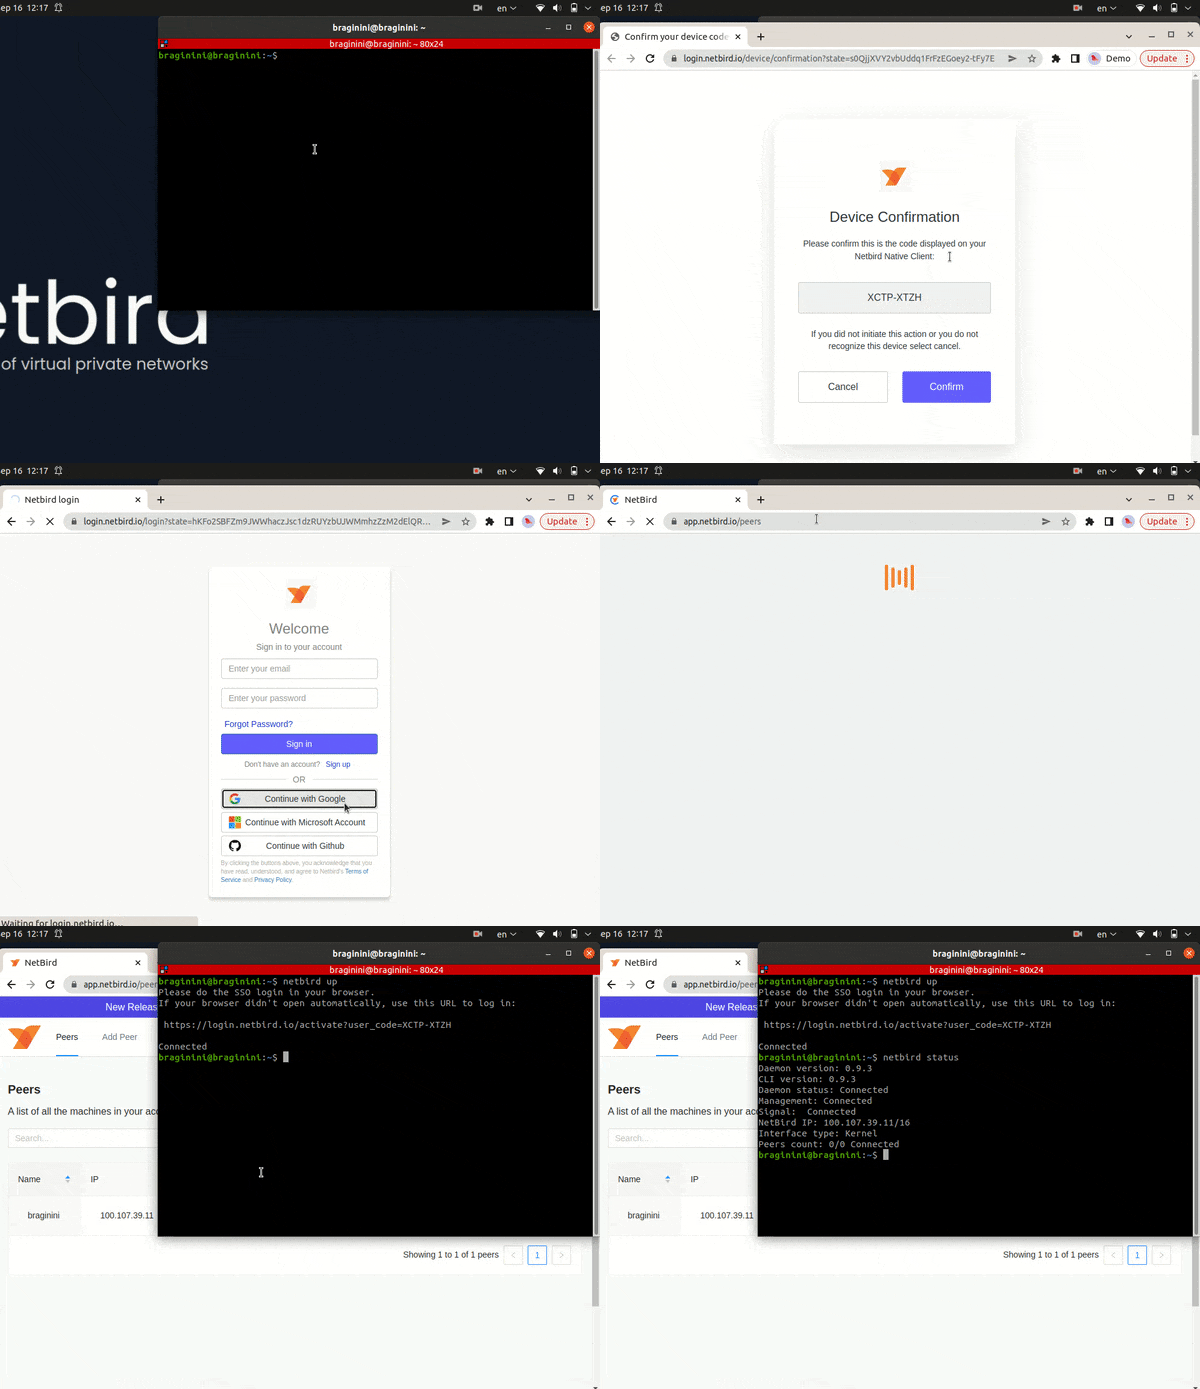
Alternatively, you could use command line. Simply run

netbird up

It will open your browser, and you will be prompt for email and password. Follow the instructions.
high-level-dia

Check connection status:

  netbird status

Running NetBird with a Setup Key

In case you are activating a server peer, you can use a setup key as described in the steps below.

This is especially helpful when you are running multiple server instances with infrastructure-as-code tools like ansible and terraform.

  1. Login to the Management Service. You need to have a setup key in hand (see setup keys).

For all systems:

  netbird up --setup-key <SETUP KEY>

For Docker, you can run with the following command:

docker run --network host --privileged --rm -d -e NB_SETUP_KEY=<SETUP KEY> -v netbird-client:/etc/netbird netbirdio/netbird:<TAG>

TAG > 0.6.0 version

Alternatively, if you are hosting your own Management Service provide --management-url property pointing to your Management Service:

  netbird up --setup-key <SETUP KEY> --management-url http://localhost:33073

You could also omit the --setup-key property. In this case, the tool will prompt for the key.

  1. Check connection status:
  netbird status
  1. Check your IP:

On macOS :

  sudo ifconfig utun100

On Linux:

  ip addr show wt0

On Windows:

  netsh interface ip show config name="wt0"

Running NetBird in Docker

Set the NB_SETUP_KEY environment variable and run the command.

NetBird makes use of eBPF and raw sockets, therefore to guarantee the client software functionality, we recommend adding the flags --cap-add=SYS_ADMIN and --cap-add=SYS_RESOURCE for docker clients. The experience may vary depending on the docker daemon, operating system, or kernel version.

docker run --rm --name PEER_NAME --hostname PEER_NAME --cap-add=NET_ADMIN --cap-add=SYS_ADMIN --cap-add=SYS_RESOURCE -d -e NB_SETUP_KEY=<SETUP KEY> -v netbird-client:/etc/netbird netbirdio/netbird:latest

See Docker example for details.

Troubleshooting

  1. If you are using self-hosted version and haven't specified --management-url, the client app will use the default URL which is https://api.wiretrustee.com:33073.

  2. If you have specified a wrong --management-url (e.g., just by mistake when self-hosting) to override it you can do the following:

netbird down
netbird up --management-url https://<CORRECT HOST:PORT>/

To override it see the solution #1 above.

Updating

Linux

If your NetBird client was installed through a package manager, use that to update. If you used the one-command script to install, you can follow this to update:

netbird down
curl -fsSLO https://pkgs.netbird.io/install.sh
chmod +x install.sh
./install.sh --update
netbird up