Managing Access with NetBird: Groups and Access Policies
NetBird empowers administrators to effectively manage and control access between resources (referred to as peers) using groups and access policies. These access policies define which peers or peer groups are allowed to connect, specify the protocols and ports available for these connections, and optionally incorporate posture checks. By integrating posture checks, NetBird enforces zero trust principles, enabling dynamic and context-aware access control that adapts to the specific security needs of your environment.
Watch our Access Control video on YouTube:
For a visual overview of your access policies and network topology, check out the Control Center, which provides an interactive graph view of peers, groups, and their access relationships.
Introduction
Initially, a NetBird account is configured with a Default policy which allows peers to connect via any protocol, resulting in the formation of a full mesh network. This setup often suits small networks or those requiring minimal security. In scenarios where higher security is needed or access to specific resources must be restricted for certain users or services, policies can be set up to determine access permissions.
Access control policies make use of groups to control connections between peers. These groups, which are sets of peers (meaning different machines with the NetBird client installed), can be added as Source or Destination of a policy. They are evaluated when the Management service distributes the list of peers across your network.
Concepts
Groups
A NetBird group works and follows a similar concept to tags in other platforms; they are easily created and can be associated with peers and used in policies to control traffic within your network.
Here are some key attributes of groups:
- Each group is unique.
- A single group can have multiple peers.
- Peers can be part of multiple groups simultaneously.
- Groups can be included in the 'Source' and 'Destination' lists of policies.
- Groups can be created either in
Access Control > Groupsor in places where a group input field is provided. Type the preferred group name into the input and press 'Enter' to create the new group. Learn more - Groups can be deleted in
Access Control > GroupsLearn more - There exists a default group called
Allwhich cannot be deleted or renamed.
You can assign groups automatically with the peer auto-grouping feature.
The All Group
The 'All' group serves as a default group that automatically includes every peer in your network. This group cannot be modified or removed.
Policies
Policies act as rules governing how different resources (peers) can communicate and connect. They specify the source and destination of communication and can allow bidirectional or unidirectional connections.
Policies are processed when the Management service shares a network map with all peers of your account. Because you can only create ALLOW policies, there is no processing order or priority. So, the decision to distribute peer information is based on its association with a group belonging to an existing policy.
Each policy has a direction flag — bidirectional (both groups can initiate) or unidirectional (only the source initiates) — and the data-plane honors it for every protocol, including ALL, ICMP, and TCP/UDP without specific ports.
If you need to allow peers from the same group to communicate with each other, you can do so by adding the same group to the Source and Destination lists.
Without policies, a network operates by denying traffic, meaning peers cannot communicate with each other. That's why the default policy is automatically created upon account creation.
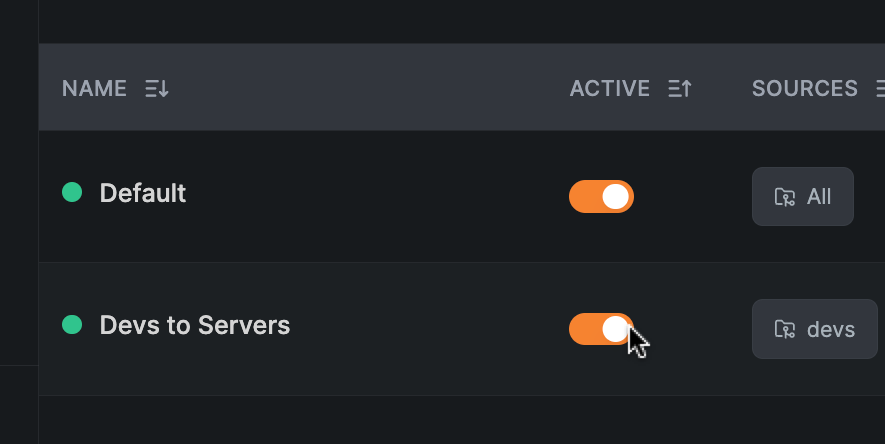
The Default policy
The Default policy is created when you first create your account. This policy is very permissive because it allows communication between all peers in your network, utilizing the All group as both the source and destination. It's worth noting that the All group is also automatically present when the account is being created. If you want to have better control over your network, it is recommended that you delete this policy and create more restricted policies with custom groups.
If you need to restrict communication within your network, you can create new policies and use different groups. Then, you can remove the default policy to achieve the desired behavior.
Multiple Mesh Networks
Policies shape how your network behaves as a mesh. Bidirectional policies suit clusters or service pairs that need to talk both ways; unidirectional policies are the typical Zero Trust pattern.
There is a Default policy, which configures a default mesh connection between all peers of your network. With policies, you can define smaller mesh networks by grouping peers and adding these groups to Source and Destination lists.
Managing Policies
Creating Policies
After accessing the Access Control > Policies tab, click on the Add policy button to create a new policy.
In the popup, specify connection Source and Destination groups. You can select existing groups or create new ones by entering a name in the input box.
We recommend using identity provider (IdP) integrations to provision your user groups from the IdP.
You can limit access to specific protocol and ports by selecting the Protocol and providing the port numbers in the Ports field.
Starting version 0.48 NetBird supports port ranges in policies, allowing you to specify a range of ports in the format start-end (e.g., 8000-9000).
Set the Direction field, then provide a name and description for your policy.
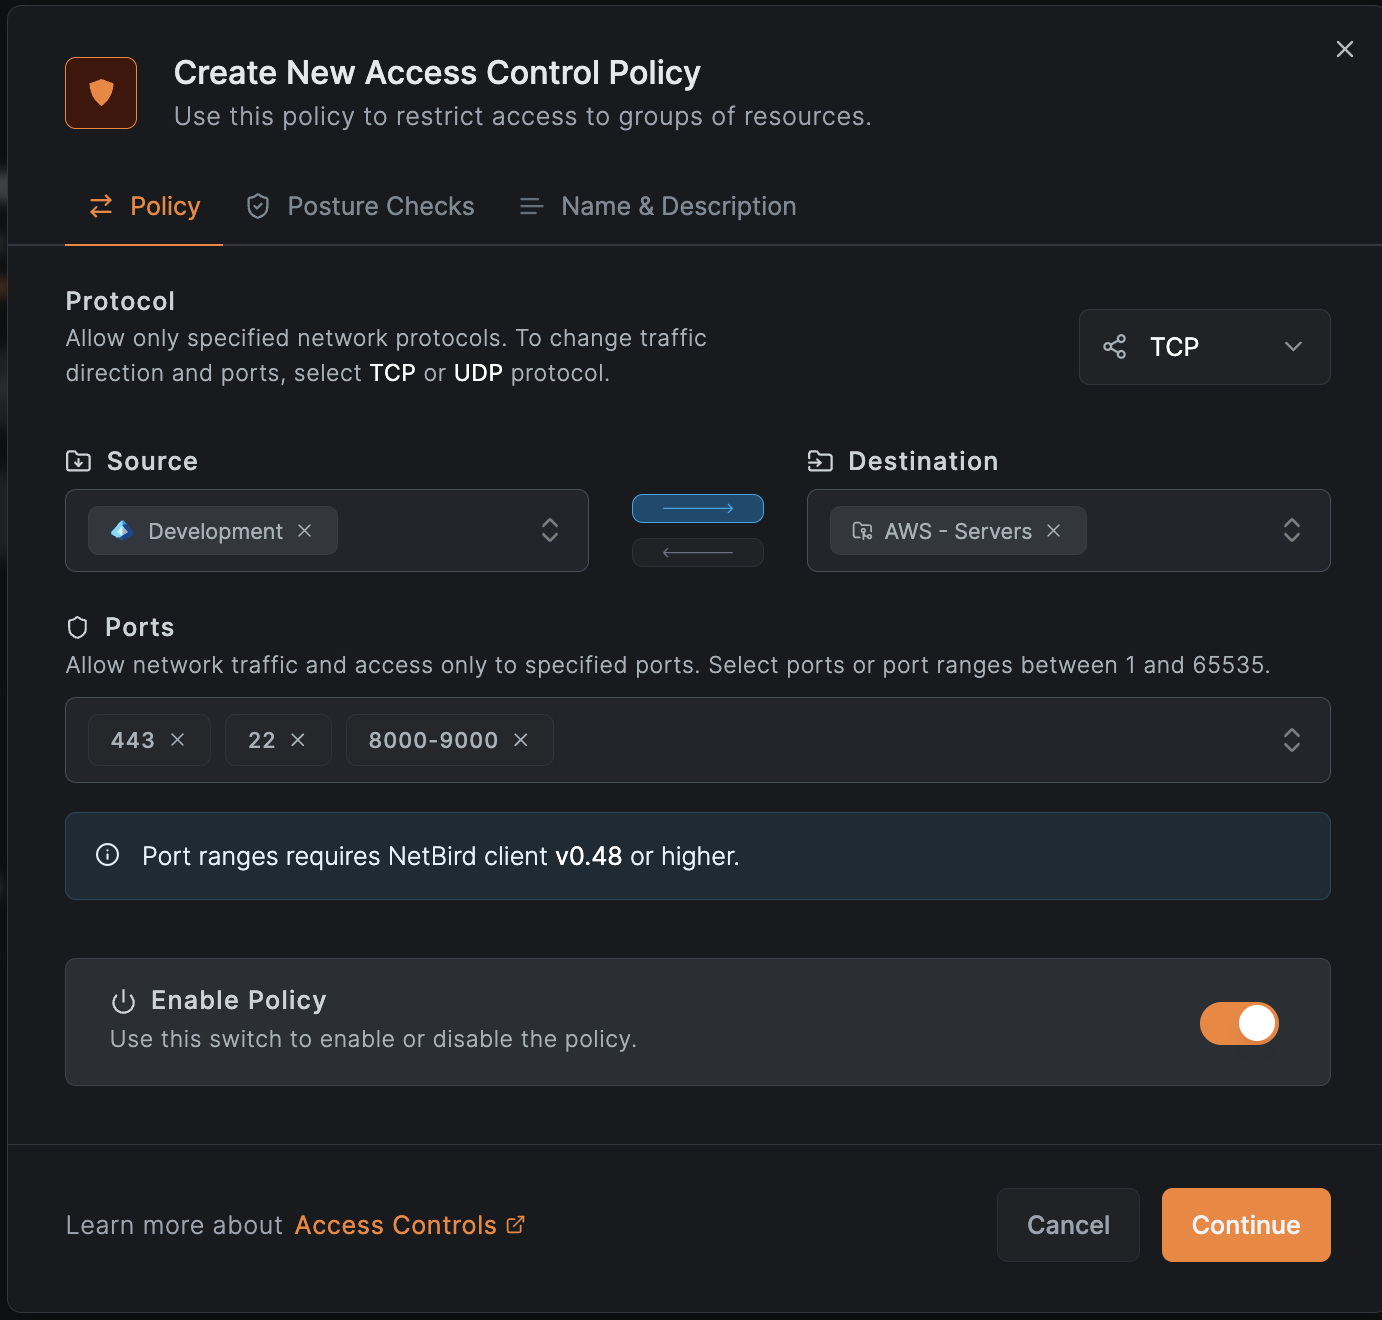
If necessary, you can also add a posture checks to the policy. Posture checks are used to ensure that the peer meets certain security requirements before allowing it to connect. You can select from predefined posture checks or create custom ones.
Once you have finished configuring the policy, click Add Policy to save it. You will then see your new policy in the table.
Because of its permissiveness, new policies will take effect once you remove the Default policy.
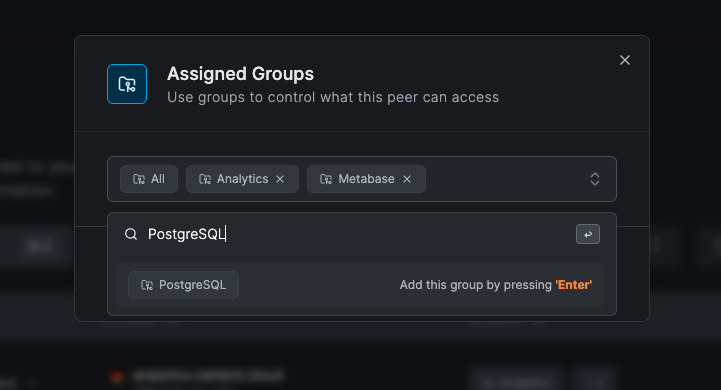
Adding peers to groups
If you create a new group when defining a policy, you will need to add a peer to the group for the policy to take effect.
You can assign a peer to a group by accessing the Peers section. Then, choose the specific peer you want to assign to a group. Click on the Assigned Groups select box and select the group(s) you wish to assign to this peer.
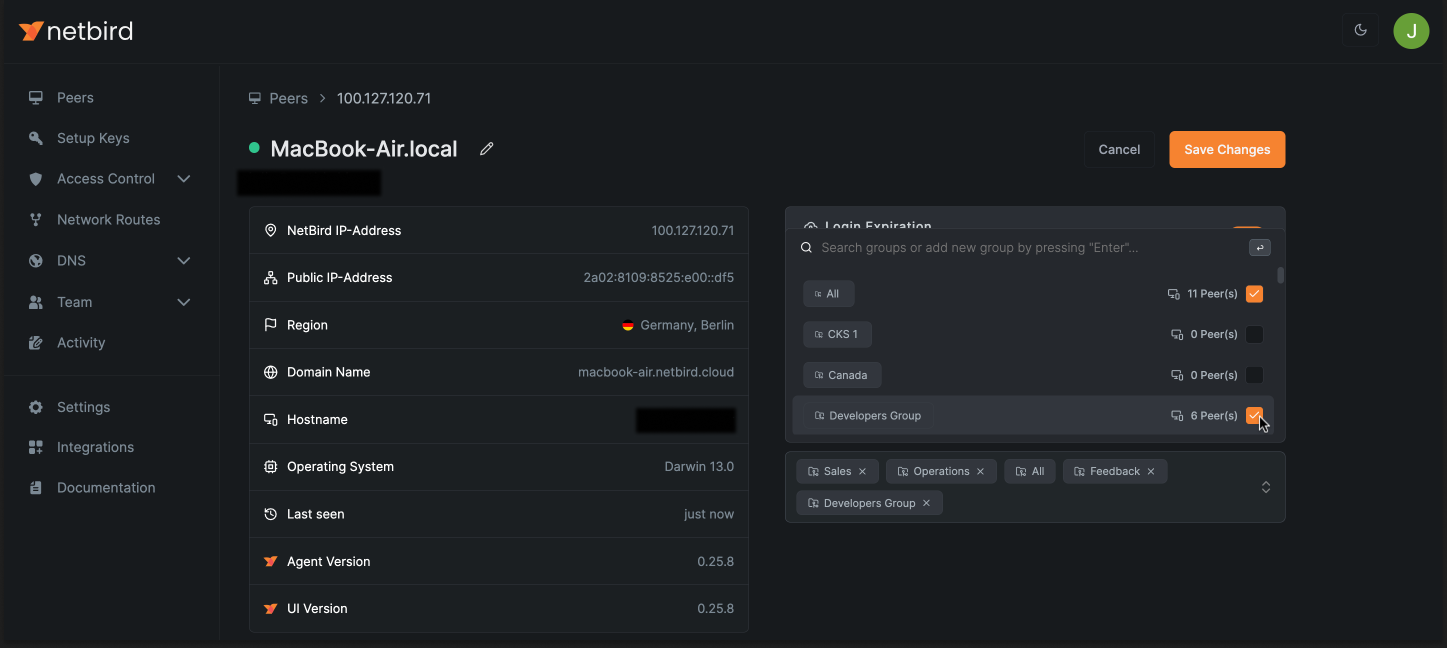
You can assign groups automatically with the peer auto-grouping feature.
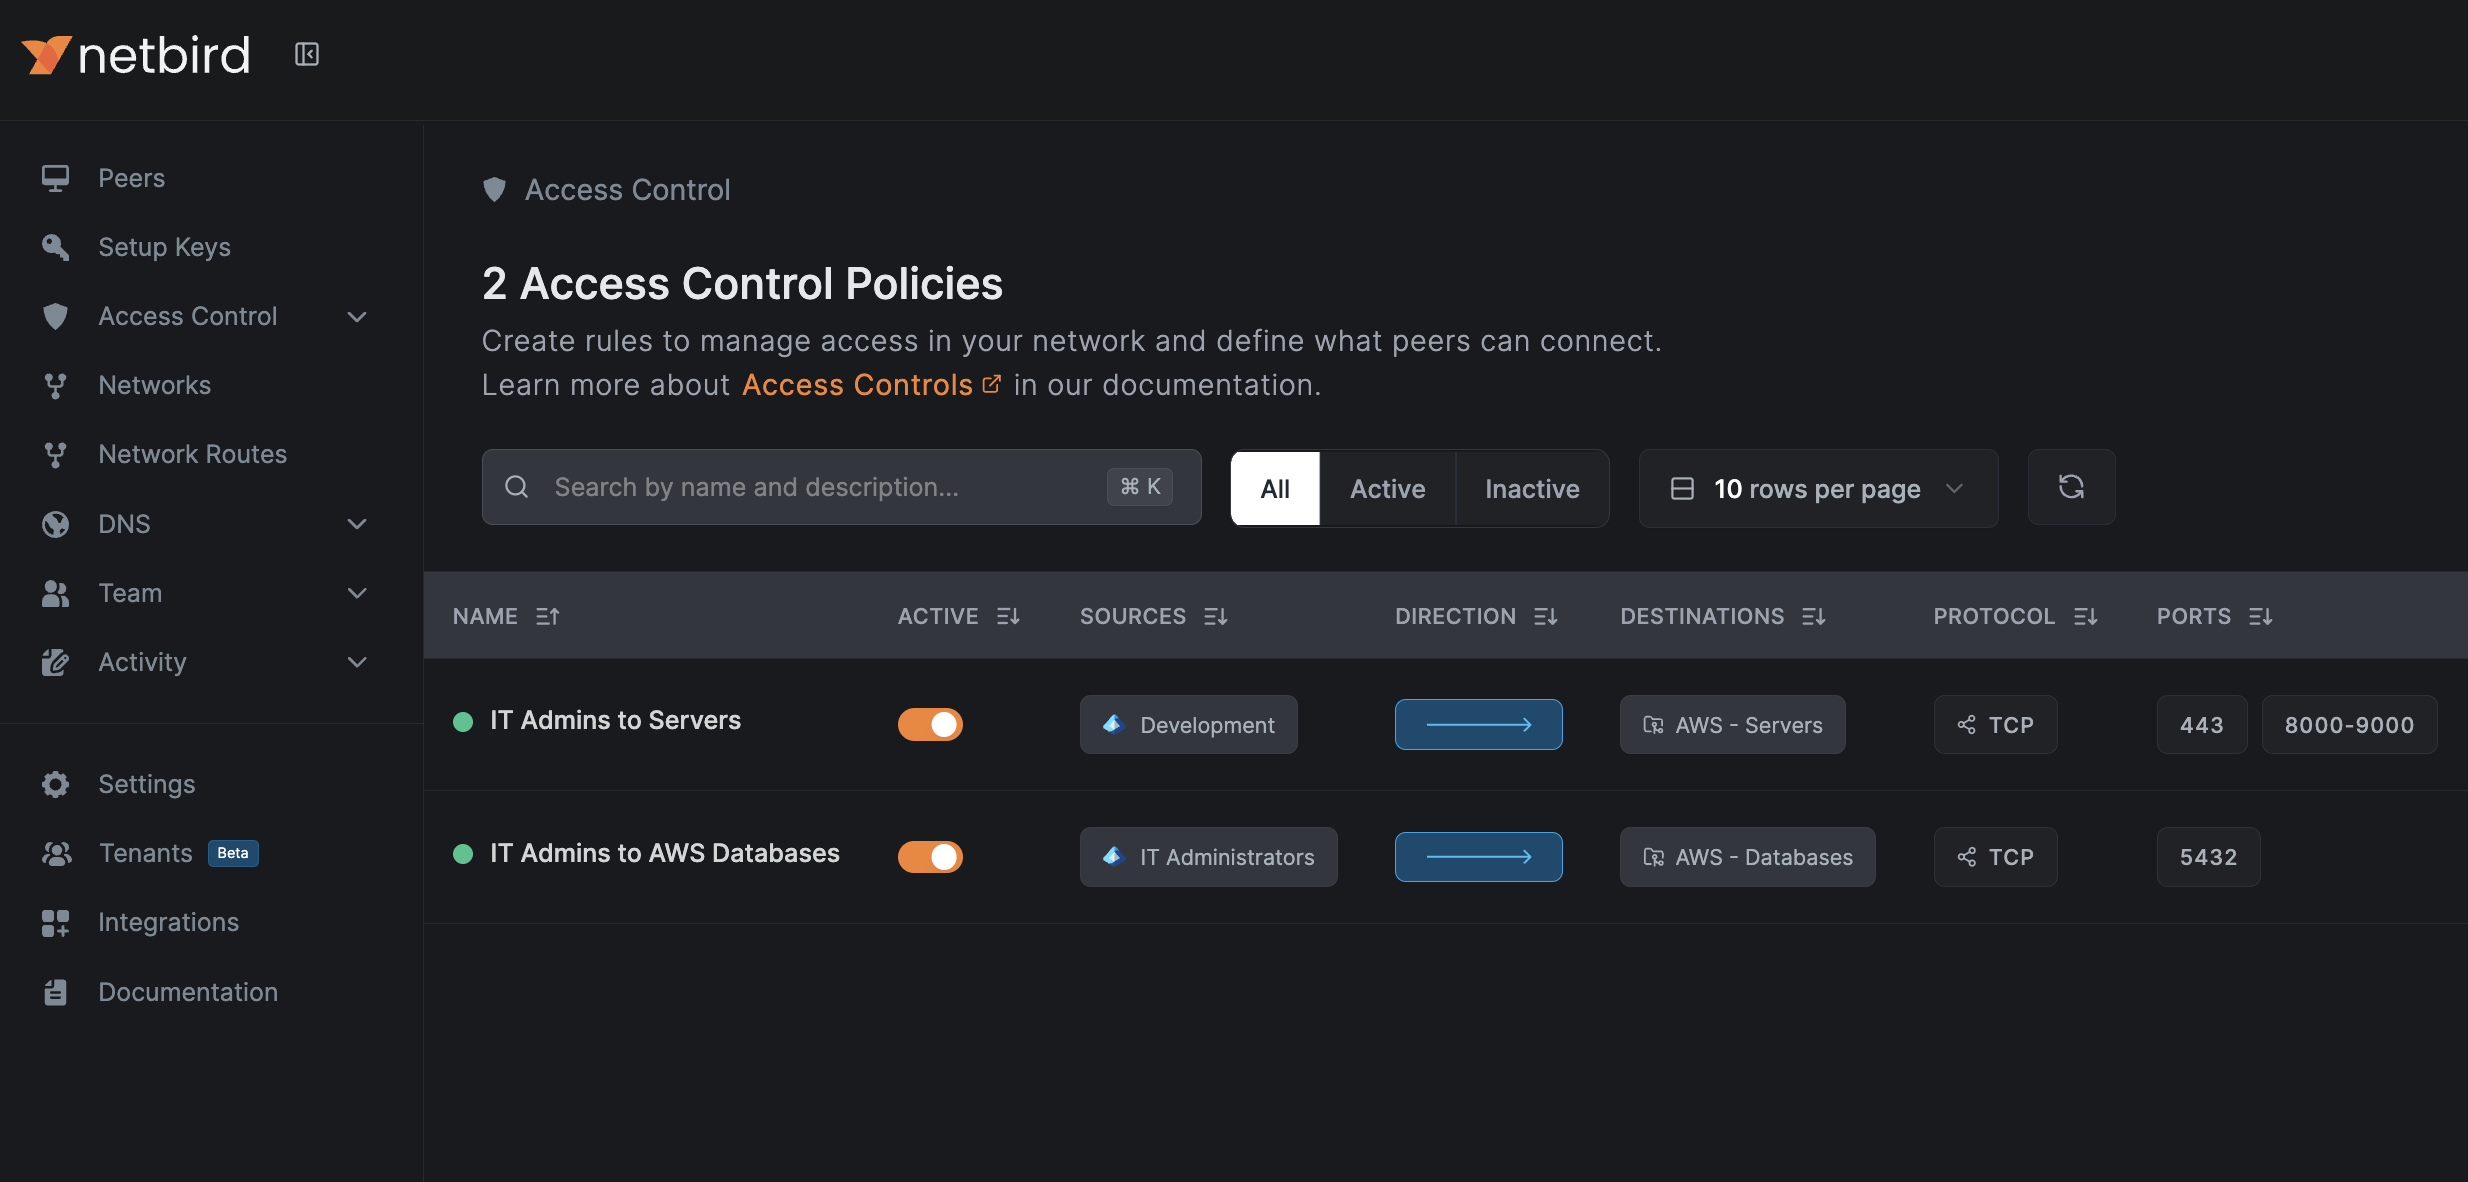
Updating Policies
To update a policy, just click on its name and customize it according to your requirements. This action will open the same screen where you can update policy groups, descriptions, and status, or modify allowed traffic direction, protocols with ports, and posture checks, similar to the information described in the "Creating Policies" section above.
Disabling Policies
To disable a policy, use the switch in the Active column of the table.
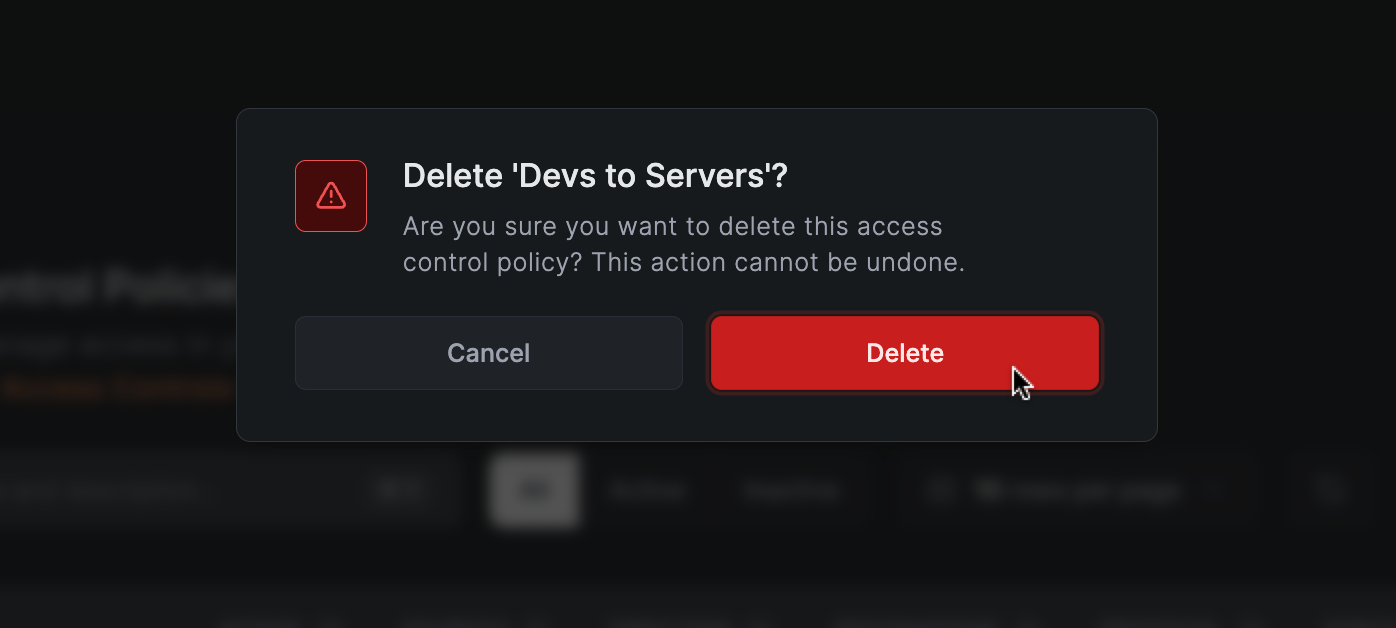
Deleting Policies
To delete a policy, click on Delete in the table, and confirm the message that appears.
Managing Groups
Creating Groups
You can create groups in two ways:
Quick Creation (Inline)
When you see a group input field anywhere in the dashboard (e.g. such as when creating policies), you can create groups directly from the input field.
- Type your preferred group name into the input field
- Press 'Enter' to create the new group
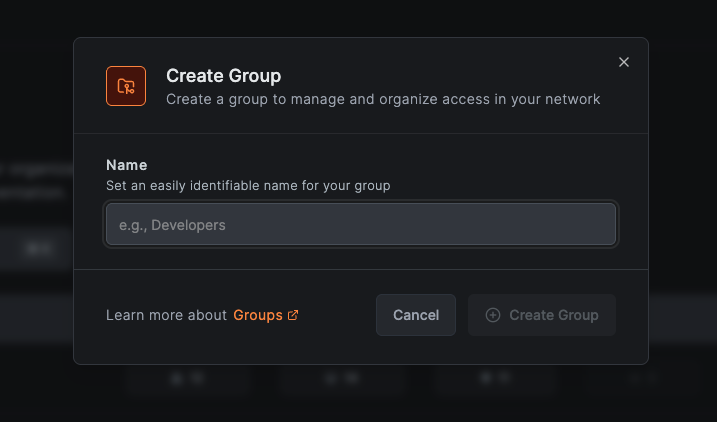
From Groups Page
- Navigate to
Access Control>Groups - Click the
Create Groupbutton - Provide a name for your new group
Viewing Groups
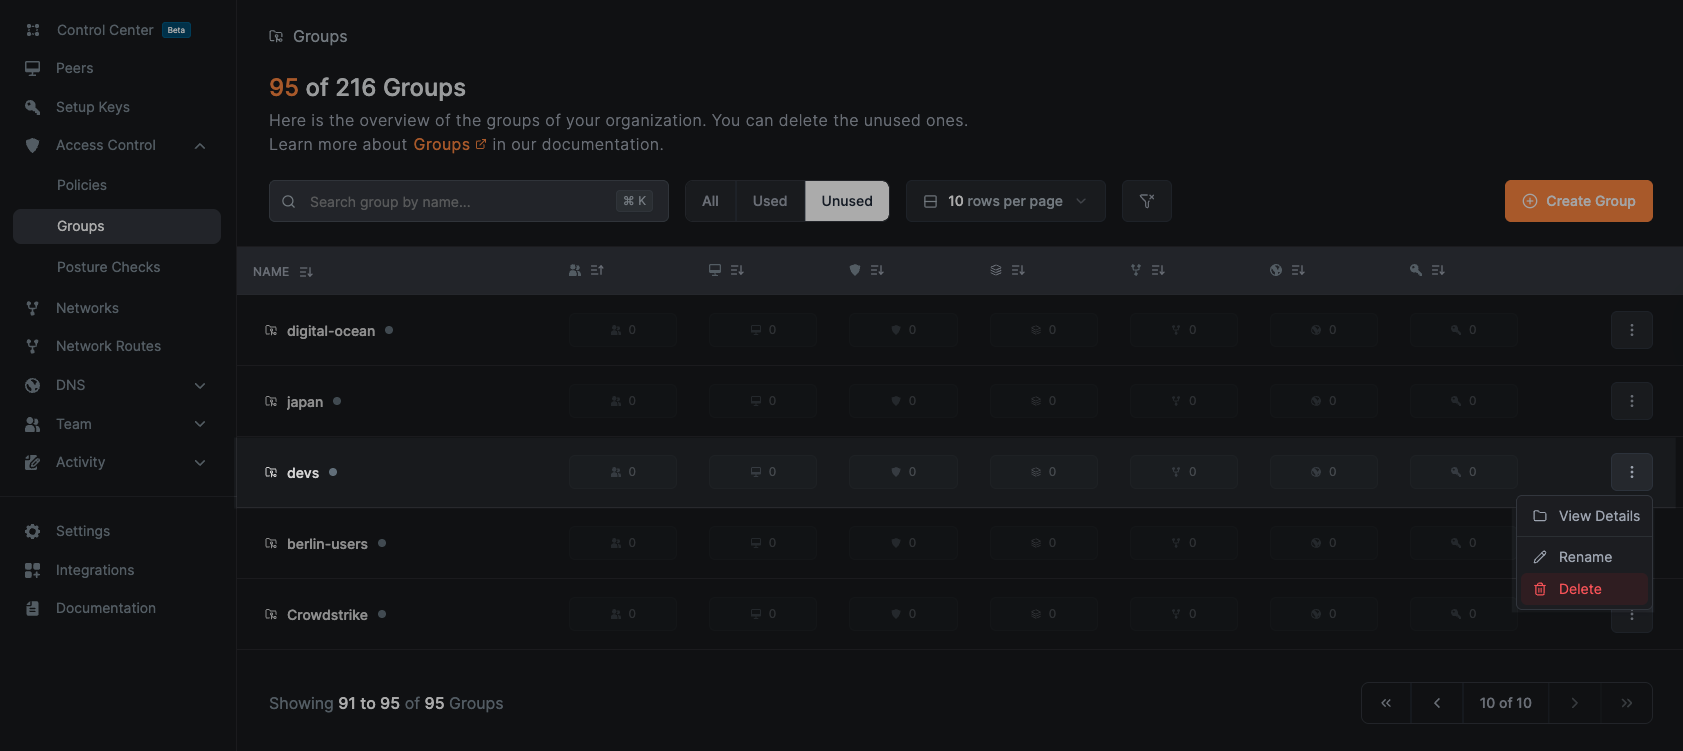
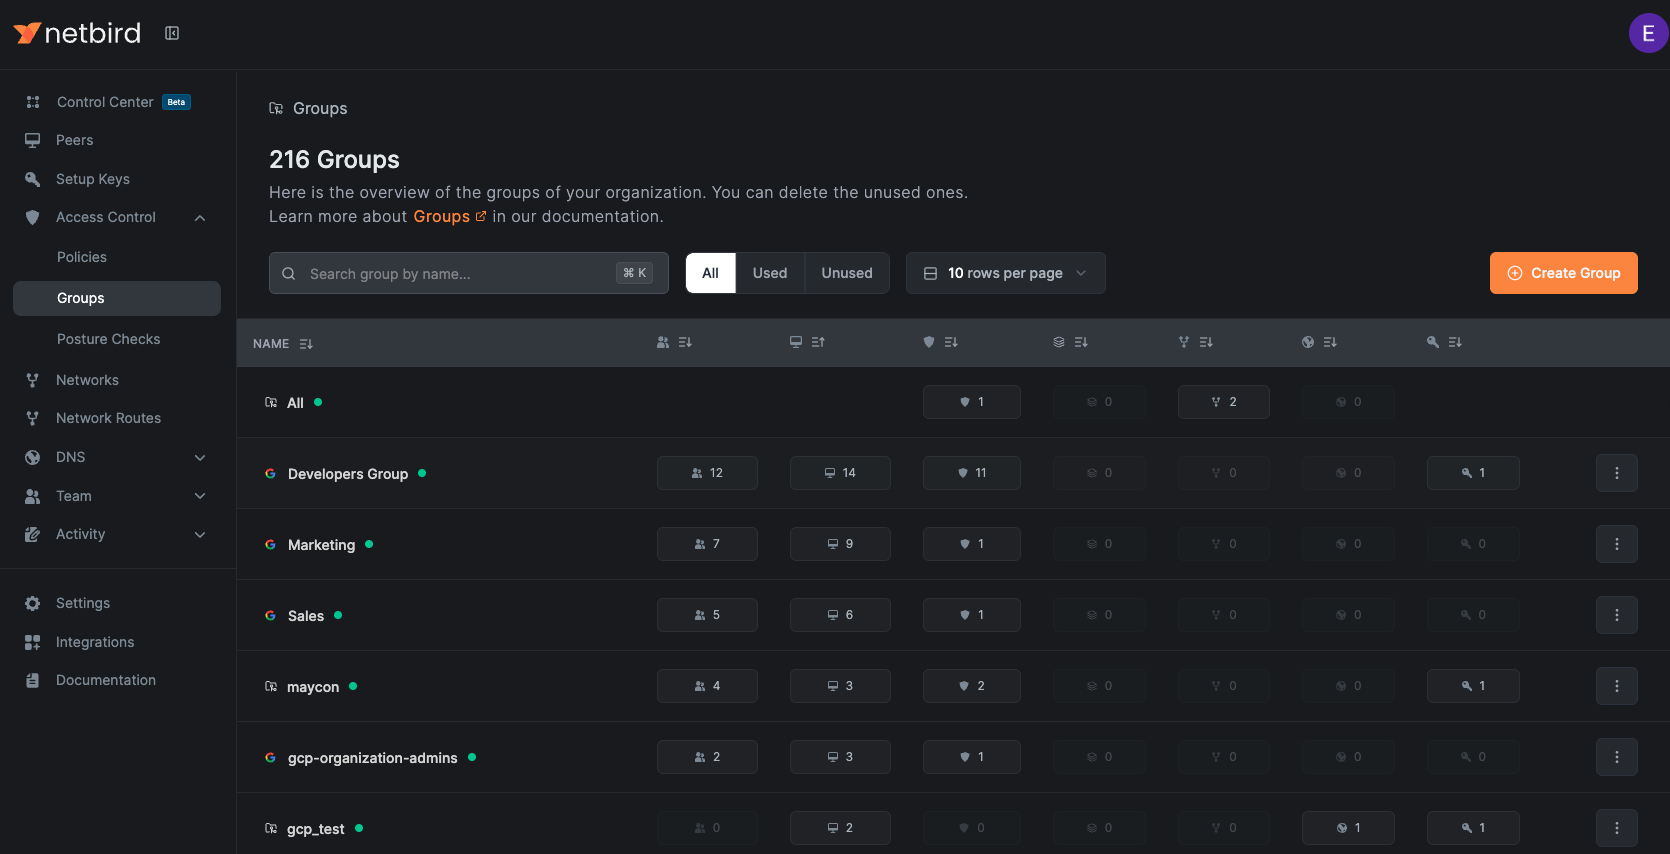
Groups Overview
Navigate to Access Control > Groups to view all groups in your organization. This page shows:
- All existing groups
- Associated objects (peers, users, policies, etc.)
- Usage status (used/unused groups)
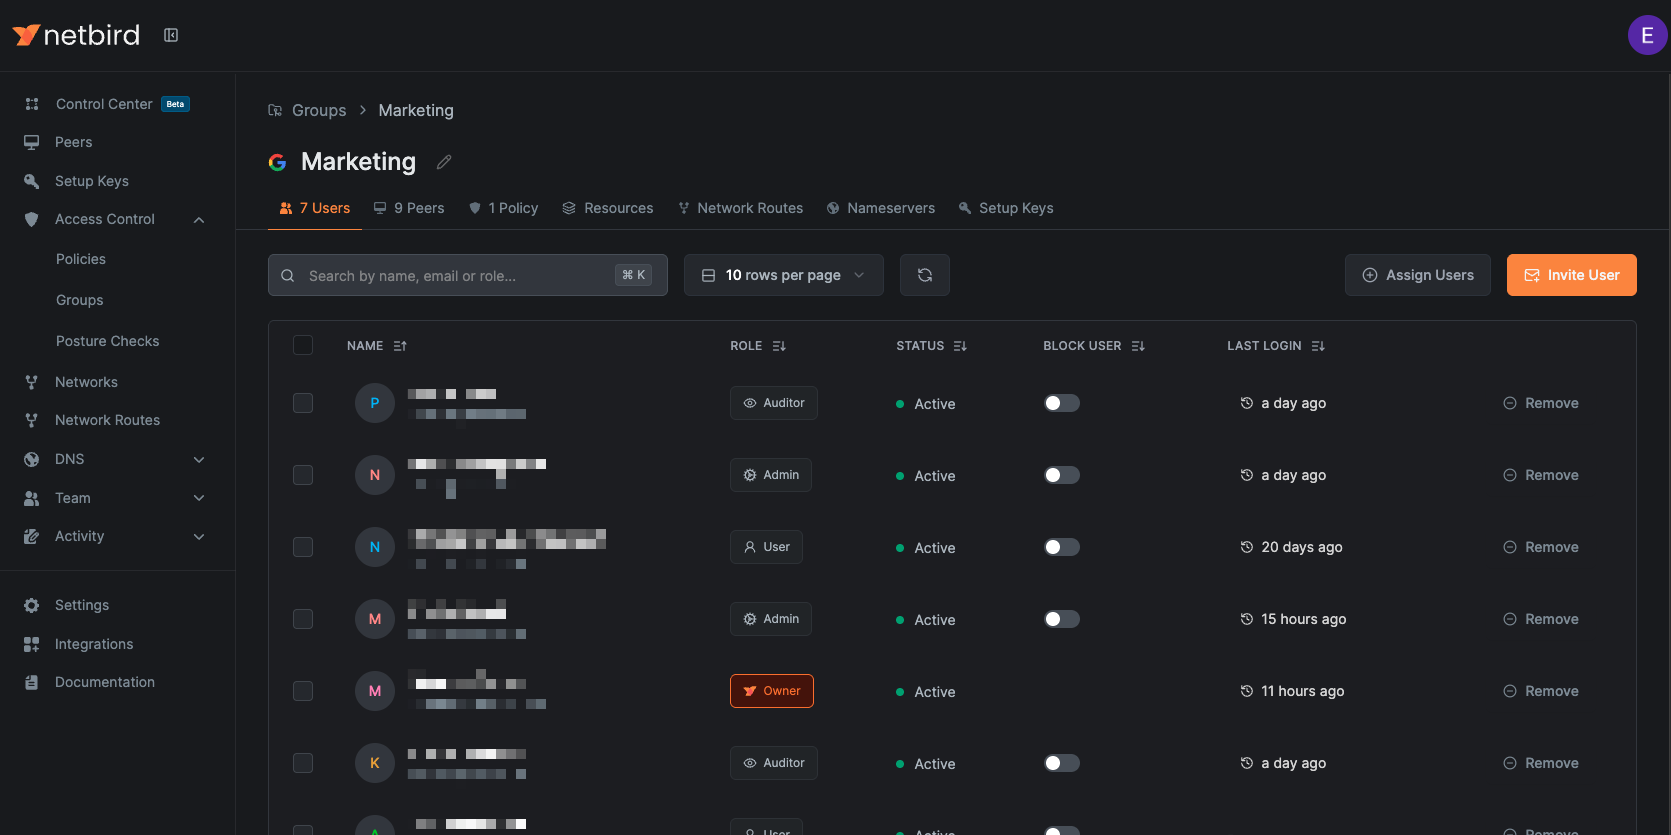
Group Details
Navigate to Access Control > Groups and then click on any group name to view detailed information and manage associated objects:
- Users: View, assign, or invite users to this group
- Peers: Manage which peers are assigned to this group
- Policies: See policies where this group is used as a source or destination
- Network Resources: View associated resources from networks
- Routes: See routes using this group (either part of the distribution, access control, or routing peer group)
- Nameservers: View nameservers using this group as a distribution group
- Setup Keys: See setup keys with this group as an auto-assigned group
Renaming Groups
- Navigate to
Access Control>Groups - Click the dropdown button (⋮) next to the group you want to rename
- Select
Rename - Enter the new name and click
Save
Groups synchronized from Identity Providers (Google Workspace, Entra ID, etc.) cannot be renamed.
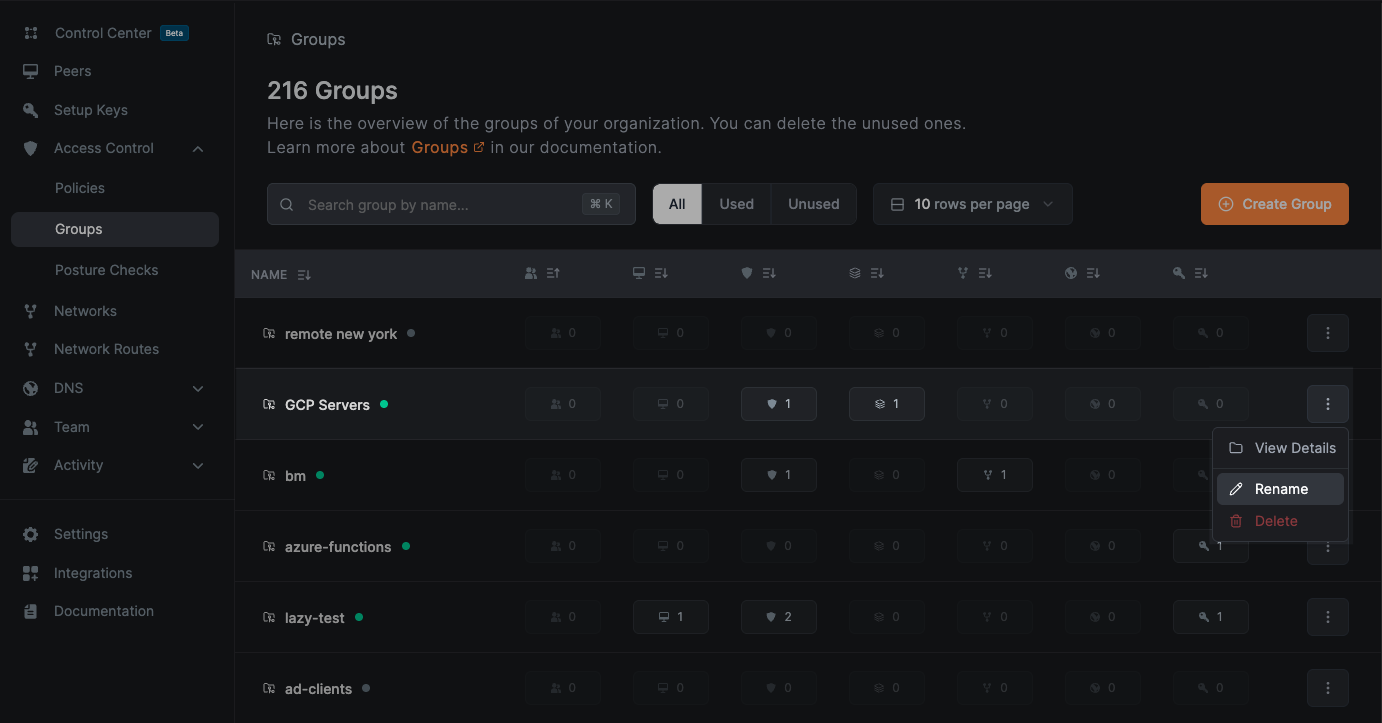
Deleting Groups
- Navigate to
Access Control>Groups - Click the dropdown button (⋮) next to the group you want to delete
- Select
Delete - Confirm the action by clicking
Deletein the confirmation dialog
Groups synchronized from Identity Providers (Google Workspace, Entra ID, etc.) cannot be deleted.
Groups with active dependencies cannot be deleted. First remove all dependencies in order to delete the group.