Add Servers to the Network with Setup Keys
For DevOps teams managing complex infrastructures, adding new servers or containers to the network is a persistent challenge. Traditionally, manual configuration and individual setup processes have been the norm, often leading to time-consuming, error-prone, and potentially insecure deployments.
The problem with conventional server and container network integration methods includes:
- Time-Intensive Setup: Manually configuring each new server or container for network access can be tedious and time-consuming, especially in rapidly scaling environments.
- Scalability Limitations: As infrastructure grows, the complexity of managing network access for numerous servers and containers increases exponentially.
- Security Risks: Manual processes can lead to human errors, potentially exposing servers to unauthorized access or creating security loopholes in the network.
This guide introduces NetBird's Setup Keys as an elegant solution for seamlessly and securely adding servers and containers to your network by:
- Streamlining Deployment: Providing a simple, automated way to connect new servers and containers to your NetBird network with minimal manual intervention.
- Facilitating Scalability: Enabling rapid expansion of your network infrastructure without compromising on security or operational efficiency.
- Enhancing Security: Implementing a secure, automated process that reduces the risk of human error and unauthorized access, strengthening your overall security posture.
This approach significantly reduces deployment time, ensures consistent and secure network configurations, and supports seamless scalability.
Let's dive into the step-by-step process of using NetBird's Setup Keys to securely add a server with a Docker container to your network.
Prerequisites
For this tutorial, you'll need the following prerequisites:
- A NetBird account
- The NetBird agent installed in your local machine
- A cloud-hosted virtual machine (VM) with SSH access
- Docker installed on the cloud VM
With these prerequisites in place, you'll be prepared to set up a secure network connection using NetBird's Setup Keys by:
- Creating a Setup Key in your NetBird account
- Provisioning a VM and installing NetBird using the Setup Key
- Deploying a Docker container on the VM
- Connecting the Docker container to the NetBird network using the Setup Key
This process will demonstrate how Setup Keys simplify and secure the addition of new servers and containers to your NetBird network.
Creating a Setup Key in Your NetBird Account
To seamlessly integrate virtual machines or Docker containers into your NetBird network, you'll start by creating a setup key. While NetBird's documentation offers comprehensive guidance on this process, let's quickly review the essential steps:
- Access your NetBird dashboard
- Navigate to
Settings→Setup Keys - Click the
Create Setup Keybutton on the right - Name your key (e.g., "VM-Docker-Demo")
- Set an expiration date (recommended for enhanced security)
- Configure auto-assigned groups if needed
- Click
Create Setup Keyto generate the setup key - Copy the generated key and store it securely as you'll need it for the next steps
Here's an example:
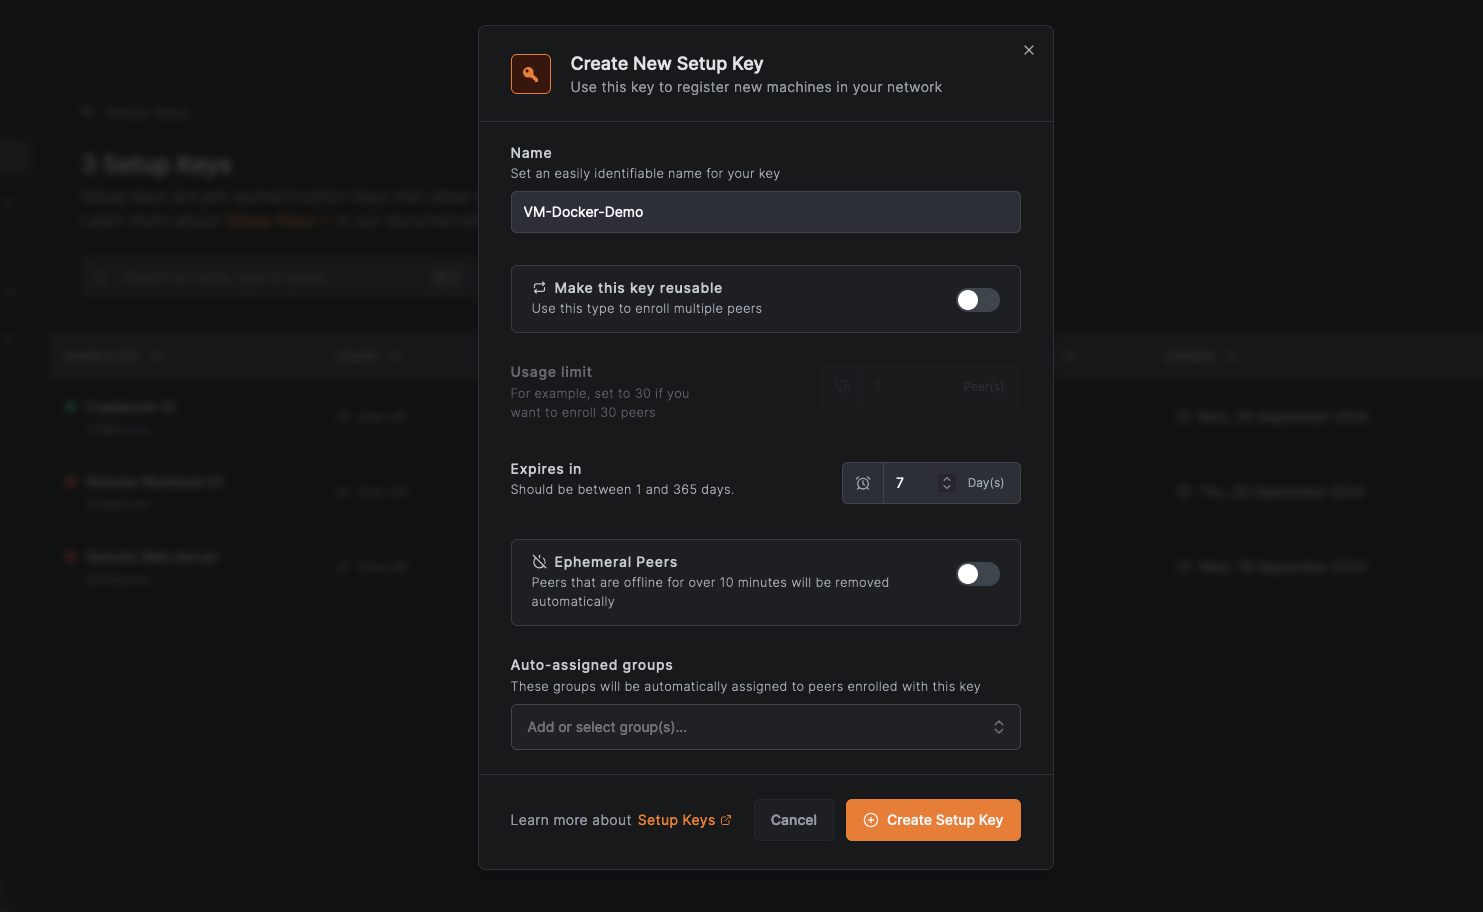
This setup key will serve as your secure passport for adding both your VM and Docker container to the NetBird network, ensuring a consistent integration process.
The Setup Key expiration date applies only to the key's validity period for adding new peers to the network. Once a peer is connected using the setup key, the expiration date does not affect the peer's network access.
Provisioning a VM and Installing NetBird Using the Setup Key
After creating your setup key, the next step is to provision your VM and install NetBird:
- SSH into your cloud-hosted VM
- Install NetBird by running:
curl -fsSL https://pkgs.netbird.io/install.sh | sh
Once installation completes, connect to the NetBird network using your setup key:
netbird up --setup-key <YOUR_SETUP_KEY>
Verify NetBird's status:
netbird status
You should see output confirming the connection status, assigned IP, and peer information.
OS: linux/amd64
Daemon version: 0.29.4
CLI version: 0.29.4
Management: Connected
Signal: Connected
Relays: 2/2 Available
Nameservers: 0/0 Available
FQDN: docker-vm.netbird.cloud
NetBird IP: 100.85.148.249/16
Interface type: Kernel
Quantum resistance: false
Routes: -
Peers count: 0/0 Connected
You can also check the NetBird service status by running:
sudo systemctl status netbird
This should show the service as active and running.
● netbird.service - A WireGuard-based mesh network that connects your devices into a single private network.
     Loaded: loaded (/etc/systemd/system/netbird.service; enabled; vendor preset: enabled)
     Active: active (running) since Tue 2024-09-24 19:22:56 UTC; 52s ago
   Main PID: 3819 (netbird)
      Tasks: 7 (limit: 1011)
     Memory: 26.3M
        CPU: 113ms
     CGroup: /system.slice/netbird.service
             └─3819 /usr/bin/netbird service run --config /etc/netbird/config.json --log-level info --daemon-ad
Next, ensure NetBird starts automatically on boot:
sudo systemctl enable netbird
Finally, log into your NetBird dashboard and navigate to Peers to confirm your VM is listed and connected.
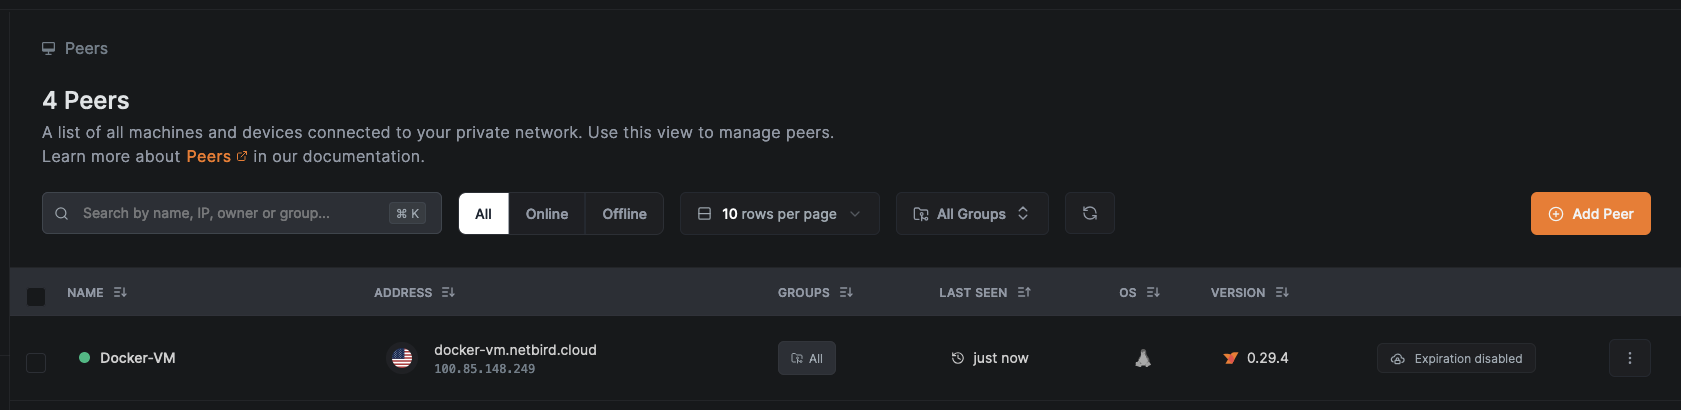
By using the setup key, you've securely added your VM to the NetBird network with minimal manual configuration, demonstrating the efficiency and security benefits of this approach.
Deploying a Docker Container on the VM
To test NetBird's secure point-to-point connection, we'll deploy a simple Docker container with a Nginx-based web server serving a welcome page.
Create a directory for the Docker project:
mkdir netbird-demo && cd netbird-demo
Create a HTML file with the welcome message:
echo "<html><body><h1>Welcome to NetBird Demo</h1><p>If you can see this, you've successfully connected to the container via NetBird.</p></body></html>" > index.html
Create a Dockerfile:
cat << EOF > Dockerfile
FROM nginx:alpine
COPY index.html /usr/share/nginx/html/index.html
EOF
Next, build and run the Docker container using the commands:
docker build -t netbird-demo .
docker run -d --name netbird-demo-container -p 8080:80 netbird-demo
Notice that the container is accessible on port 8080 of the VM. You'll use this port to test the connection.
Connecting the Docker Container to the NetBird Network Using the Setup Key
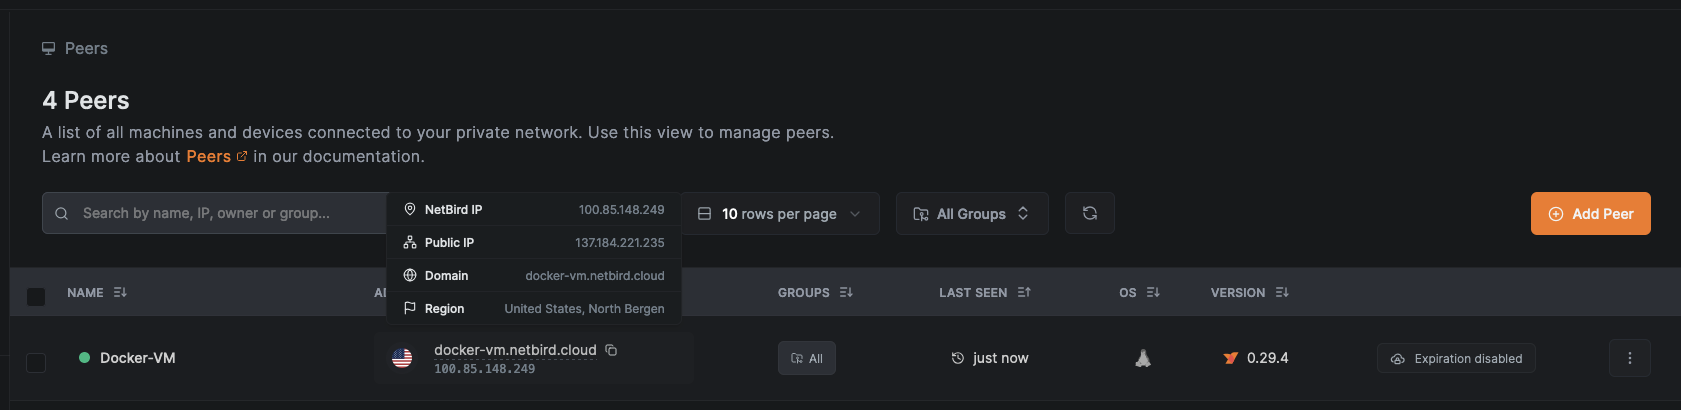
Now that your VM is connected to the NetBird secure network, you can verify the connection using either curl or your web browser. Simply use the NetBird-assigned IP address or domain for the VM to access the deployed web server.
To locate the NetBird-assigned IP or domain, go to Peers in your NetBird dashboard and hover your cursor over the VM's name.
Verify connectivity to the VM from any NetBird-connected device using:
curl http://<NETBIRD_IP>:8080
The expected output should be similar to the following:
$ curl 100.85.148.249:8080
<html><body><h1>Welcome to NetBird Demo</h1><p>If you can see this, you've successfully connected to the container via NetBird.</p></body></html>
Alternatively, you can go to http://VM_NETBIRD_DOMAIN:8080 using your browser:
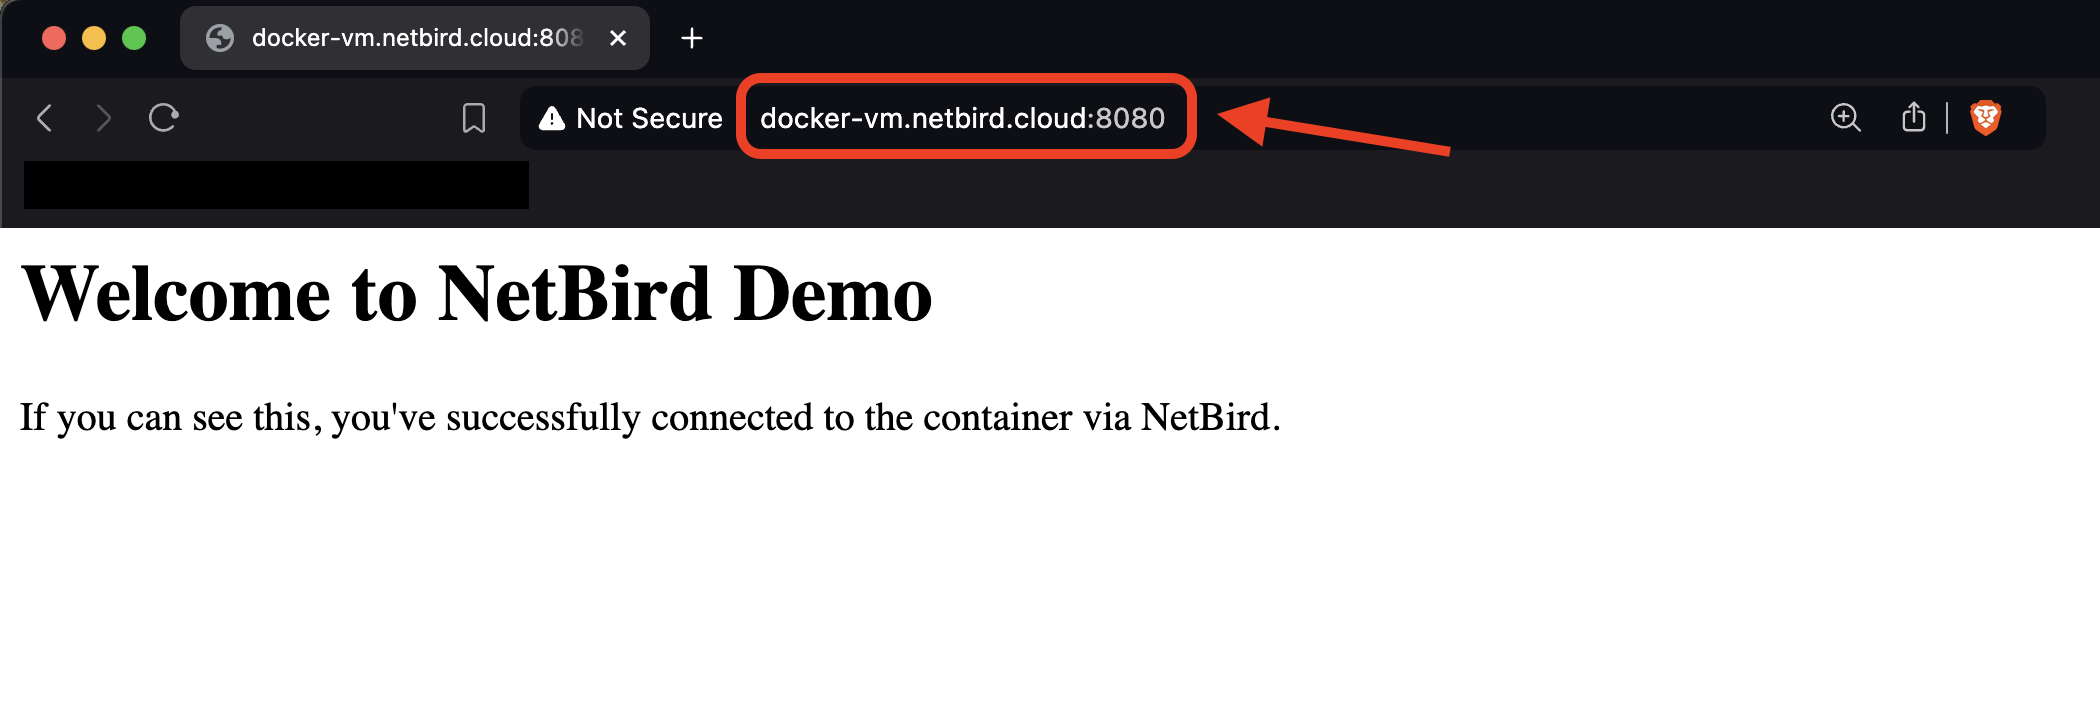
Keep in mind that this tutorial used the default All group for simplicity. However, implementing NetBird's Access Policy to restrict peer-to-peer connections to specific user groups is a best practice for gaining granular control over resource access, thus improving your network's overall security posture in various scenarios.
Optional: Automating SSH Access to Your VM
To further enhance your network security, you can enable SSH access to your VM via an embedded NetBird SSH server. This feature allows you to securely access your VM with SSH without exposing it to the public internet and without the need for distributing and managing SSH keys. To enable NetBird SSH access, run the following command on your VM:
netbird up --allow-server-ssh
You can then use the NetBird SSH client to connect to your VM:
sudo netbird ssh <NETBIRD_DOMAIN | NETBIRD_IP>
Summing up, NetBird's setup keys solve the challenge of securely connecting unattended resources, streamlining the integration of servers and containers without user intervention. For those looking to scale, the NetBird API offers powerful automation capabilities, allowing programmatic management of peers, setup keys, and access policies. These features combine to create a robust, secure, and easily manageable network infrastructure that adapts to your organization's needs.