Deploying NetBird with Intune
Microsoft Intune is a cloud-based endpoint management solution that manages user access to organizational resources and simplifies app and device management across multiple platforms, including Android, iOS/iPadOS, Linux, macOS, and Windows client devices. Working alongside Microsoft Entra ID (formerly Azure Active Directory), Intune forms a powerful identity and access management framework that organizations rely on to secure digital assets.
When combined, Intune and Microsoft Entra ID ensure that only managed and compliant devices can access email, Microsoft 365 services, Software as a service (SaaS) apps, and on-premises applications. This integration combines multiple security signals, such as user identity, device health, and location, to enforce organizational policies using Conditional Access capabilities.
NetBird enhances this security ecosystem by providing a WireGuard-based overlay network with Zero Trust Network Access capabilities. While Intune focuses on device compliance and application management, NetBird provides secure network connectivity through its point-to-point private network infrastructure. This creates a complementary security approach where:
- Intune verifies device compliance and manages application policies
- Entra ID provides identity verification and conditional access decisions
- NetBird establishes secure network pathways with granular access controls
This division of security responsibilities creates a comprehensive zero-trust implementation in which devices are verified as compliant before they can establish network connections to protected resources.
In this hands-on tutorial, you'll learn how to deploy NetBird with Intune to grant tailored access permissions for different teams.
Prerequisites
Before beginning this tutorial, ensure you have the following prerequisites in place:
- Complete the tutorial Provision Users and Groups From Microsoft Entra ID to ensure you can select Entra ID-managed users and groups within Intune.
- A NetBird account with administrative permissions to create and manage access policies.
- An active Microsoft Intune license (included with Microsoft 365 E3, E5, F1, F3, Enterprise Mobility + Security E3/E5, or Business Premium plans).
- An Intune admin user with at least the Policy and Profile Manager built-in role (Intune Administrator role recommended for full control over advanced features)
- At least one device (Windows, Mac, iPad, iPhone, Android, Linux) enrolled in Intune.
Setting Up NetBird Access Policies for Team-Specific Permissions
NetBird's Access Control Policies provide the foundation for implementing a zero-trust architecture with Intune. They enable you to define precise permissions based on user groups and resource categories. This ensures that team members can only access what they need for their specific roles.
These policies work in tandem with Intune's device compliance mechanisms, creating a powerful security layer where identity and device posture determine access rights to the network.
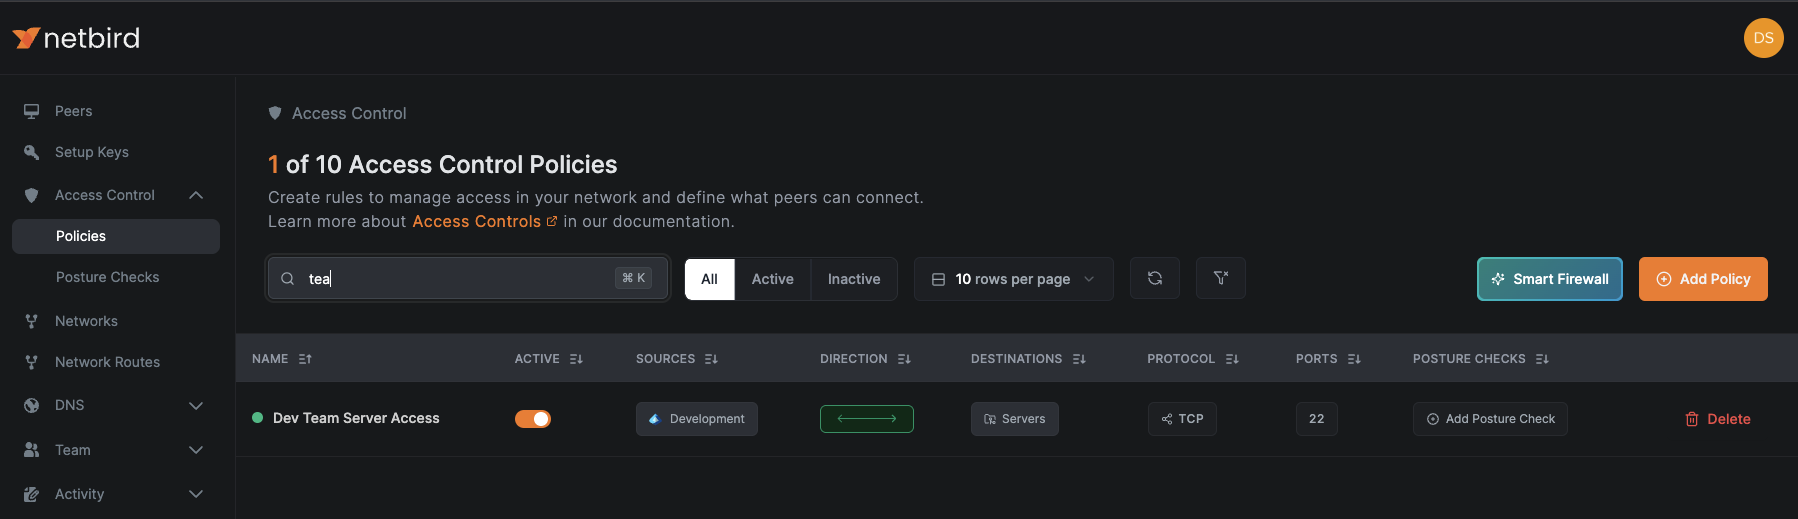
Let's create a policy that enables the Development team to access the Servers group.
- Log in to your NetBird management dashboard with administrative credentials
- Navigate to
Access Control > Policiesand click theAdd Policybutton in the upper right corner. - Set the source group to
Development(or the appropriate team group synchronized from Entra ID) and the destination group toServers - Configure the protocol and port settings based on required access patterns (e.g., TCP 22 for SSH access to servers)

Provide a descriptive name for the policy, such as "Dev Team Server Access" that indicates its purpose, and click Save to create and activate the policy.
This access policy will automatically apply to all devices enrolled in Intune that belong to users in the Development group (as synchronized from Entra ID), providing them secure access to designated resources while preventing lateral movement to unauthorized systems.
Moreover, users will only gain this network access when using compliant devices that meet your organization's security standards, creating a true zero-trust environment where user identity and device security status are verified before granting resource access.
Note: For maximum security, create separate policies rather than overly broad policies for each distinct access requirement. This approach minimizes your attack surface by ensuring precise access controls aligned with job responsibilities.
With these access policies in place, we can now proceed to configure the automated deployment of NetBird through Intune, ensuring that all team members have the required secure connectivity client installed on their devices.
Deploying NetBird as a Win32 App
Opt for Win32 app deployment over the Line-of-Business (LOB) method (described in the next section) when requiring advanced features such as specific detection rules, prerequisites, dependencies, or update supersedence.
Preparing the .intunewin File
.intunewin FileUsing the Win32 method requires you to convert either NetBird's .exe or .msi installer to the .intunewin format. Here's an overview of the procedure using the .exe installer:
- Download the Microsoft Win32 Content Prep Tool from GitHub
- Download your preferred NetBird Windows installer from the NetBird installation documentation
- Run the Content Prep Tool and follow the instructions to convert the NetBird installer to
.intunewinformat. You'll be asked about the source folder (usually where you downloaded the installer), the NetBird setup file you will use, and the output folder (where you want the.intunewinfile to be saved). - For detailed information on using the Win32 Content Prep Tool, refer to Microsoft's documentation.
Adding NetBird Win32 App to Intune Catalog
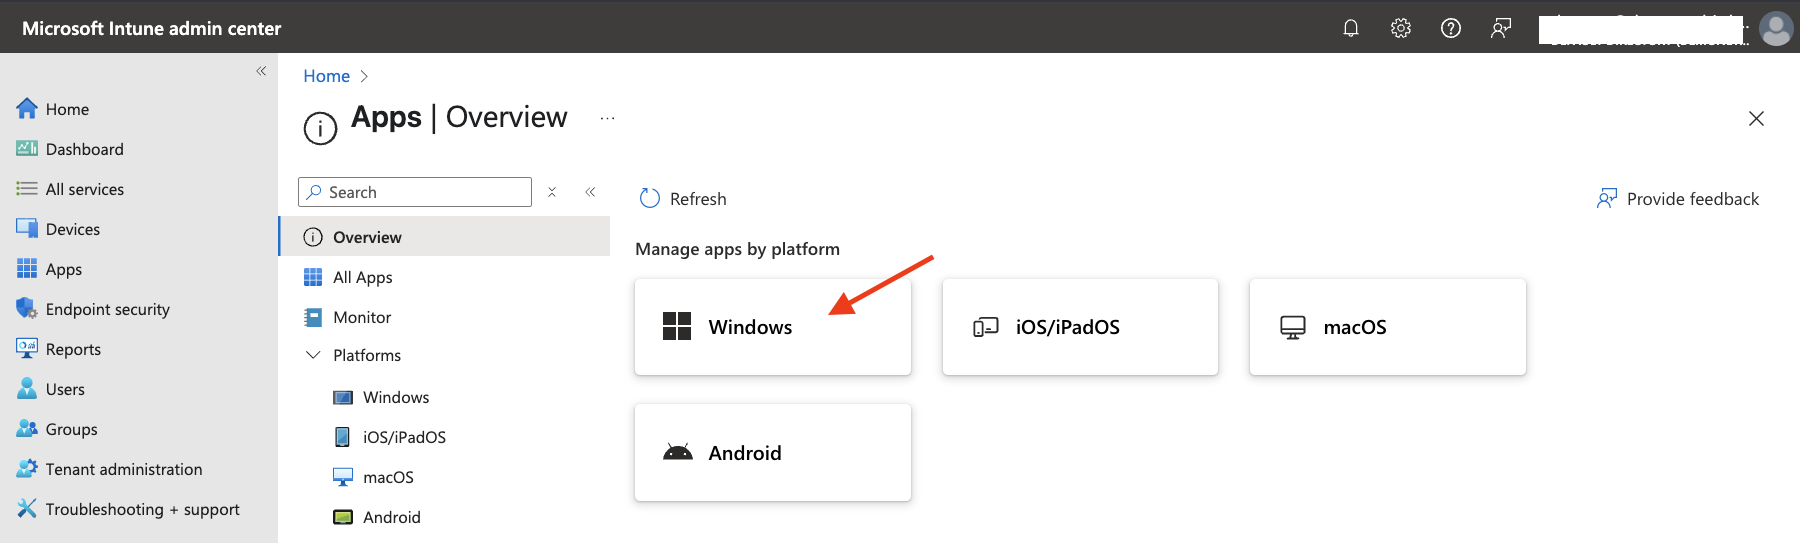
- Sign in to the Microsoft Intune admin center, navigate to
Apps, and click theWindowsbutton.
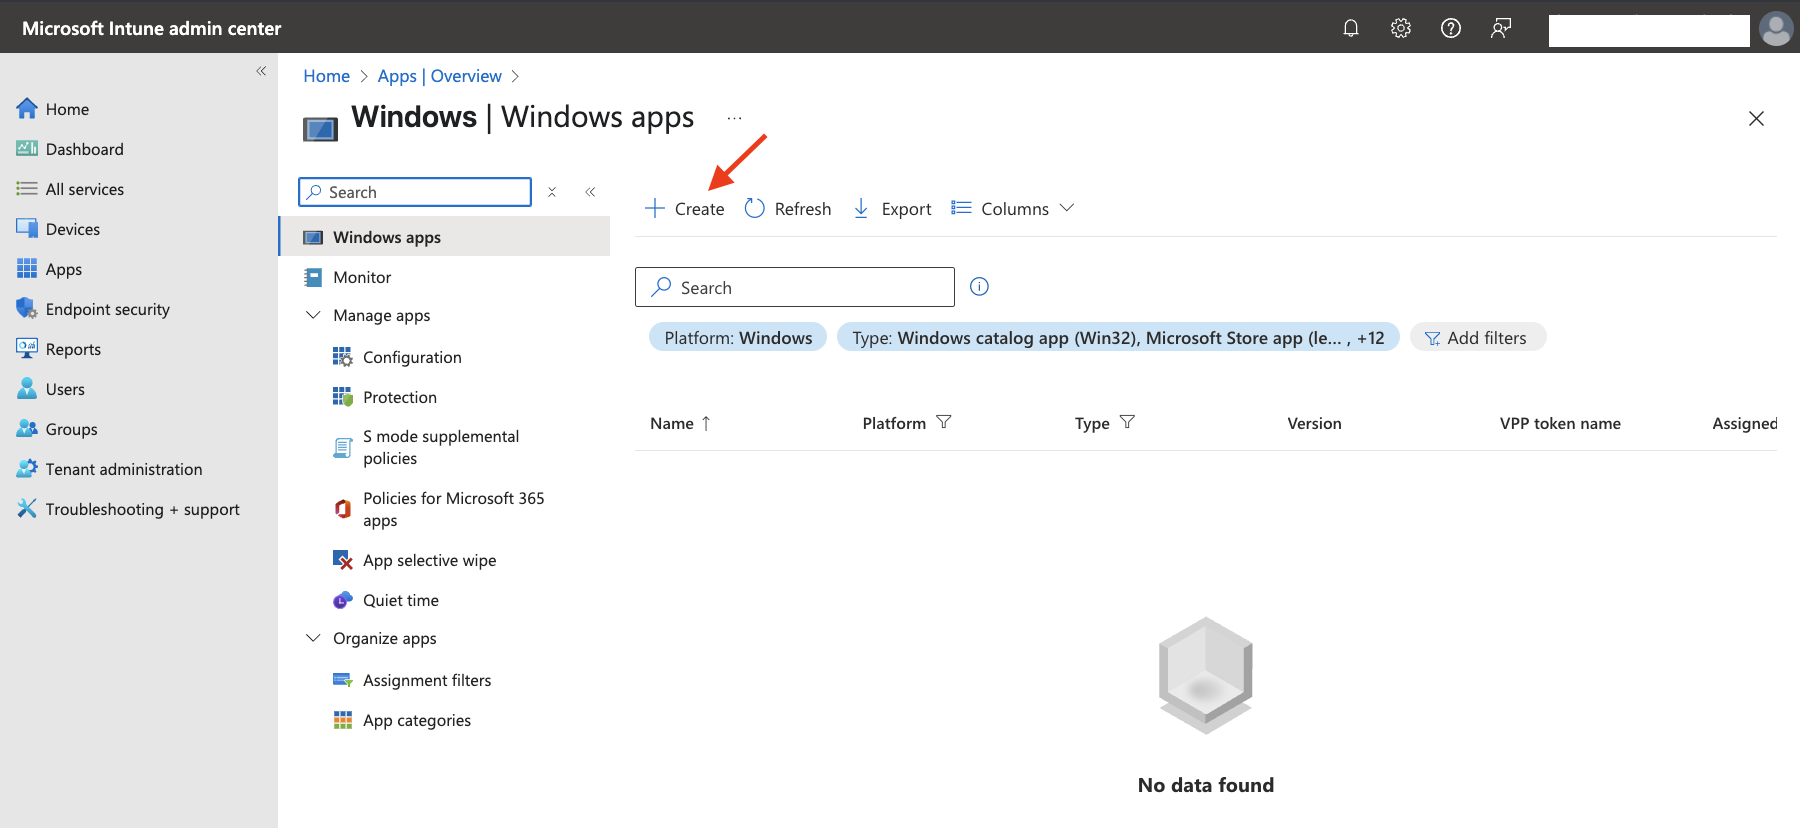
- Click the
+ Createbutton to add a new Windows application
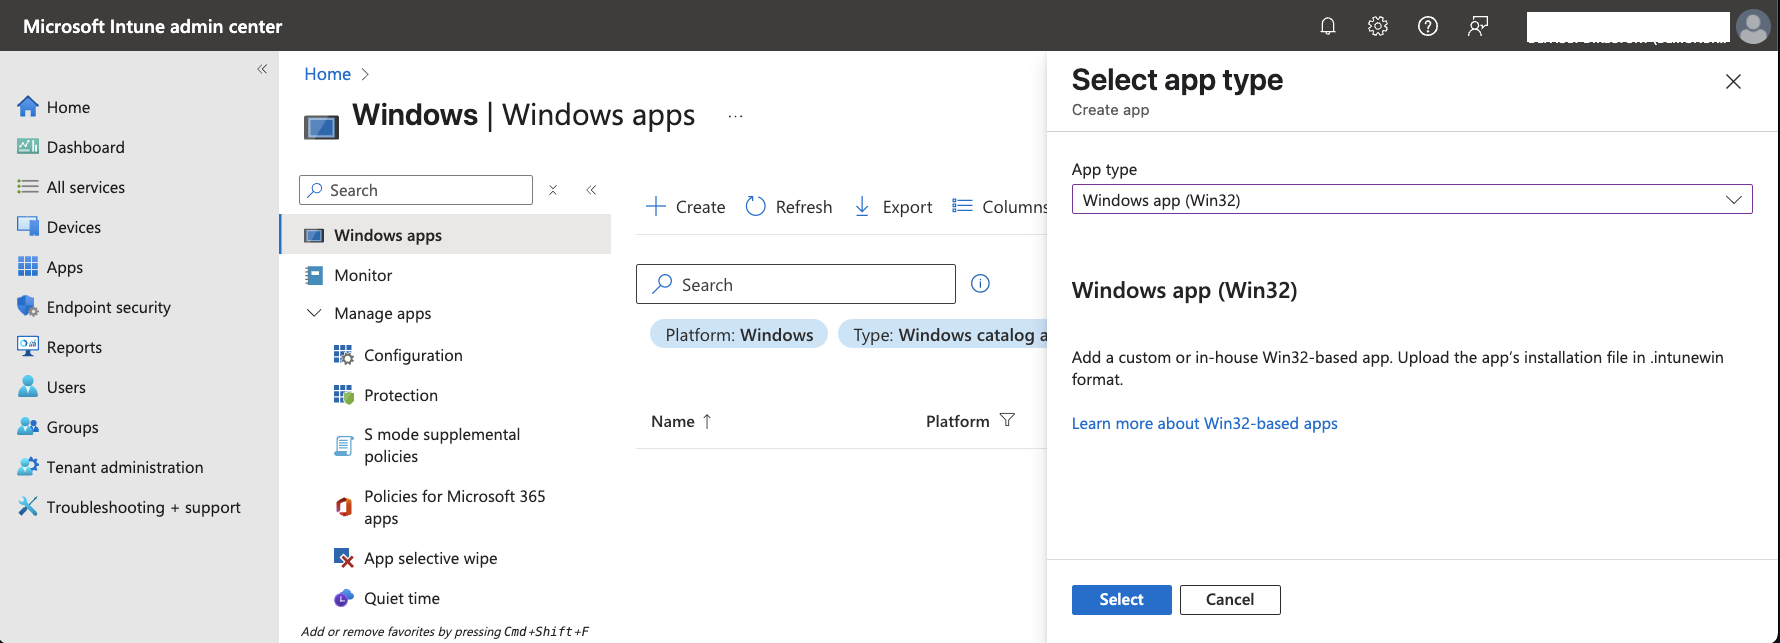
- In the
App typedropdown, selectWindows app (Win32)and clickSelect
-
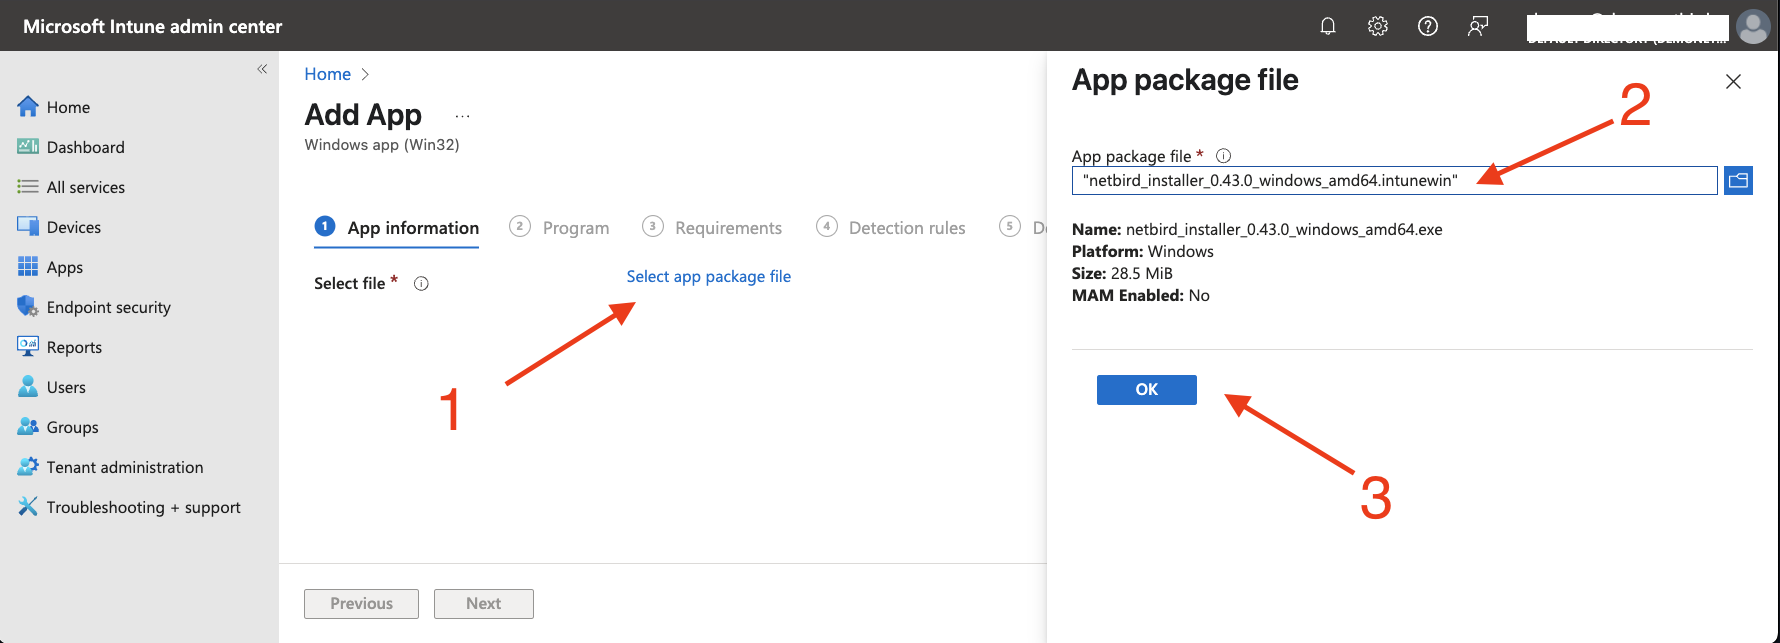
On the
Add Appscreen, clickSelect app package fileand browse to the location of the NetBird.intunewinfile you created earlier -
Select the
.intunewinfile and clickOK
-
On the
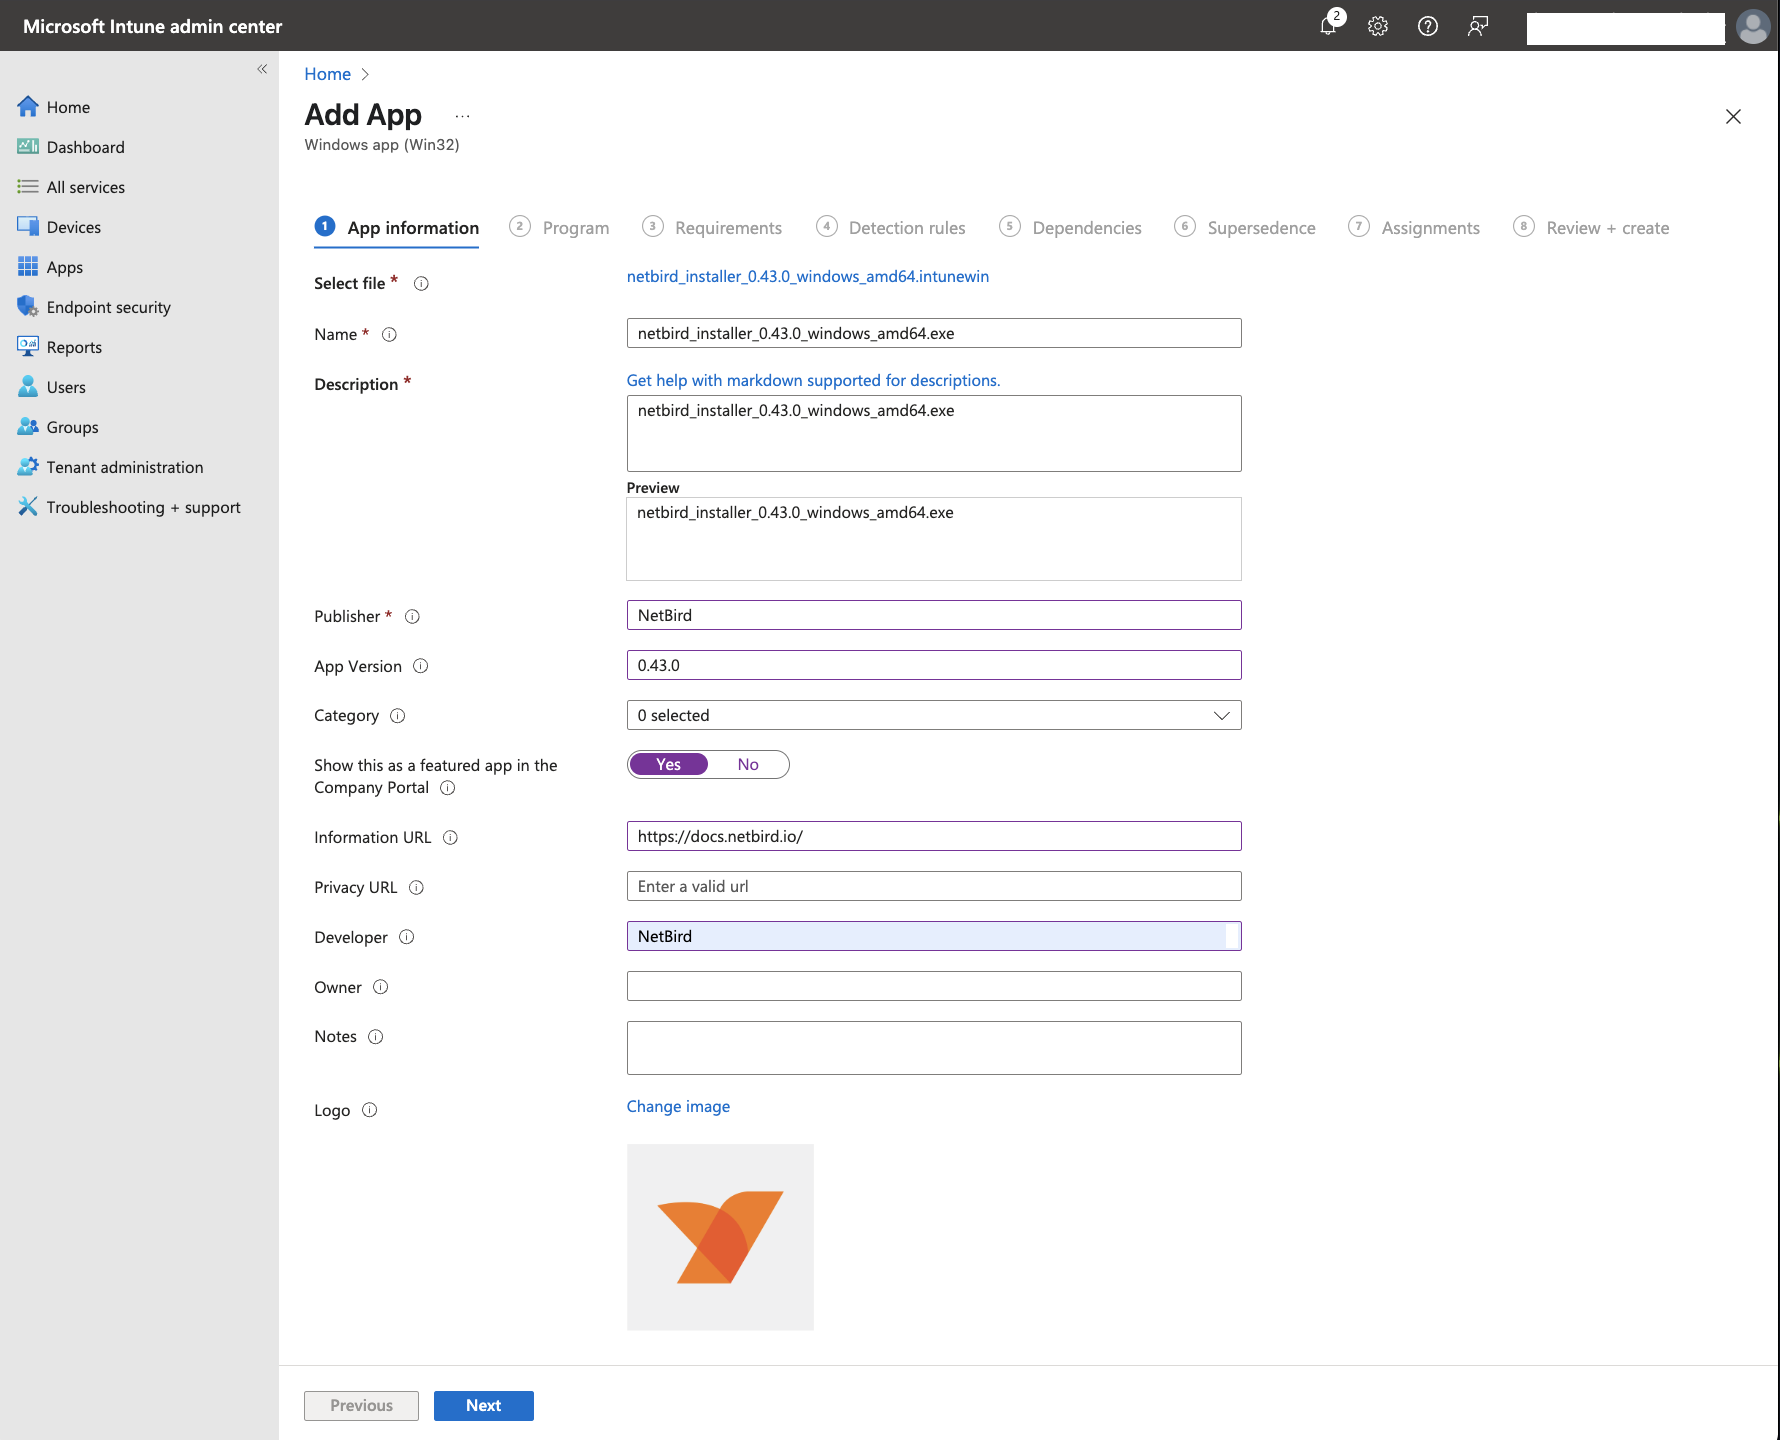
App informationtab, configure NetBird with the following values: -
Name: Leave the default file name
-
Description: Leave the default file name
-
Publisher: NetBird
-
App Version: Enter the current app version (optional)
-
Category: Select any category that fits your needs (optional)
-
Show this as a featured app in the Company Portal: Yes
-
Information URL: https://docs.netbird.io/
-
Developer: NetBird (optional)
You can leave the rest of the fields empty.
-
Click
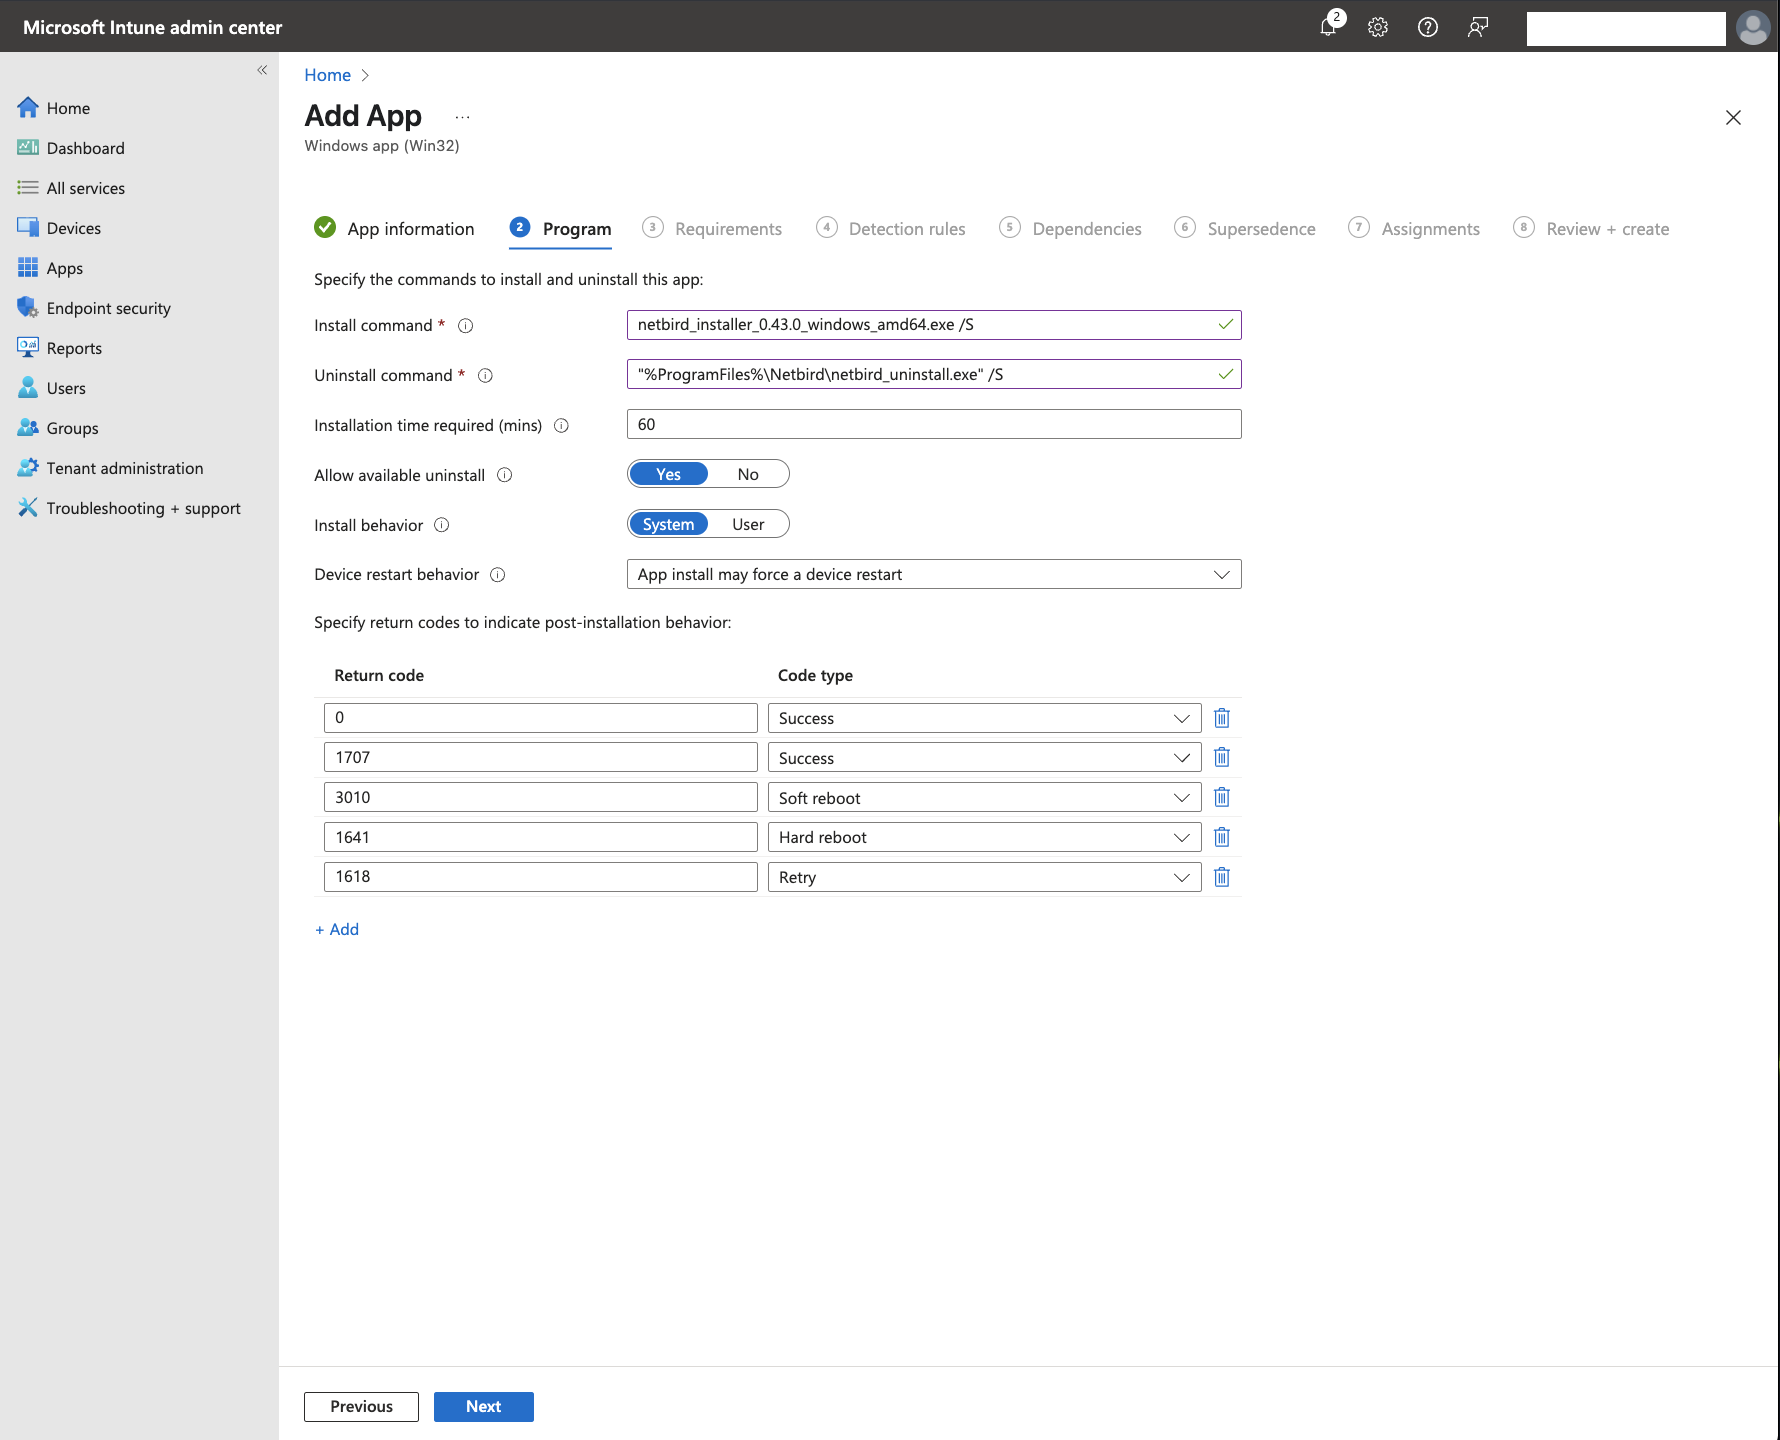
Nextto advance to theProgramtab. Use the following commands in the install and uninstall fields: -
Install command:
netbird_installer_0.43.0_windows_amd64.exe /S -
Uninstall command:
"%ProgramFiles%\Netbird\netbird_uninstall.exe" /S
Note: The commands above assume a standard installation using the
/Sflag to specify "silent mode". Change them accordingly if you require NetBird installed on a different path.
For this example, leave the rest of the configuration unchanged. Note that you can change the install behavior and users' ability to uninstall NetBird if required.
-
Click
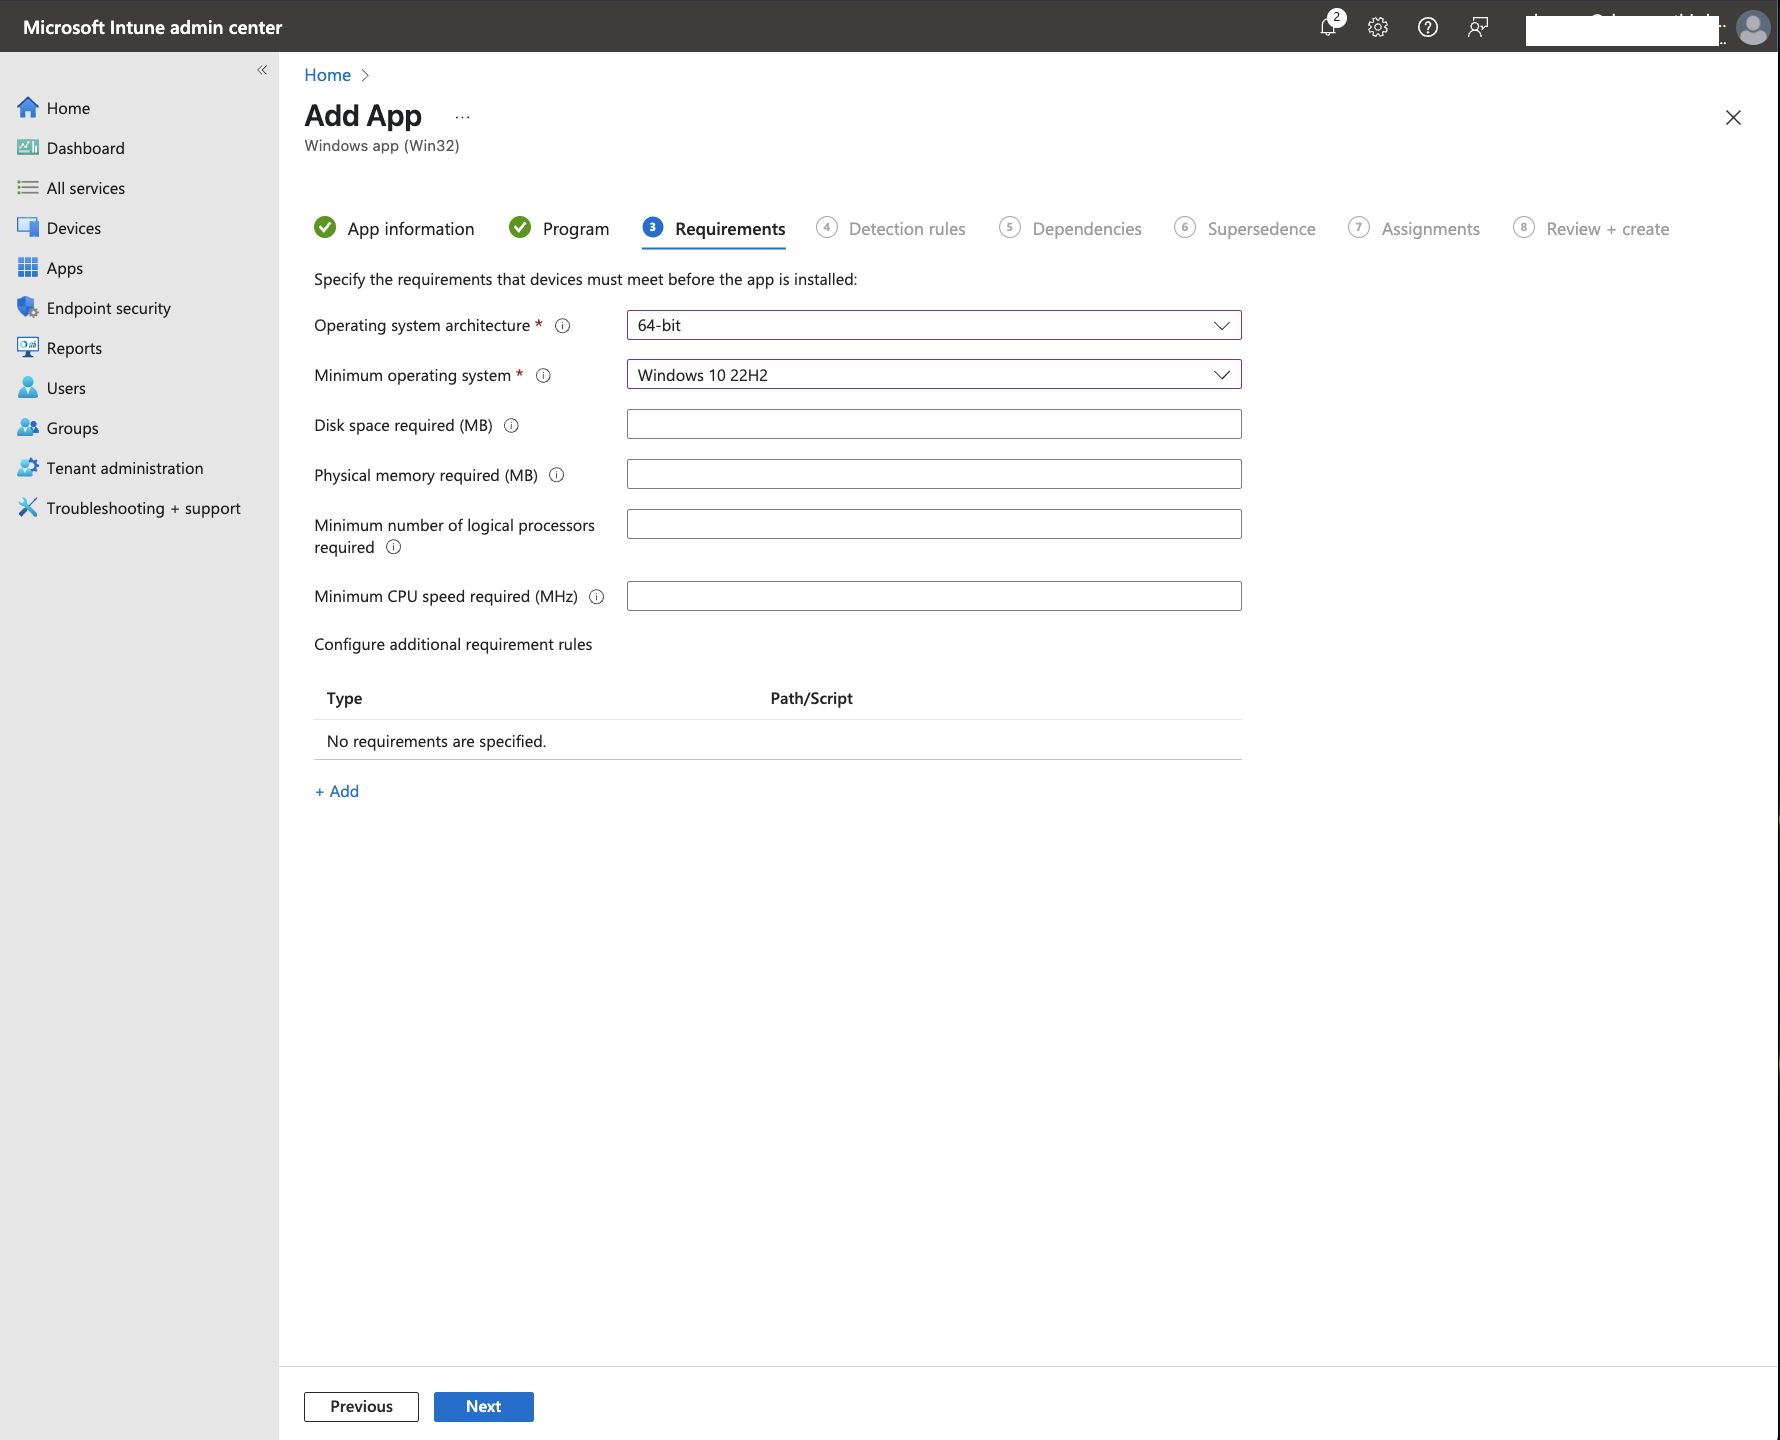
Nextto advance to theRequirementstab. Here you can specify the architecture and minimum OS version required for installing NetBird. For instance: -
Operating system architecture: 64-bit
-
Minimum operating system: Windows 10 22H2
-
Click
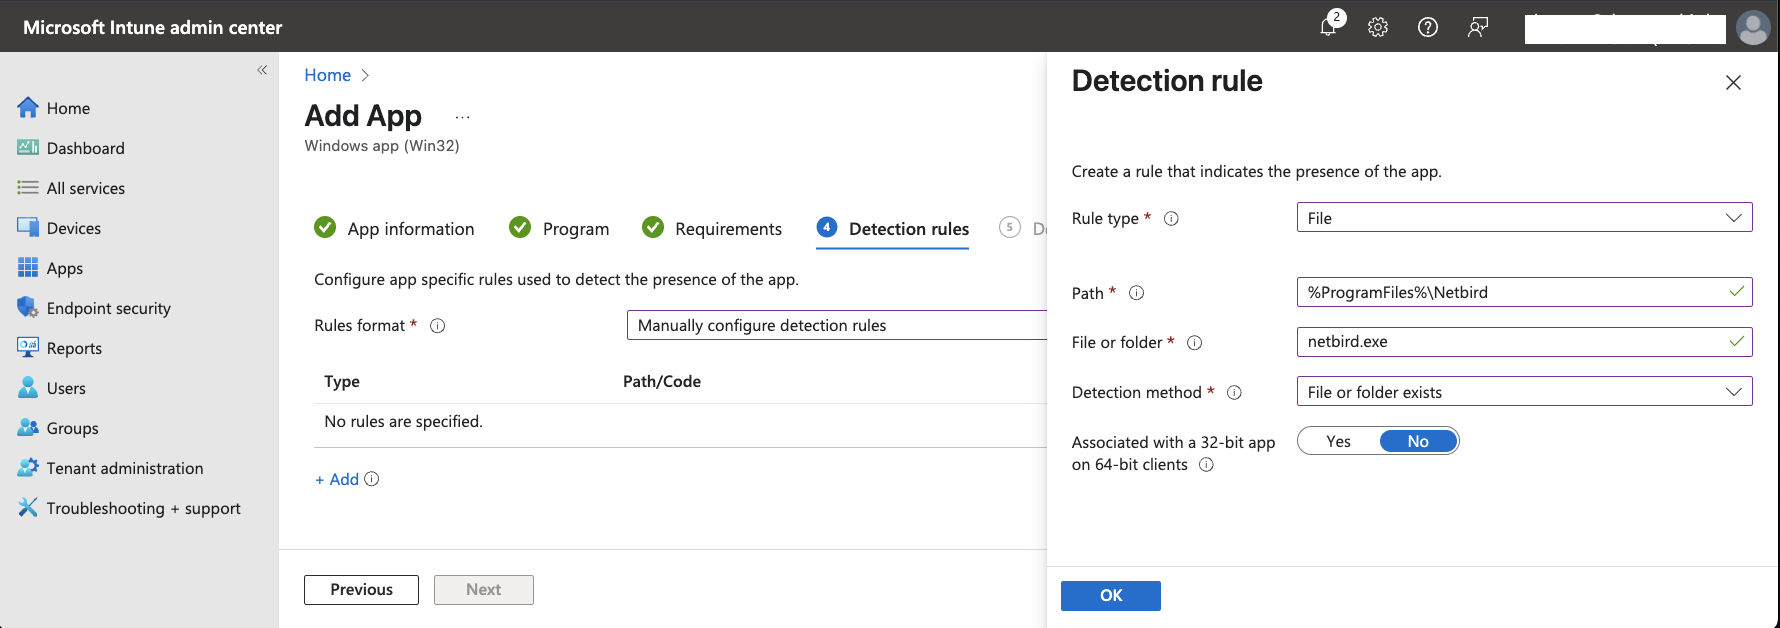
Nextto advance to theDetection rulestab. Intune lets you choose between using a custom detection script or manually configuring detection rules. Select the latter and configure it as follows: -
Rule type: File
-
Path:
%ProgramFiles%\Netbird -
File or folder:
netbird.exe -
Detection method: File or folder exists
-
Associated with a 32-bit app on 64-bit clients: No
Click OK when ready.
For examples on registry-based detection rules, refer to Intune documentation
-
Click
Nextto continue to theDependenciestab. In this tab, you can add any applications that must be installed before NetBird. For this demonstration, clickNextto continue. -
Intune's
Supersedencetab lets you choose between updating or entirely replacing any other specific application listed. ClickNextwithout adding any apps to skip the supersedence configuration for this deployment. -
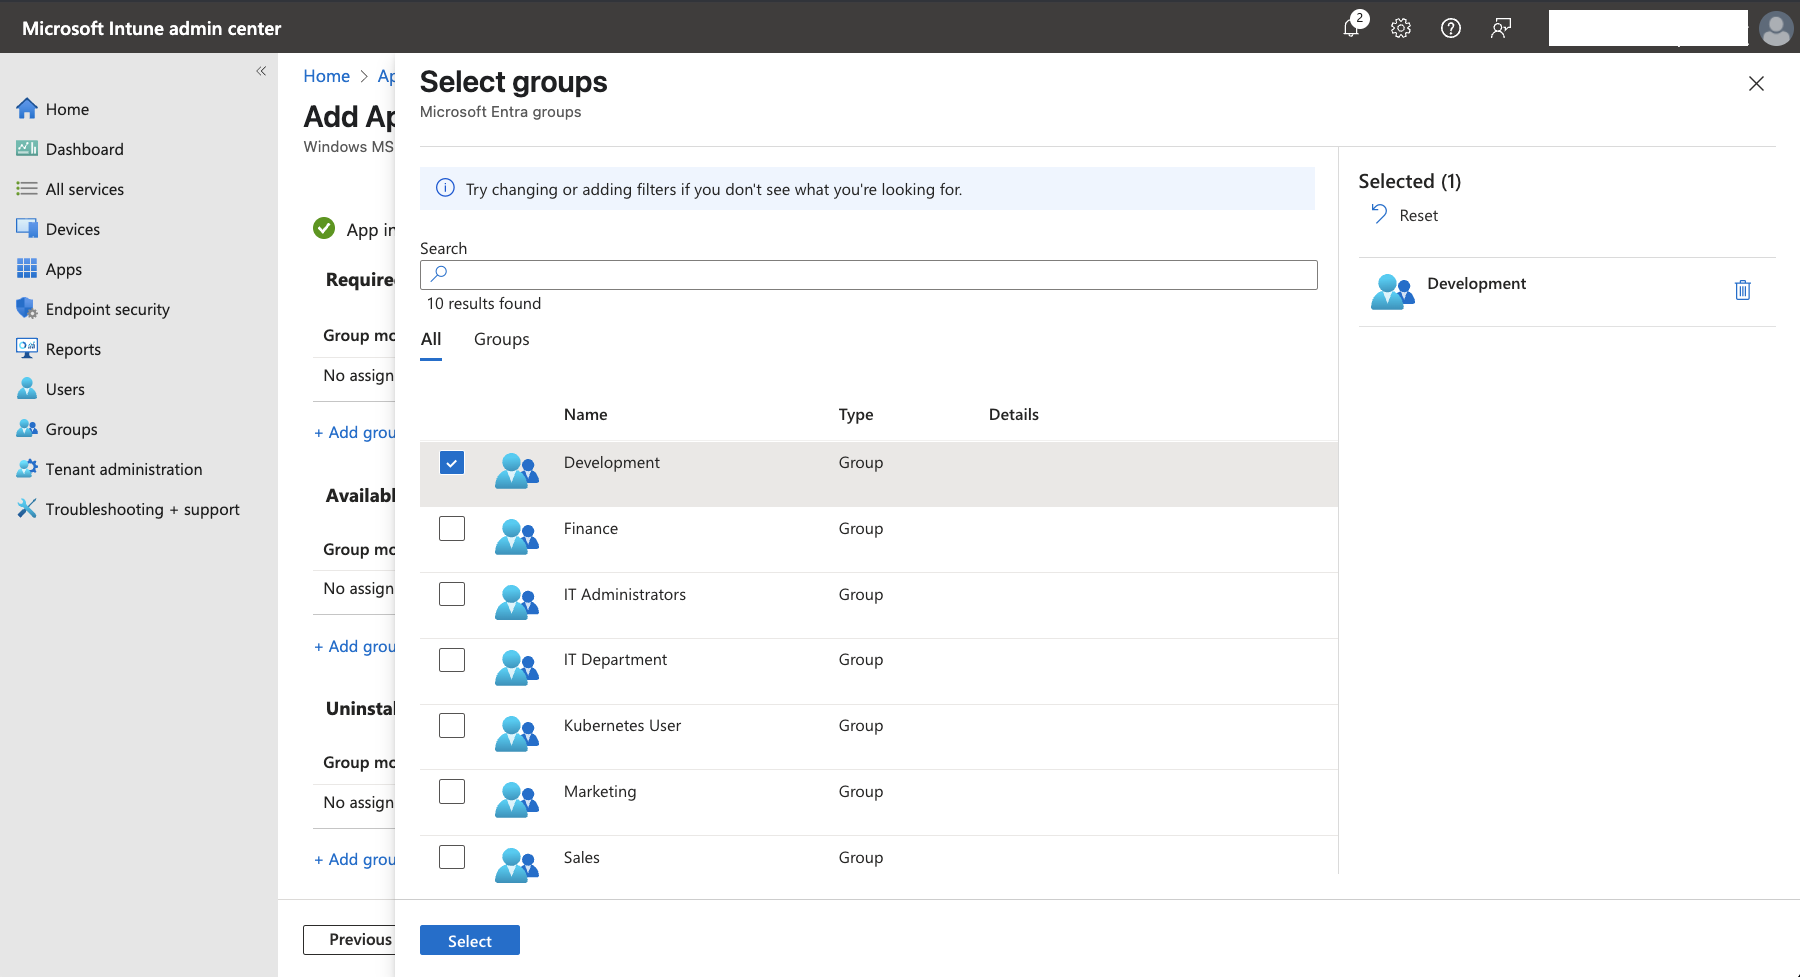
On the
Assignmentstab, underRequired, click+ Add group
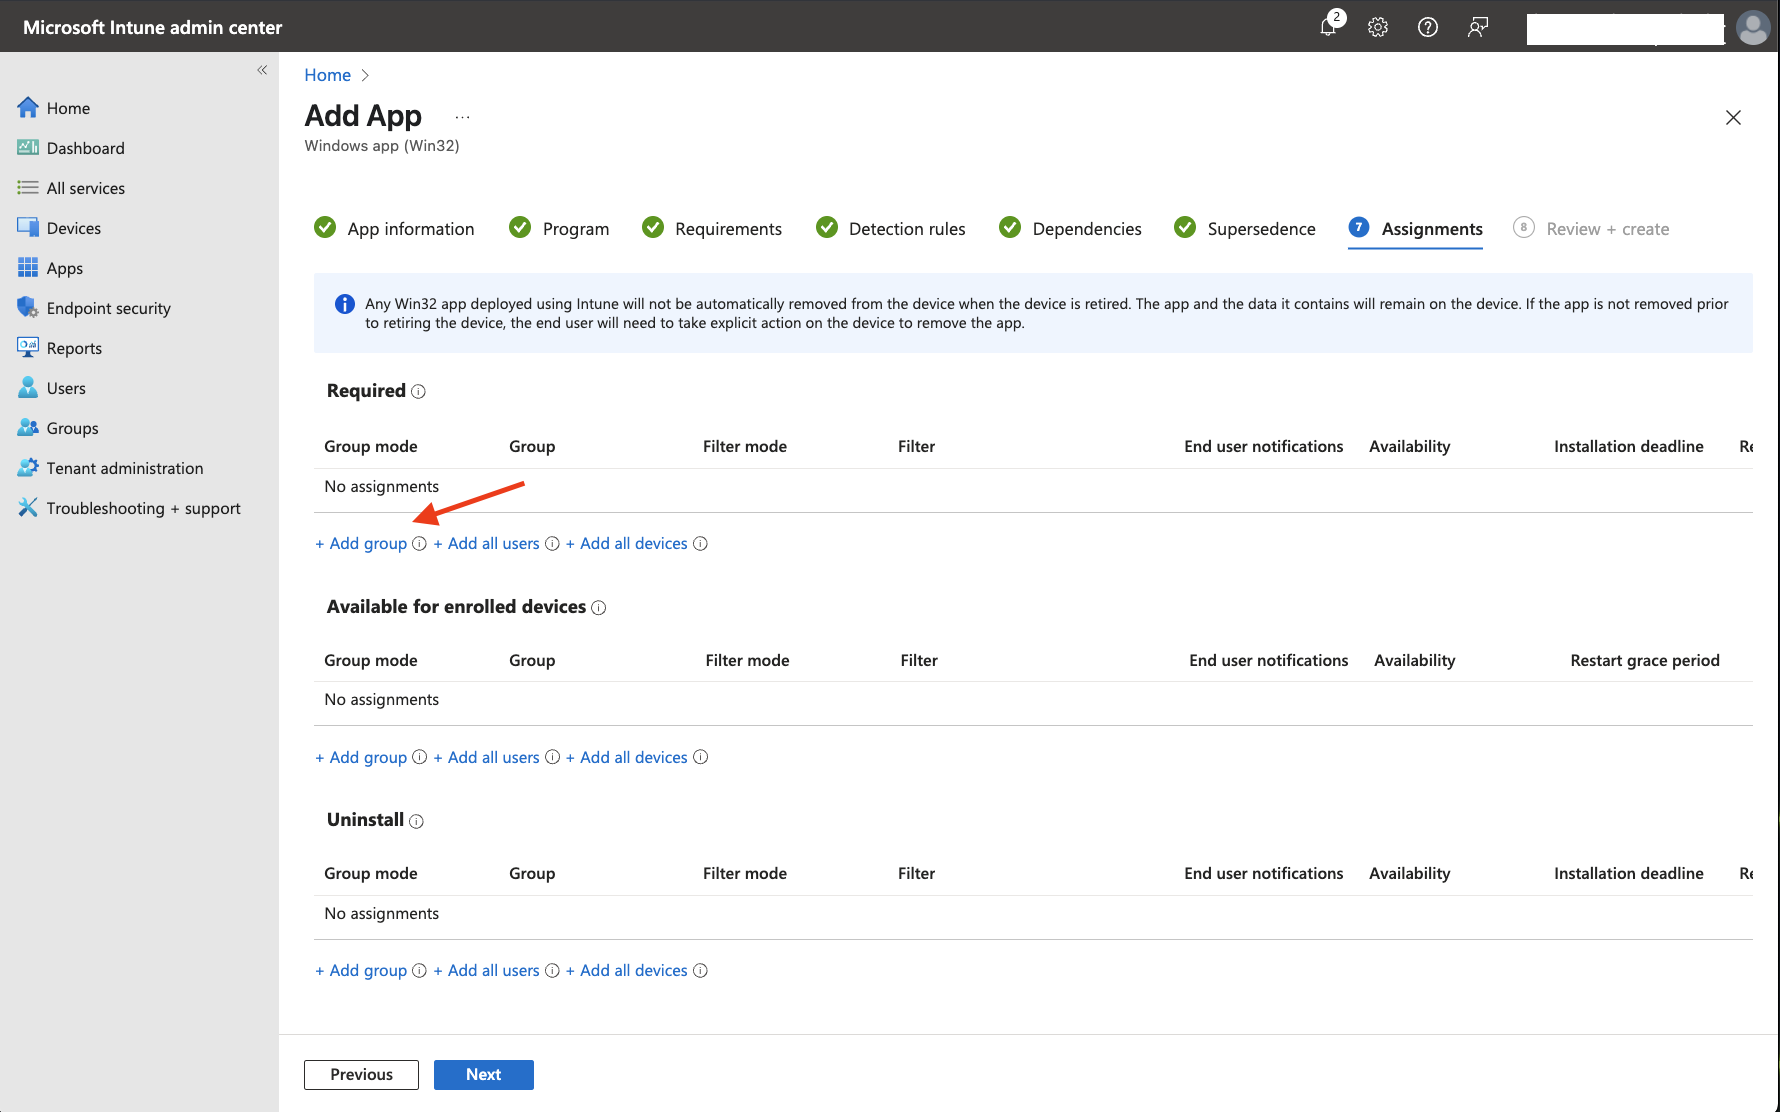
- Select the appropriate group that contains your users (like the
Developmentgroup synchronized from Entra ID) and clickSelect
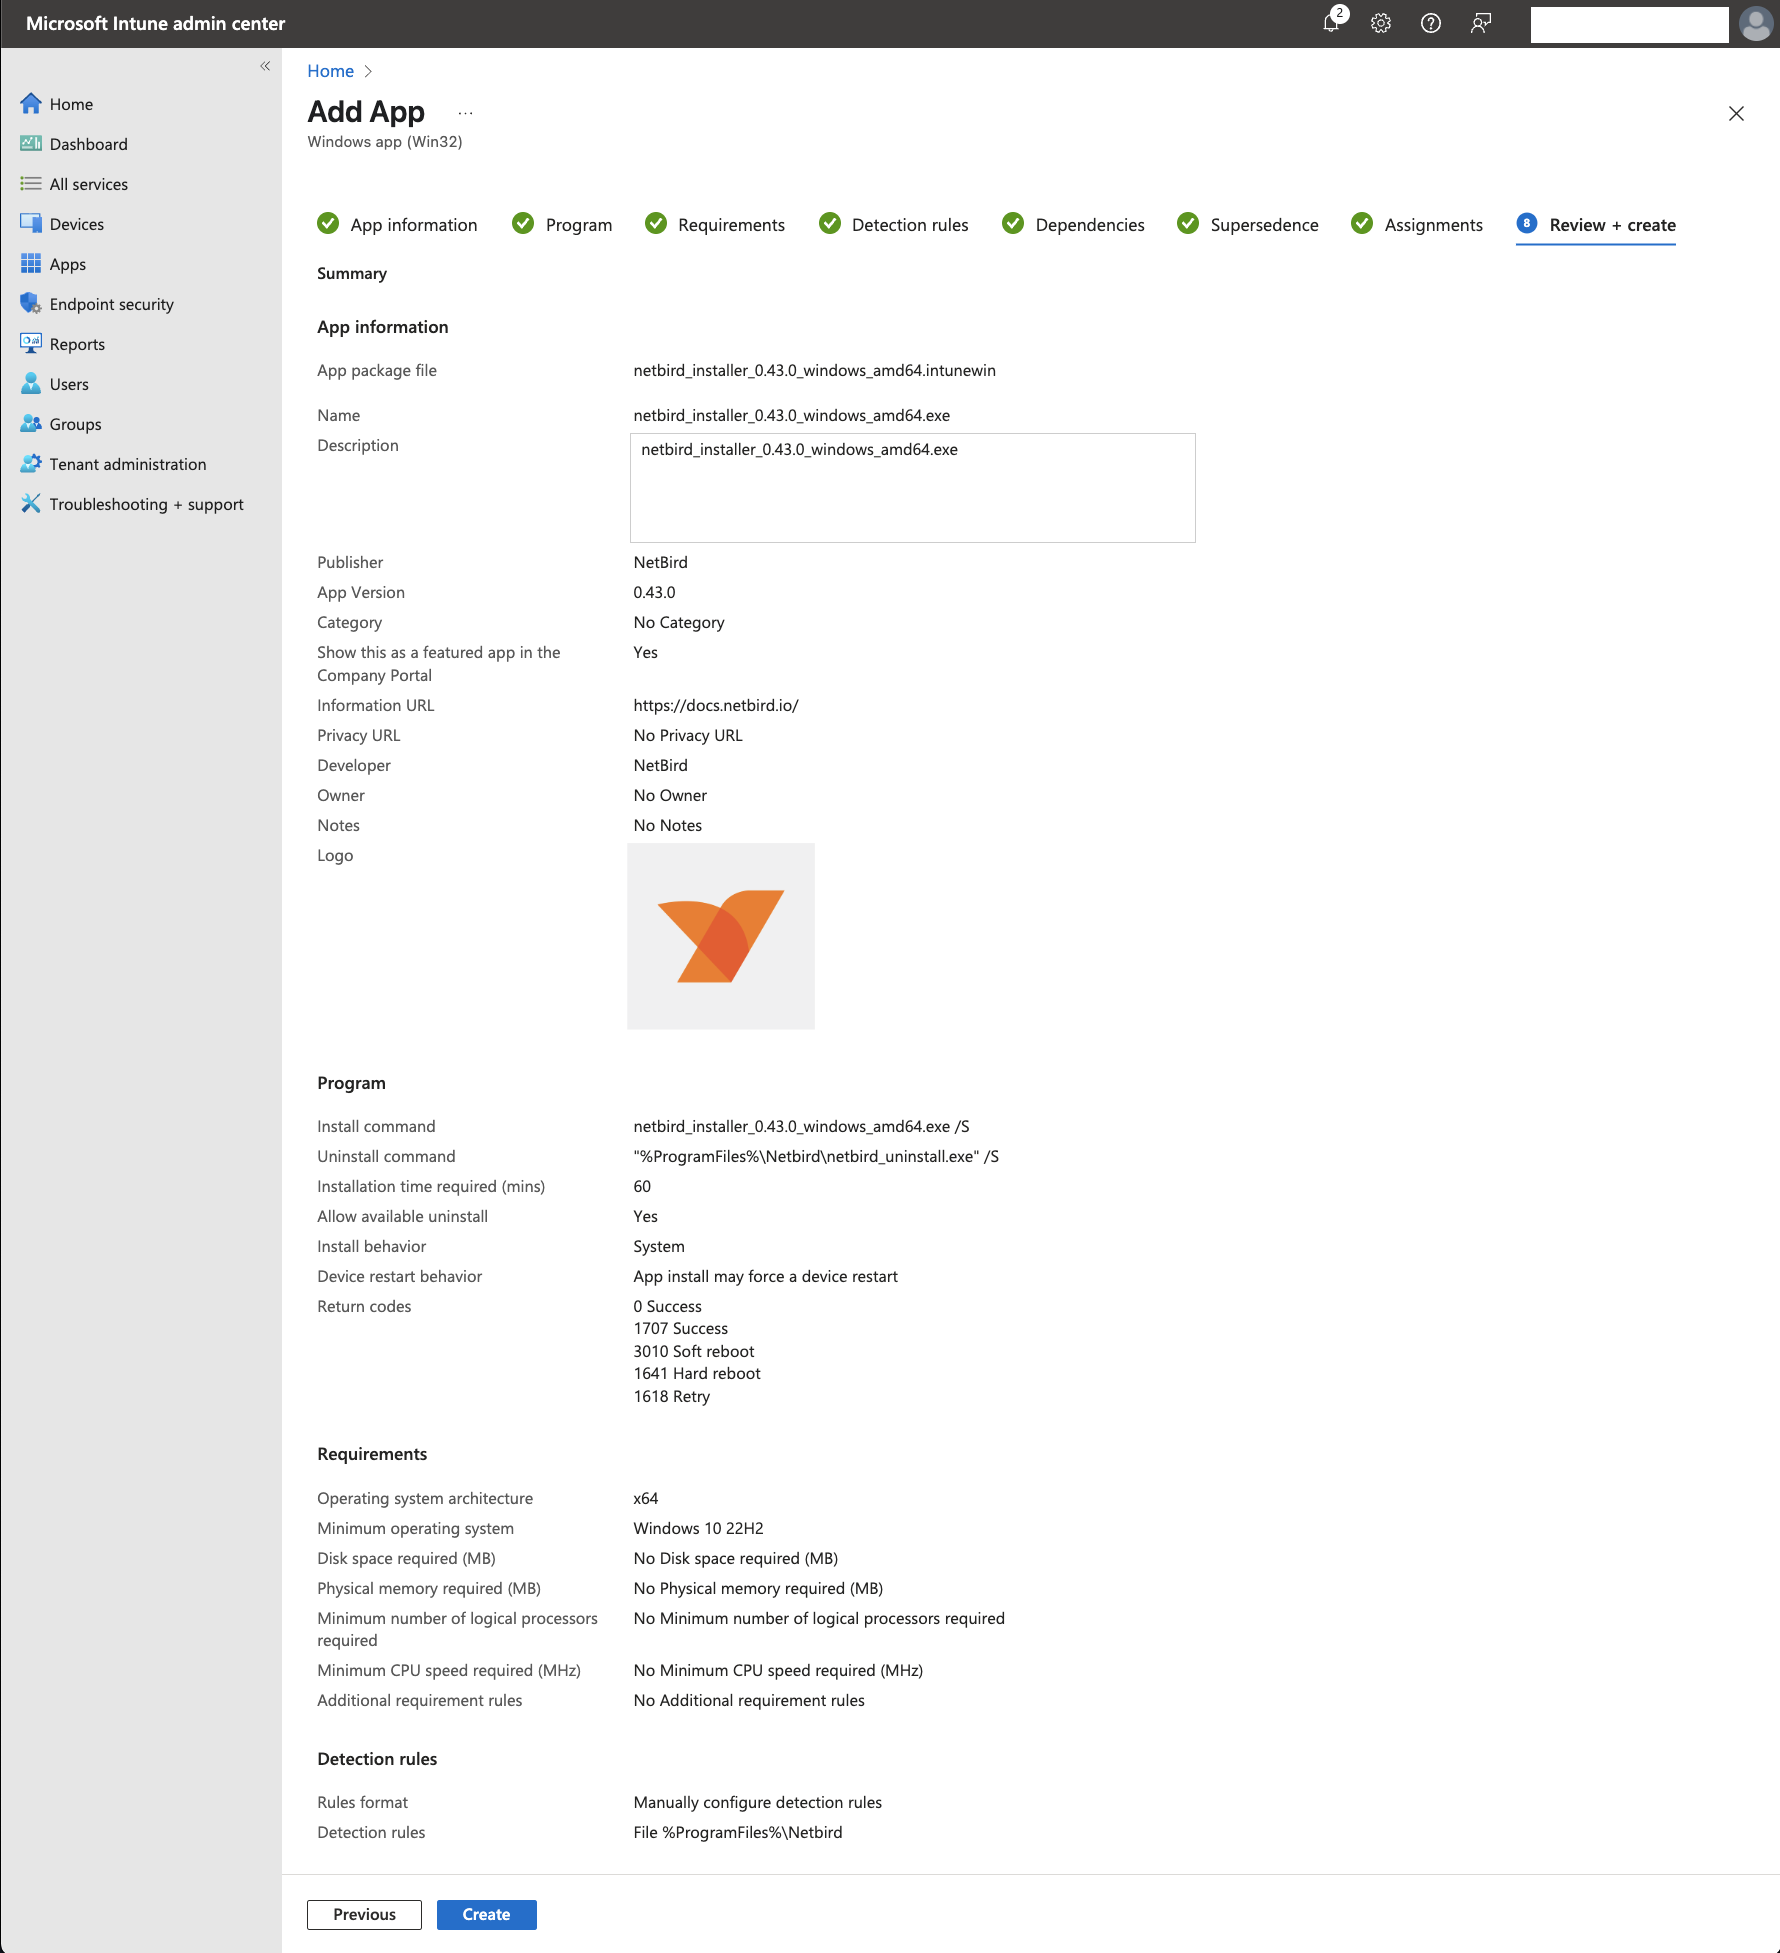
- To continue, click
Next. Review your configuration in theReview + createtab, then clickCreateto add NetBird to your Intune app catalog.
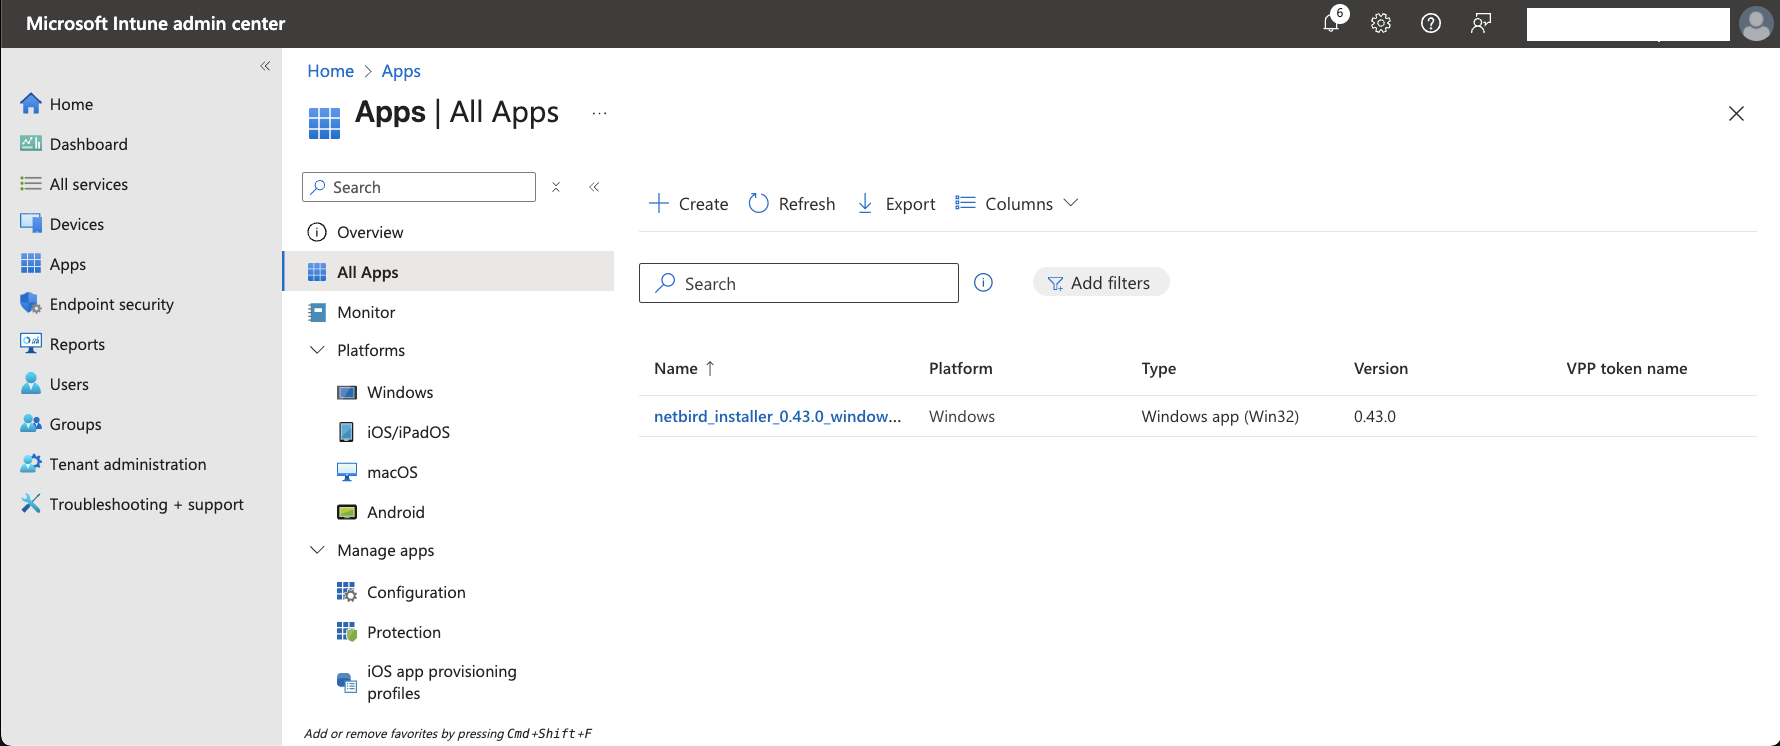
- To verify that NetBird was added to Intune, navigate to
Apps > All Appsto see your Windows applications:
Deploying NetBird as a Line-of-business (LOB) App
As a simpler alternative to the Win32 method described previously, you can deploy the NetBird MSI installer directly as a Line-of-Business (LOB) app. This approach is ideal for basic deployment scenarios that don't necessitate the advanced management features offered by Win32.
Adding NetBird MSI Installer to Intune
- Download the NetBird Windows MSI installer from the NetBird installation documentation
- Sign in to the Microsoft Intune admin center, navigate to
Apps, and click theWindowsbutton.
- Click the
+ Createbutton to add a new Windows application
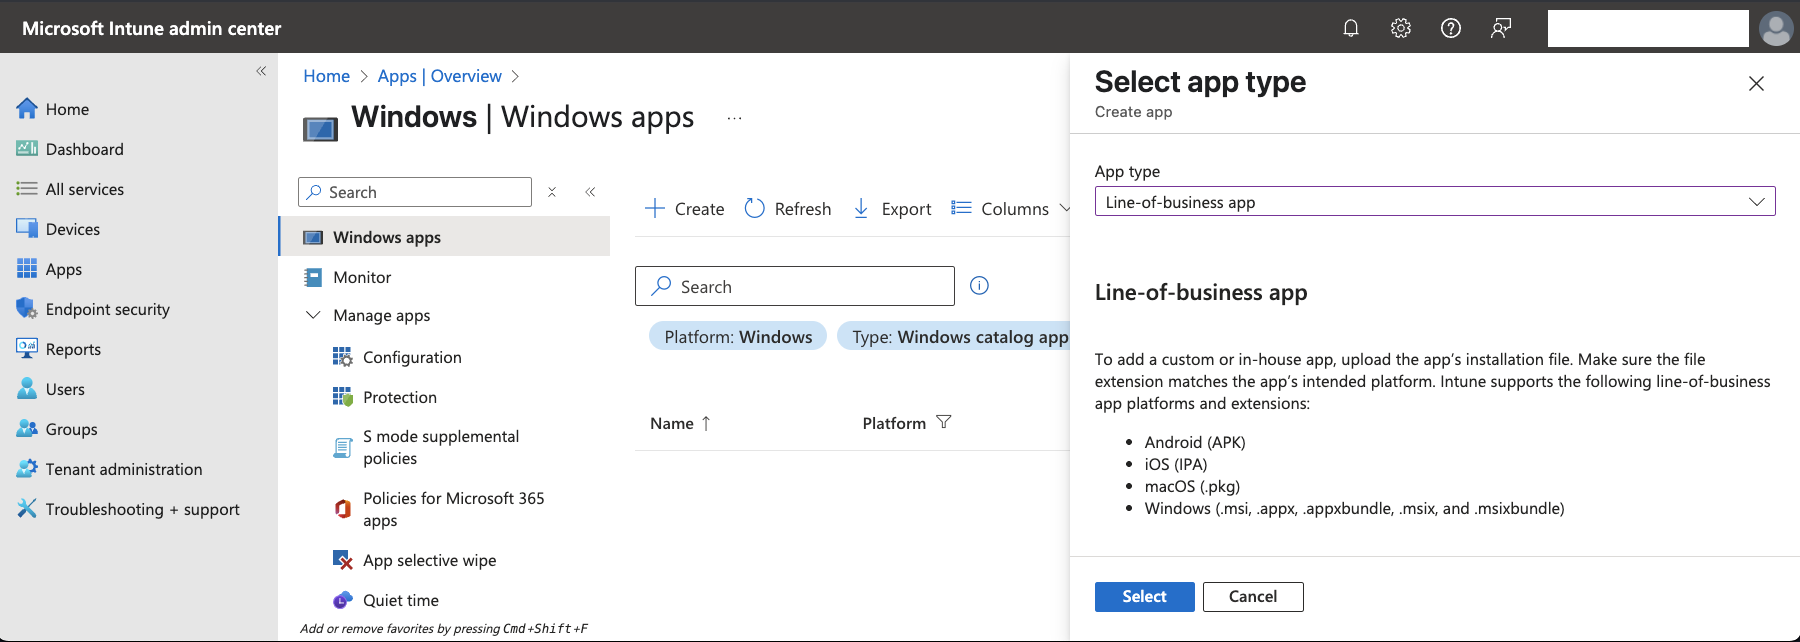
- In the
App typedropdown, selectLine-of-business appand clickSelect
- On the
Add Appscreen, clickSelect app package fileand browse to the location of the NetBird MSI file you downloaded earlier - Select the NetBird MSI installer and click
OK

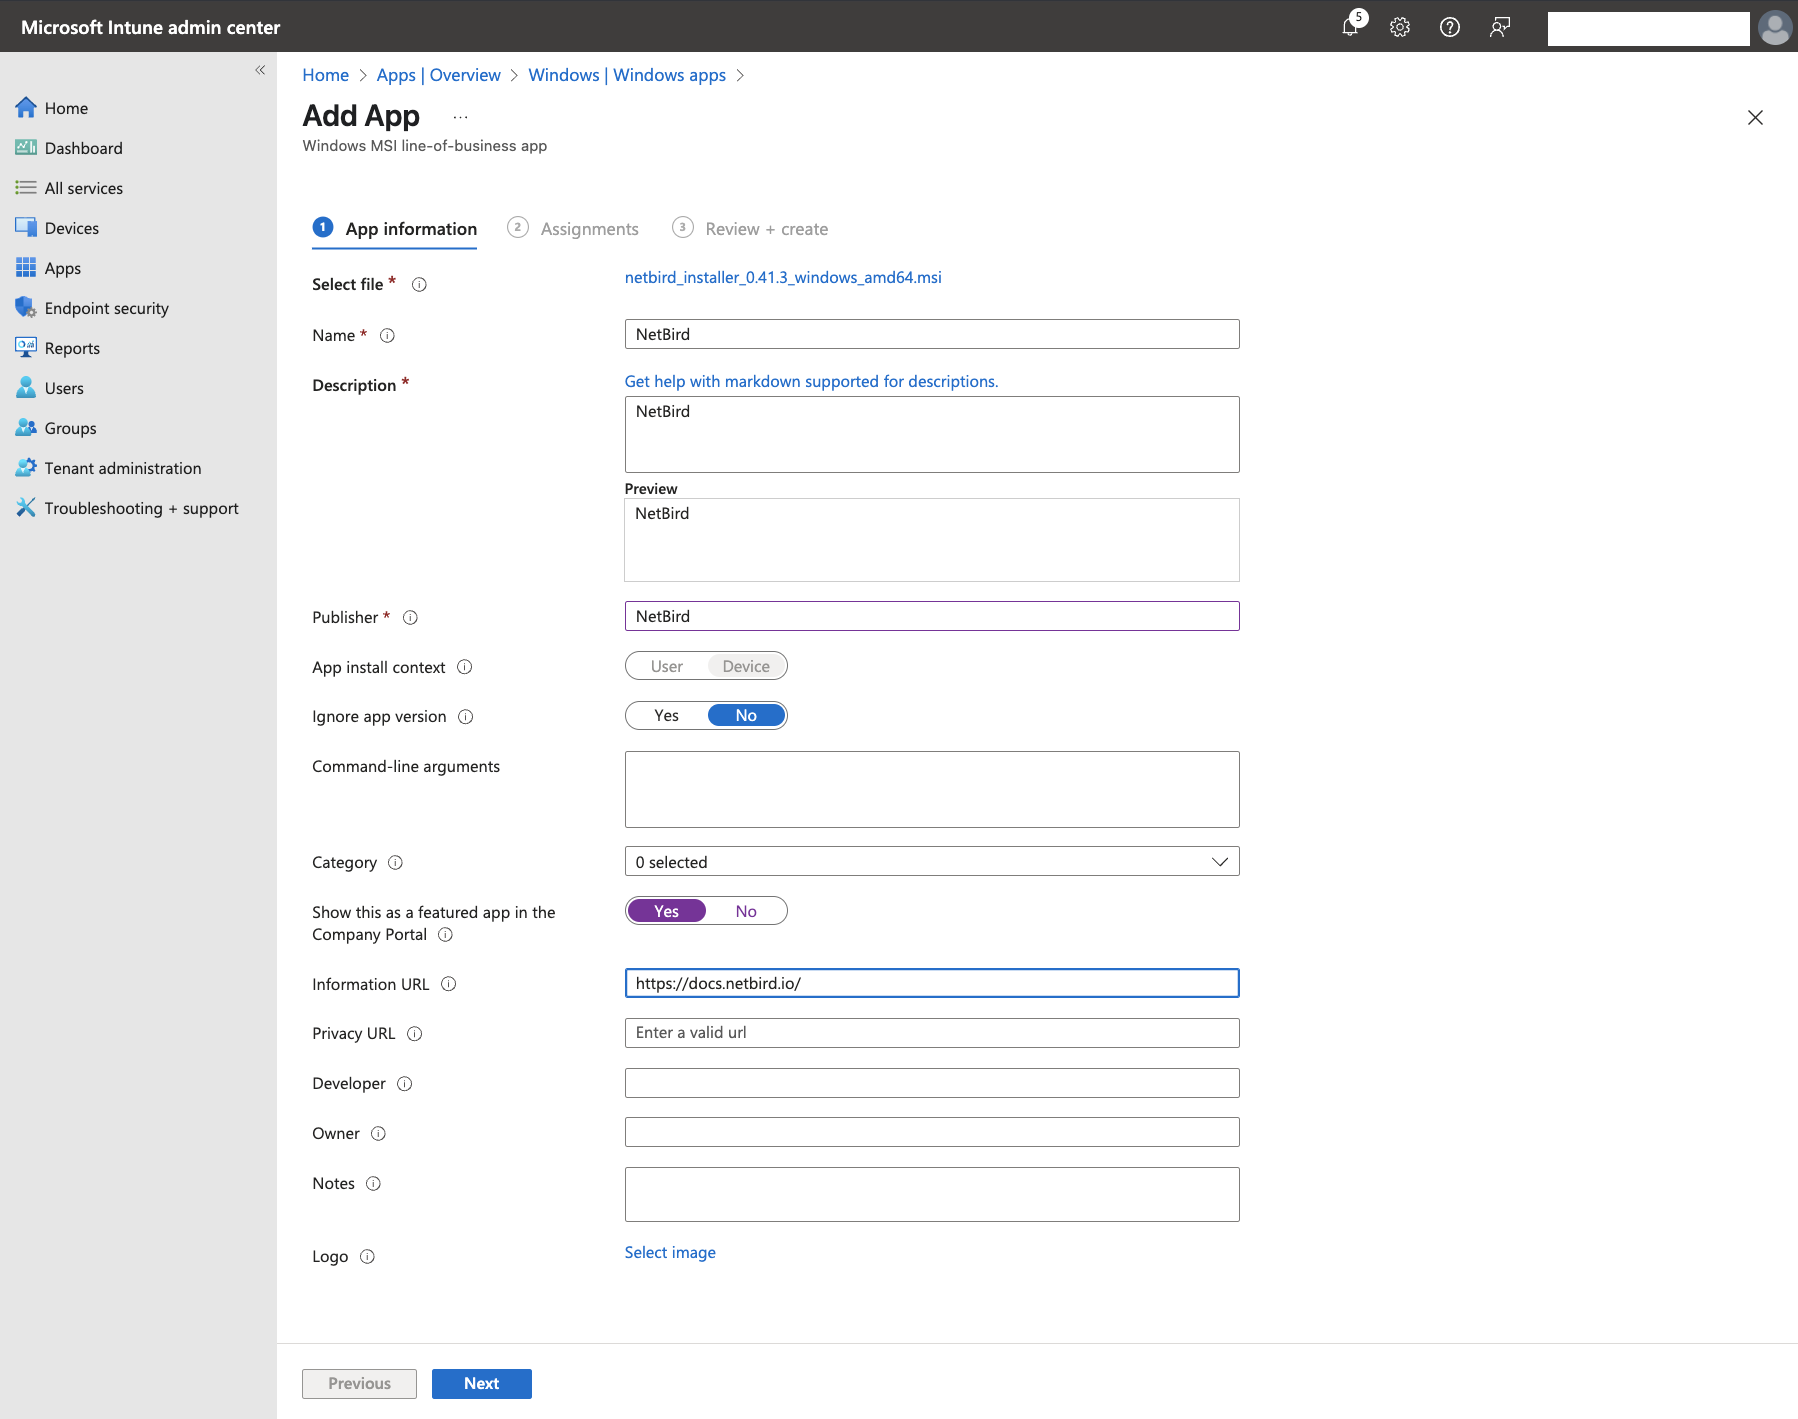
Click Next to configure NetBird with the following details:
- Name: NetBird
- Description: NetBird
- Publisher: NetBird
- App install context: Device
- Ignore app version: No (This ensures updates will be applied when available)
- Command-line arguments: Leave empty
- Category: Select any category that fits your needs (optional)
- Show this as a featured app in the Company Portal: Yes
- Information URL: https://docs.netbird.io/
You can leave the rest of the fields empty.
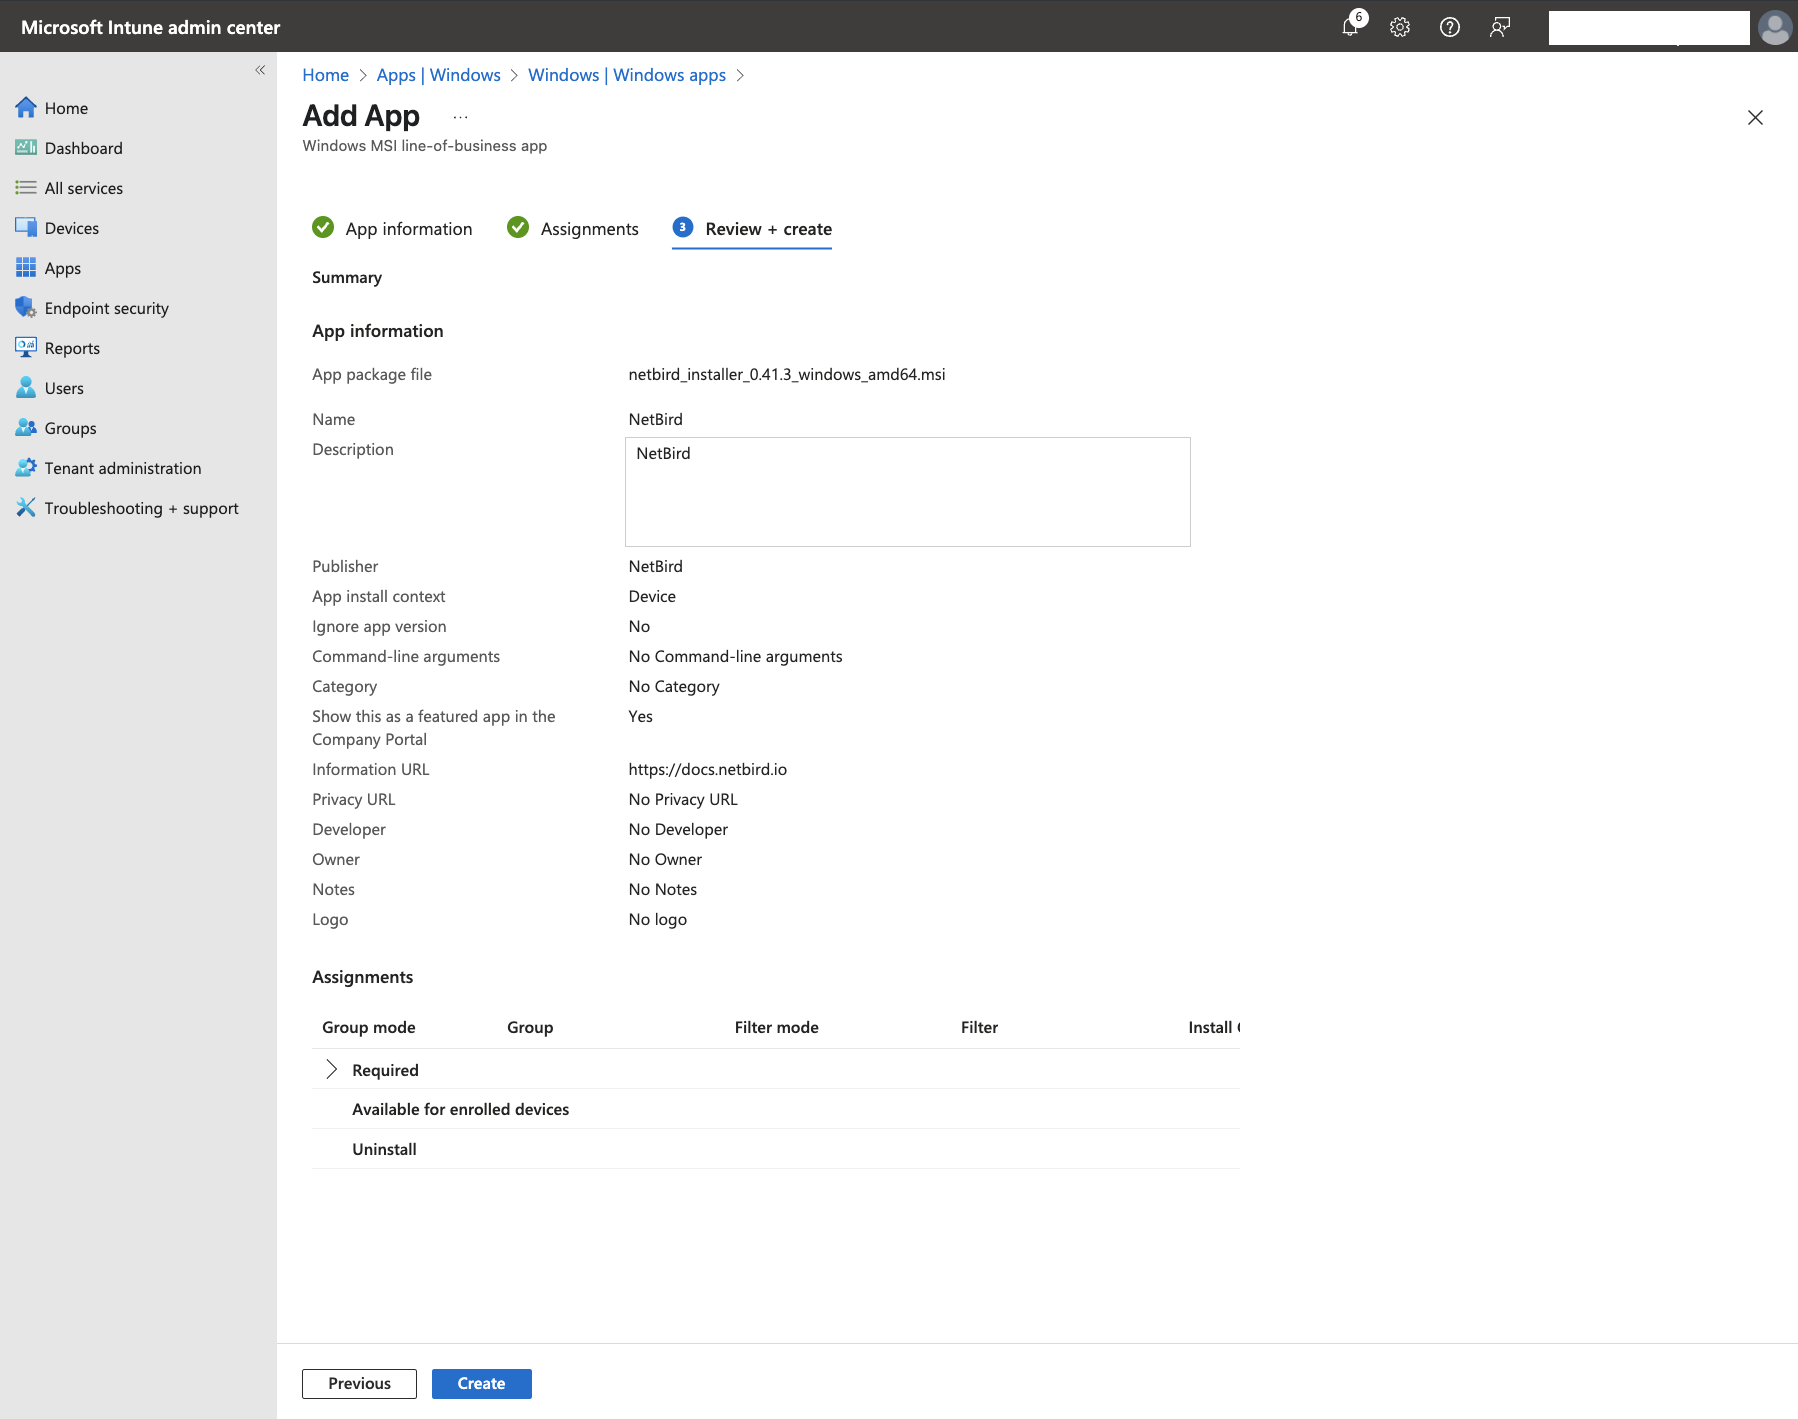
When ready, click Next to proceed to the Assignments tab. Under Required, click + Add group

- Select the appropriate group that contains your users (like the
Developmentgroup synchronized from Entra ID) and clickSelect
- To continue, click
Next. Review your configuration in theReview + createtab, then clickCreateto add NetBird to your Intune app catalog.
After adding NetBird, you'll see an overview screen for the NetBird app, showing deployment status and management options.

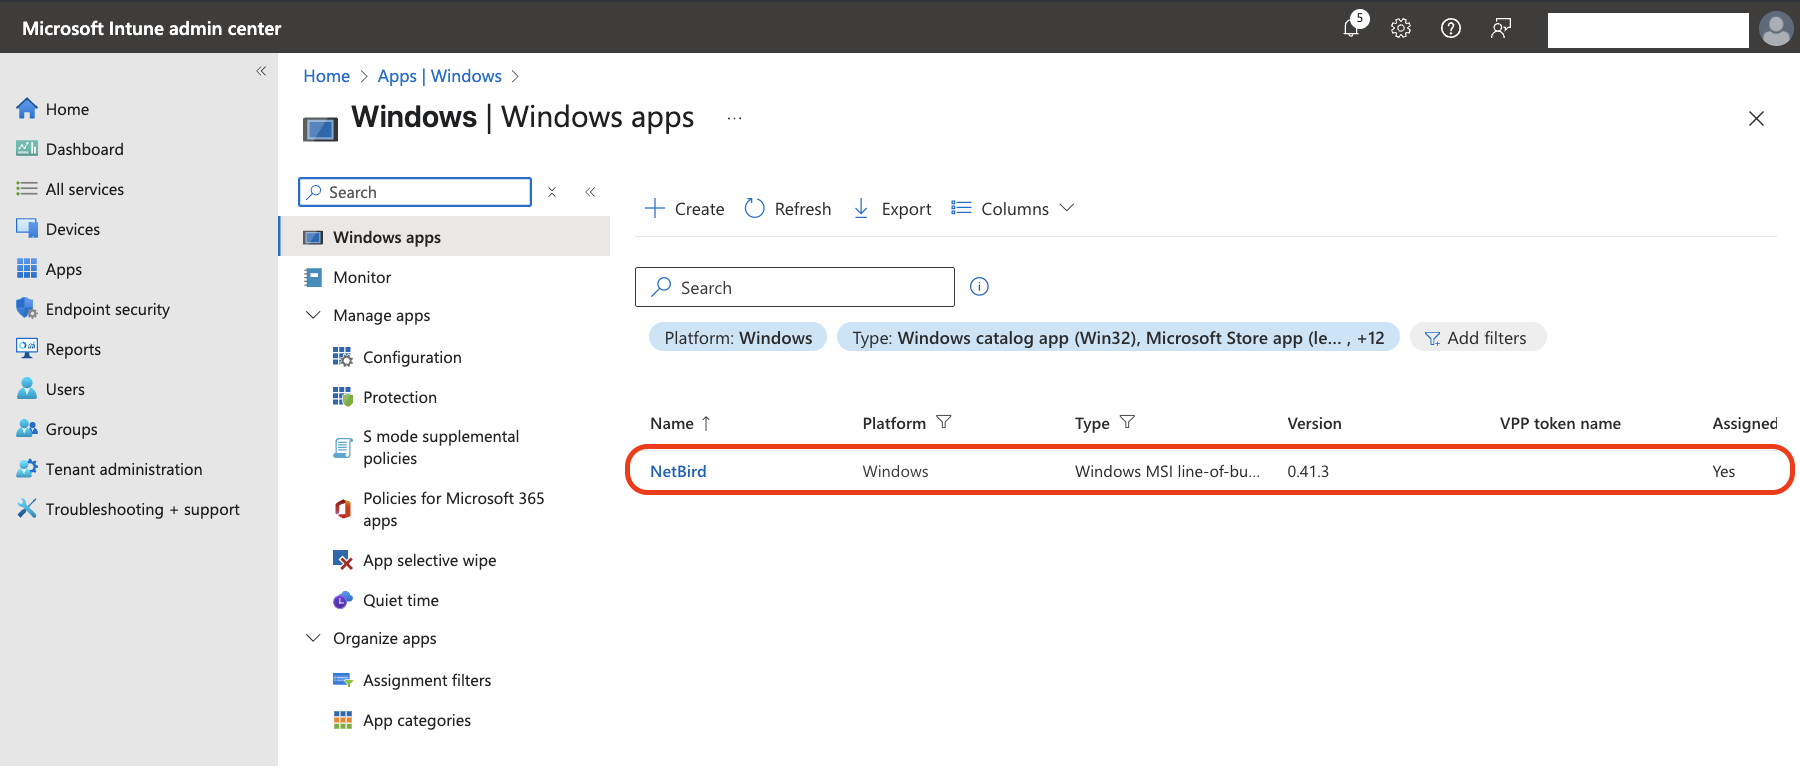
To verify that NetBird was added to Intune, navigate to Home > Apps | Windows to see all your Windows applications:
Deploying NetBird to Other Platforms
While each platform has slightly different configuration options, adding NetBird and assigning it to groups follows the same pattern across Intune. For more information, refer to Intune app management.
With NetBird successfully deployed through Intune, your organization has the foundation for implementing a comprehensive zero-trust access model that verifies user identity and device compliance before granting network access.