Deploying NetBird with Acronis Cyber Protect Cloud
Acronis Cyber Protect Cloud serves as the centralized management hub for Managed Service Providers (MSPs) and enterprise IT departments, delivering comprehensive cybersecurity and data protection through a unified platform. Acronis' Remote Monitoring and Management (RMM) functionality enables IT professionals to efficiently oversee client networks, automate maintenance tasks, and remotely deploy software across Windows, macOS, and Linux machines at scale. This software deployment capability becomes particularly powerful when MSPs need to install security solutions, such as NetBird, across multiple client environments without requiring manual intervention on each endpoint.
NetBird offers a WireGuard-based overlay network with Zero Trust Network Access capabilities, integrating seamlessly with RMM deployment workflows. Once Acronis RMM handles the automated installation and initial configuration, NetBird delivers secure network connectivity through its peer-to-peer private network infrastructure with zero ongoing manual configuration requirements. This integration creates a streamlined operational approach where:
- Acronis Cyber Protect Cloud automates NetBird installation, manages updates, and maintains deployment compliance across client networks
- NetBird establishes secure network pathways with granular access controls and direct encrypted connections
- Combined solution delivers automated Zero Trust networking deployment with centralized management capabilities
This approach allows MSPs to deploy comprehensive Zero Trust security solutions efficiently while maintaining centralized control over both installation processes and ongoing network access policies.
In this hands-on tutorial, you'll learn how to use Acronis Cyber Protect Cloud software deployment capabilities to install and configure NetBird across Windows and macOS machines, creating secure, manageable network environments for distributed teams.
Prerequisites
Before beginning this tutorial, ensure you have the following prerequisites in place:
- A NetBird account with administrative permissions to create and manage access policies.
- NetBird's Windows installer (
exeor.msi) downloaded from the NetBird installation documentation - An active Acronis Cyber Protect Cloud subscription like Cyber Protect Advanced.
- Acronis Cyber Protect Cloud Agent installed and registered on all target Windows and macOS machines.
- Administrative access to the Acronis Cyber Protect Cloud Console with permissions to manage software deployment and device policies.
- At least one Windows and one macOS device listed in the All devices screen in Acronis Protect Cloud.
Setting Up NetBird Access Policies for Team-Specific Permissions
NetBird's Access Control Policies let you implement a zero trust security approach alongside Acronis Cyber Protect Cloud. They enable you to define precise permissions based on user groups and resource categories, ensuring that team members can only access what they need for their specific roles. This granular approach aligns with MSP requirements for managing multiple client environments with distinct access requirements.
These policies work in tandem with Acronis RMM's monitoring and management capabilities. While Acronis monitors system compliance and maintains device health, NetBird enforces network-level access restrictions based on predefined group memberships.
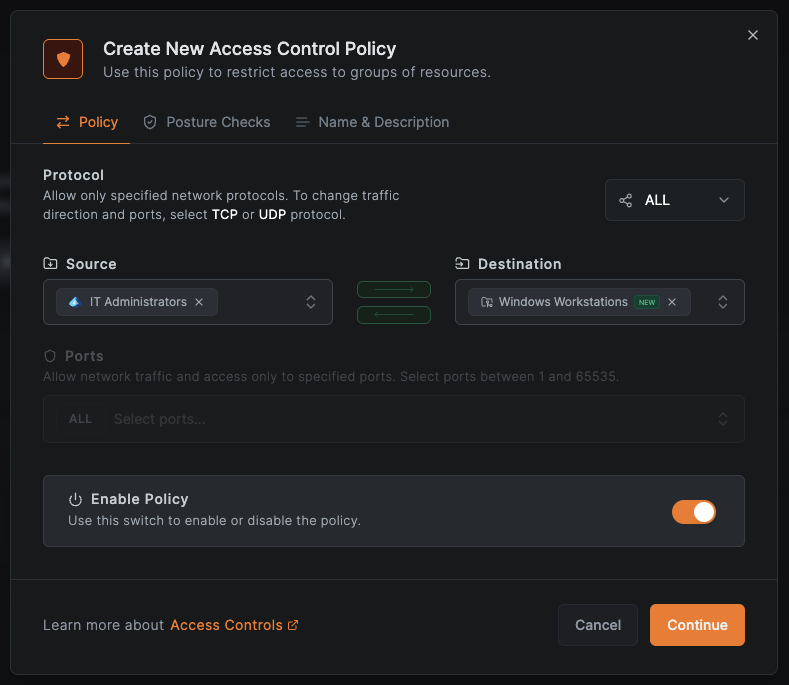
For example, let's create an access policy. While the steps are the same for macOS, this demonstration will use a Windows group for simplicity. Our goal is to enable the IT Administrators team to access the Windows Workstations group:
- Log in to your NetBird management dashboard with administrative credentials
- Navigate to
Access Control > Policiesand click theAdd Policybutton in the upper right corner. - Set the source group to
IT Administratorsand the destination group toWindows Workstations - Configure the protocol and port settings based on required access patterns (e.g., TCP 22 for SSH access to servers, TCP 80 for web servers, etc.)
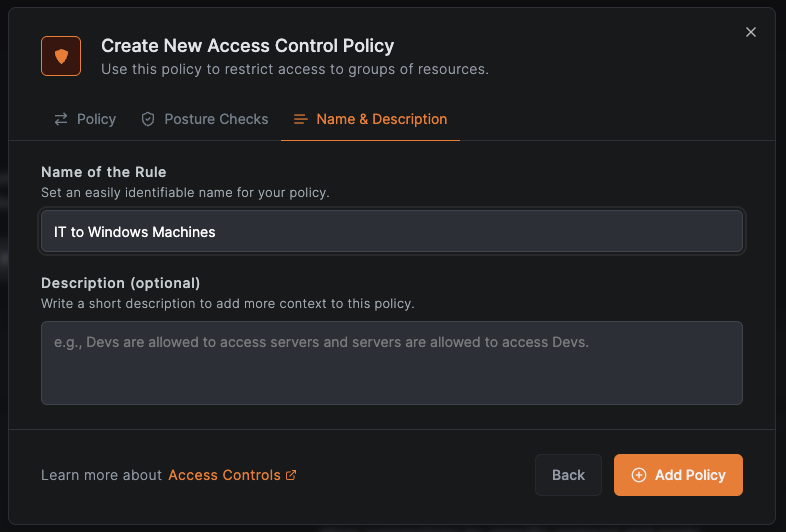
Provide a descriptive name for the policy, such as "IT to Windows machines" that indicates its purpose, and click Save to create and activate the policy.
This access policy will automatically apply to all devices managed by Acronis Cyber Protect Cloud that belong to users in the IT Administrators group, providing them secure access to designated resources while preventing lateral movement to unauthorized systems. The policy enforcement occurs at the network level, complementing Acronis Cyber Protect Cloud's device-level monitoring and management capabilities.
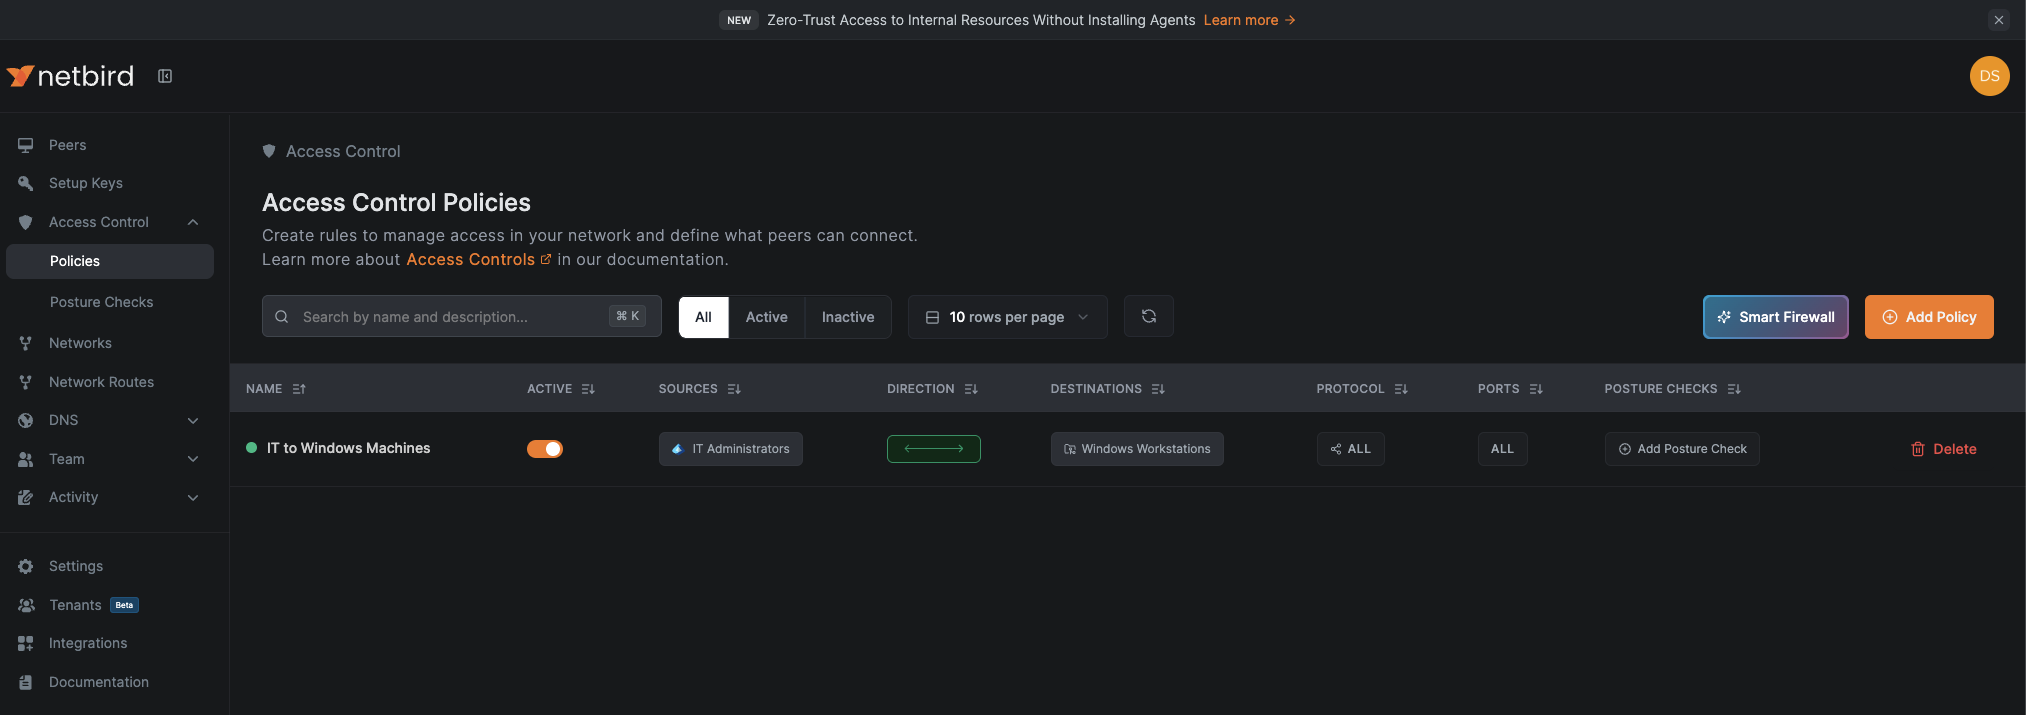
Moreover, users will only gain this network access when their devices are actively monitored and maintained through Acronis Cyber Protect Cloud, creating a comprehensive security approach where device health monitoring and network access controls work together. This combination ensures that only properly managed and compliant devices can establish secure network connections to protected resources.
Note: For maximum security, create separate policies rather than overly broad policies for each distinct access requirement. This approach minimizes your attack surface by ensuring precise access controls aligned with job responsibilities and reducing complexity in multi-client MSP environments.
With these access policies configured, you can now proceed to use Acronis' software deployment capabilities to install NetBird across your managed Windows machines, ensuring that all team members have the required secure connectivity client automatically deployed and configured.
Installing NetBird in Windows using Acronis Packages
This section demonstrates how to create a software package in Acronis Cyber Protect Cloud and deploy NetBird across your managed Windows machines using automated installation commands.
Adding the NetBird Installer Package to Acronis
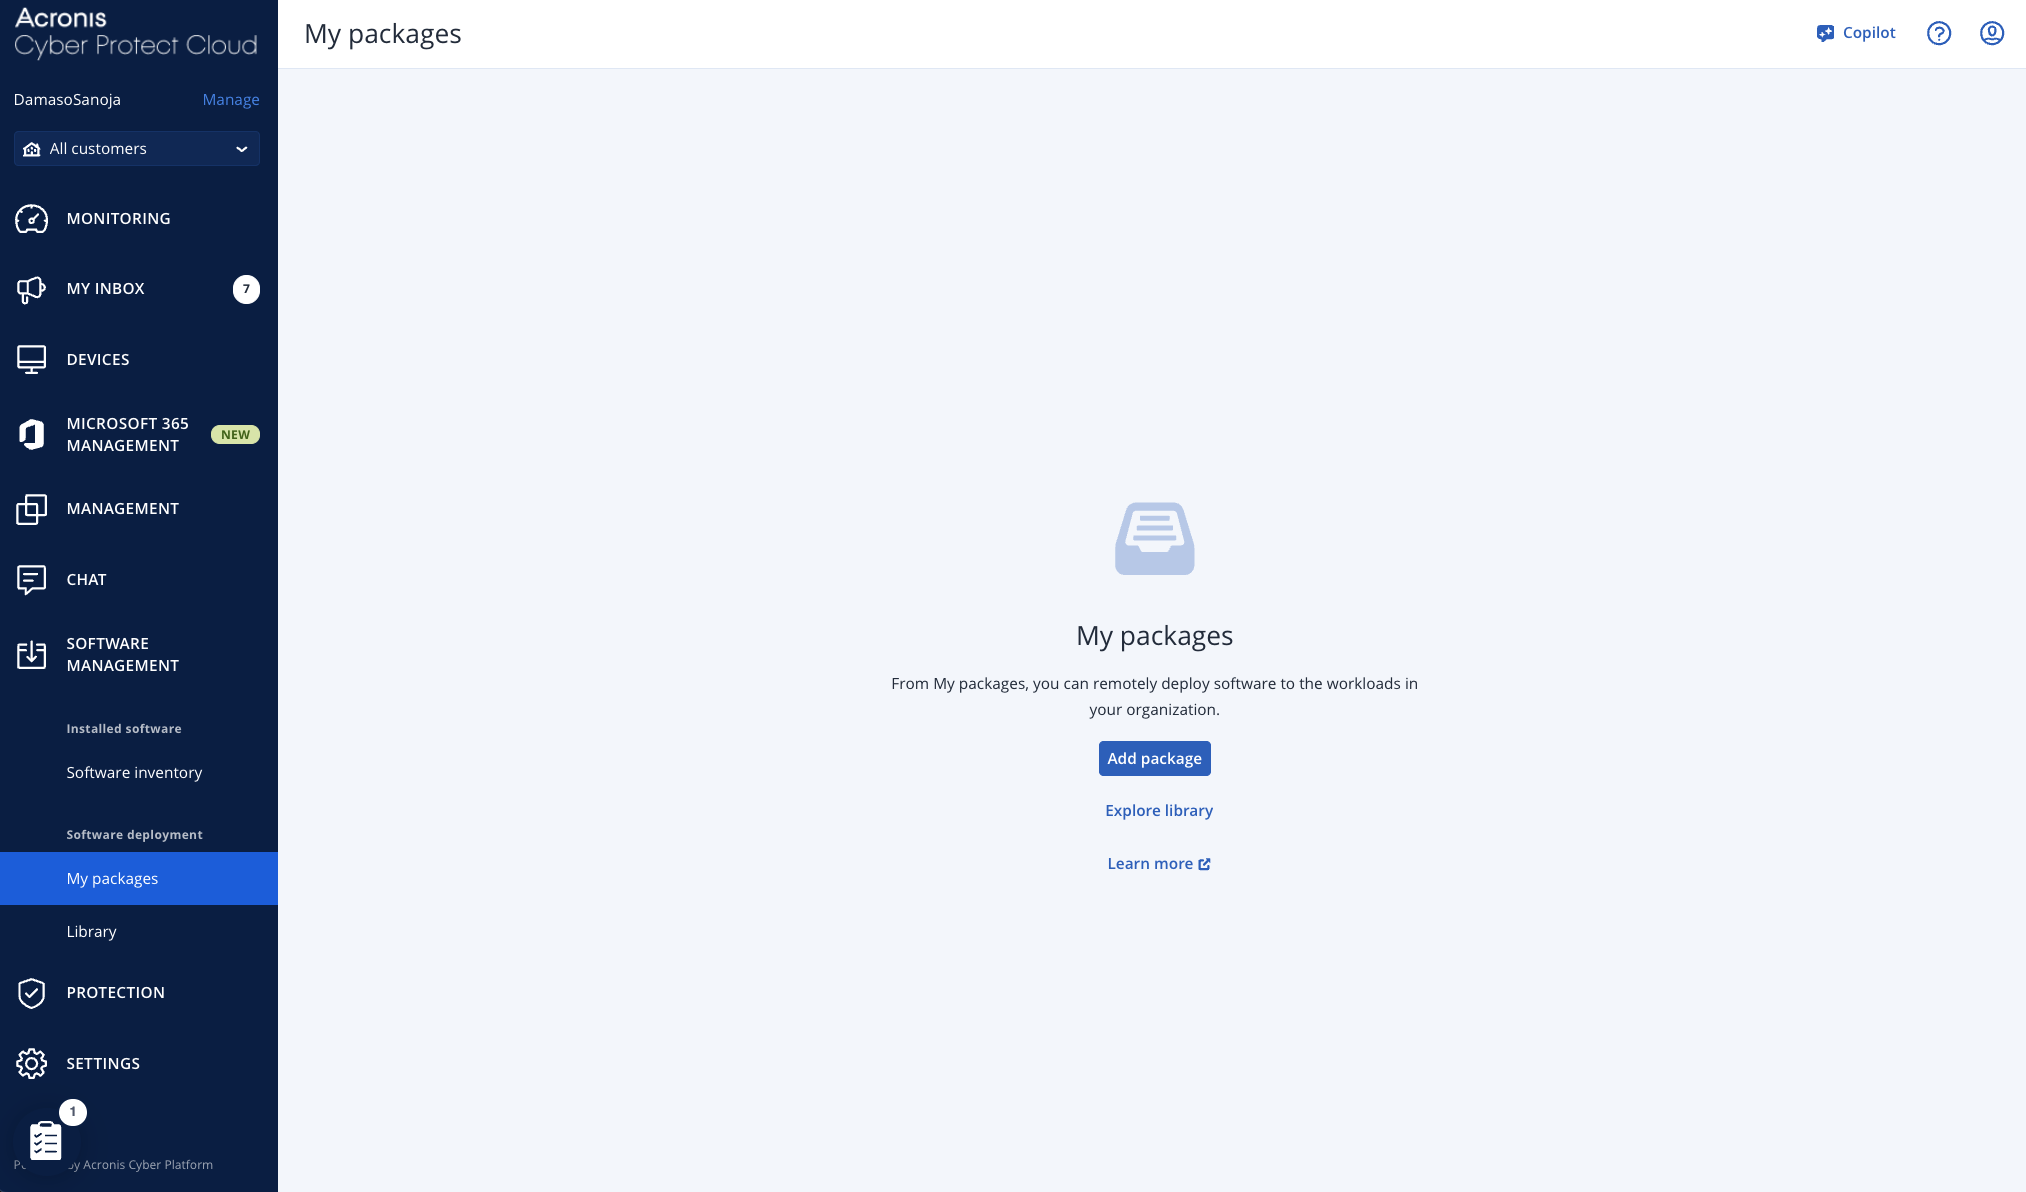
Log in to Acronis Cyber Protect Cloud, navigate to SOFTWARE MANAGEMENT > My packages and click the Add package button:
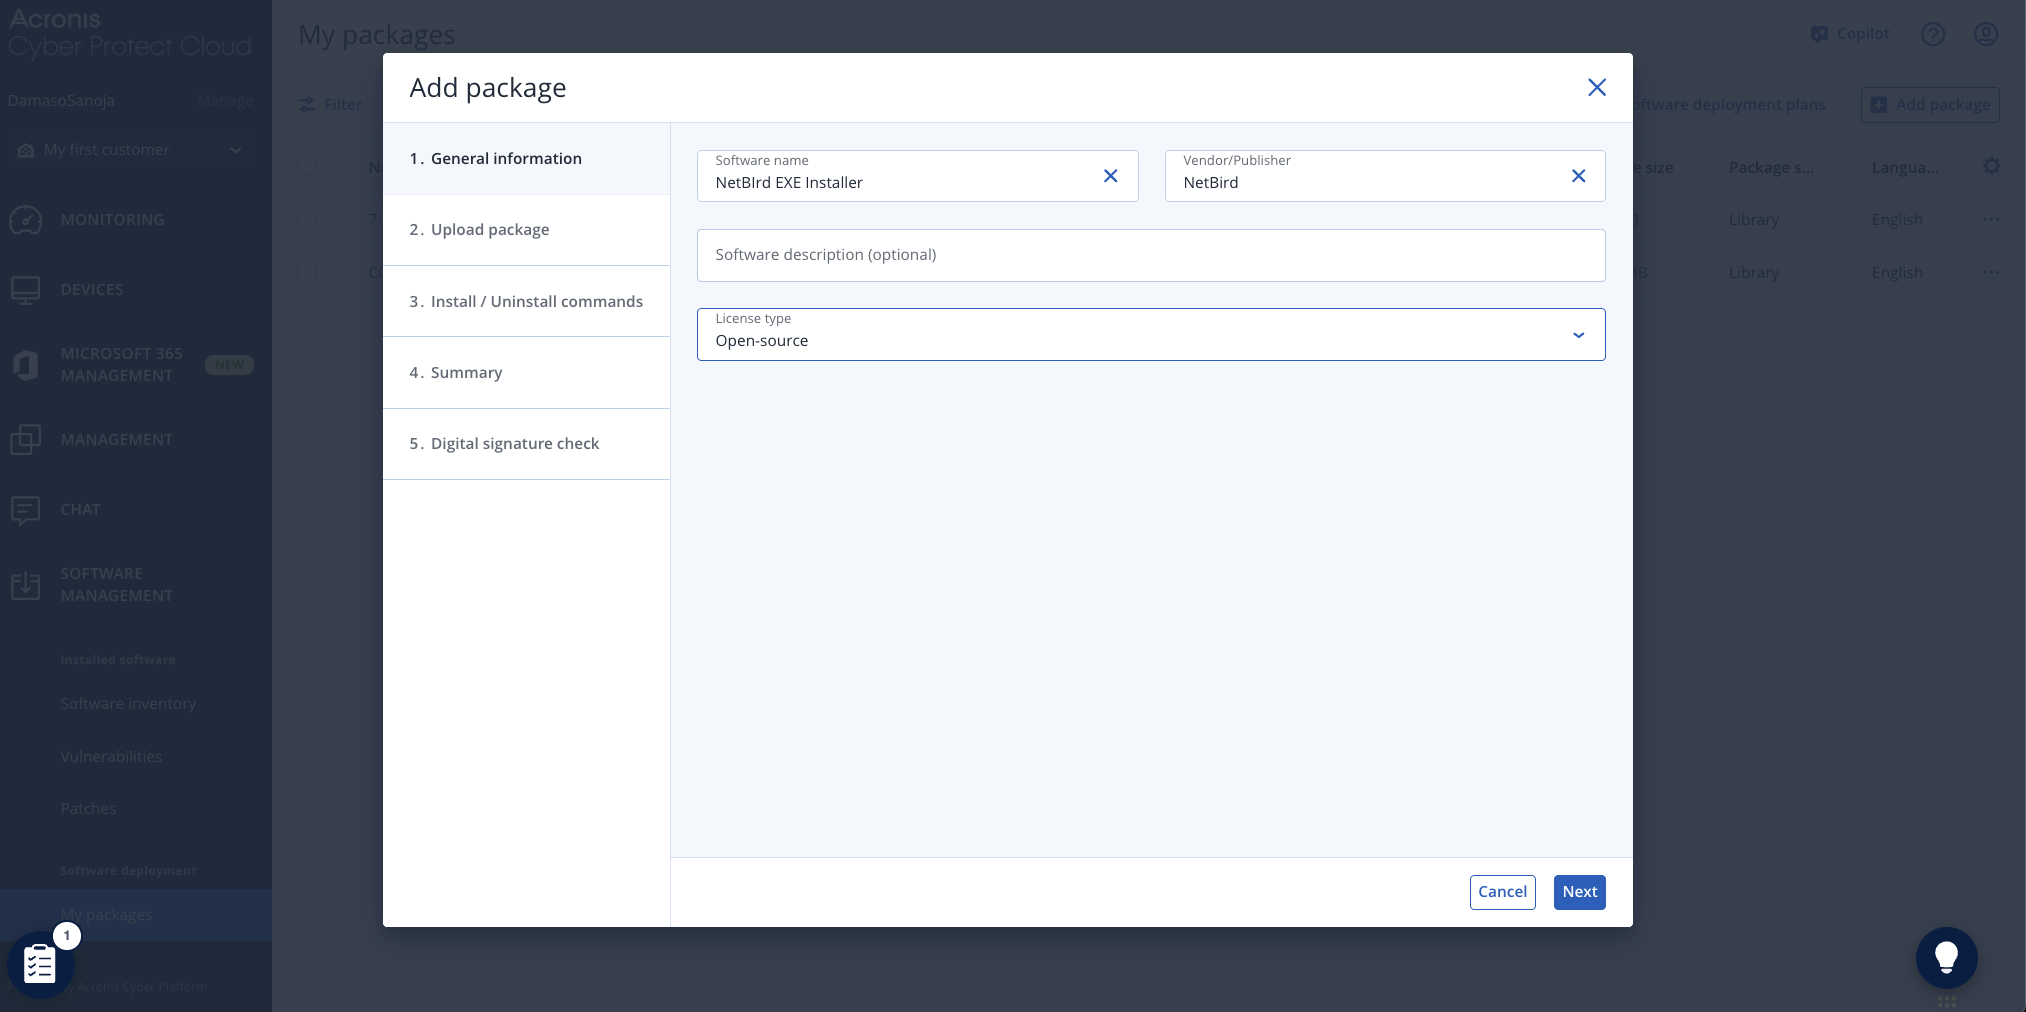
In the General information tab, provide a descriptive name for the package (e.g., "NetBird EXE Installer") and specify the vendor name. Optionally, add a package description and select the appropriate license type from the dropdown menu. Click Next to continue.
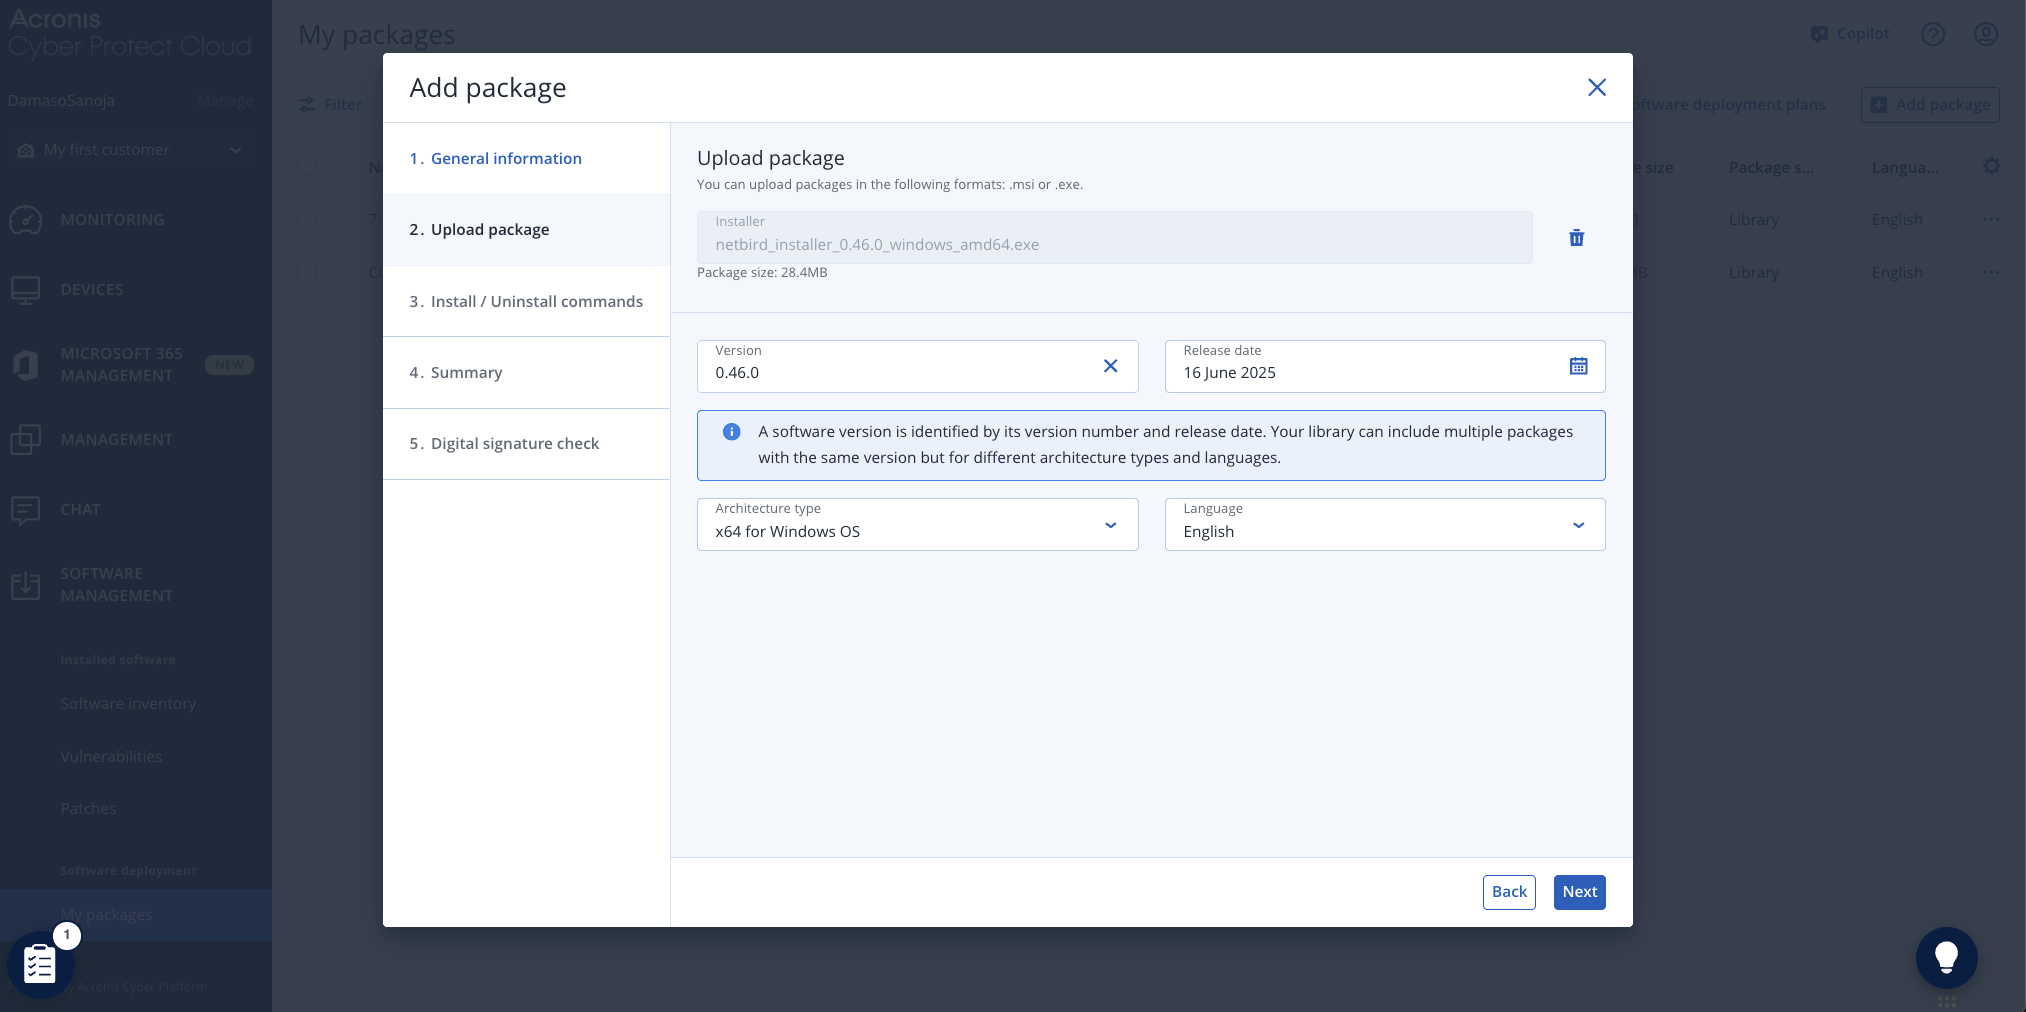
In the Upload package tab, enter the installer version (required field) and select the target architecture type. Click the + Upload button in the top right corner to upload the NetBird installer package.
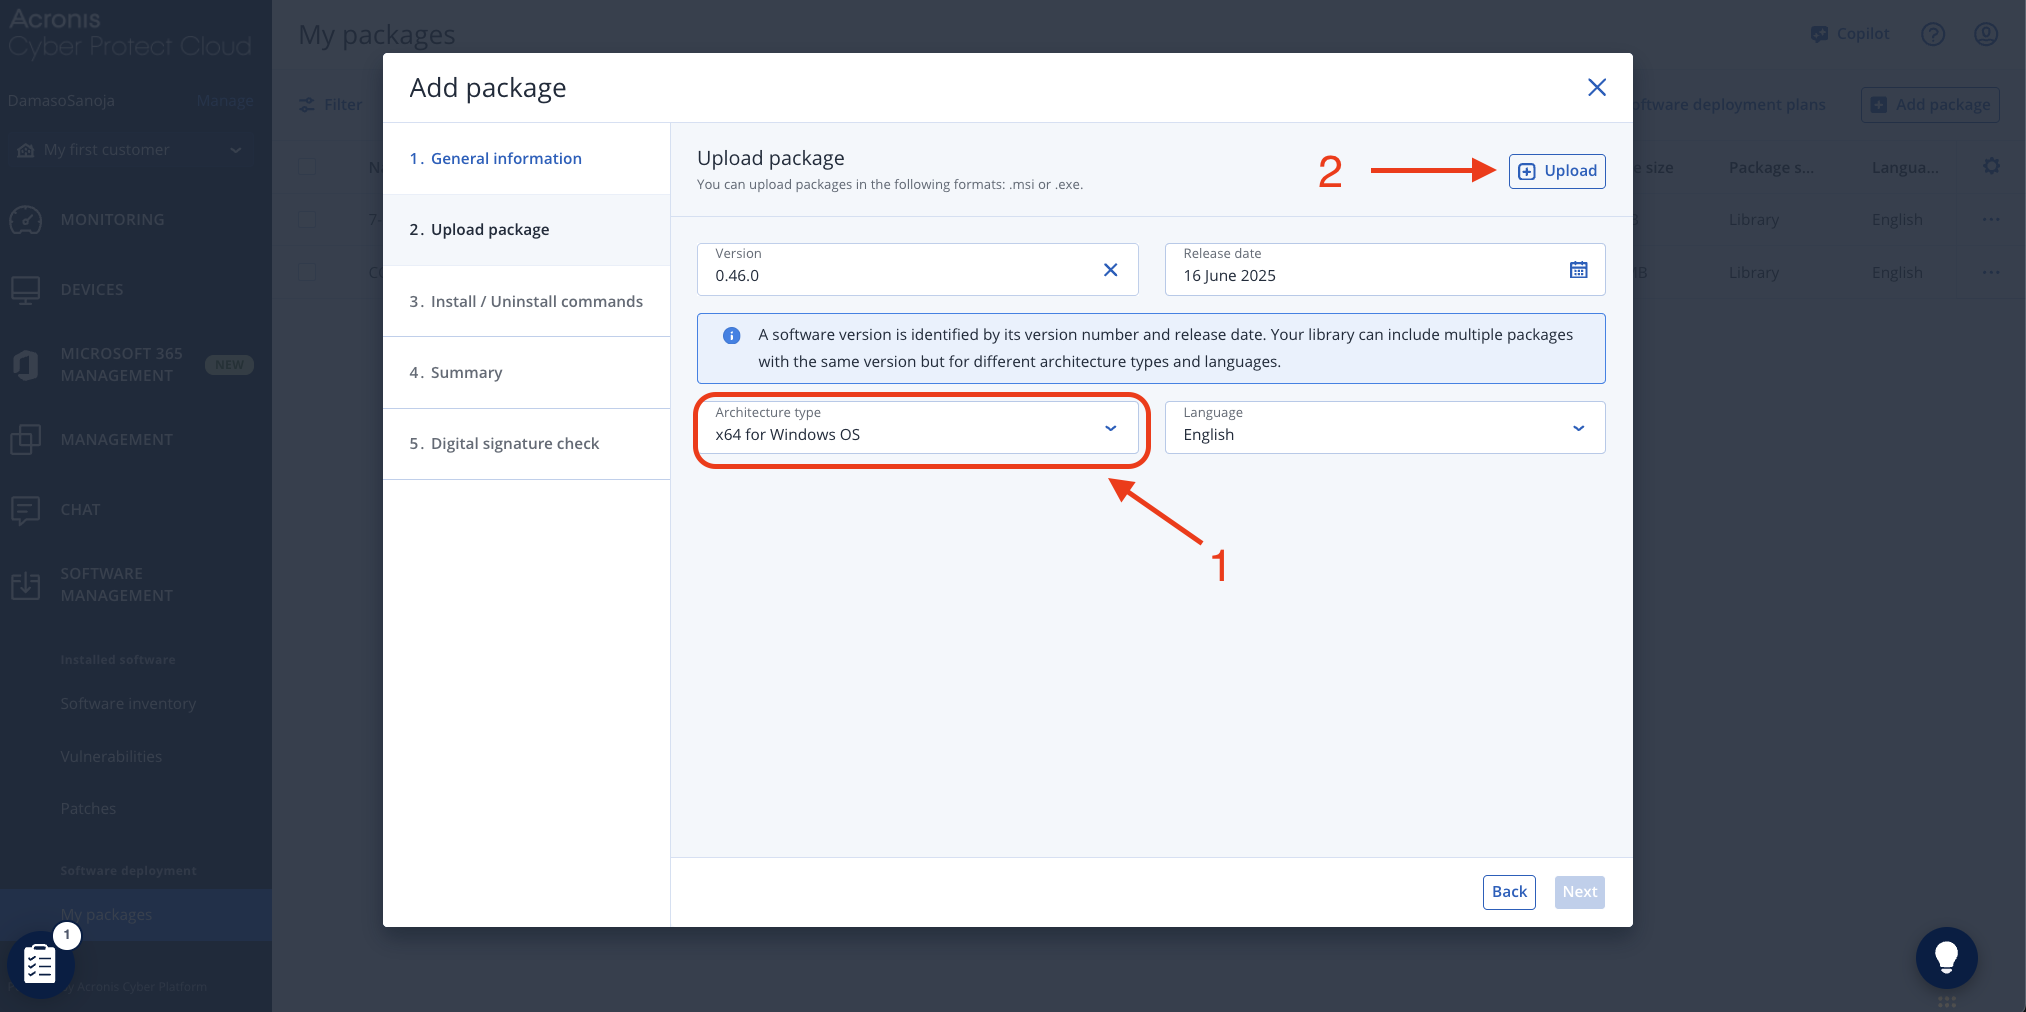
Select the NetBird installer file from your local system. Once the upload completes, click Next to proceed.
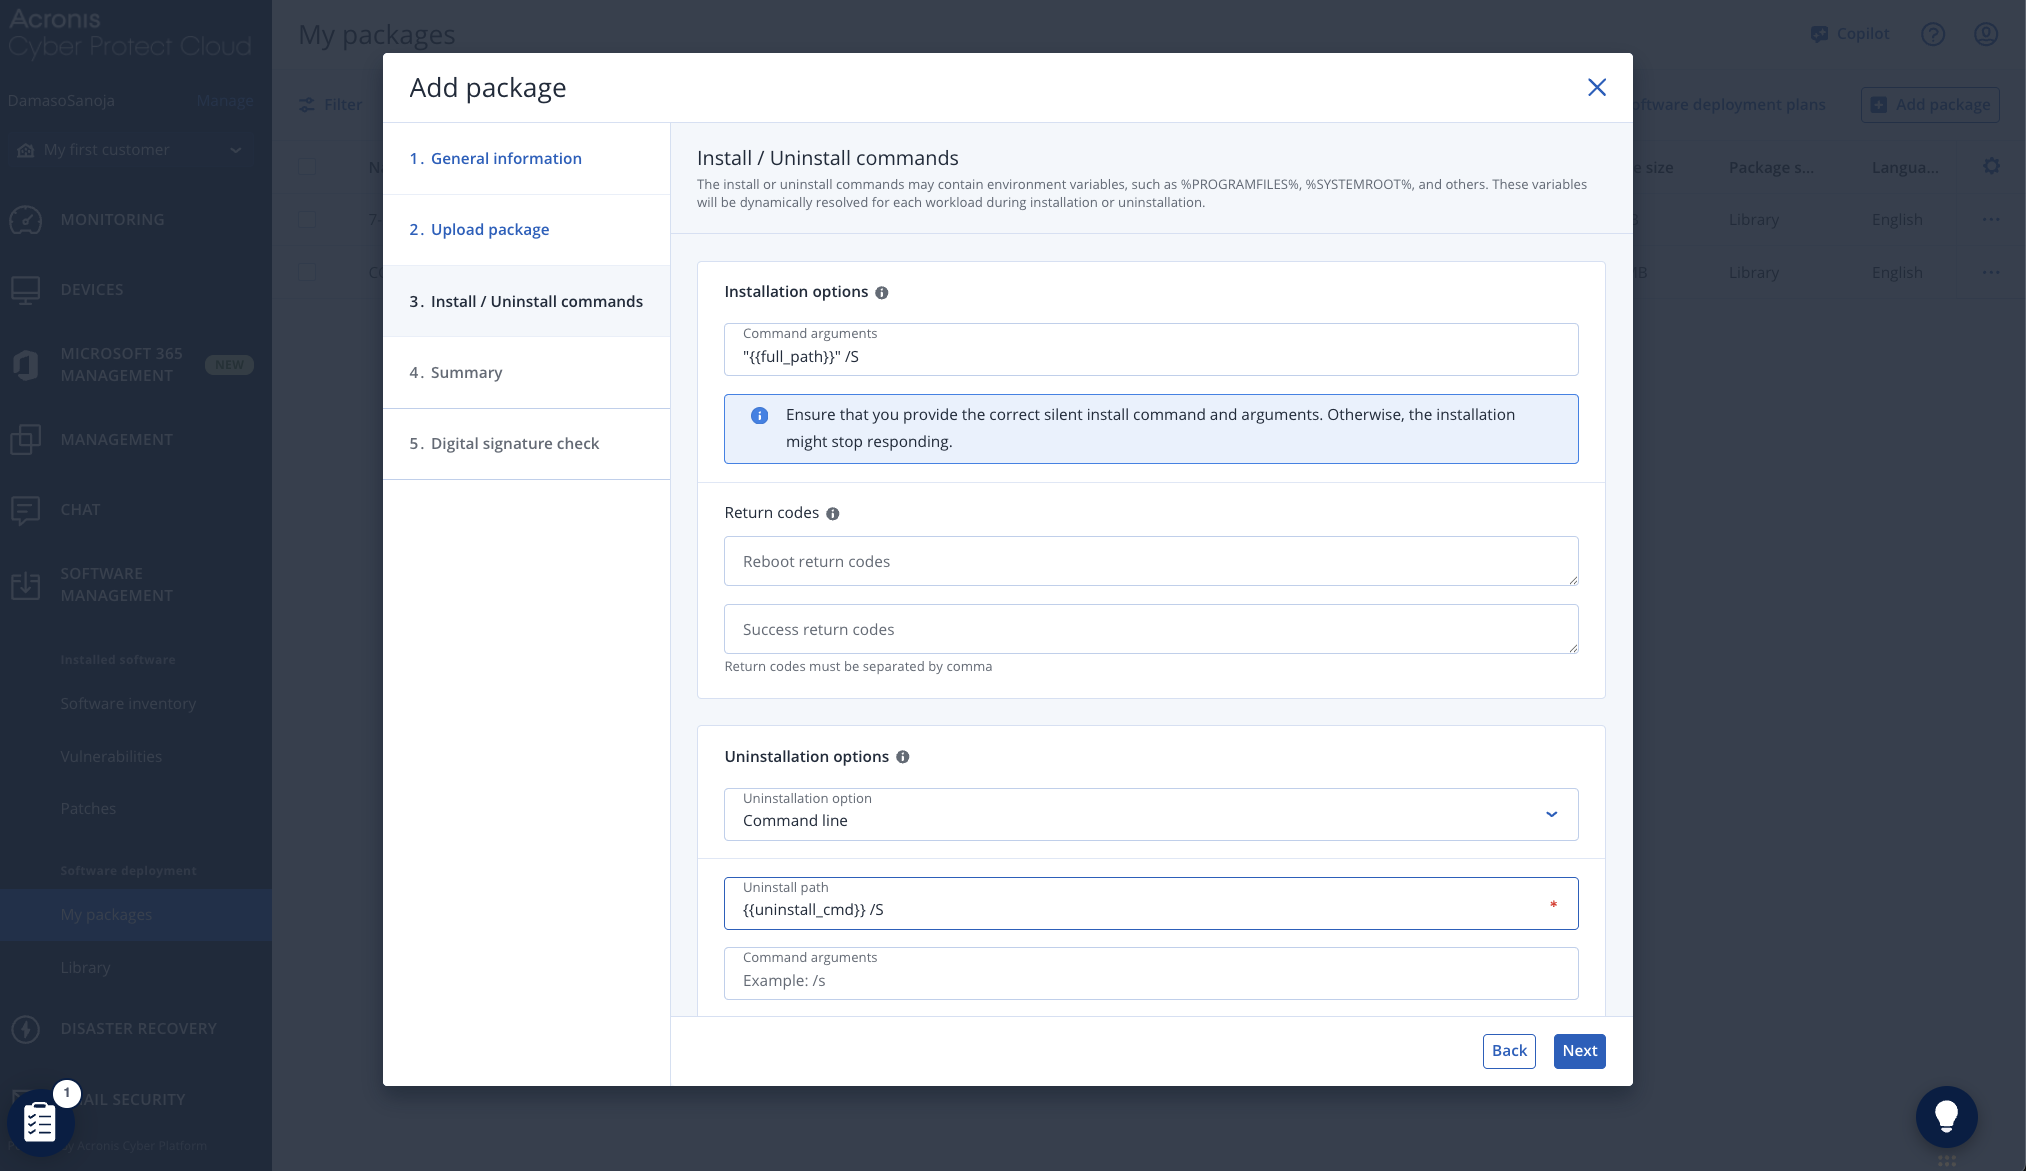
In the Install / Uninstall commands tab, configure the silent installation parameters by entering the following commands:
- Installation options:
"{{full_path}}" /S - Uninstallation options:
{{uninstall_cmd}} /S
The /S parameter ensures silent installation without user prompts for NetBird's EXE installer, while {{full_path}} and {{uninstall_cmd}} are Acronis variables that automatically resolve to the correct paths during deployment. Click Next when ready.
Note: If you're using NetBird's MSI installer instead of the EXE installer, use
/qnin the Installation options field instead of"{{full_path}}" /S. The Uninstallation options field remains the same ({{uninstall_cmd}} /S) for both installer types. Starting with v0.75.0, neither installer creates a machine-wide UI autostart entry and the MSI has noAUTOSTARTproperty. The desktop app manages Launch NetBird UI at Login per user. Use thedisableAutostartMDM setting to suppress it on managed endpoints.
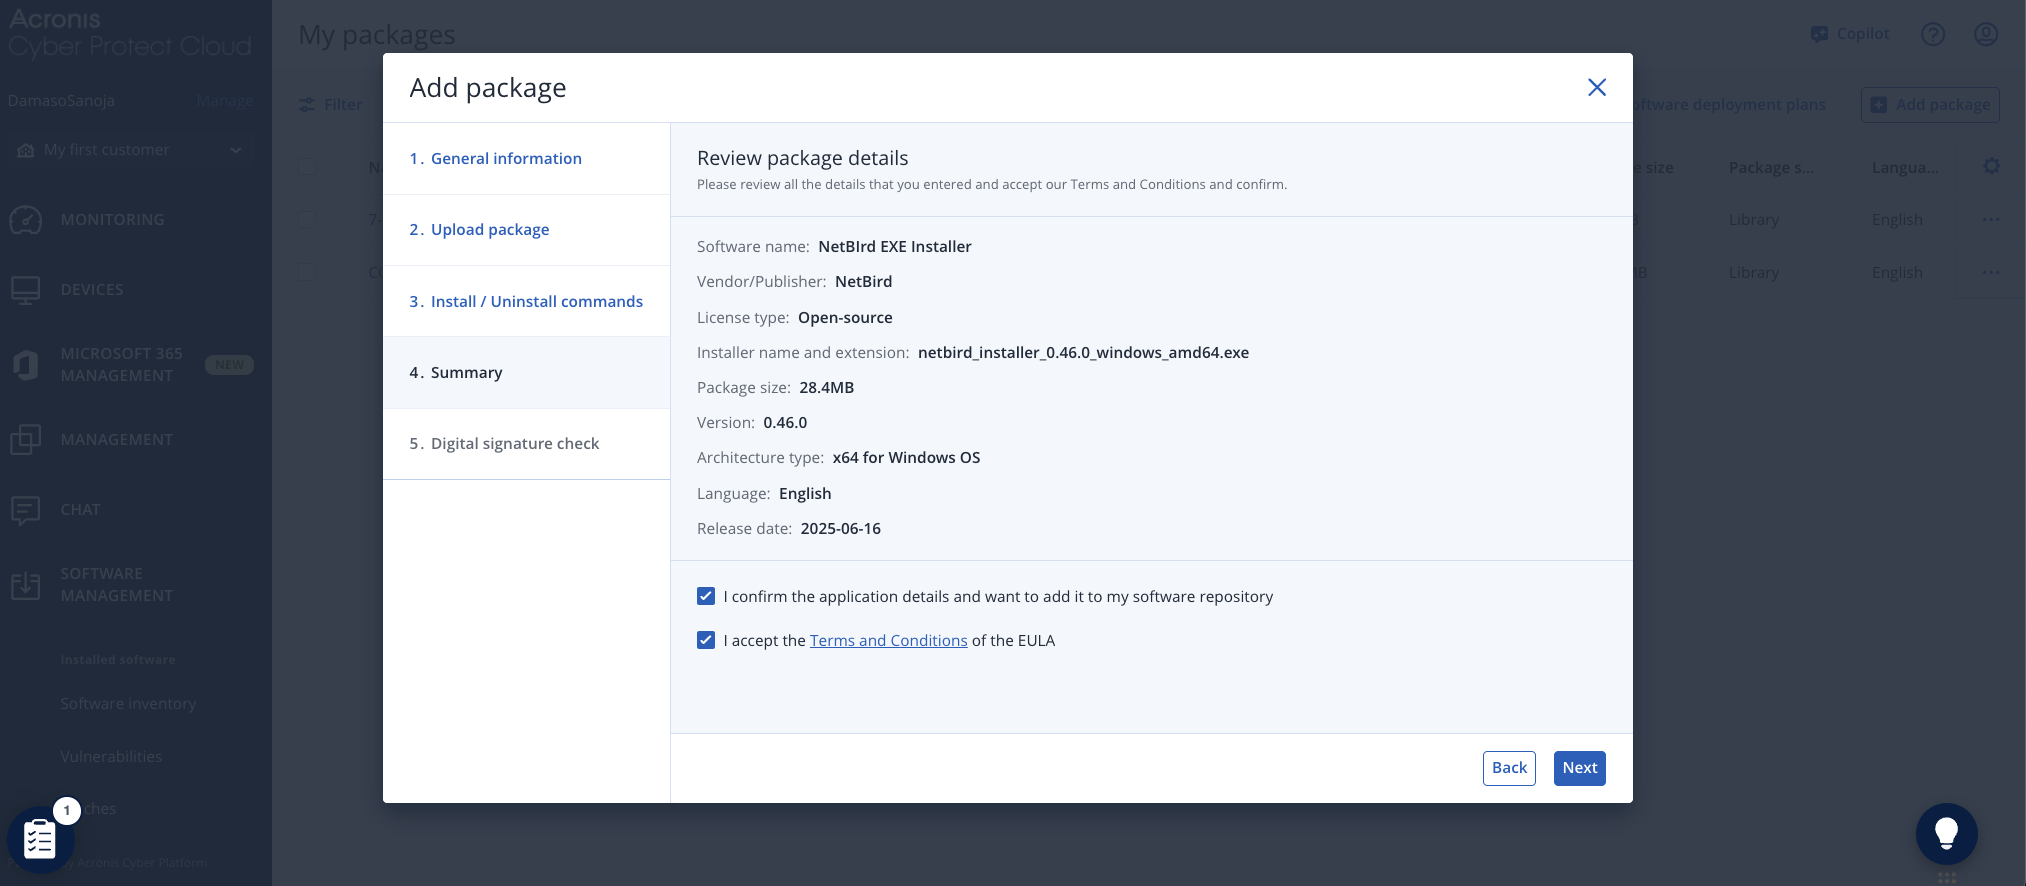
In the Summary tab, review all package configuration details for accuracy. Check the required boxes to confirm your settings and accept the End User License Agreement (EULA) terms. Click Next to proceed.
The Digital signature check tab provides security verification options for the uploaded package. Enable digital signature checking to ensure package integrity and authenticity—this represents a security best practice for enterprise deployments. Click Add package to complete the package creation process.

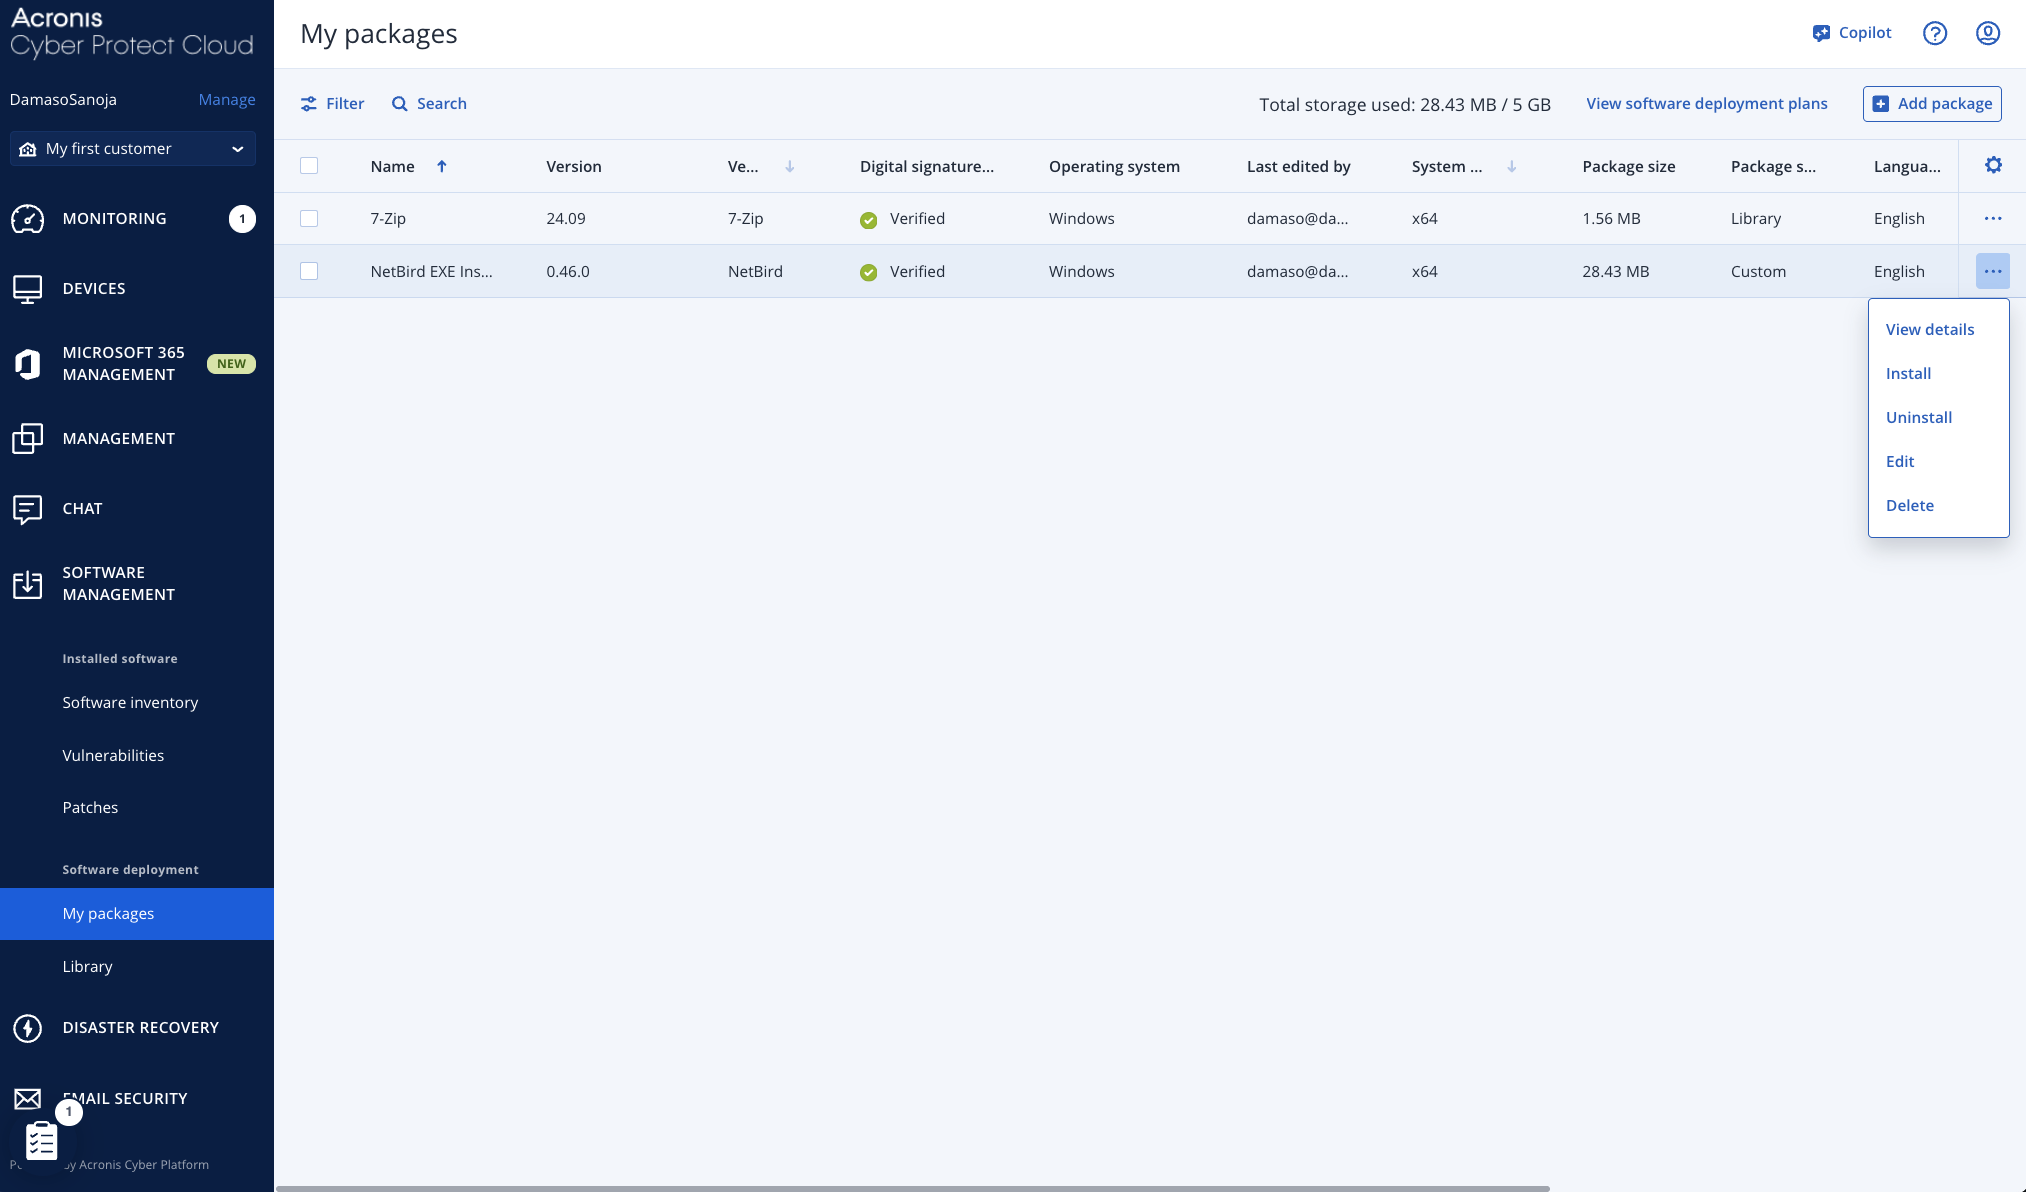
Acronis will perform the digital signature verification automatically. Once completed, you'll see a Verified status next to the NetBird package in your software library.

With the NetBird package successfully added to your Acronis software library, you can now proceed to deploy it across your managed Windows machines.
Deploying the NetBird Package to Windows Endpoints
Acronis Cyber Protect Cloud provides multiple deployment methods for installing NetBird across your managed Windows machines, allowing you to choose the approach that best fits your operational workflow and scheduling requirements.
Method 1: Direct Installation from Package Library
To install NetBird from the available packages, navigate to SOFTWARE MANAGEMENT > My packages and click the three-dot menu next to the NetBird package. Select Install from the dropdown options.
In the Deploy software window, click + Add workloads and select your target machines from the available endpoints.
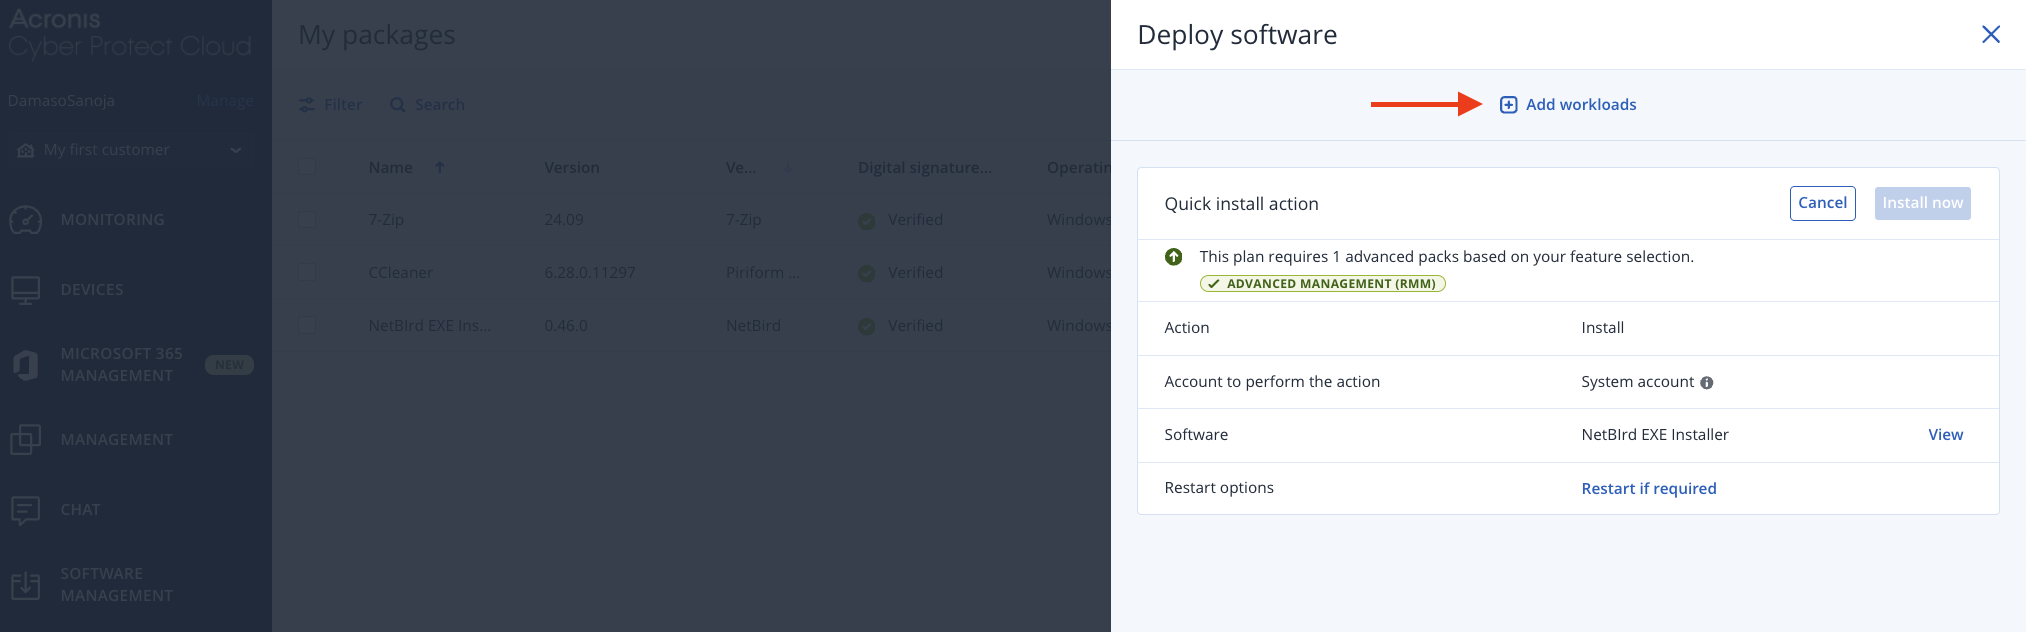
For this example, we selected a single endpoint called Windows-11. Click the Install now button to begin the immediate deployment process.
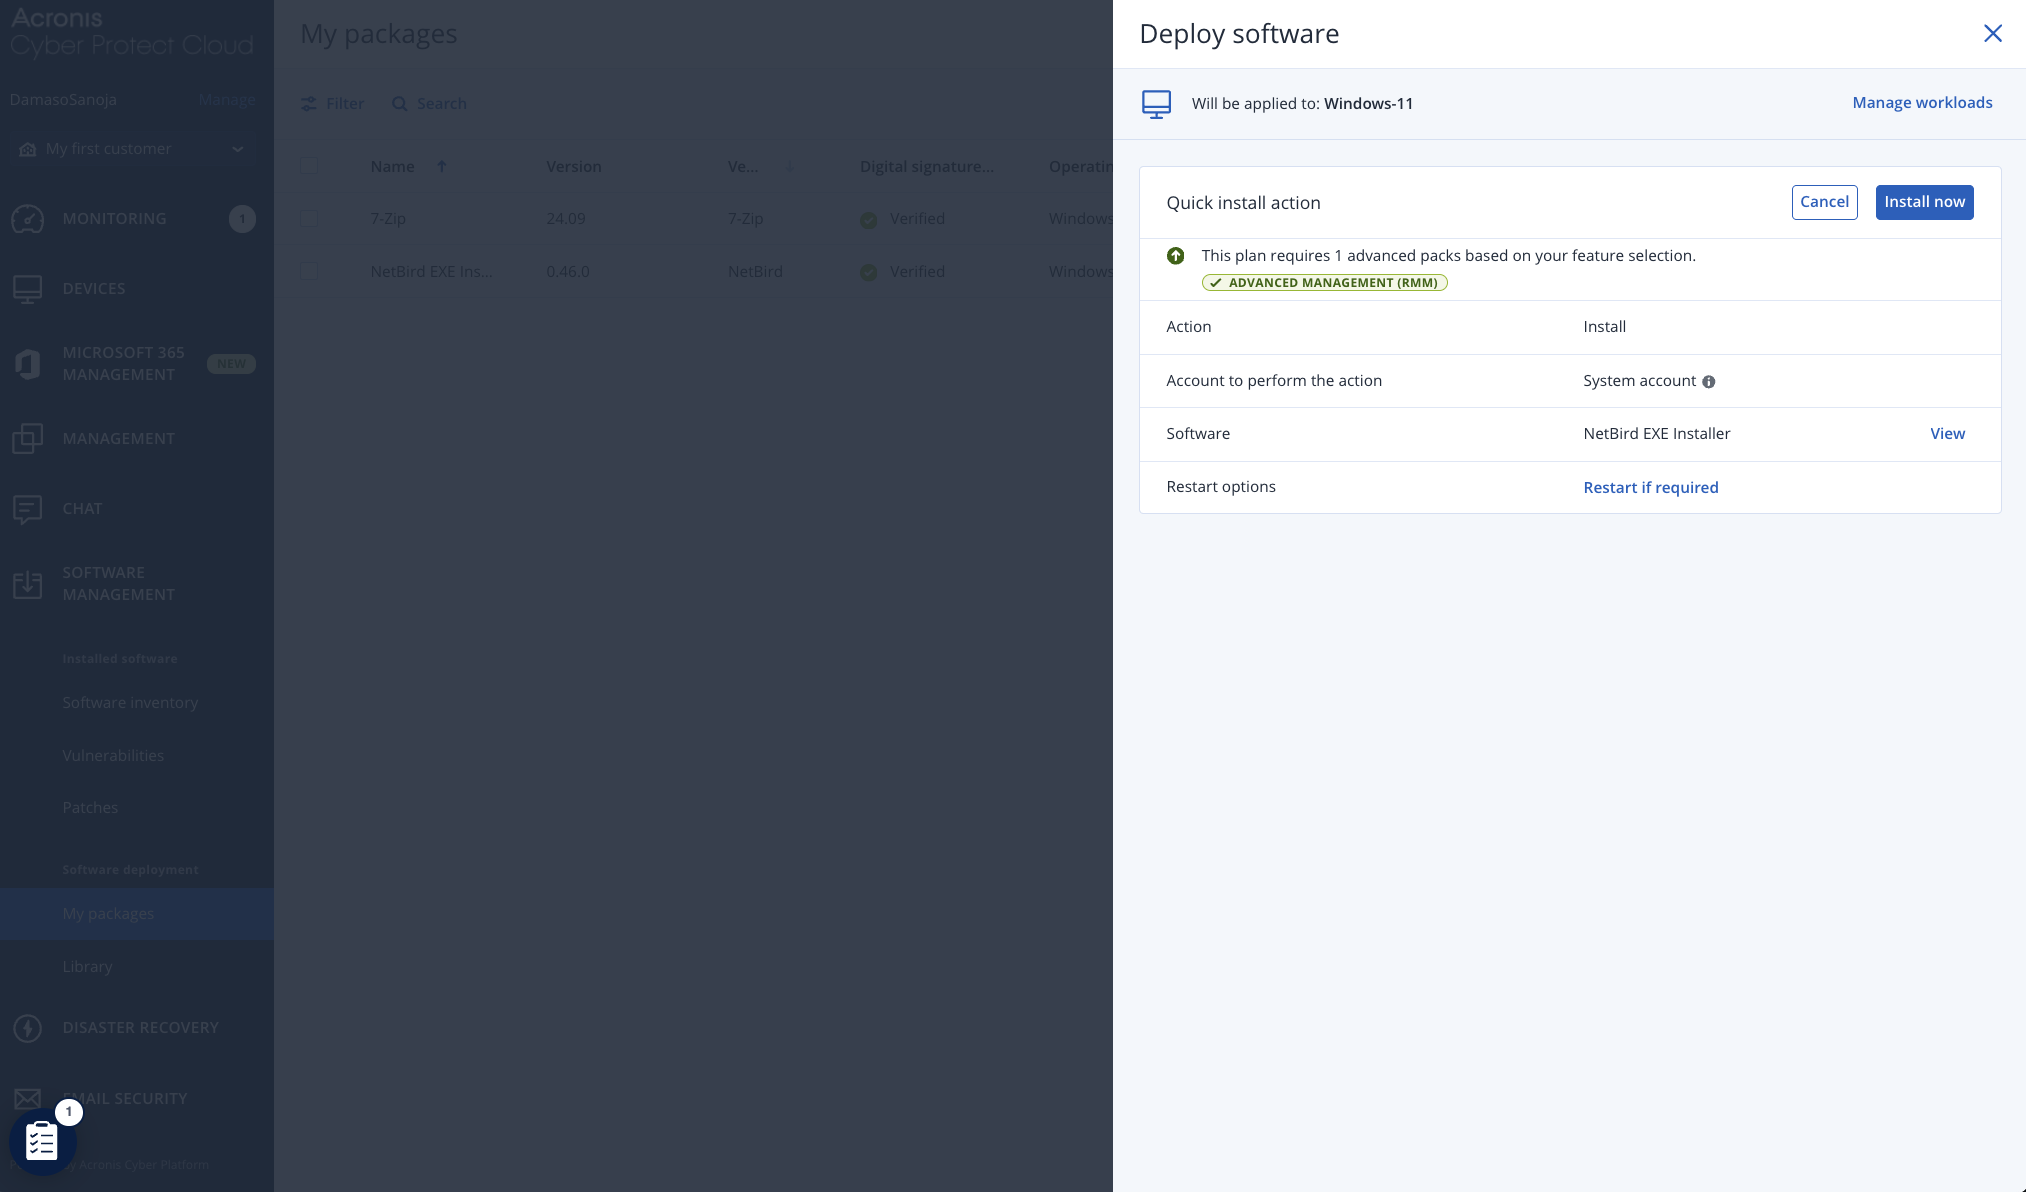
Monitor the installation progress by navigating to MONITORING > Activities, where you can track the deployment status across all selected machines.

Verify successful installation by navigating to SOFTWARE MANAGEMENT > Software inventory, where NetBird should appear in the installed software list for each target machine.

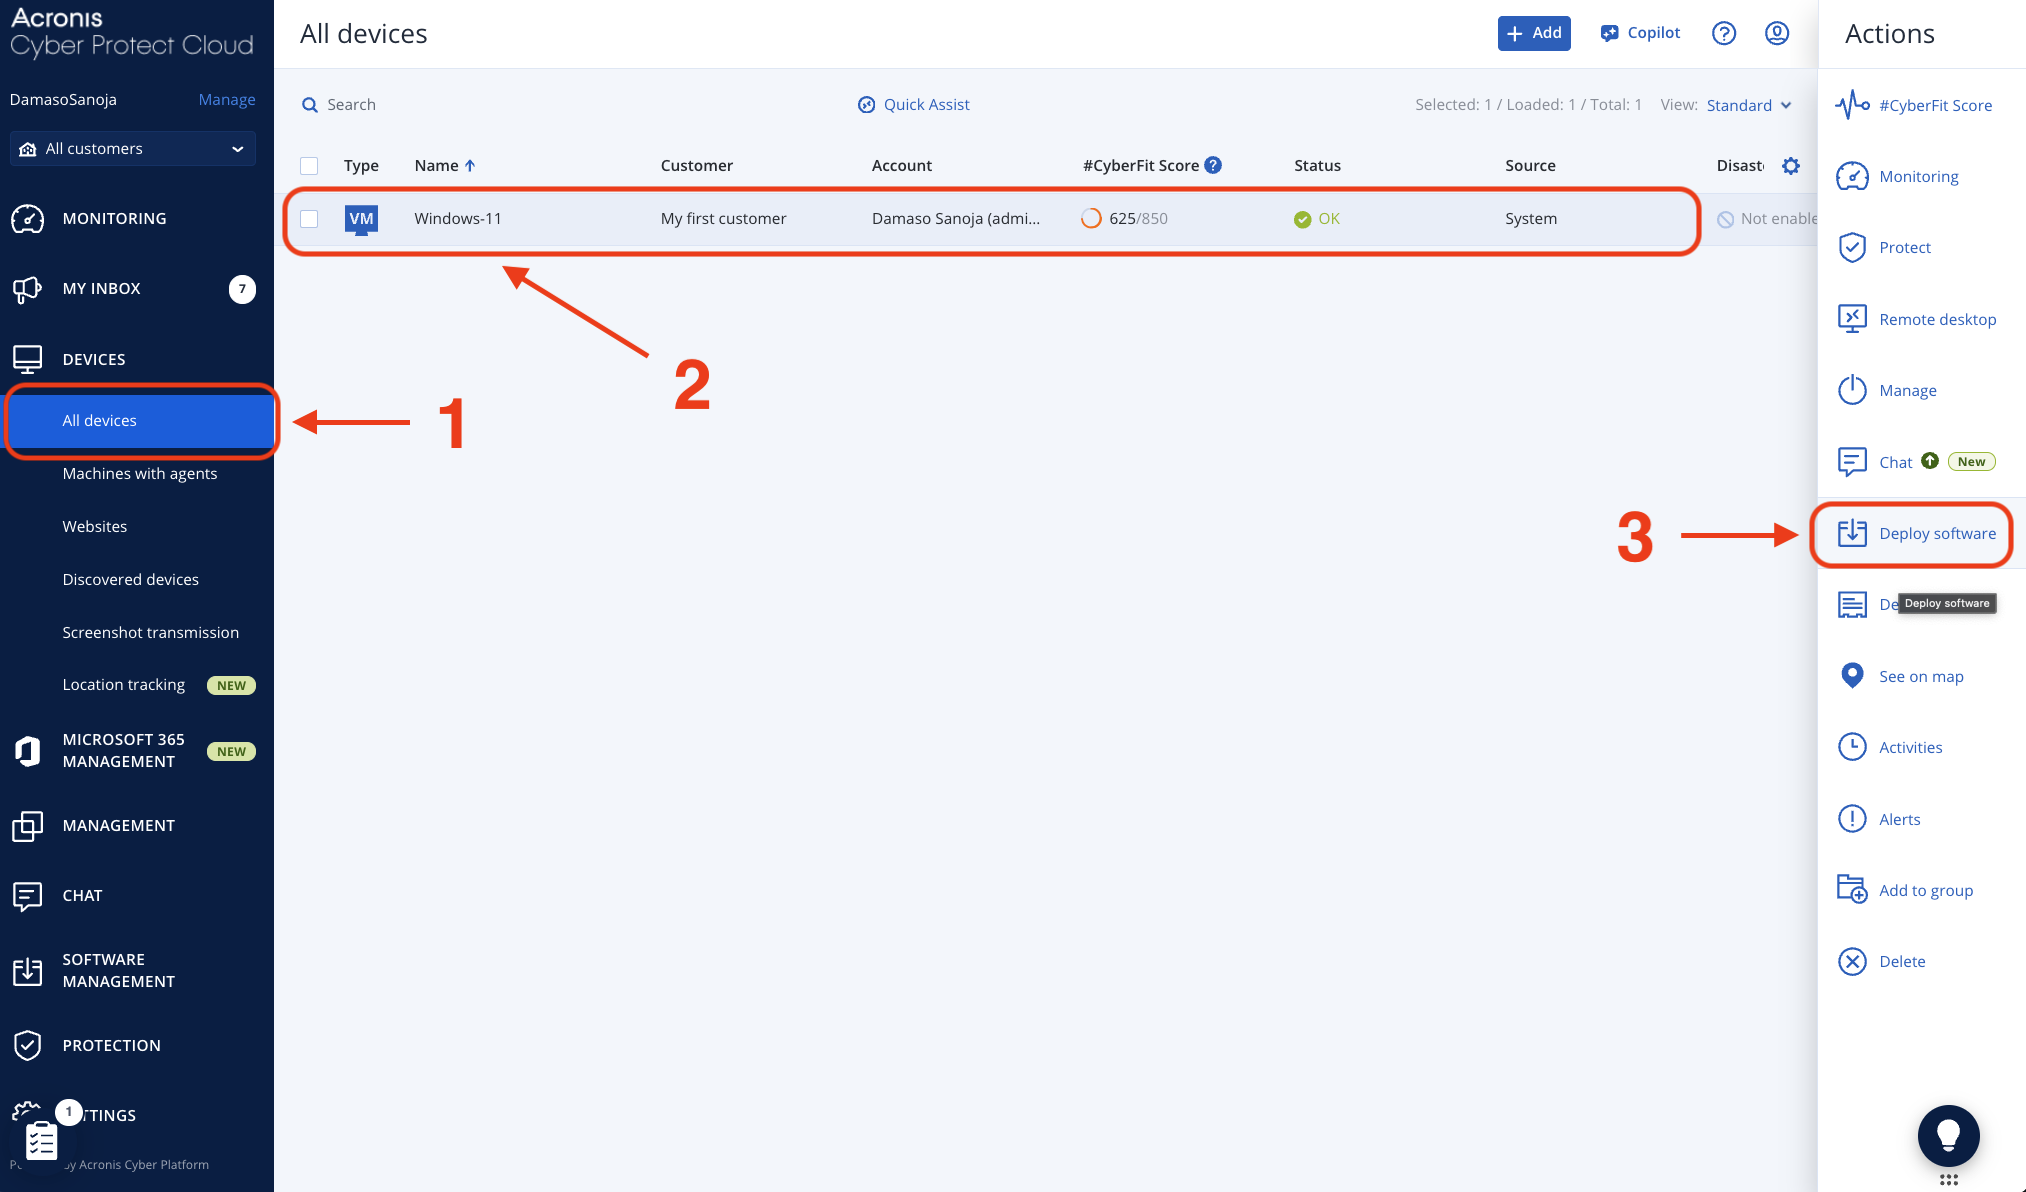
Method 2: Bulk Selection from Device Management
Alternatively, navigate to DEVICES > All devices and select the checkboxes for all target endpoints you want to include in the deployment. Click on any selected device to open the right sidebar, then select Deploy software. This approach opens the same Deploy software interface with your pre-selected workloads ready for deployment.
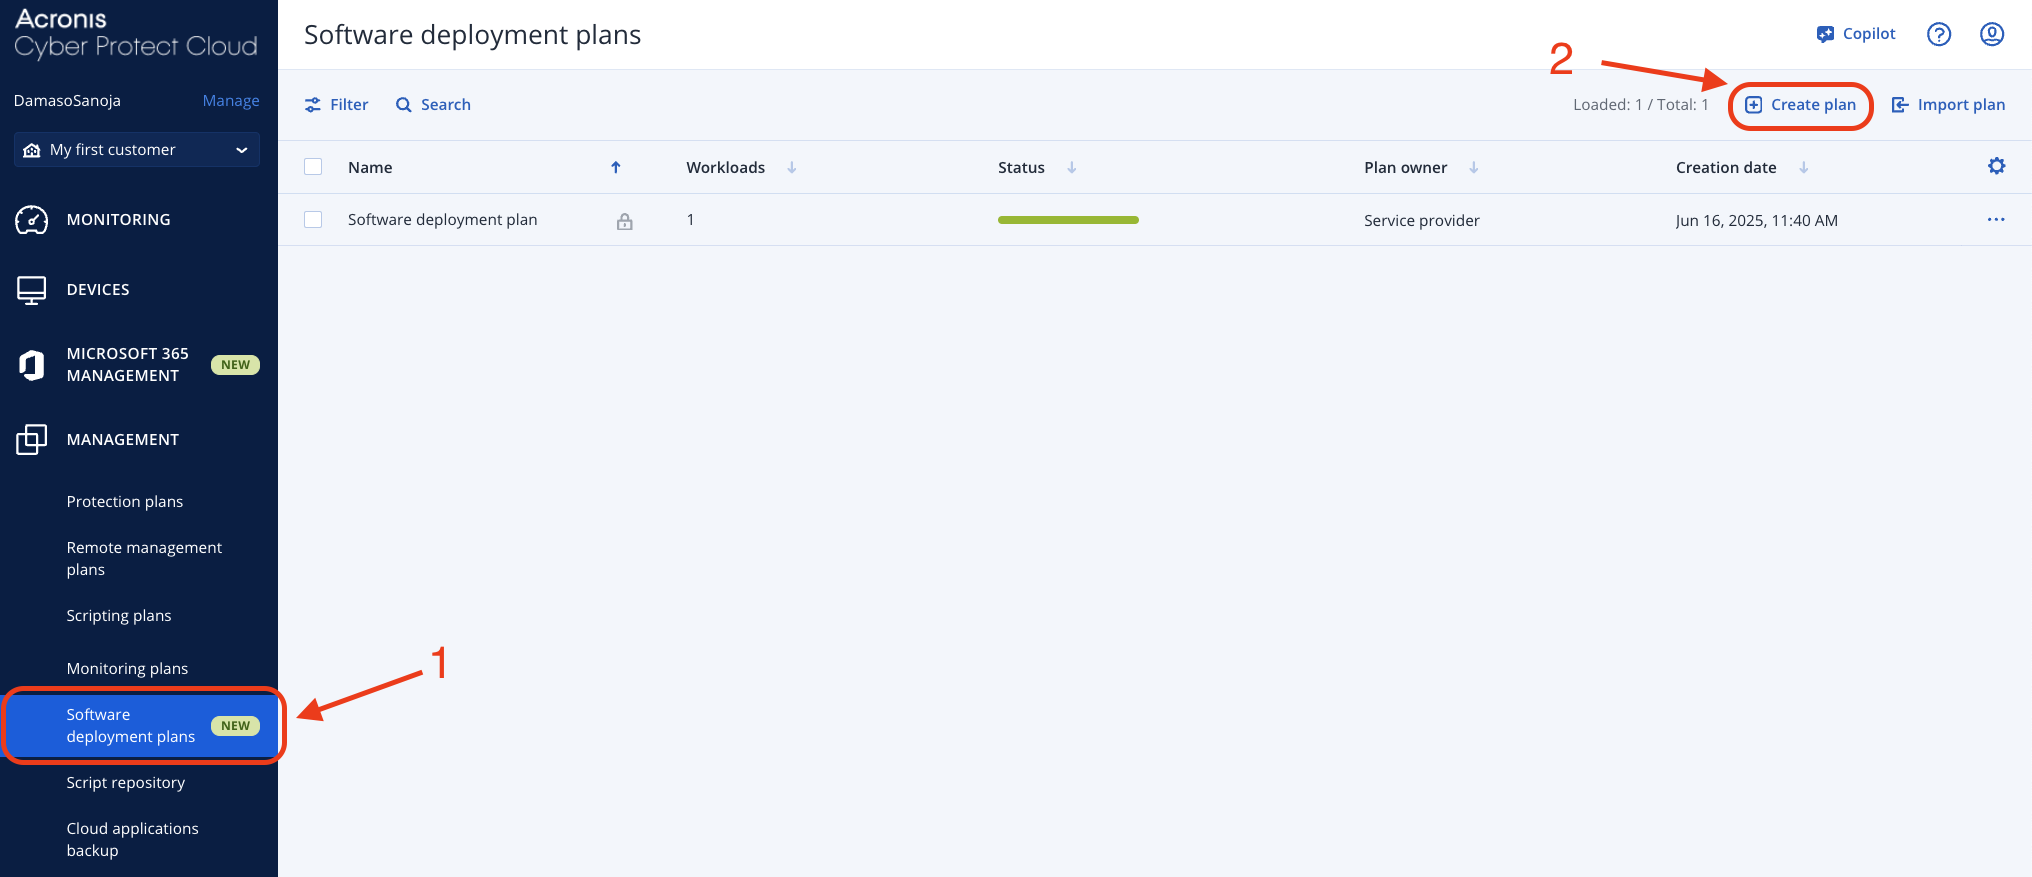
Method 3: Scheduled Deployment Plans
For more advanced deployment control, use Acronis' deployment plans feature. Navigate to MANAGEMENT > Software deployment plans and click + Create plan in the upper right corner.
In the Create software deployment plan window, click the pencil icon to customize the plan name, select either Install or Uninstall under Action, and click Select software to add the NetBird package. Configure your preferred deployment schedule by setting the specific date and time for automated execution.
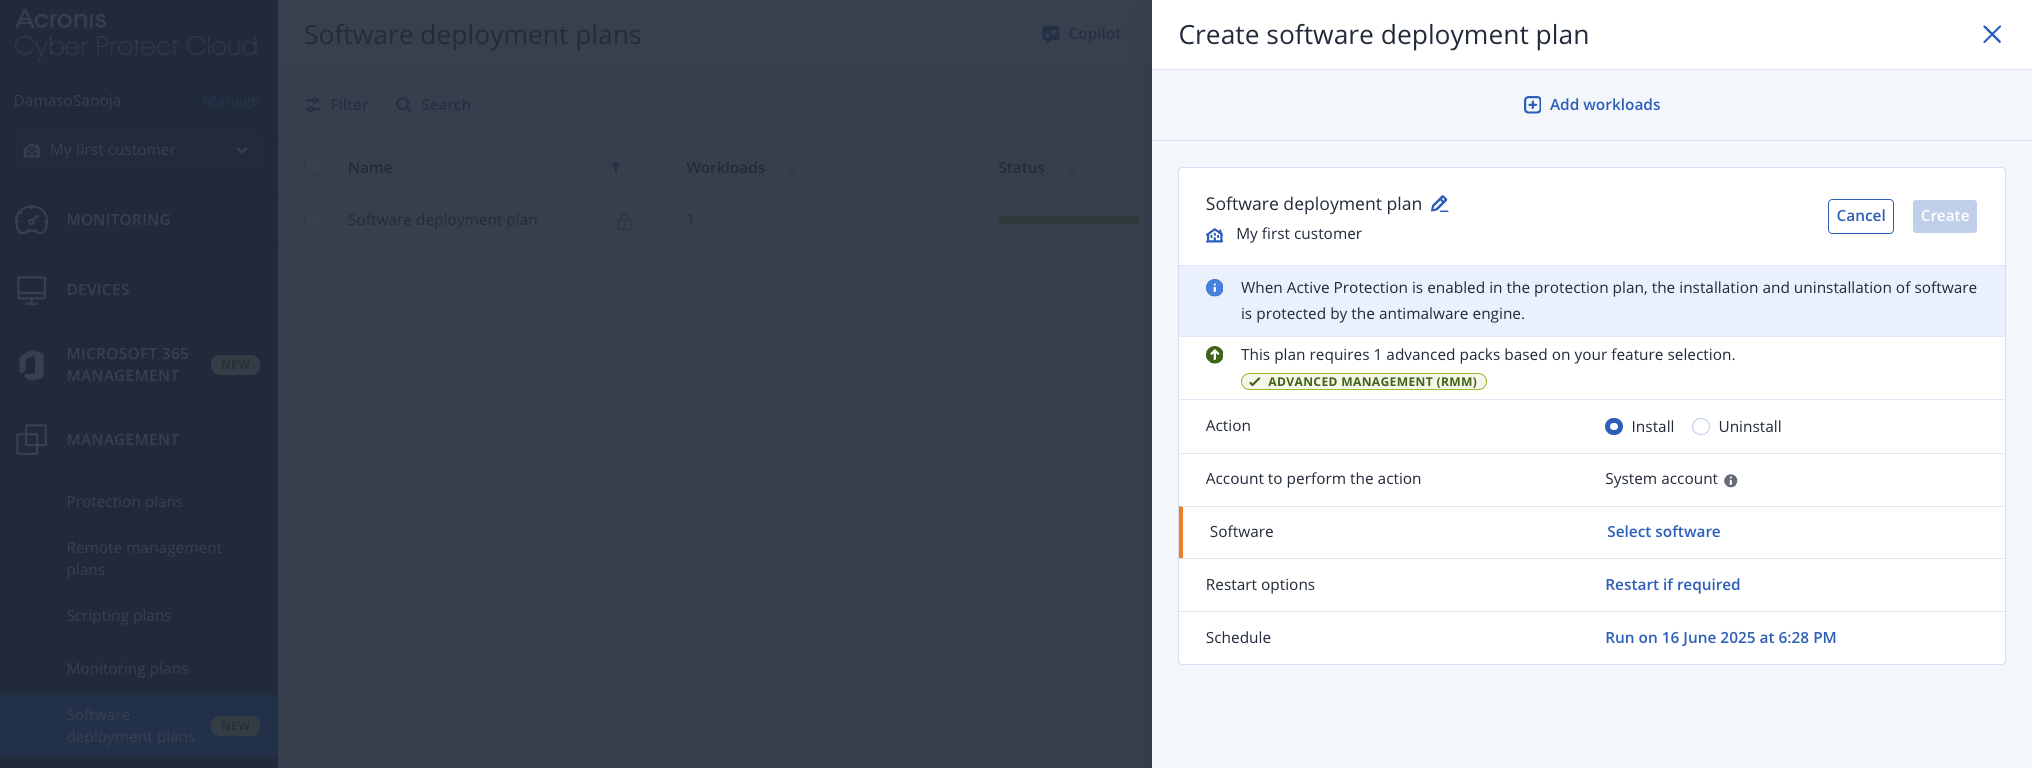
After configuring the plan parameters, click Create to save the plan for future use, or click + Add workloads to immediately select target endpoints and execute the deployment.
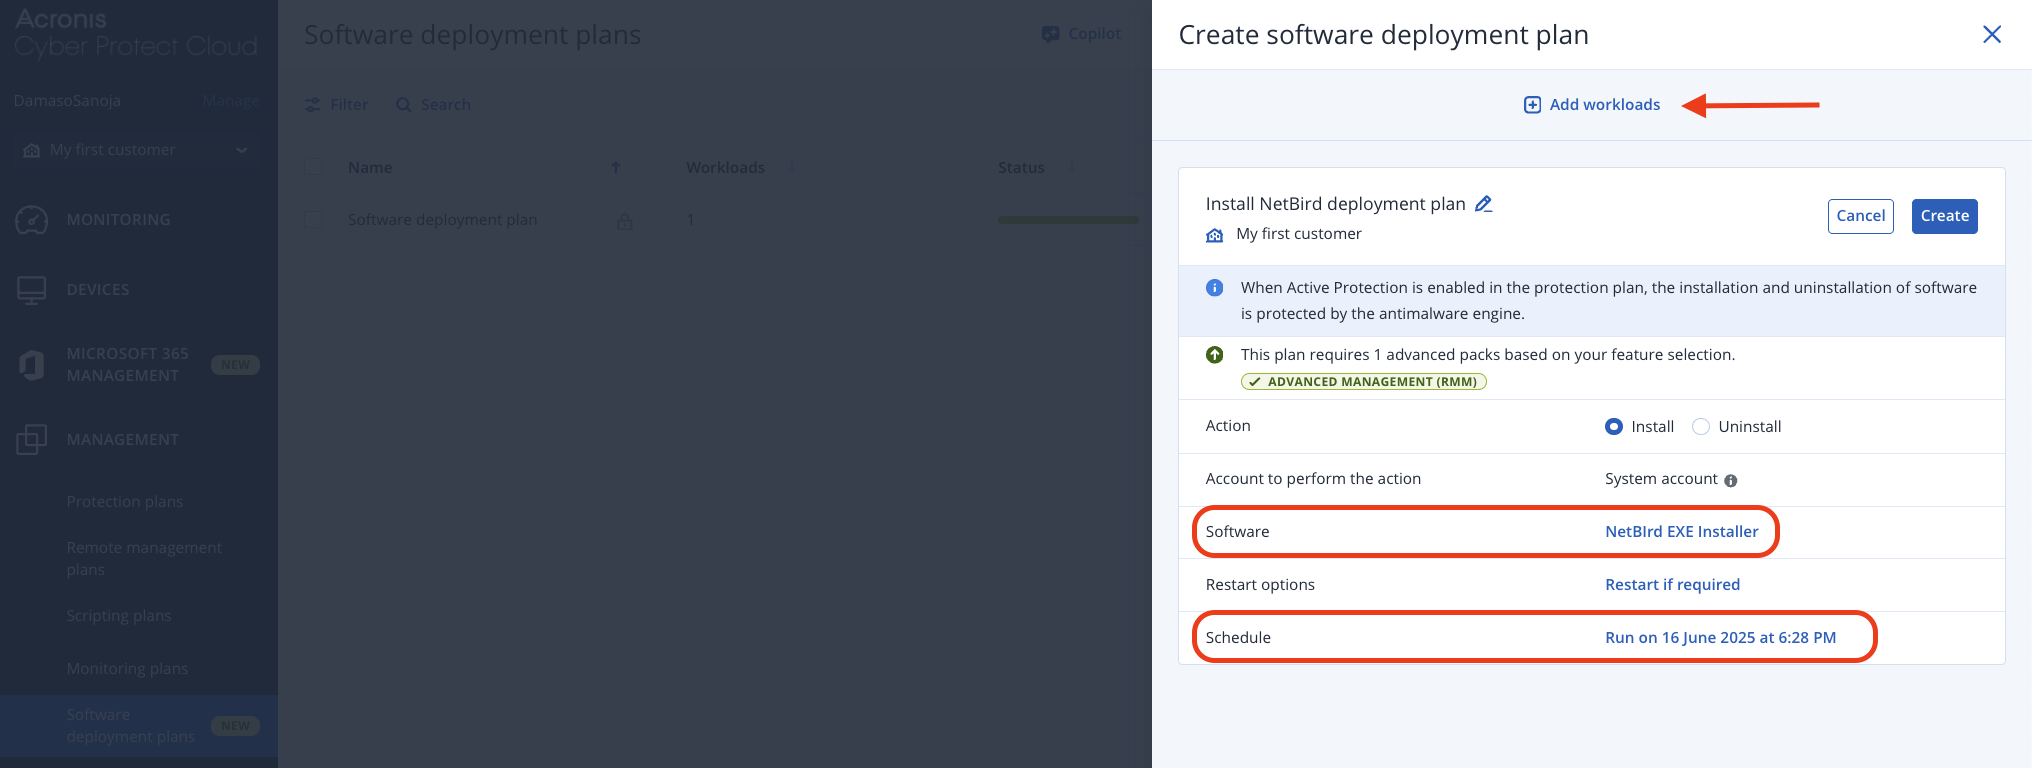
The advantage of deployment plans is that they enable scheduled, repeatable installations across multiple client environments, allowing MSPs to standardize NetBird deployments during designated maintenance windows while maintaining consistent configuration management across all managed endpoints.
Installing NetBird in Windows using a PowerShell Script
In addition to packages, Acronis Cyber Protect Cloud allows you to install NetBird using PowerShell scripts. This method is handy to automate NetBird installation on Windows Servers, especially if you plan to use setup keys.
Adding NetBird PowerShell Scripts to Acronis
To add a new PowerShell script, navigate to MANAGEMENT > Script repository and click the Create script by using AI button.
Paste the following script into the IDE:
# NetBird Windows Installation Script
# Requires Administrator privileges

param(
    [string]$SetupKey = "",
    [string]$ManagementUrl = "",
    [switch]$Silent = $true
)

# Check if running as Administrator
if (-NOT ([Security.Principal.WindowsPrincipal] [Security.Principal.WindowsIdentity]::GetCurrent()).IsInRole([Security.Principal.WindowsBuiltInRole] "Administrator")) {
    Write-Error "This script requires Administrator privileges. Please run as Administrator."
    exit 1
}

try {
    # Define variables
    $TempDir = $env:TEMP
    $NetBirdInstaller = "$TempDir\netbird-installer.exe"

    # Get the latest release URL from GitHub API
    Write-Host "Fetching latest NetBird release information..."
    $ReleaseInfo = Invoke-RestMethod -Uri "https://api.github.com/repos/netbirdio/netbird/releases/latest"

    # Find Windows installer (look for .exe file)
    $WindowsAsset = $ReleaseInfo.assets | Where-Object { $_.name -like "*windows*" -and $_.name -like "*.exe" }

    if (-not $WindowsAsset) {
        Write-Error "Could not find Windows installer in latest release"
        exit 1
    }

    $DownloadUrl = $WindowsAsset.browser_download_url
    Write-Host "Found installer: $($WindowsAsset.name)"

    # Download the installer
    Write-Host "Downloading NetBird installer..."
    Invoke-WebRequest -Uri $DownloadUrl -OutFile $NetBirdInstaller

    # Install NetBird
    Write-Host "Installing NetBird..."
    if ($Silent) {
        $InstallArgs = "/S"  # Silent installation flag for NSIS-based installers
        Start-Process -FilePath $NetBirdInstaller -ArgumentList $InstallArgs -Wait -NoNewWindow
    } else {
        Start-Process -FilePath $NetBirdInstaller -Wait
    }

    # Verify installation
    $NetBirdPath = "C:\Program Files\NetBird\netbird.exe"
    if (Test-Path $NetBirdPath) {
        Write-Host "NetBird installed successfully at: $NetBirdPath" -ForegroundColor Green

        # Start NetBird service if it exists
        $Service = Get-Service -Name "NetBird*" -ErrorAction SilentlyContinue
        if ($Service) {
            Write-Host "Starting NetBird service..."
            Start-Service $Service.Name
        }

        # Connect with setup key if provided
        if ($SetupKey) {
            Write-Host "Connecting NetBird with setup key..."
            $ConnectArgs = @("up", "--setup-key", $SetupKey)
            if ($ManagementUrl) {
                $ConnectArgs += @("--management-url", $ManagementUrl)
            }
            & $NetBirdPath $ConnectArgs
        }

    } else {
        Write-Error "Installation verification failed. NetBird not found at expected location."
        exit 1
    }

} catch {
    Write-Error "Installation failed: $($_.Exception.Message)"
    exit 1
} finally {
    # Cleanup
    if (Test-Path $NetBirdInstaller) {
        Remove-Item $NetBirdInstaller -Force
    }
}

Write-Host "NetBird installation completed successfully!" -ForegroundColor Green
The script automatically downloads the latest .exe installer from the official releases page and installs it using the silent flag.
Next, on the right sidebar:
- Enter a descriptive name for the script (e.g., NetBird EXE Script)
- Ensure the
Languageis set toPowerShelland theOperating systemisWindows. - If needed, Acronis lets you pass
Argumentsto the installer, such as setup keys and the management URL. - Once done, set the script's status to
Approvedand clickSave.

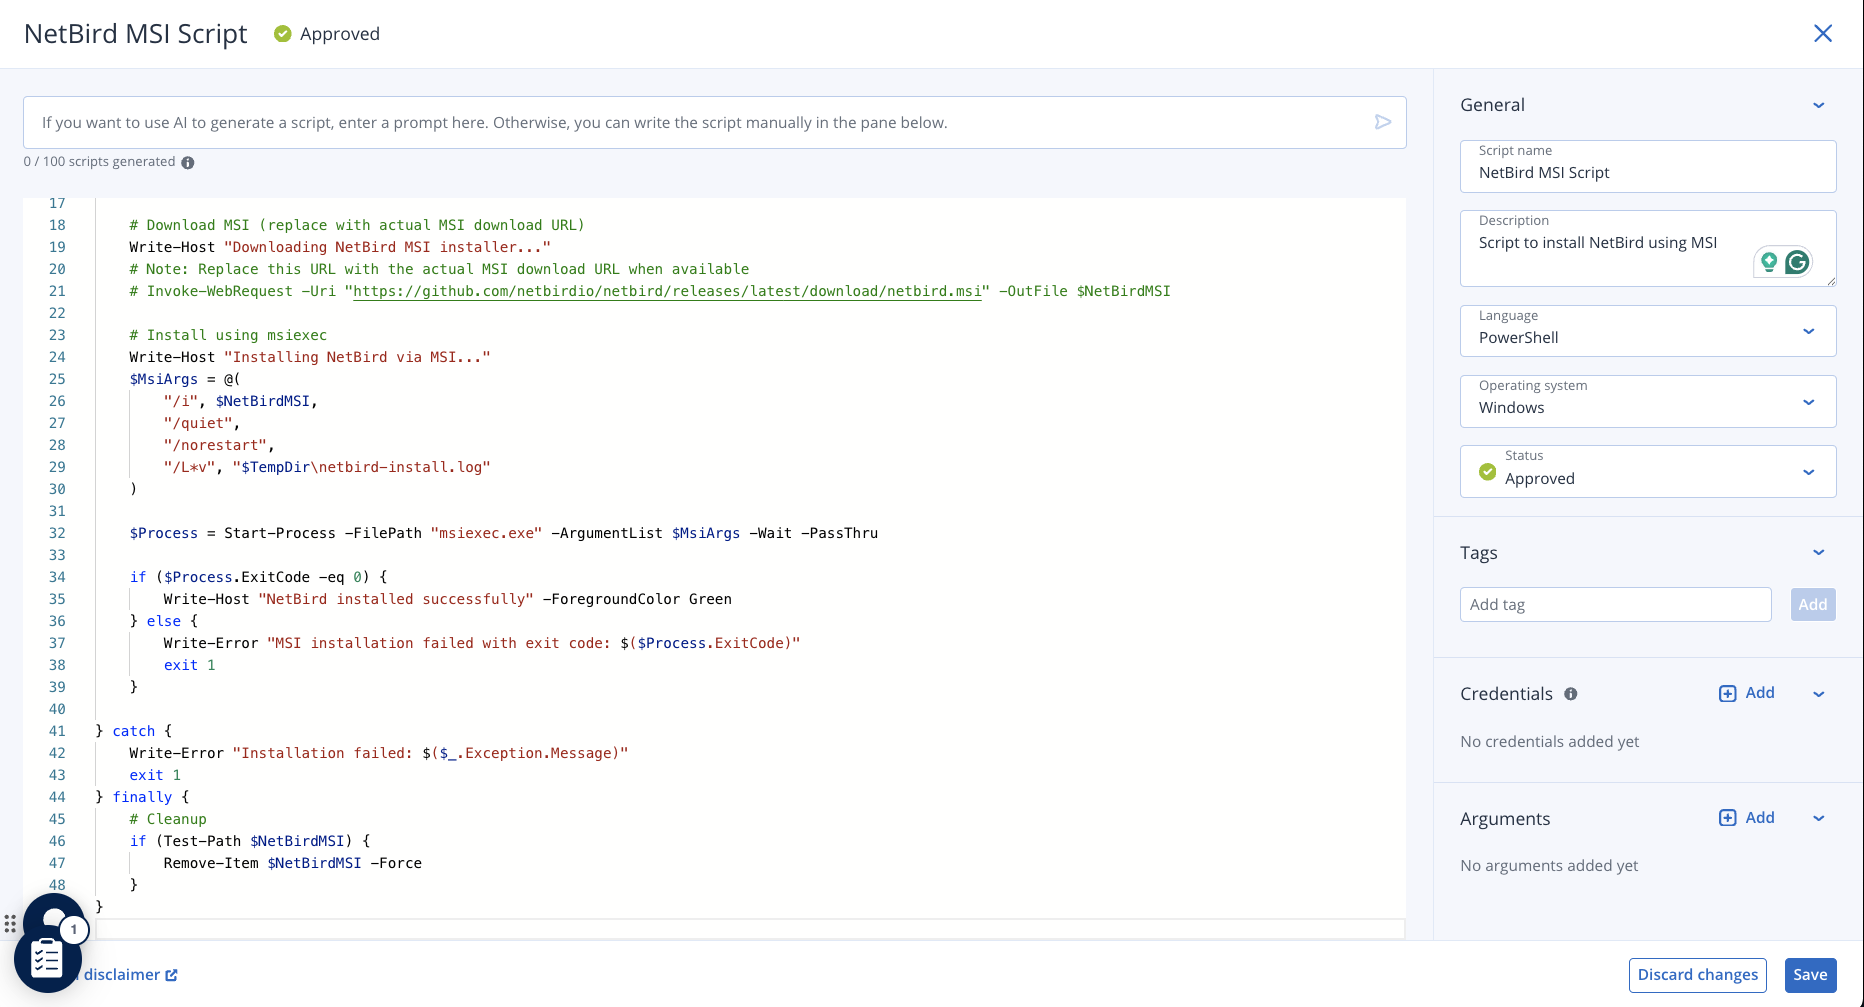
Using a similar procedure, you can add the following script to use the MSI installer instead of the EXE installer:
# NetBird MSI Installation Script
# Requires Administrator privileges

param(
    [string]$SetupKey = "",
    [string]$ManagementUrl = "",
    [switch]$UseLatestRelease = $true
)

# Check if running as Administrator
if (-NOT ([Security.Principal.WindowsPrincipal] [Security.Principal.WindowsIdentity]::GetCurrent()).IsInRole([Security.Principal.WindowsBuiltInRole] "Administrator")) {
    Write-Error "This script requires Administrator privileges. Please run as Administrator."
    exit 1
}

try {
    # Define variables
    $TempDir = $env:TEMP
    $NetBirdMSI = "$TempDir\netbird-installer.msi"

    if ($UseLatestRelease) {
        # Get the latest release from GitHub API
        Write-Host "Fetching latest NetBird release information..."
        $ReleaseInfo = Invoke-RestMethod -Uri "https://api.github.com/repos/netbirdio/netbird/releases/latest"

        # Find MSI installer
        $MSIAsset = $ReleaseInfo.assets | Where-Object { $_.name -like "*windows*" -and $_.name -like "*.msi" }

        if (-not $MSIAsset) {
            Write-Error "Could not find Windows MSI installer in latest release"
            exit 1
        }

        $DownloadUrl = $MSIAsset.browser_download_url
        Write-Host "Found MSI installer: $($MSIAsset.name)"
    } else {
        # Use the direct package repository URL
        $DownloadUrl = "https://pkgs.netbird.io/windows/msi/x64/netbird_installer_windows_amd64.msi"
        Write-Host "Using direct package repository URL"
    }

    # Download the MSI installer
    Write-Host "Downloading NetBird MSI installer from: $DownloadUrl"
    try {
        Invoke-WebRequest -Uri $DownloadUrl -OutFile $NetBirdMSI -UseBasicParsing
        Write-Host "Download completed successfully"
    } catch {
        Write-Error "Failed to download MSI installer: $($_.Exception.Message)"
        exit 1
    }

    # Verify MSI file was downloaded
    if (-not (Test-Path $NetBirdMSI)) {
        Write-Error "MSI installer file not found after download"
        exit 1
    }

    # Install NetBird using msiexec
    Write-Host "Installing NetBird via MSI..."
    $LogFile = "$TempDir\netbird-install.log"

    # Build MSI installation arguments
    $MsiArgs = @(
        "/i", $NetBirdMSI,
        "/qn",           # Quiet mode, no user interface
        "/norestart",    # Do not restart automatically
        "/L*v", $LogFile # Verbose logging
    )

    # Add setup key if provided
    if ($SetupKey) {
        $MsiArgs += "SETUP_KEY=$SetupKey"
    }

    # Add management URL if provided
    if ($ManagementUrl) {
        $MsiArgs += "MANAGEMENT_URL=$ManagementUrl"
    }

    Write-Host "Running: msiexec $($MsiArgs -join ' ')"
    $Process = Start-Process -FilePath "msiexec.exe" -ArgumentList $MsiArgs -Wait -PassThru -NoNewWindow

    # Check installation result
    if ($Process.ExitCode -eq 0) {
        Write-Host "NetBird MSI installation completed successfully" -ForegroundColor Green

        # Verify installation
        $NetBirdPath = "C:\Program Files\NetBird\netbird.exe"
        if (Test-Path $NetBirdPath) {
            Write-Host "NetBird installed successfully at: $NetBirdPath" -ForegroundColor Green

            # Start NetBird service
            $Service = Get-Service -Name "*NetBird*" -ErrorAction SilentlyContinue
            if ($Service) {
                Write-Host "Starting NetBird service..."
                Start-Service $Service.Name -ErrorAction SilentlyContinue
            }

            # Connect with setup key if provided and not already configured via MSI properties
            if ($SetupKey -and -not $MsiArgs.Contains("SETUP_KEY")) {
                Write-Host "Connecting NetBird with setup key..."
                $ConnectArgs = @("up", "--setup-key", $SetupKey)
                if ($ManagementUrl) {
                    $ConnectArgs += @("--management-url", $ManagementUrl)
                }
                & $NetBirdPath $ConnectArgs
            }

        } else {
            Write-Error "Installation verification failed. NetBird not found at expected location."
            if (Test-Path $LogFile) {
                Write-Host "Installation log content:"
                Get-Content $LogFile | Select-Object -Last 20
            }
            exit 1
        }

    } else {
        Write-Error "MSI installation failed with exit code: $($Process.ExitCode)"
        if (Test-Path $LogFile) {
            Write-Host "Installation log content:"
            Get-Content $LogFile | Select-Object -Last 20
        }
        exit 1
    }

} catch {
    Write-Error "Installation failed: $($_.Exception.Message)"
    exit 1
} finally {
    # Cleanup
    if (Test-Path $NetBirdMSI) {
        Remove-Item $NetBirdMSI -Force -ErrorAction SilentlyContinue
    }
}

Write-Host "NetBird MSI installation completed successfully!" -ForegroundColor Green
The script downloads the official .msi installer and uses the silent flag to install NetBird on Windows machines, just as the .exe installer.
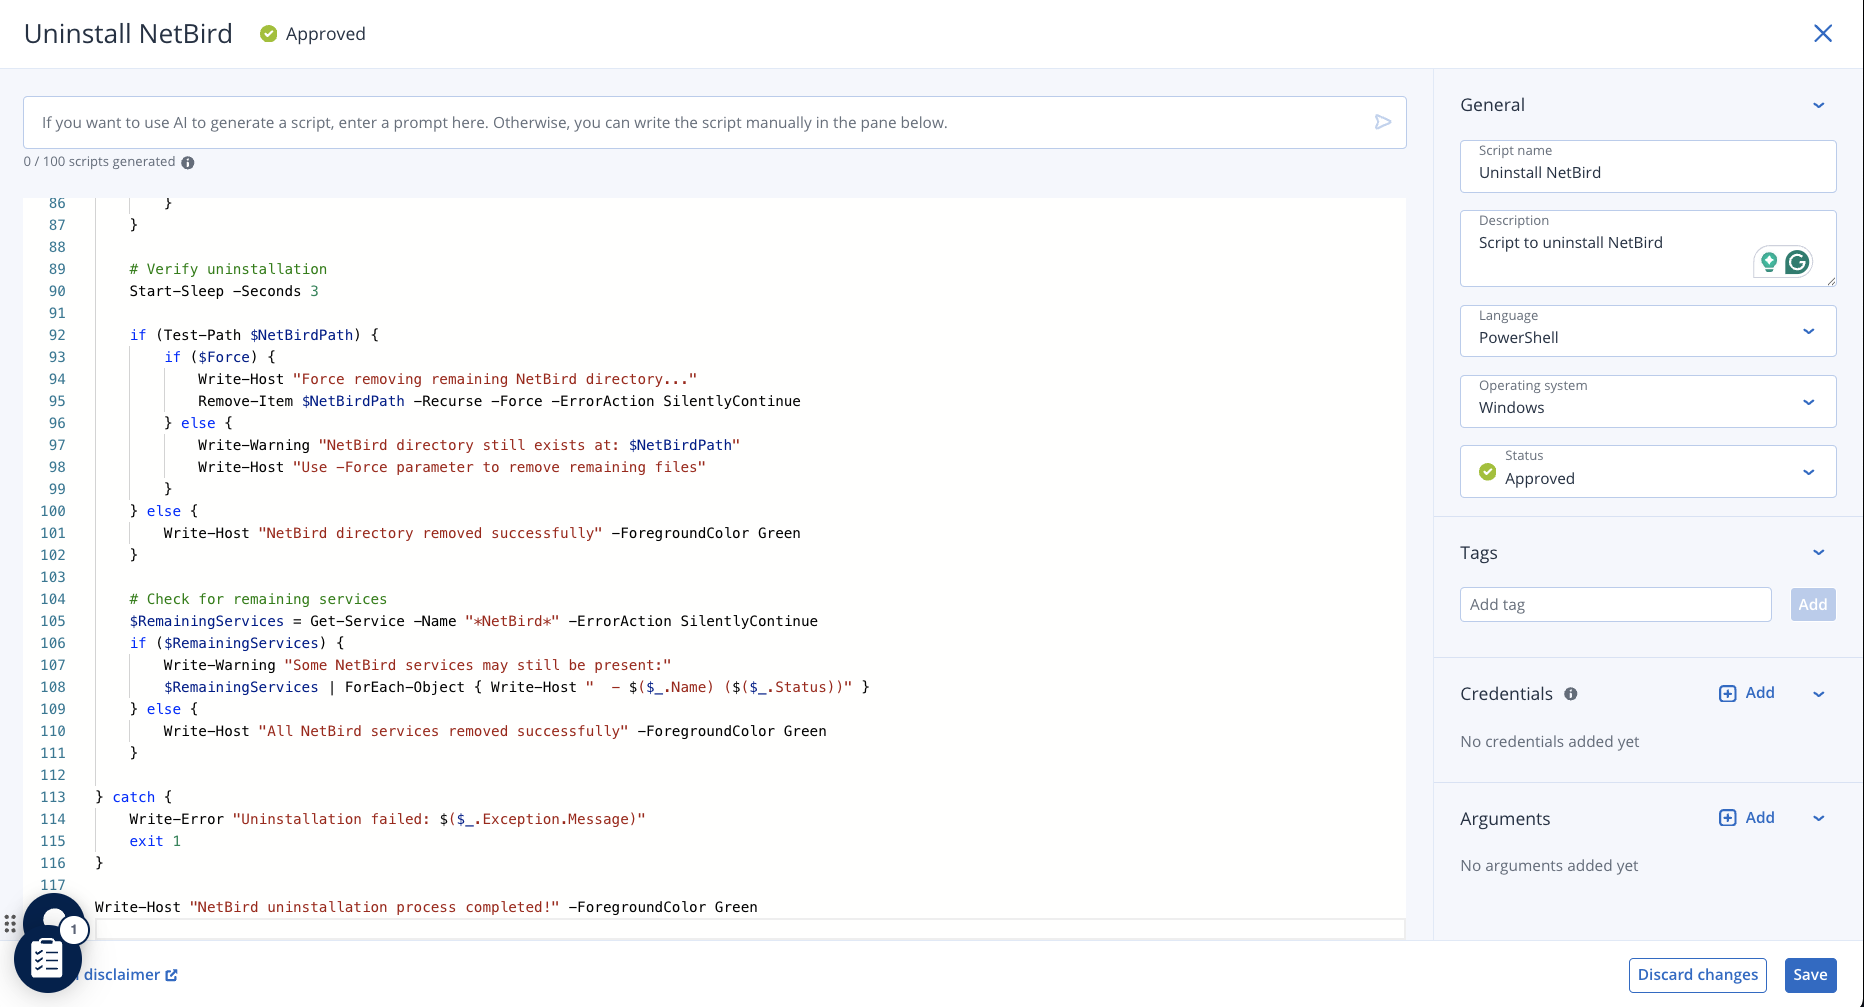
Likewise, you can add an Uninstall NetBird script:
# NetBird Windows Uninstall Script
# Requires Administrator privileges

param(
    [switch]$Silent = $true,
    [switch]$Force = $false
)

# Check if running as Administrator
if (-NOT ([Security.Principal.WindowsPrincipal] [Security.Principal.WindowsIdentity]::GetCurrent()).IsInRole([Security.Principal.WindowsBuiltInRole] "Administrator")) {
    Write-Error "This script requires Administrator privileges. Please run as Administrator."
    exit 1
}

try {
    Write-Host "Starting NetBird uninstallation..." -ForegroundColor Yellow

    # Define paths
    $NetBirdPath = "C:\Program Files\NetBird"
    $NetBirdUninstaller = "$NetBirdPath\netbird_uninstall.exe"
    $NetBirdExe = "$NetBirdPath\netbird.exe"

    # Stop NetBird service first
    Write-Host "Stopping NetBird services..."
    try {
        $NetBirdServices = Get-Service -Name "*NetBird*" -ErrorAction SilentlyContinue
        foreach ($Service in $NetBirdServices) {
            if ($Service.Status -eq 'Running') {
                Write-Host "Stopping service: $($Service.Name)"
                Stop-Service $Service.Name -Force -ErrorAction SilentlyContinue
            }
        }
    } catch {
        Write-Warning "Could not stop NetBird services: $($_.Exception.Message)"
    }

    # Use NetBird CLI to uninstall service if available
    if (Test-Path $NetBirdExe) {
        try {
            Write-Host "Uninstalling NetBird service via CLI..."
            & $NetBirdExe service uninstall
        } catch {
            Write-Warning "CLI service uninstall failed: $($_.Exception.Message)"
        }
    }

    # Stop all NetBird processes
    Write-Host "Stopping NetBird processes..."
    try {
        Get-Process | Where-Object { $_.Name -like "*netbird*" } | Stop-Process -Force -ErrorAction SilentlyContinue
        Start-Sleep -Seconds 2
    } catch {
        Write-Warning "Could not stop all NetBird processes: $($_.Exception.Message)"
    }

    # Run the uninstaller
    if (Test-Path $NetBirdUninstaller) {
        Write-Host "Running NetBird uninstaller: $NetBirdUninstaller"

        if ($Silent) {
            $UninstallArgs = "/S"  # Silent uninstall flag
            $Process = Start-Process -FilePath $NetBirdUninstaller -ArgumentList $UninstallArgs -Wait -PassThru -NoNewWindow
        } else {
            $Process = Start-Process -FilePath $NetBirdUninstaller -Wait -PassThru
        }

        if ($Process.ExitCode -eq 0) {
            Write-Host "NetBird uninstaller completed successfully" -ForegroundColor Green
        } else {
            Write-Warning "Uninstaller exit code: $($Process.ExitCode)"
        }

    } else {
        Write-Warning "NetBird uninstaller not found at: $NetBirdUninstaller"

        # Alternative: Try using Windows Uninstall via registry/WMI
        Write-Host "Attempting alternative uninstall method..."
        try {
            $UninstallEntry = Get-WmiObject -Class Win32_Product | Where-Object { $_.Name -like "*NetBird*" }
            if ($UninstallEntry) {
                Write-Host "Found NetBird in installed programs, removing..."
                $UninstallEntry.Uninstall()
            }
        } catch {
            Write-Warning "Alternative uninstall method failed: $($_.Exception.Message)"
        }
    }

    # Verify uninstallation
    Start-Sleep -Seconds 3

    if (Test-Path $NetBirdPath) {
        if ($Force) {
            Write-Host "Force removing remaining NetBird directory..."
            Remove-Item $NetBirdPath -Recurse -Force -ErrorAction SilentlyContinue
        } else {
            Write-Warning "NetBird directory still exists at: $NetBirdPath"
            Write-Host "Use -Force parameter to remove remaining files"
        }
    } else {
        Write-Host "NetBird directory removed successfully" -ForegroundColor Green
    }

    # Check for remaining services
    $RemainingServices = Get-Service -Name "*NetBird*" -ErrorAction SilentlyContinue
    if ($RemainingServices) {
        Write-Warning "Some NetBird services may still be present:"
        $RemainingServices | ForEach-Object { Write-Host "  - $($_.Name) ($($_.Status))" }
    } else {
        Write-Host "All NetBird services removed successfully" -ForegroundColor Green
    }

} catch {
    Write-Error "Uninstallation failed: $($_.Exception.Message)"
    exit 1
}

Write-Host "NetBird uninstallation process completed!" -ForegroundColor Green
The script executes netbird_uninstall.exe using the silent flag to remove NetBird from Windows endpoints.
If you need to edit or delete any script, you can do it by navigating to MANAGEMENT > Script repository > My scripts
Deploying NetBird Scripts to Windows Endpoints
As with packages, you can use different methods to deploy NetBird scripts to Windows endpoints:
Method 1: Quick Run from My scripts
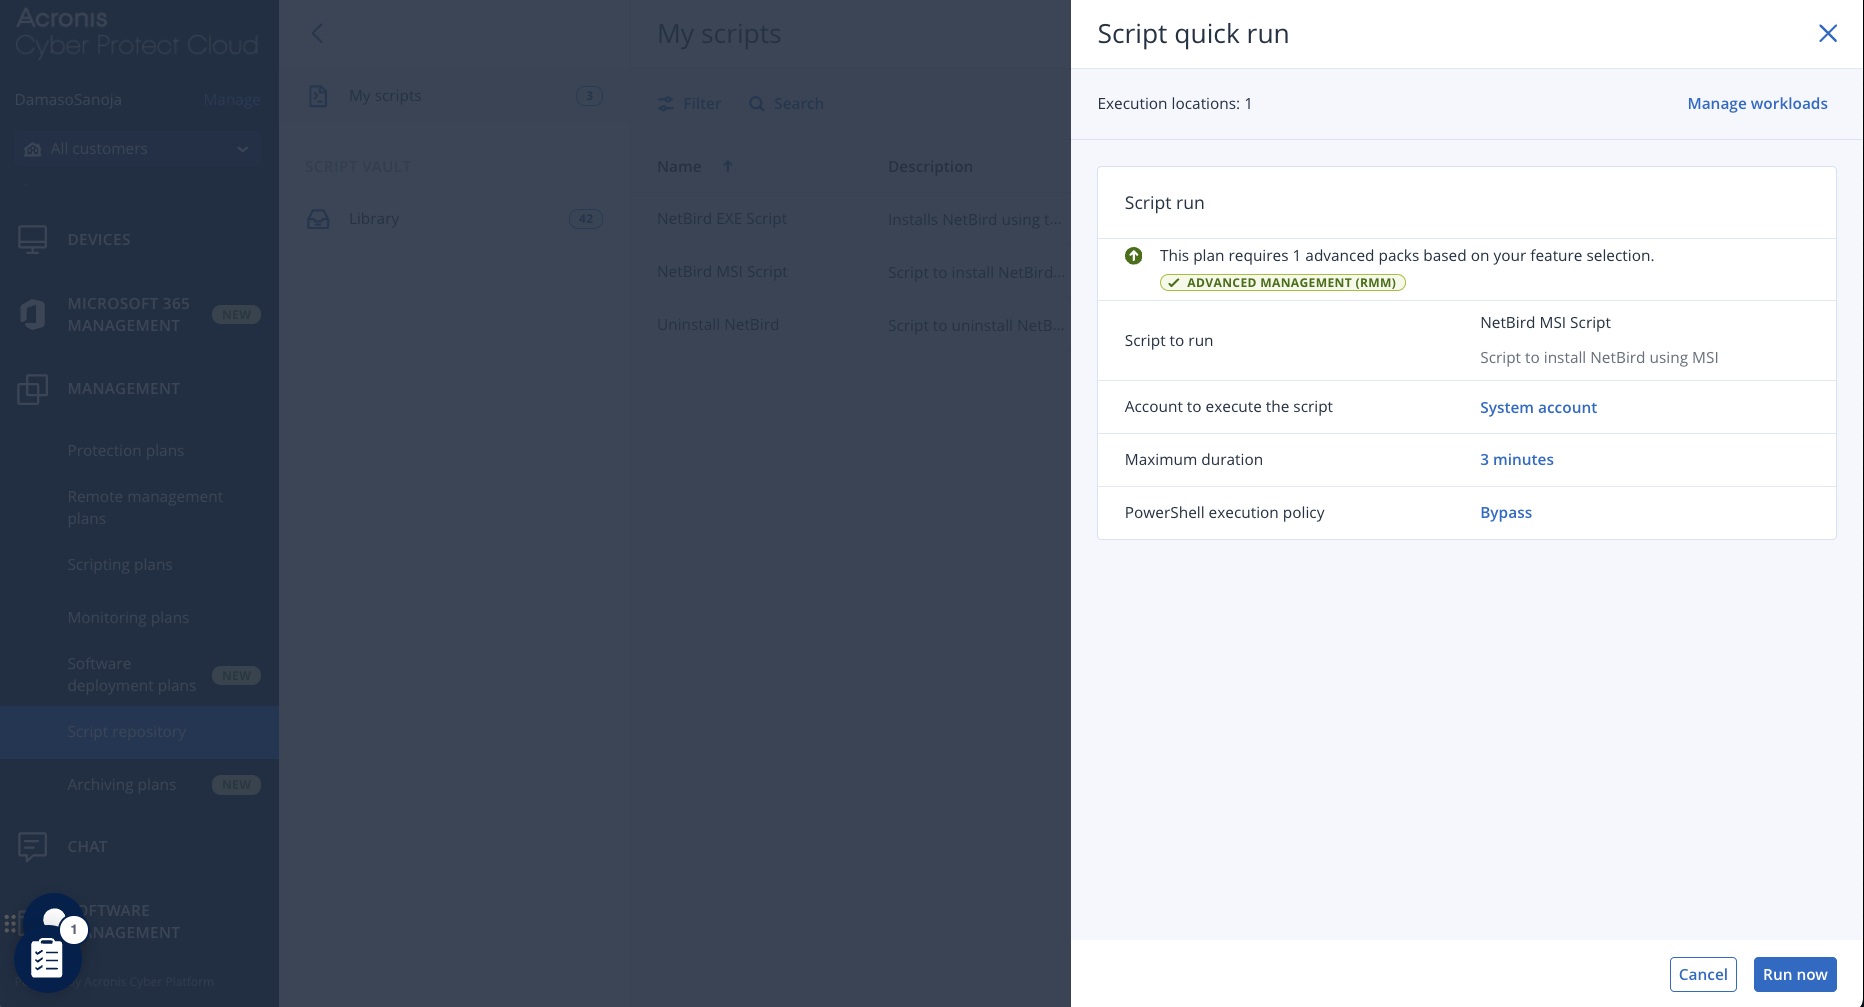
Navigate to MANAGEMENT > Script repository > My scripts, click the three-dot menu on the script you want to install, and select Script quick run:
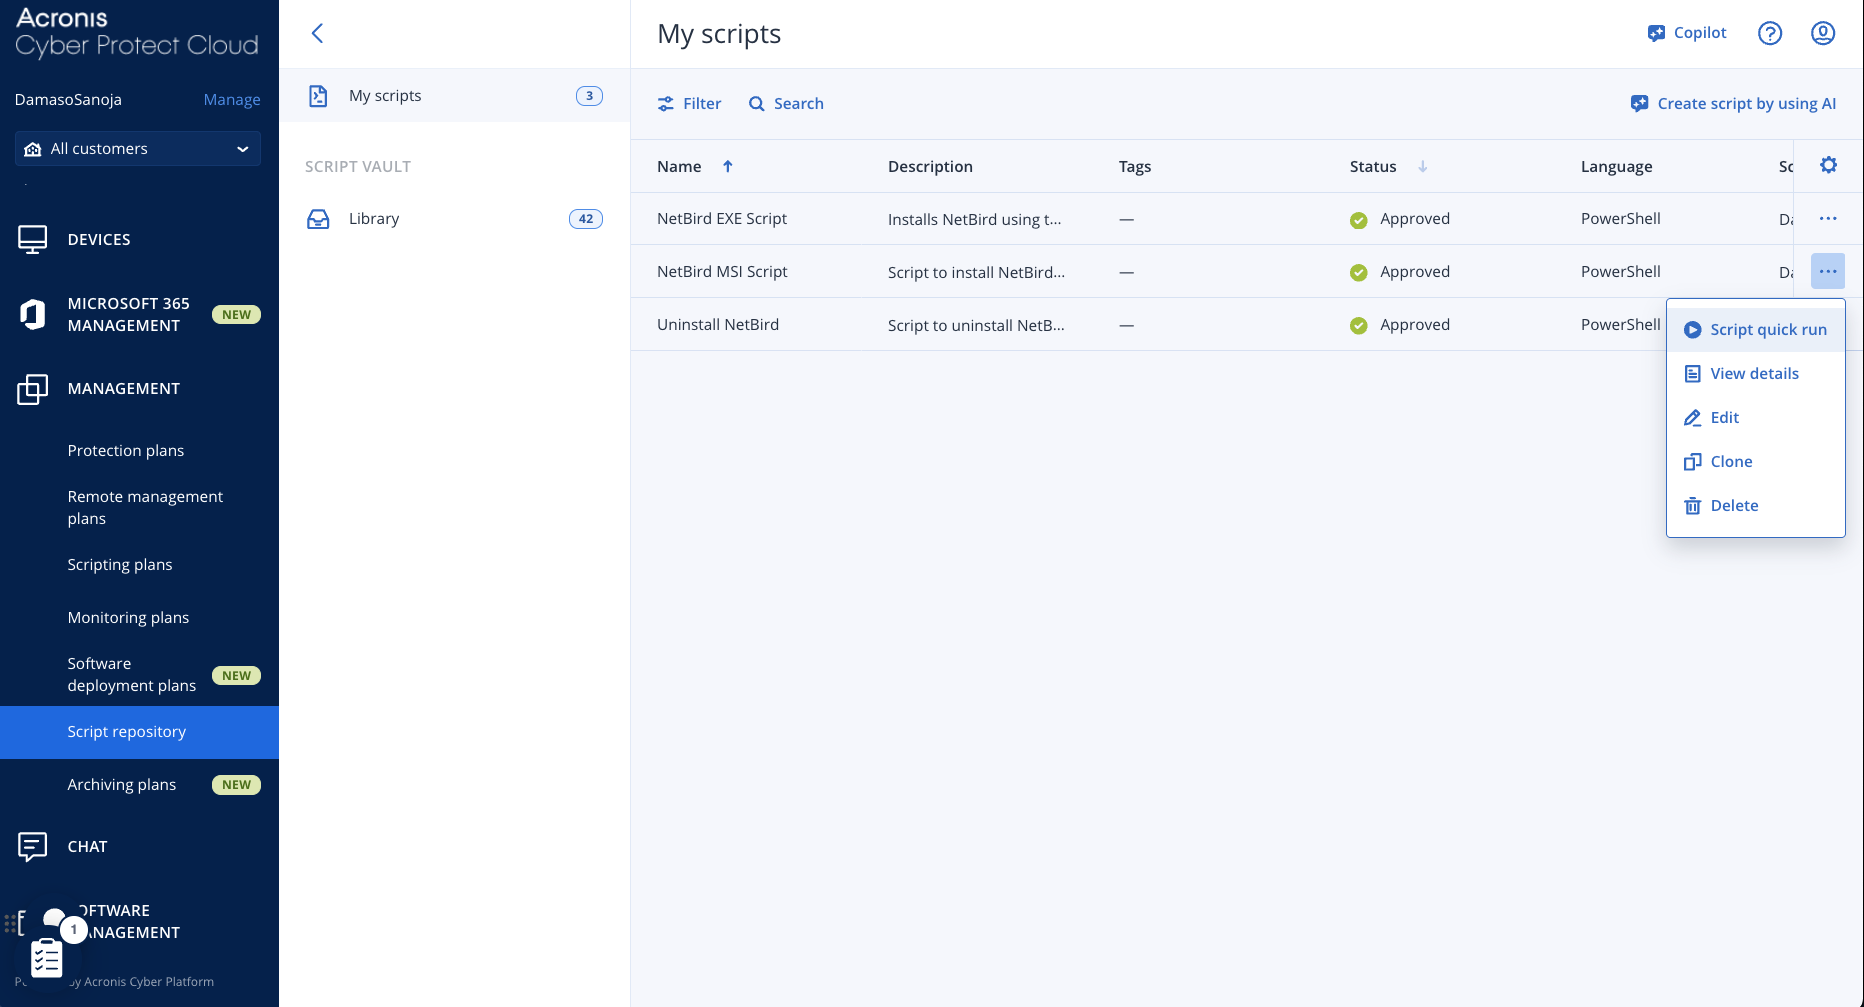
Next, you can select the workloads where you want to run the script and click the Run now button.
As before, you can follow the installation progress by navigating to MONITORING > Activities.
Method 2: Scheduled Scripting Plans
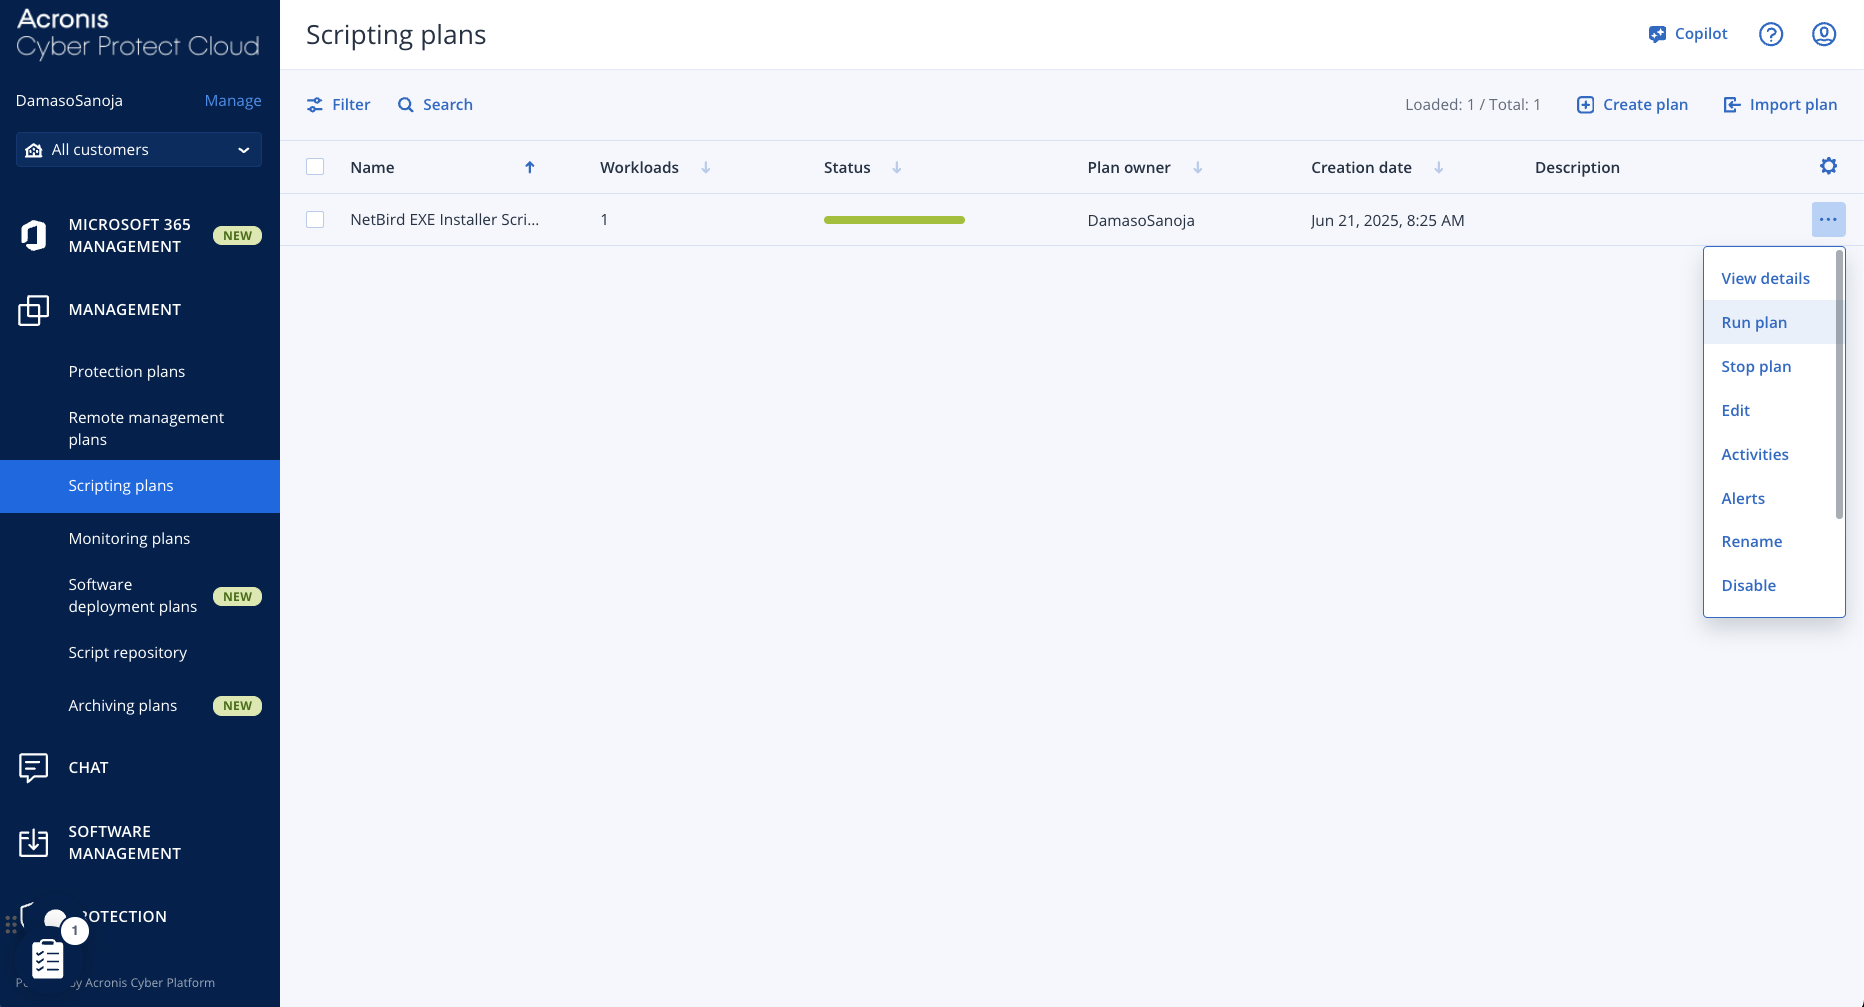
Navigate to MANAGEMENT > Scripting plans and click on Create plan. Next:
- Click on the little “pencil” icon to provide a name to the plan.
- Choose the script to run, the schedule to run it, and the maximum duration
- Add the desired workloads
- Once ready, click the
Createbutton.

From MANAGEMENT > Scripting plans, you can click on the three-dot menu of any plan to view its details, edit it, or manually run it.
Installing NetBird in macOS using a Bash Script
For large-scale deployments, you can automate the NetBird client installation on multiple macOS endpoints using a Bash script. This method downloads the official package directly from NetBird's GitHub releases and proceeds with the installation.
You can optionally use NetBird's setup keys to pre-authorize devices during provisioning. The key ensures that once a machine joins the network, it is automatically placed in the correct groups with all the right access permissions already applied.
Adding NetBird Bash Scripts to Acronis
Download the most recent NetBird macOS installer script using the following command:
curl -fsSL https://pkgs.netbird.io/install.sh > install.sh
The script downloads the latest macOS package (.pkg) from the official NetBird releases page and perform a silent, unattended installation.
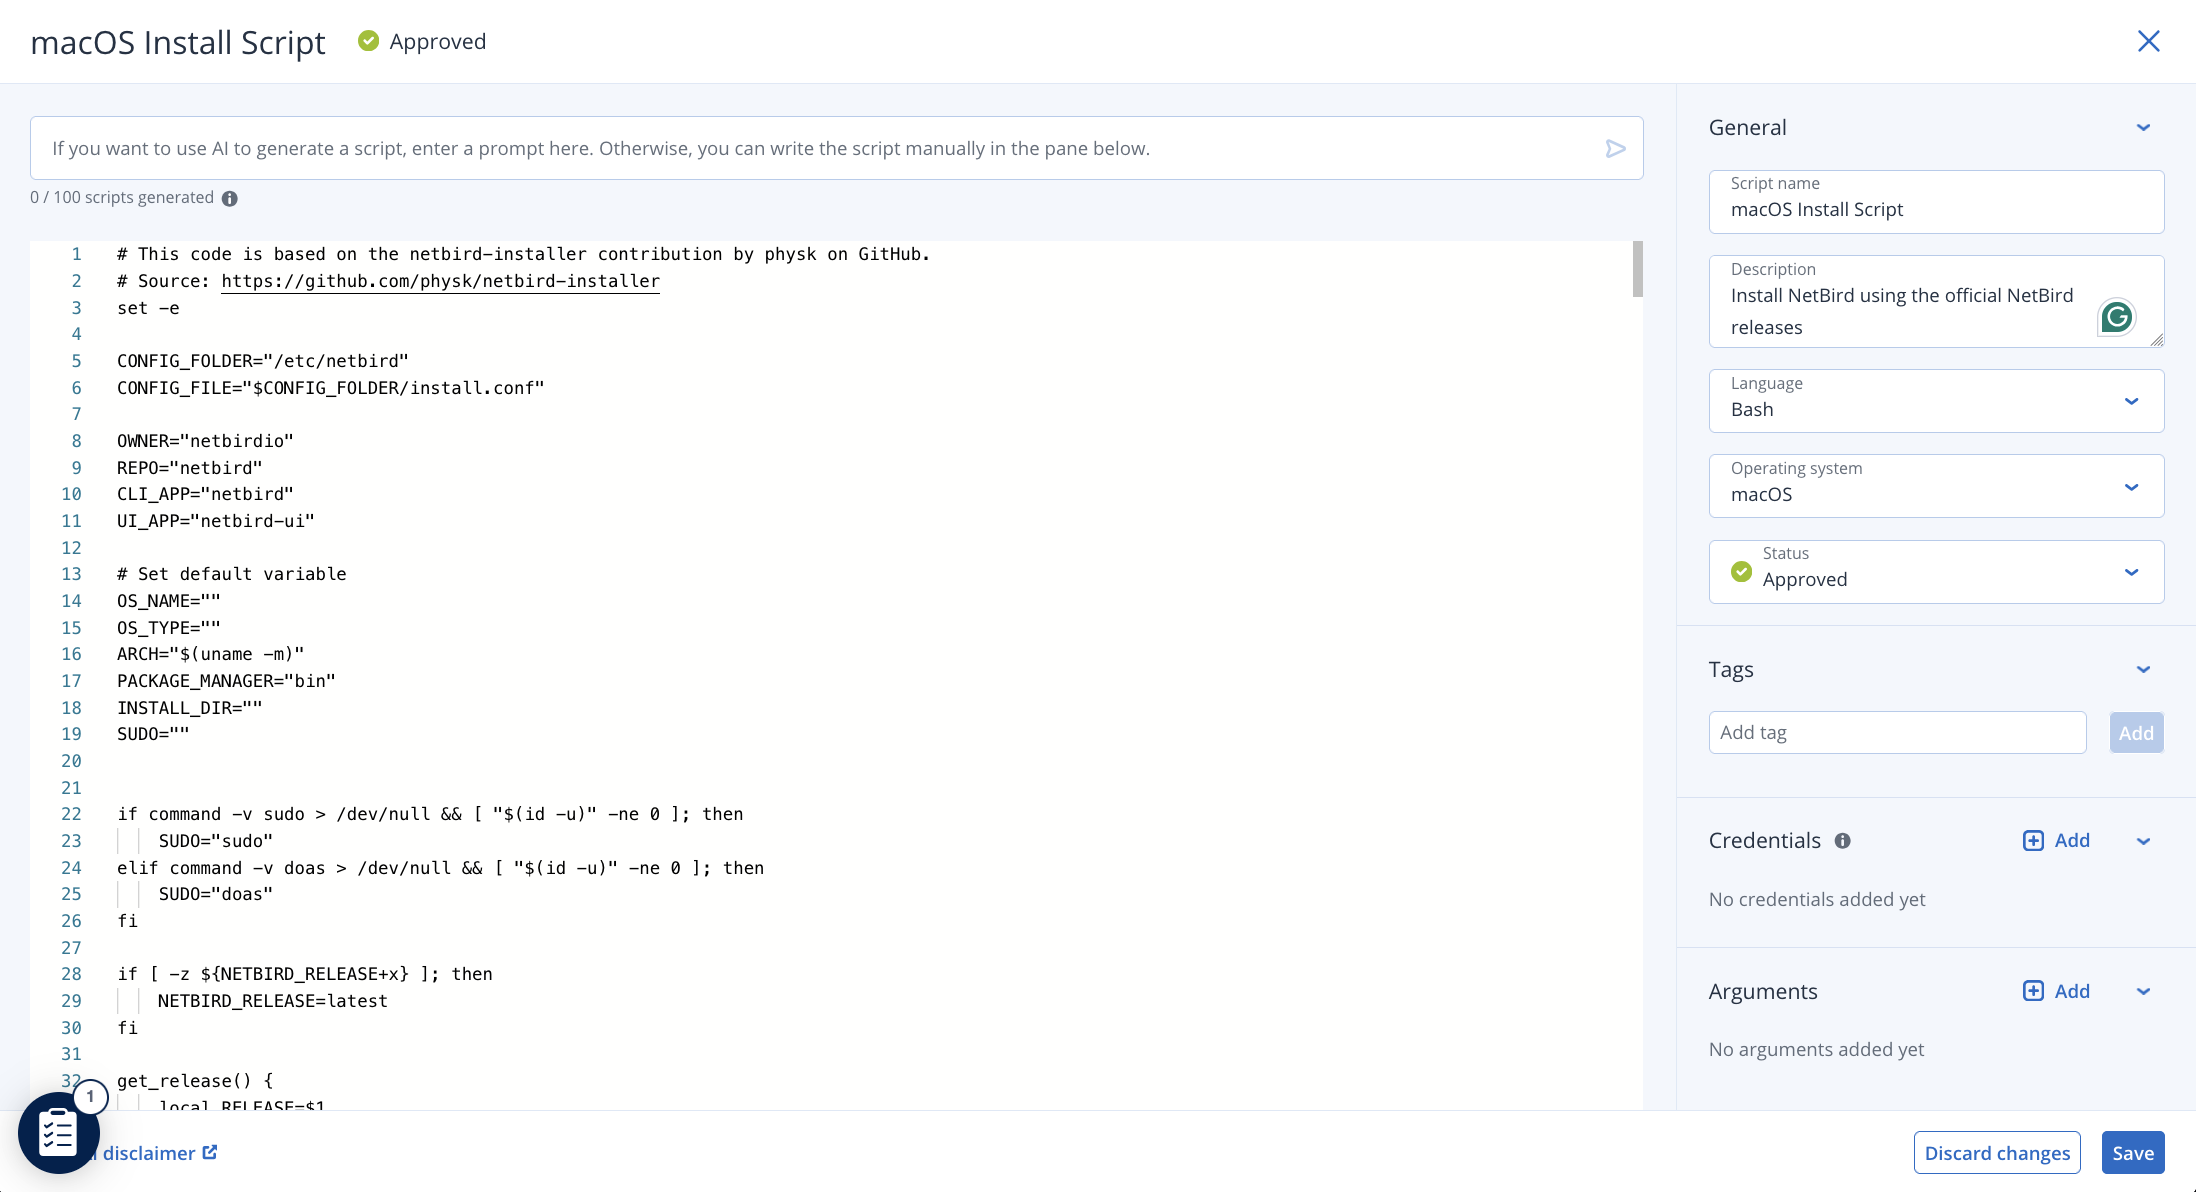
Next, from the Acronis console, go to MANAGEMENT > Script repository to create a new script for your macOS devices. Select the Create script by using AI option and paste the script code into the editor.
Configure the following properties in the right sidebar:
- Name: Enter a descriptive name for the script (e.g.,
macOS Install Script). - Language settings: Ensure the
Languageis set toBashand theOperating systemismacOS. - Arguments: If needed, you can pass parameters to the script through the
Argumentsfield, such as setup keys for automated enrollment. - Once configured, set the script's status to
Approvedand clickSave.
If you need to manage your scripts, you can do it by navigating to MANAGEMENT > Script repository > My scripts
Deploying NetBird Scripts to macOS Endpoints
Once the script is saved, you can run it on-demand from My scripts or add it to a scripting plan to schedule its execution
Method 1: Quick Run from My scripts
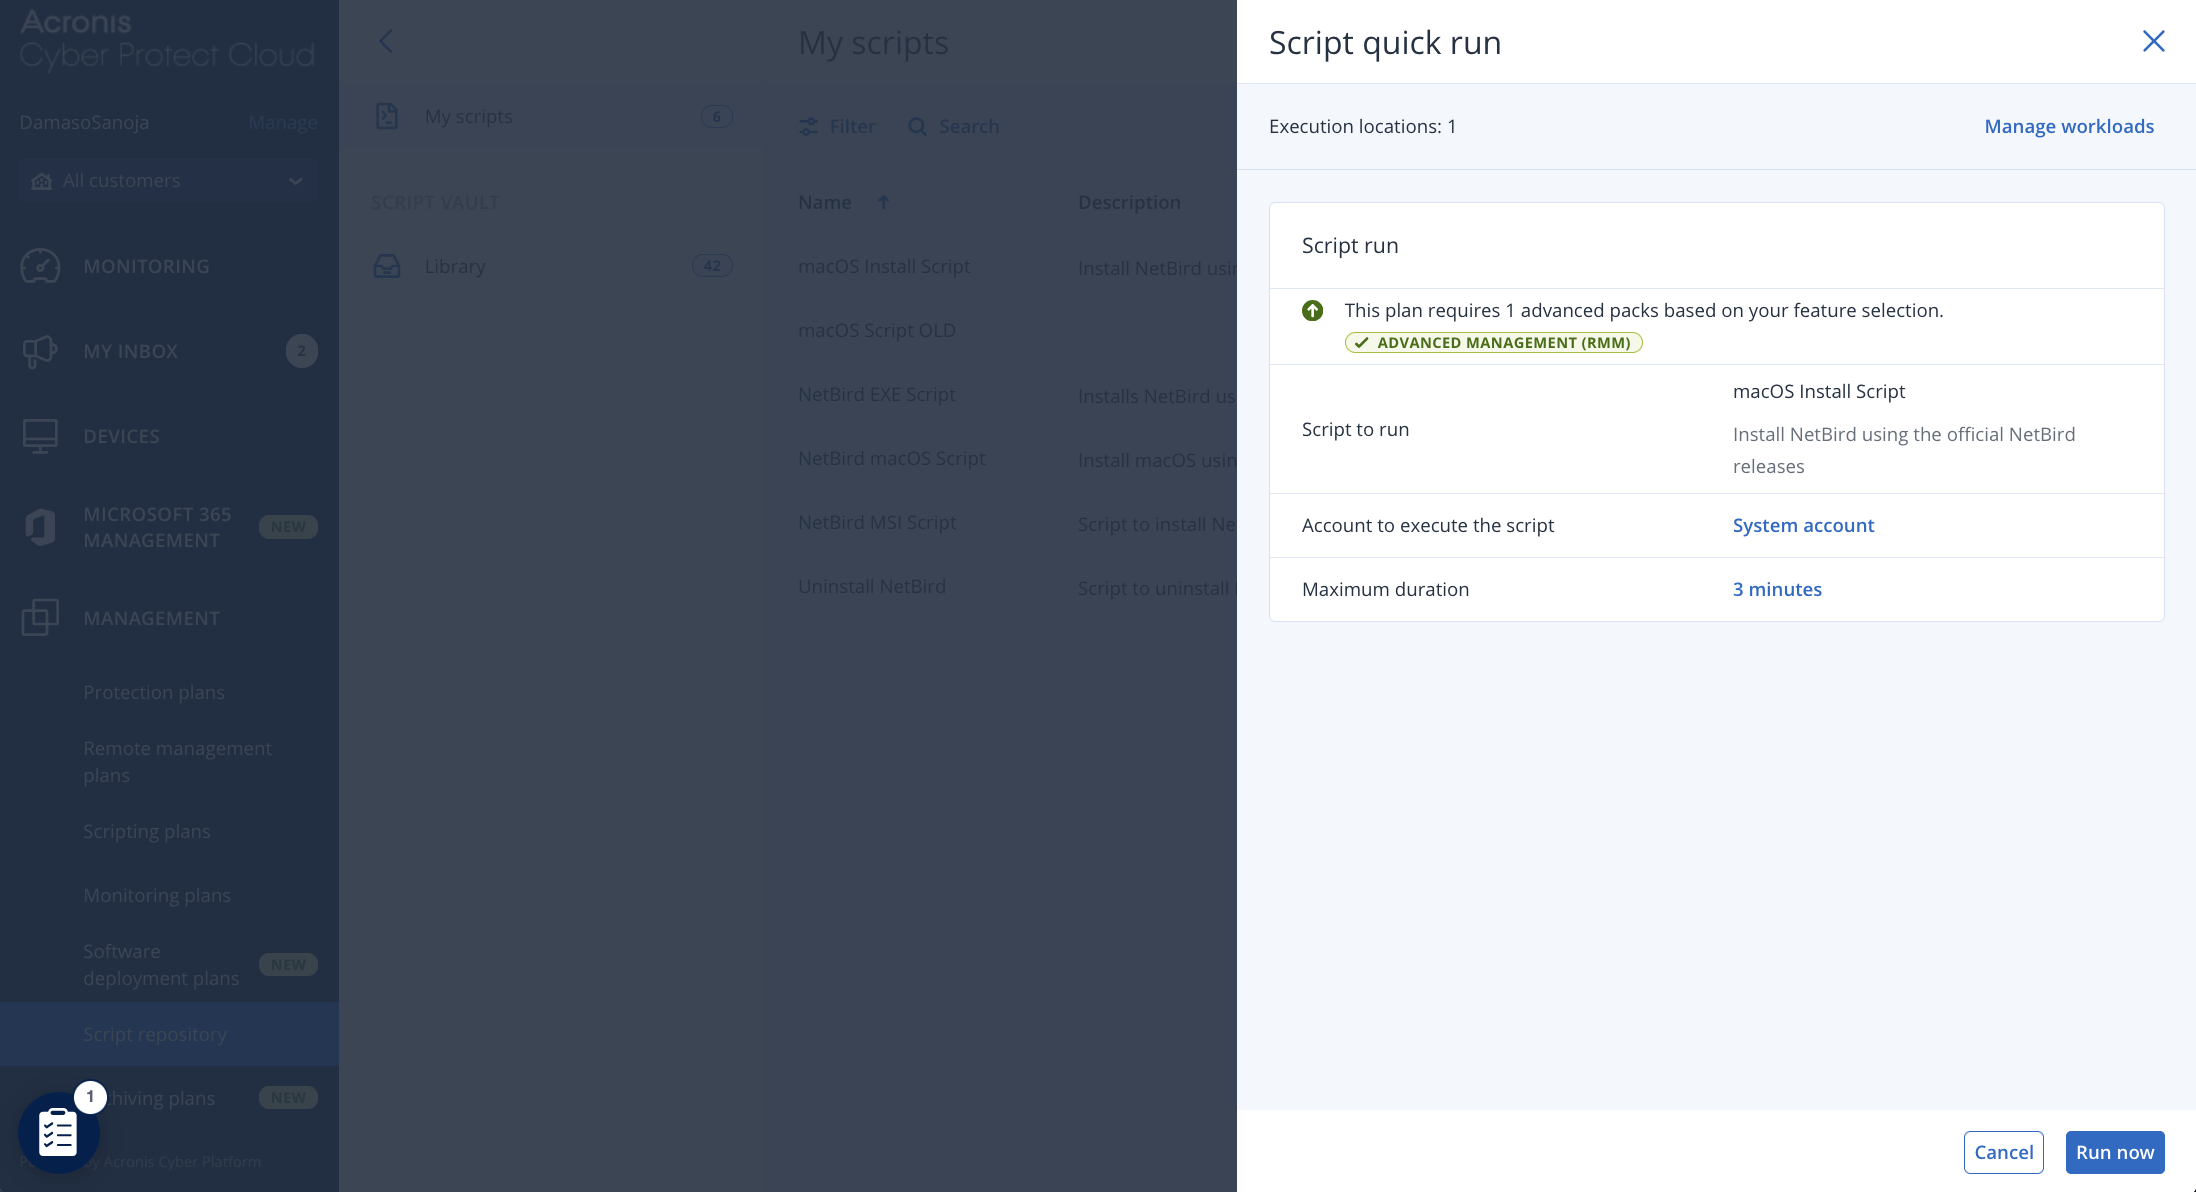
- Navigate to
MANAGEMENT > Script repository > My scripts. - Find the macOS script you created, click the three-dot menu icon next to it, and select
Script quick run. - In the pop-up that opens, select the target macOS devices (workloads) for the installation.
- Click
Run nowto deploy the script to the chosen devices. - To track the installation status, go to
MONITORING > Activities.
Method 2: Scheduled Scripting Plans
This method allows you to automate the script's execution on a recurring basis.
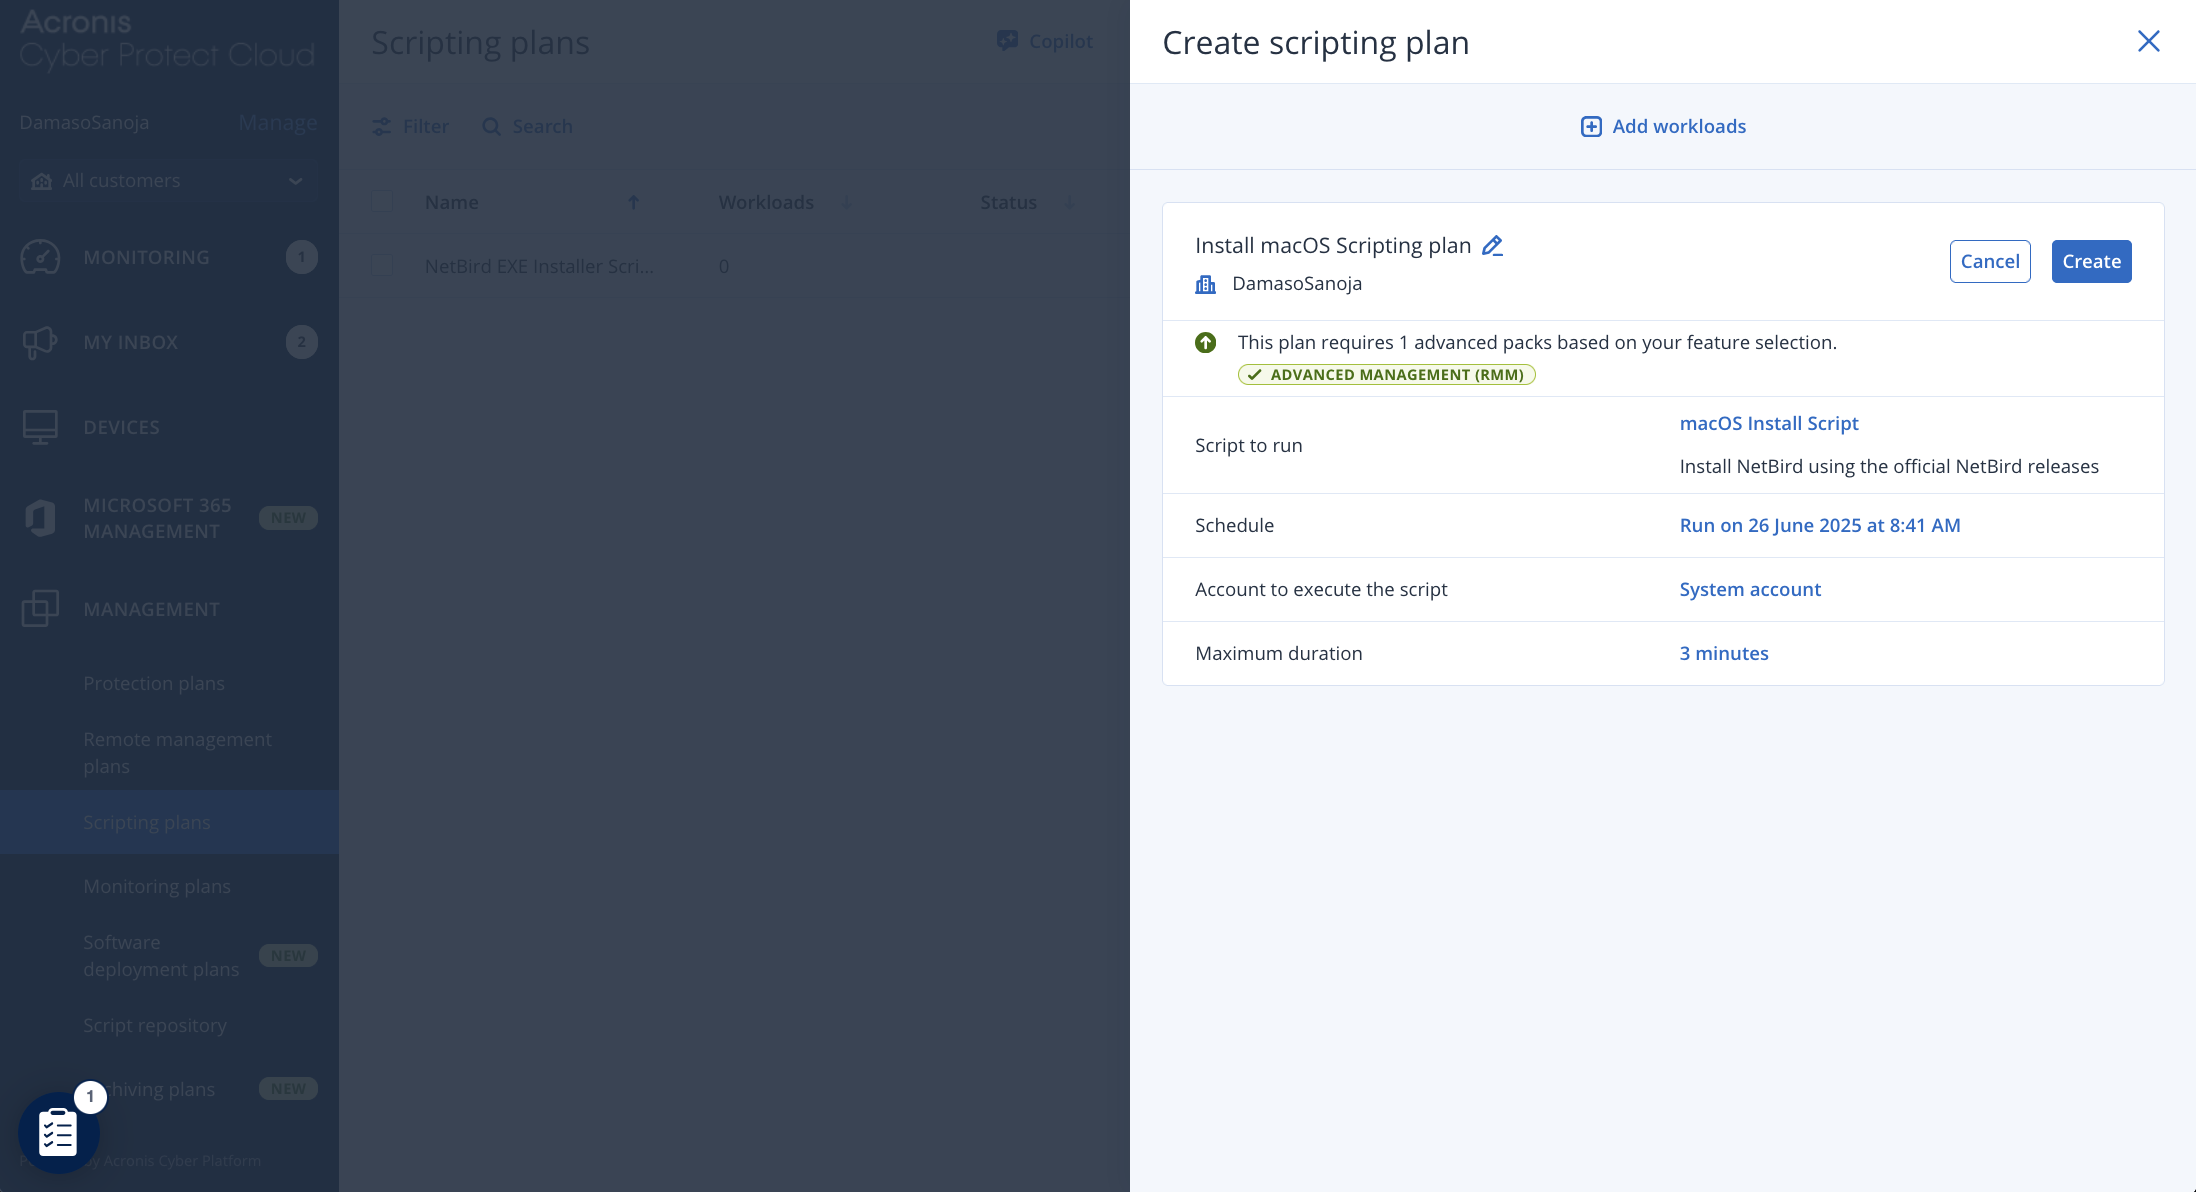
First, navigate to MANAGEMENT > Scripting plans and click Create plan. In the configuration window, set up the following options:
- Name the plan: Click the pencil icon to enter a descriptive name.
- Choose what to run: Select your macOS script from the list.
- Define the schedule: Set the desired frequency, time, and maximum allowed runtime for the script.
- Select targets: Add the macOS devices (workloads) that will be part of this plan.
Once all settings are configured, click Create to save and activate the plan.
Tip: You can manually trigger any plan outside its schedule. Go to MANAGEMENT > Scripting plans, find the plan you want to execute, click its three-dot menu, and run it.
Confirming Endpoint Registration in NetBird
While Acronis Cyber Protect Cloud handles the automated deployment of NetBird clients to your Windows and macOS endpoints, client authentication operates independently through NetBird's identity provider integration system. NetBird supports major Identity Providers (IdP), including Microsoft Entra ID, Google Workspace, Okta, and others, allowing organizations to maintain their existing authentication infrastructure.
For example, organizations using Microsoft 365 can use the NetBird-Microsoft Entra ID integration to automatically authenticate and synchronize users and groups from Entra ID to NetBird. This integration eliminates manual user provisioning by automatically syncing organizational structure, including group memberships and user access permissions. Once synchronized, users automatically inherit the corresponding Access Control Policies created in the initial configuration section (IT Administrators group has access to the Windows Workstations group), ensuring that network access permissions align with their organizational roles.
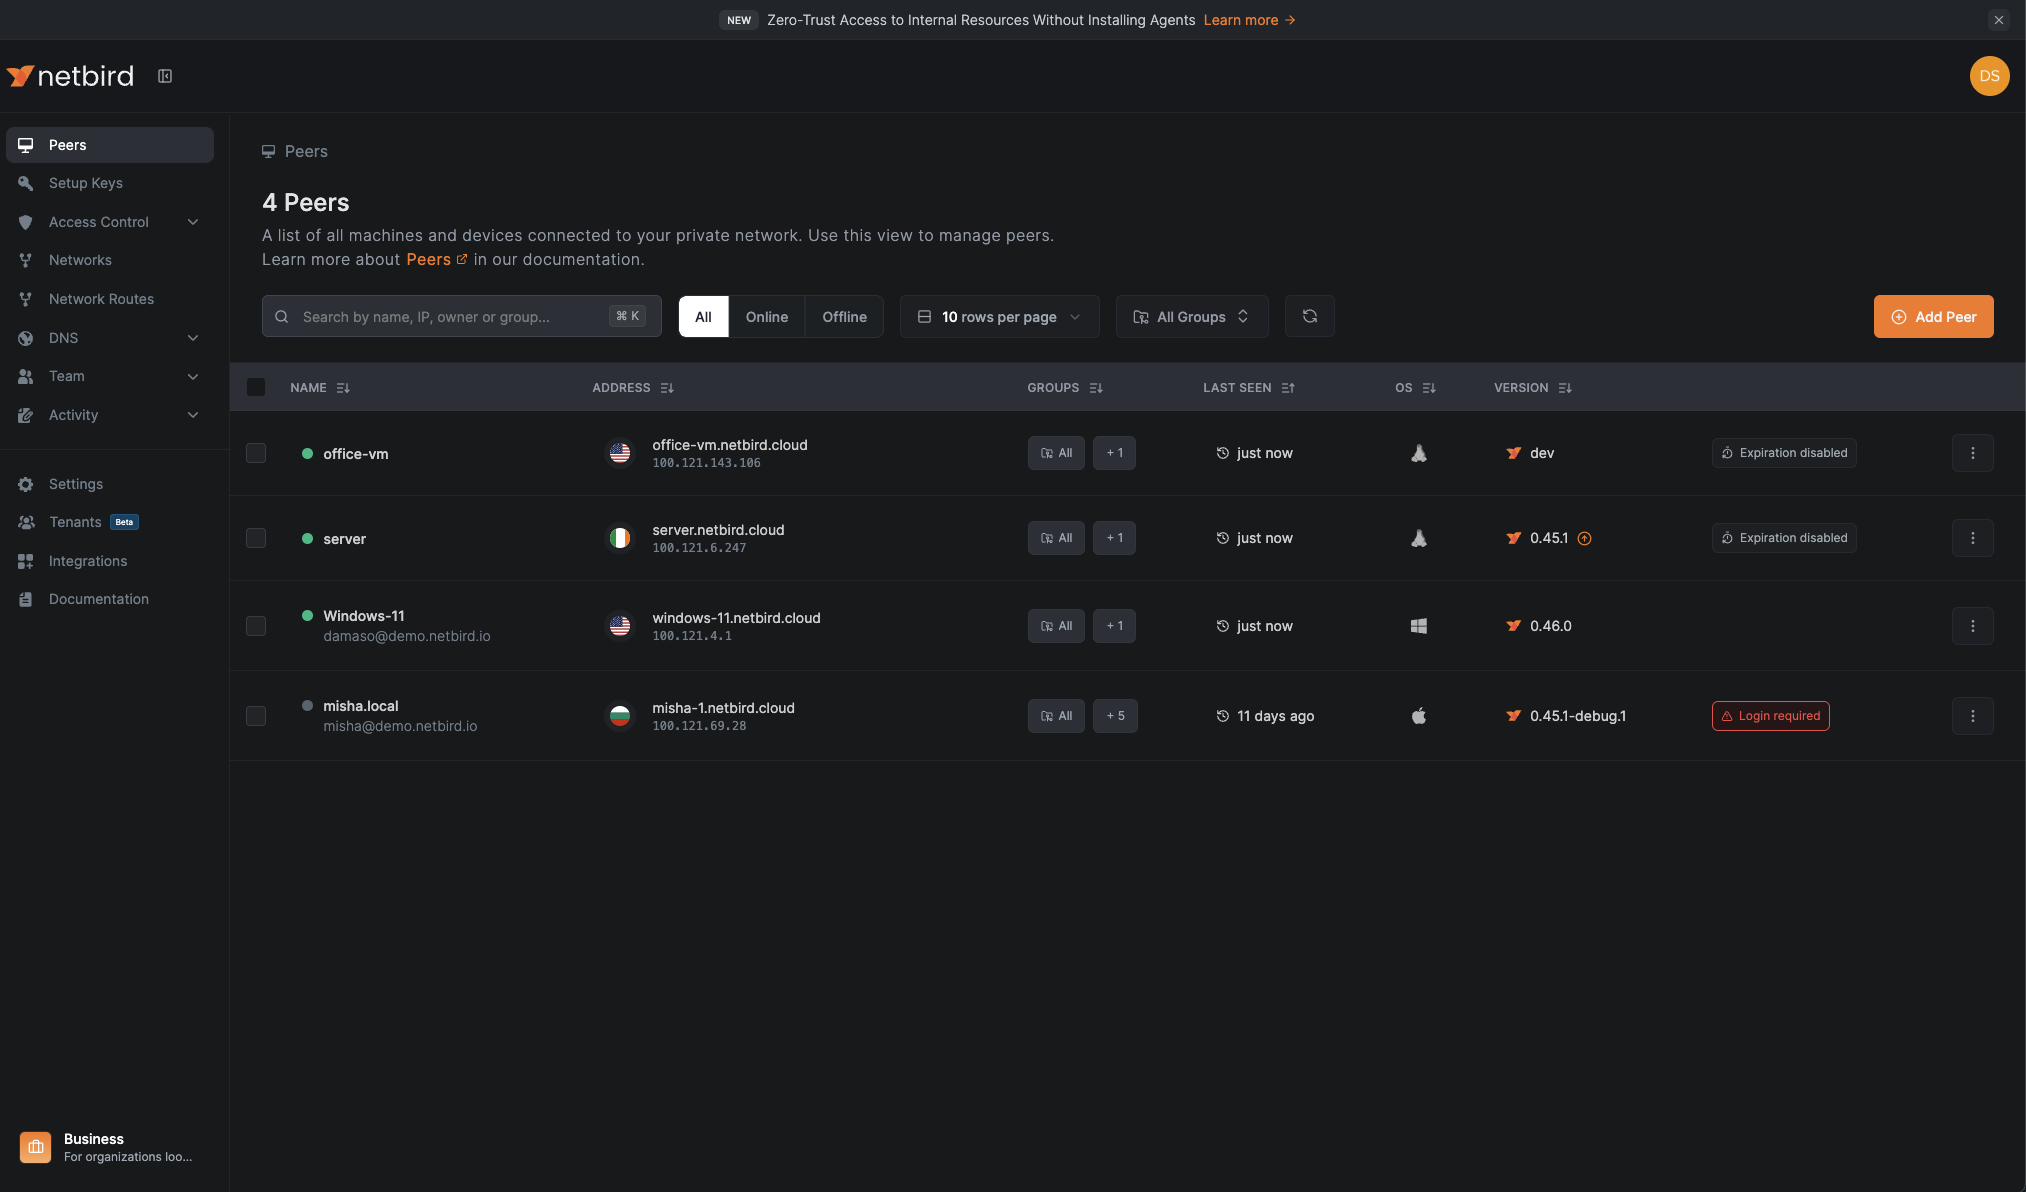
To confirm that your Acronis-deployed Windows (or macOS) endpoints successfully joined NetBird, navigate to Peers in your NetBird dashboard. Successfully registered endpoints will appear in the peers list with their device names, connection status, and assigned IP addresses within your NetBird network.
This verification step ensures that your automated deployment process has completed successfully and that devices are ready to enforce the access control policies configured for your organization's security requirements.