Implementing Zero Trust with NetBird
This guide shows how to implement a practical Zero Trust Architecture (ZTA) with NetBird, aligned with NIST SP 800-207. The focus is on protecting resources (applications, services, data) rather than network segments. For comprehensive ZTA guidance including data-level security, federated identity, and service-to-service access patterns, see NIST SP 1800-35.
0. Prerequisites
Before you start planning or changing policies, confirm the basics.
0.1 Required NetBird plan and features
This guide uses features from both the Team and Business plans. Check that your deployment includes what you need.
Team plan
- User and group provisioning from IdP (Identity Provider) for automatic group sync
- Audit event logging for policy and configuration change history
Business plan
- Device posture checks for limiting user access based on OS, client version, geolocation, CIDR, and processes (see Section 4.2 and the Posture Checks guide)
- Connection traffic event logging (Beta, requires client v0.39+) for flow visibility (see Section 7 and Traffic Events)
- Audit and traffic event streaming to Datadog, S3, Firehose, or generic HTTP for SIEM (Security Information and Event Management) integration (see Section 7 and Event Streaming)
Available in all plans (including Free)
- Access Control policies and groups
- Networks and routing peers
- Private DNS
- Control Center topology view
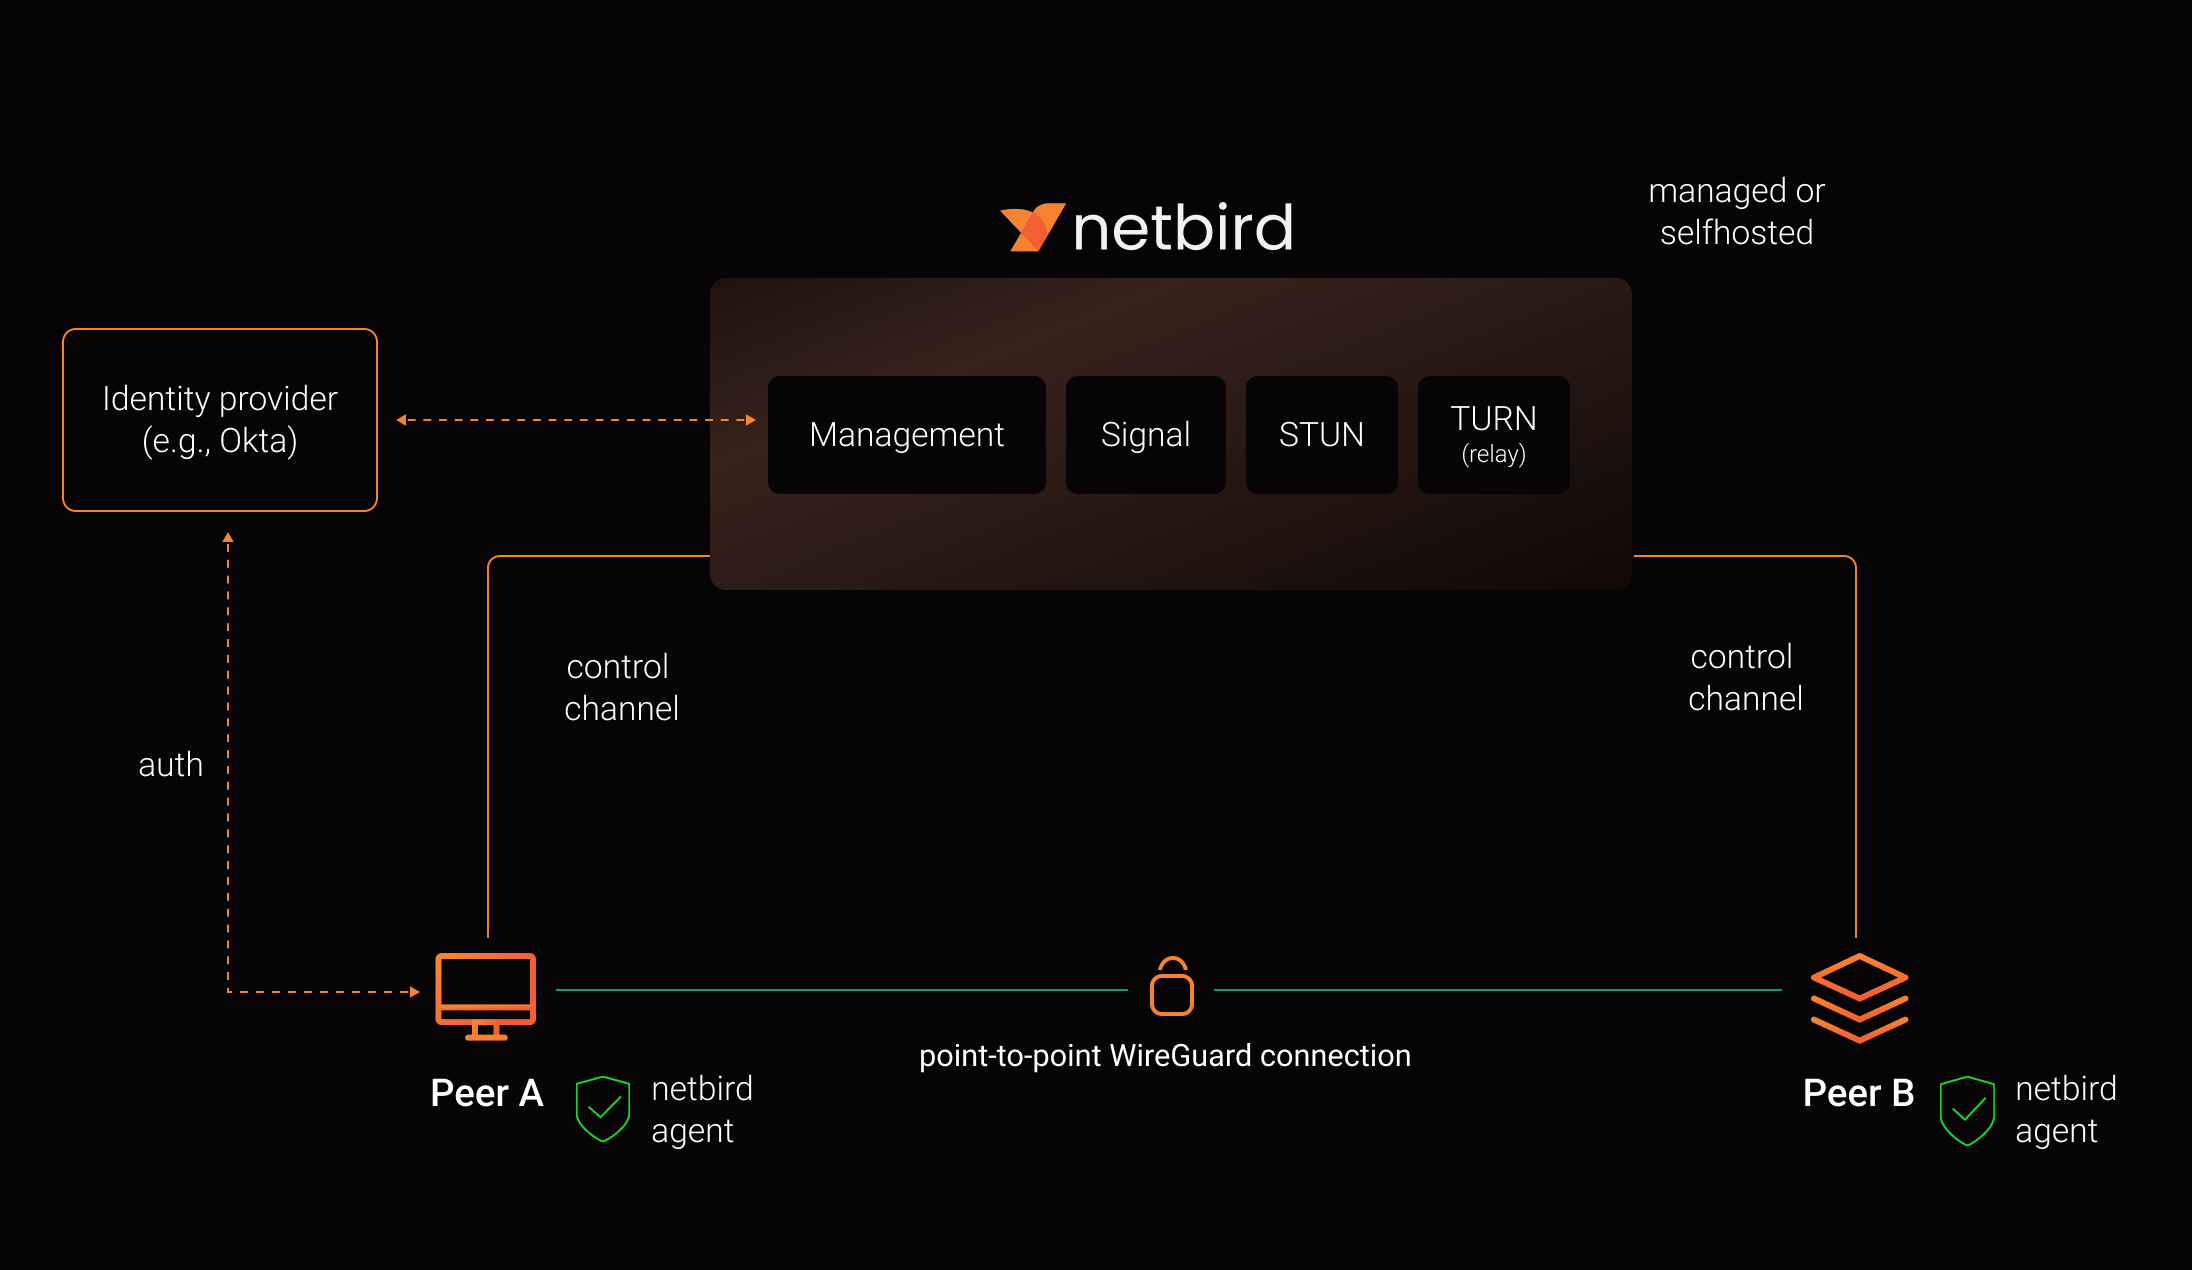
If you self-host, ensure that Management (the central coordination and authentication service), Signal (the signaling service for peer connection negotiation), and Relay (the traffic relay used when direct connections fail) are running supported versions (preferably the latest) for these features.
0.2 Firewall rules for NetBird traffic
NetBird peers do not need inbound ports open. They initiate outbound connections to NetBird's Management, Signal, and Relay services (as well as other peers) over HTTPS (TCP port 443) and UDP/STUN/TURN protocols. If your network firewall restricts outbound traffic (egress filtering), you must allow these specific endpoints and ports.
For a complete list of NetBird endpoints, IP addresses, and detailed firewall configuration examples, see the Ports & Firewalls
Understanding the services:
- Management service: The central coordination plane that manages peer authentication, access policies, and configuration
- Signal service: Coordinates peer-to-peer connections and helps peers discover each other
- Relay service: Provides fallback connections when direct peer-to-peer connections cannot be established (e.g., behind restrictive NATs)
Understanding the protocols:
- HTTPS (TCP/443): Secure web protocol used for control plane communication
- STUN/TURN (UDP): Protocols used for NAT traversal, helping peers connect through firewalls and routers
- For a list of outbound ports required for NetBird Cloud, see the Ports & Firewalls
- For a list of outbound ports required for self-hosted NetBird, see the self-hosted guide
1. Terminology and naming
This section defines how terms are used in this guide and in NetBird.
On capitalization:
Network with a capital N refers to the NetBird object that represents one or more CIDR ranges and DNS resources behind one or more routing peers.
network (lowercase) refers to generic networking concepts such as LANs, VPCs, or the internet.
1.1 Core NetBird terms
-
Peer
A device running the NetBird client. Each peer has an overlay IP address and can belong to one or more groups.
-
Routing peer
A NetBird peer that acts as a gateway, forwarding traffic between the NetBird overlay network and one or more internal subnets (private network ranges). Routing peers typically run in a VPC (Virtual Private Cloud, such as AWS VPC or Azure VNet), data center, or office LAN (Local Area Network). Think of it as a bridge between NetBird's virtual network and your physical or internal networks.
-
Overlay network and overlay IP
The overlay network is a virtual network that NetBird creates on top of your existing infrastructure (a "network on top of a network"). For each NetBird tenant, the overlay is a random /16 CIDR block within the
100.64.0.0/10range (a private IP range reserved for carrier-grade NAT). Each peer receives an overlay IP address from this /16 range for communication with other peers. Internal networks never see WireGuard encryption keys or tunnels directly. They only see overlay IPs or the routing peer's IP address, depending on whether masquerading is enabled (see Section 6.2). -
Network (NetBird object)
A NetBird configuration object that maps your internal networks (such as VPCs, LANs, or office networks) and organizes routing peers and resources. Networks group routing peers that provide access to the same internal subnets. Resources within Networks (IP addresses, ranges, or DNS names) serve as destinations in access policies. Networks replaced the older "Routes" concept starting with NetBird v0.35.0. Resources within a Network must be assigned to groups, and access is controlled through policies. Resources only become visible to peers after a policy explicitly grants access.
-
Posture check
A rule that evaluates device state, such as OS version, client version, geographic location, local network range, or running processes. Policies can require one or more posture checks to pass before allowing traffic.
-
SIEM (Security Information and Event Management)
A security platform that collects, analyzes, and stores security events from various sources. Examples include Datadog, AWS Firehose, and S3-based pipelines. SIEMs ingest NetBird events (traffic flows, policy changes, authentication events) for visibility, alerting, and compliance reporting.
1.2 Resources and scopes
-
Resource
What you are protecting: applications, APIs, databases, internal services, or entire networks.
-
Scope
A bounded set of users, groups, peers, and resources that belong together operationally. Examples include
prod-orders-app,prod-admin-portal, ordev-tooling.
2. Planning phases before you touch NetBird
These three phases are the planning work you do before and while you start configuring NetBird. They keep the scope small and make later implementation steps predictable.
In this guide, "resources" refers to what you are protecting: applications, services, servers, databases, and the data they contain. This aligns with Zero Trust's focus on protecting resources rather than network segments.
Phase 1: Select initial protected resources
Start with one or two concrete resources, not "our whole network". For example:
- Customer-facing admin portal
- Remote access to internal developer tools
- Access to a critical internal app (web, API, and DB)
For each selected resource, list:
- The users and service accounts that need it
- The devices they use (laptops, jump hosts, CI runners, and so on)
- The systems and services the resource touches
You are not configuring anything yet. You are deciding what to bring under Zero Trust control first and defining what "working as intended" means.
Outcome of Phase 1
- One to two clearly named resource scopes (for example,
prod-order-api,prod-admin-portal) - A simple inventory of who needs access (users, service accounts) and what they access (hosts, services, subnets) per scope
- A named owner for each resource who can confirm whether the rollout broke anything
Phase 2: Map dependencies and communication flows
Next, map how each resource actually works on the wire.
For each resource:
- Which users, groups, or peers need to talk to which resources
- Which protocols and ports are used (for example TCP/443, TCP/5432, SSH, metrics ports)
- Supporting services such as DNS, IdP, logging, metrics, and external APIs
- Background jobs or batch exports that also touch the resource
If you have existing diagrams or runbooks, start there. Then validate with something real:
- Existing firewall rules and security groups
- Application configurations
- Later, NetBird Traffic Events and SIEM once peers are enrolled
Most admins do not have perfect flow logs. Treat this as a rough first pass that you will refine using traffic data once NetBird is in place. If you lack flow data, interview application owners or review firewall deny logs to fill in the gaps.
Outcome of Phase 2
- A list of users, groups, peers, and resources per scope with their relationships
- A simple diagram or table showing who talks to what, on which port and protocol
- A list of supporting services (DNS, IdP, logging, monitoring) that must remain reachable
Phase 3: Design Zero Trust segmentation policies
Now decide how access should look under a Zero Trust posture.
For each flow identified in Phase 2:
- Is this flow required, or is it legacy or "nice to have"?
- Which side should initiate the connection?
- Which protocol and port are actually required?
- Should the flow be allowed, restricted to a smaller group, or blocked?
Capture this as a simple matrix with users, groups, and peers on one axis, resources on the other, and allowed protocols and ports in each cell.
When you implement this in NetBird, you can start slightly more permissive for a short period and use Traffic Events and SIEM to validate your assumptions, then tighten down to the final allow list.
Outcome of Phase 3
- A draft allow list of required flows for each scope
- A list of flows that must be blocked
- A clear picture of which traffic should be one-way versus two-way
The next sections show how to turn these phases into concrete NetBird configuration:
- Phase 1 drives IdP integration, groups, and setup keys
- Phase 2 feeds resource modeling, Networks, and routing peers
- Phase 3 becomes access policies, posture checks, and monitoring
3. Integrate identity and onboard peers safely
3.1 Integrate your Identity Provider
Connect NetBird to your IdP (Identity Provider, for example Microsoft Entra ID, Google Workspace, Okta) and enable SSO (Single Sign-On) with MFA (Multi-Factor Authentication). This allows users to log in to NetBird using their existing corporate credentials instead of separate NetBird accounts.
Where to do this: Integrations → Identity Provider Sync.
Map:
- Your IdP groups (for example
DevOps,Support,Finance) to NetBird groups where it makes sense - A small pilot set of users (for example DevOps and the owners of your Phase 1 resources)
Do not expose production Networks yet. At this stage, you only need authenticated identities and a few test peers.
For the full traffic discovery workflow that you can reuse per scope, see Section 7.2, which covers flow discovery using event logs. Enable Traffic Events and streaming now so you can use that workflow as soon as peers are enrolled.
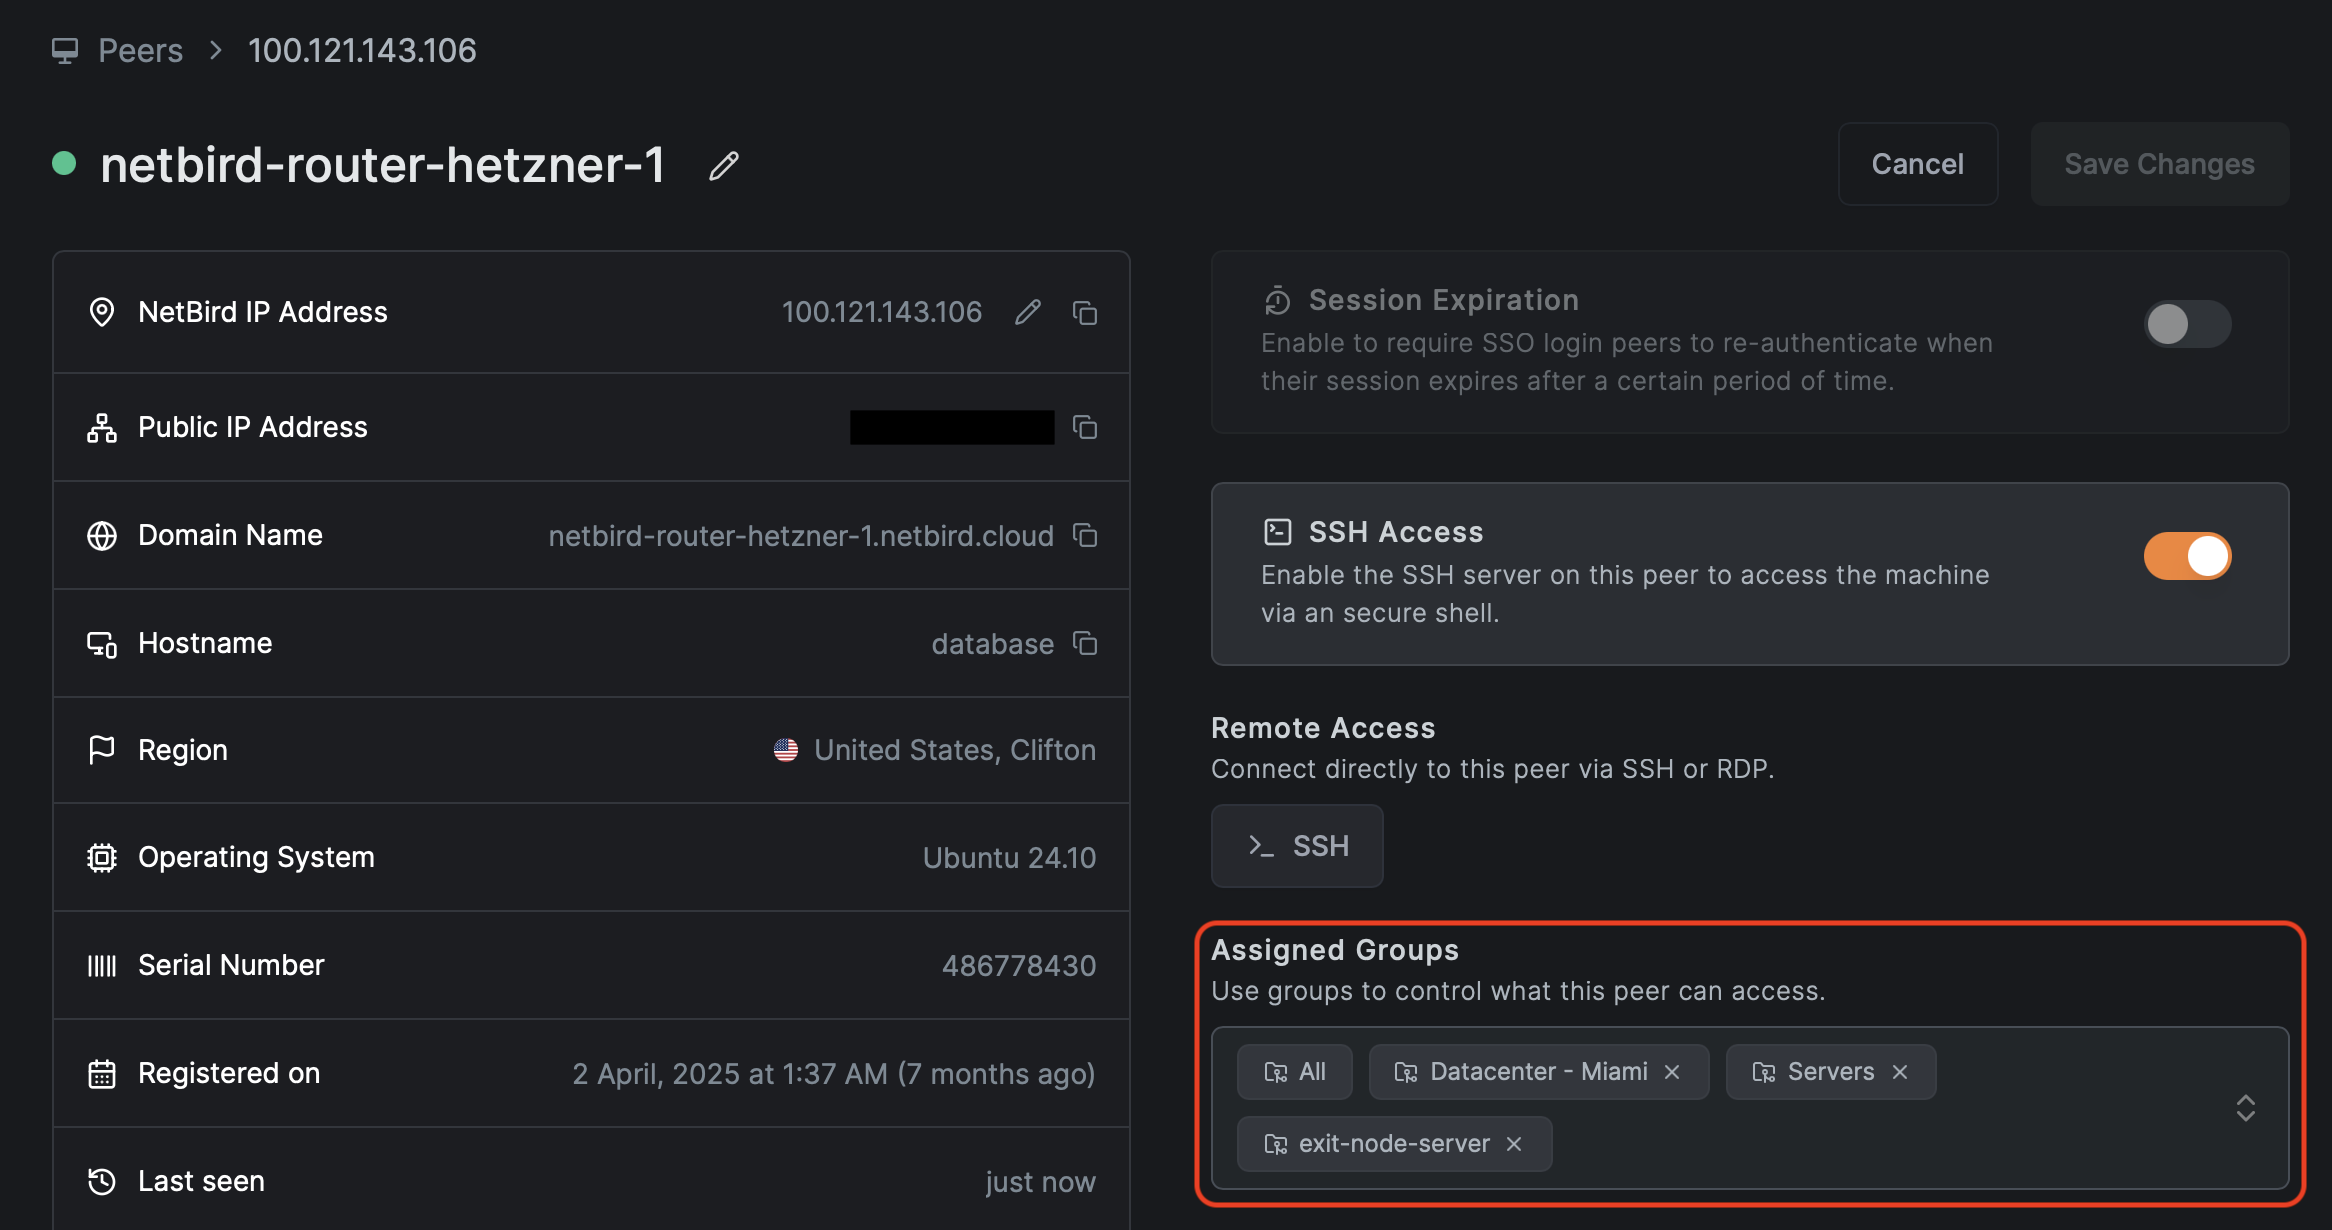
3.2 Groups and naming conventions
Use groups for two things:
- Source groups: who is initiating the connection (users, teams, service accounts)
- Resource groups: what is being accessed (servers, apps, Networks)
Where to manage groups: Access Control → Groups.
Recommended naming:
peer-<team>-<env>for user devicespeer-devops-prod,peer-support,peer-contractors
svc-<app>-<tier>-<env>for services and hostssvc-orders-web-prod,svc-orders-app-prod,svc-orders-db-prod
net-<location>-<purpose>for routed Networksnet-aws-euc1-prod,net-dc-dc1-lan
Use suffixes for environment:
dev,stage,prod
The exact scheme is up to you. The important point is to pick a convention and stick with it. Without one, the group and policy list will become unmanageable.
See Appendix A for a quick naming cheat sheet.
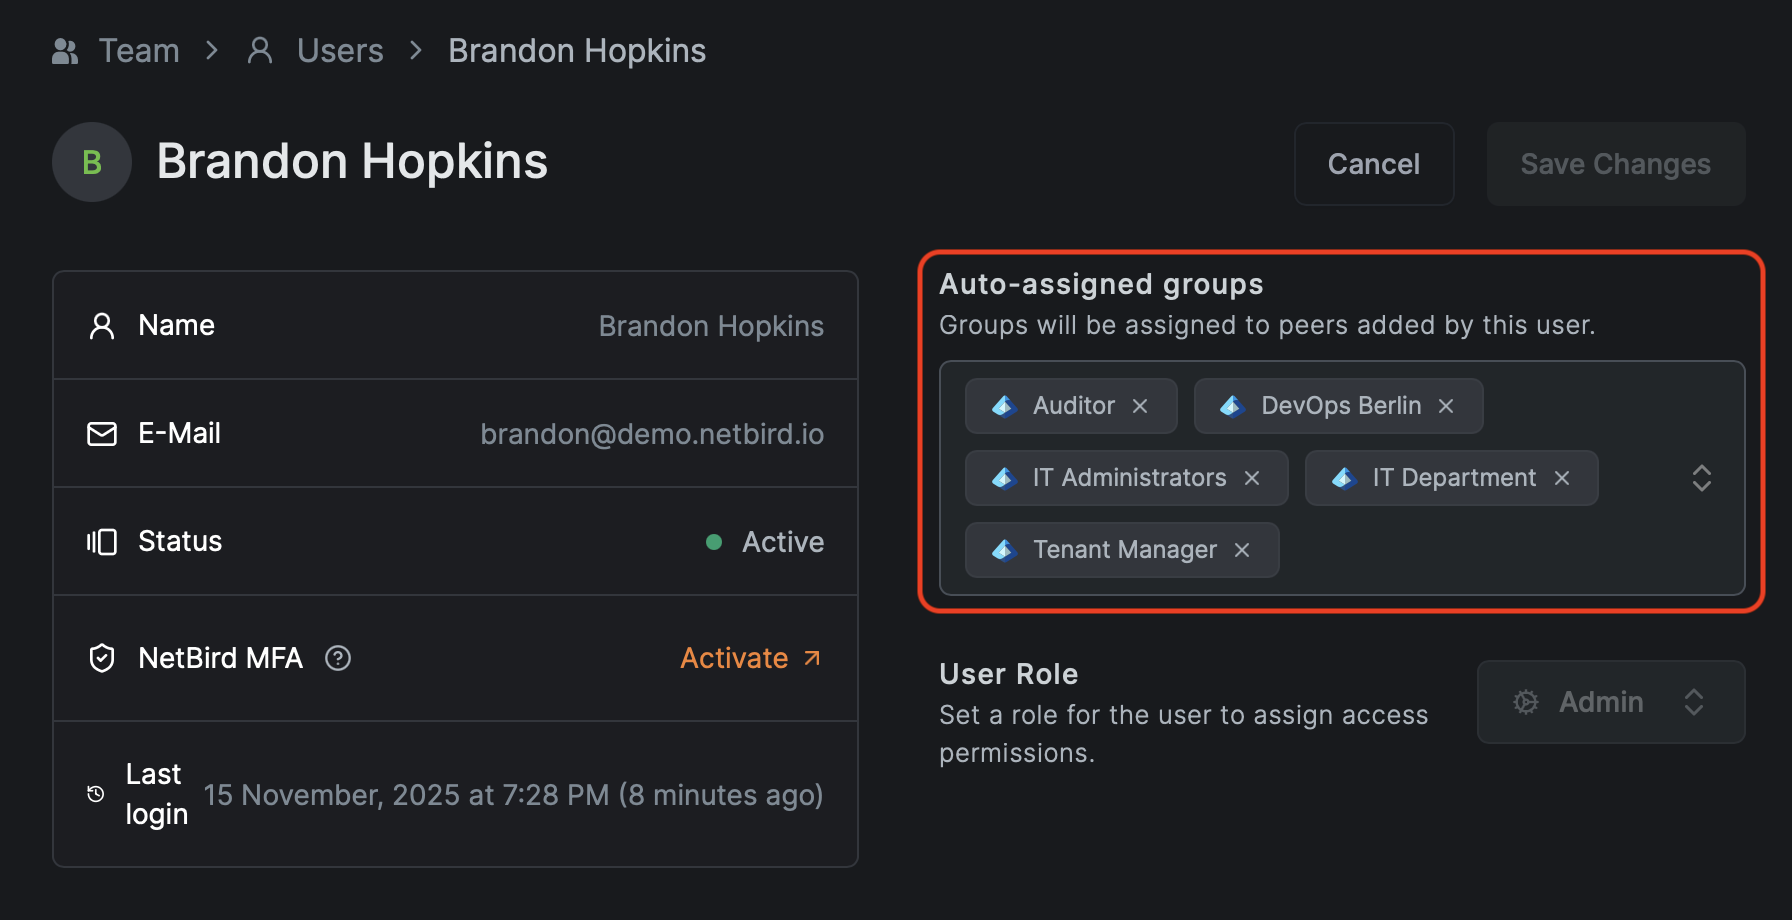
3.3 Setup keys for automation and service accounts
Setup keys are used for:
- Routing peers for NetBird Networks
- Servers without human login (CI runners, Kubernetes nodes, headless Linux boxes)
- Automated deployment through MDM, RMM, or configuration management tools
Where to manage them: Setup Keys.
Guidelines:
- Create scoped keys per environment:
setup-prod-serversthat auto-assignssvc-*-prodgroupssetup-stage-serversthat auto-assignssvc-*-stagegroups
- Prefer one-off keys for bulk enrollment and delete them after use.
- Restrict who can view or create setup keys.
Rotating setup keys
When staff leaves or you need to rotate a key:
- Create a new key with the same auto-assign groups.
- Update scripts and automation to use the new key.
- Verify new peers join with the expected groups.
- Revoke or delete the old key.
Rotating keys does not affect existing peers. Rotation only affects new enrollments.
Verification checklist:
- Users can successfully authenticate with SSO and MFA and enroll their devices
- Servers enrolled with setup keys land in the correct groups automatically
- Your SIEM receives NetBird events and you can filter by peer, user, and group
4. Define access policies and posture checks
4.1 Default deny and the starter policy
NetBird is deny-by-default. Without policies, peers cannot talk to each other.
To avoid early confusion, NetBird creates a Default policy in new environments that allows every peer to communicate with every other peer on all protocols and ports. This is useful only as a temporary onboarding aid.
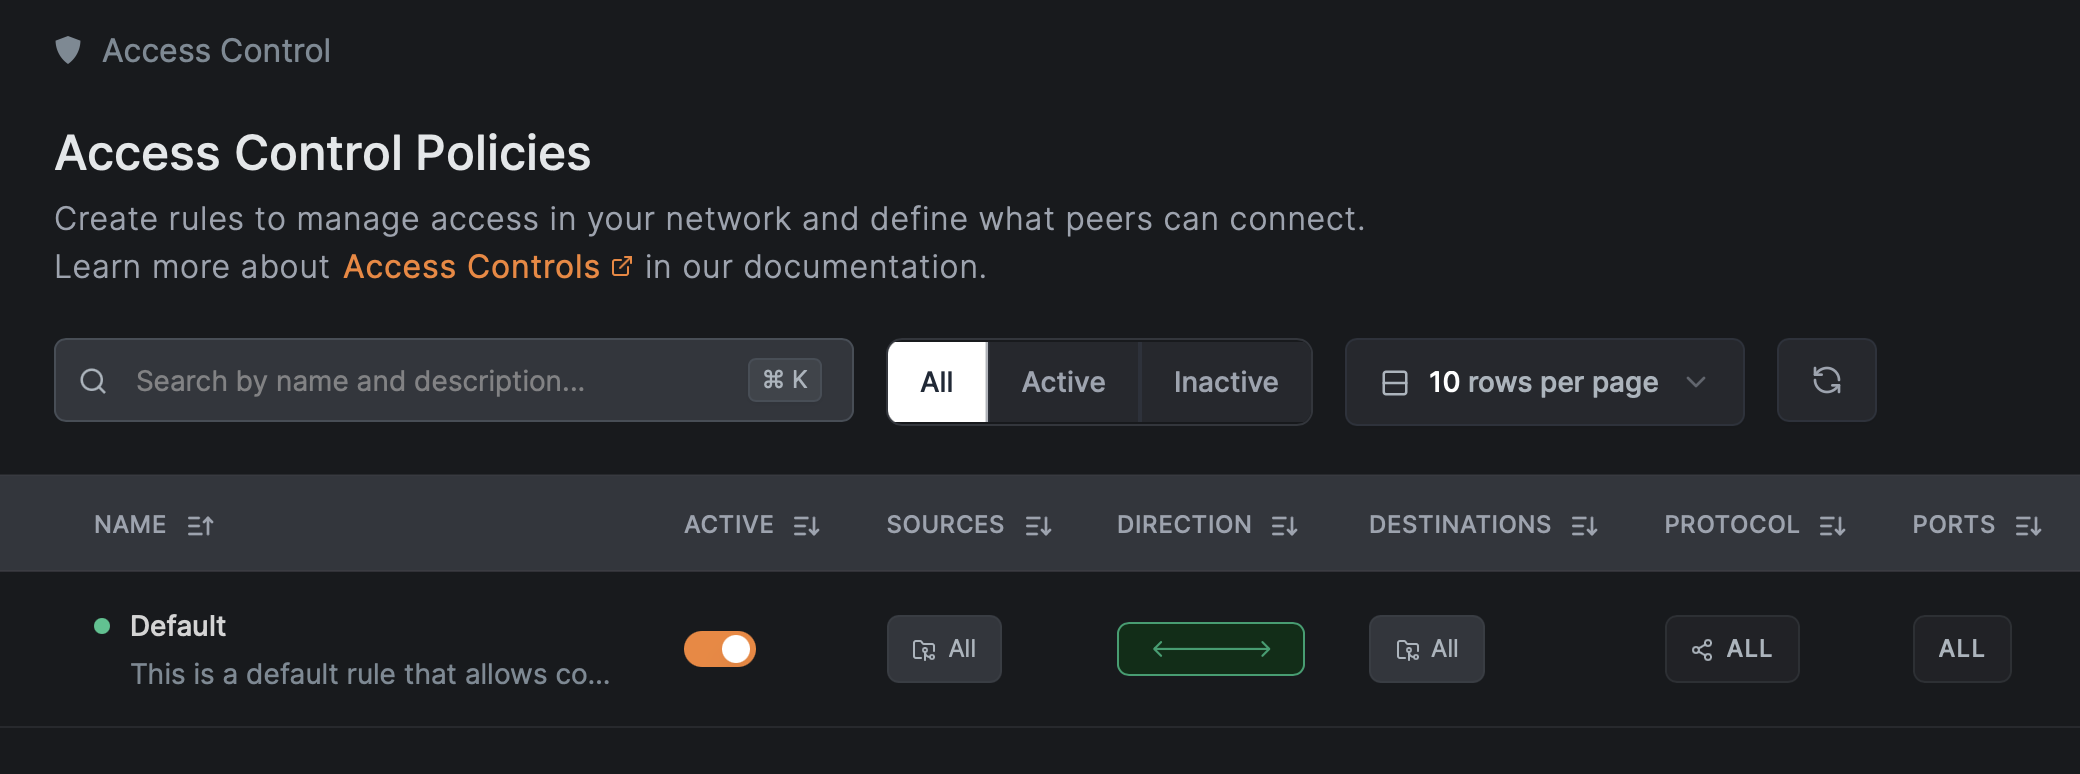
Where to see and edit policies: Access Control → Policies.
For a Zero Trust posture:
- Keep the Default policy while you are only enrolling and testing.
- Before going to production, replace it with specific policies and then delete it.
Before deleting the Default Policy, ensure you have created and tested at least one specific Allow rule. Otherwise, you will immediately lose connectivity to all peers.
4.2 Posture checks and their limits
NetBird posture checks evaluate device state before allowing traffic. They can validate:
- NetBird client version
- OS type and version
- Geographic location
- Network CIDR the peer is connected from
- Presence of specific processes
Where to configure them: Access Control → Posture Checks.
Posture checks are not a security boundary against compromised endpoints. They validate configuration and policy compliance, not trustworthiness. An attacker with admin rights on a device can bypass or spoof them. Design your policies assuming posture checks can be evaded.
Recommended posture checks per policy:
- Client version
- Enforce minimum NetBird version (for example
>= 0.45.0) for critical access.
- Enforce minimum NetBird version (for example
- OS and version
- Block unsupported or unpatched OS versions on production access.
- Geolocation or peer network range
- Restrict access to known countries or corporate CIDRs (IP address ranges such as
10.0.0.0/8or192.168.1.0/24).
- Restrict access to known countries or corporate CIDRs (IP address ranges such as
- Process checks
- Require your EDR (Endpoint Detection and Response) or RMM (Remote Monitoring and Management) agent process to be running before granting access to sensitive resources. This ensures security tools are active on the device.
On iOS and Android, the Peer Network Range (CIDR) posture check cannot evaluate the device's local network interfaces, so ranges intended to match local LANs (e.g. 192.168.1.0/24) will not match. Ranges that target the peer's public connection IP (e.g. 203.0.113.10/32 or a public CIDR like 1.0.0.0/24) still work on mobile, because the management server observes that source IP itself. For mobile-only deployments that need country-level restrictions, Geolocation remains a good alternative.
Example posture combinations:
- Linux production servers
- OS: Linux, distribution version in a supported list (for example Ubuntu 22.04 or later).
- NetBird client at or above your standard version.
- Admin laptops
- OS: macOS 13 or later, or Windows 11.
- Required process: your security agent (for example Jamf or CrowdStrike), using the exact process name from your security team.
Start with client and OS version checks. Add process checks once you can reliably identify the right processes per platform.
4.3 Policy structure
Most application traffic has a clear client and server:
- User device to web frontend
- Web frontend to app backend
- App backend to database
- Monitoring system to metrics endpoints
In NetBird:
- For Zero Trust enforcement, prefer
TCP(connection-oriented) orUDP(connectionless) with exact ports and the direction set to unidirectional, so only the source initiates the connection. - "All" protocol policies are broad. Limit them to very specific scopes or emergency use.
- Portless rules are effectively "all ports" and should be treated as wide open. These are not recommended for Zero Trust.
Where to do this: create or edit policies in Access Control → Policies, choose Source group, Destination group, then restrict Protocol and Ports.
This keeps most of your policies simple and least privilege.
4.4 Worked example: Three-tier app
Consider a production orders application with a three-tier architecture (web frontend, application backend, database):
- Web tier:
svc-orders-web-prod(port 443 - HTTPS, the secure web protocol) - App tier:
svc-orders-app-prod(port 8443 - typically HTTPS for internal API communication) - DB tier:
svc-orders-db-prod(port 5432 - PostgreSQL database default port) - DNS: Internal DNS resolvers at IP addresses
10.10.0.10and10.10.0.11(used for name resolution) - Monitoring:
svc-monitoring-prodscraping metrics on ports 9100 (Prometheus) and 9200 (Elasticsearch)
Groups
Source groups:
peer-devops-prodpeer-support
Resource groups:
svc-orders-web-prodsvc-orders-app-prodsvc-orders-db-prodsvc-monitoringsvc-dns-prod(or a Network resource containing the DNS IPs)
Diagram:
┌─────────────────────────────────────────────────────────────────┐
│  Users                                                          │
│  (peer-devops-prod, peer-support)                               │
└───────────────────────────┬─────────────────────────────────────┘
                            │ TCP/443
                            ▼
┌─────────────────────────────────────────────────────────────────┐
│  svc-orders-web-prod (Web Tier)                                 │
└───────────────────────────┬─────────────────────────────────────┘
                            │ TCP/8443
                            ▼
┌─────────────────────────────────────────────────────────────────┐
│  svc-orders-app-prod (App Tier)                                 │
└───────────────────────────┬─────────────────────────────────────┘
                            │ TCP/5432
                            ▼
┌─────────────────────────────────────────────────────────────────┐
│  svc-orders-db-prod (DB Tier)                                   │
└─────────────────────────────────────────────────────────────────┘

Monitoring (svc-monitoring) ──TCP/9100,9200──► All Tiers
All Peers ──UDP,TCP/53──► Internal DNS (svc-dns-prod)
Policies
- Users to web
- Source:
peer-devops-prod,peer-support - Destination:
svc-orders-web-prod - Protocol: TCP, Port: 443
- Source:
- Web to app
- Source:
svc-orders-web-prod - Destination:
svc-orders-app-prod - Protocol: TCP, Port: 8443
- Source:
- App to DB
- Source:
svc-orders-app-prod - Destination:
svc-orders-db-prod - Protocol: TCP, Port: 5432
- Source:
- Monitoring
- Source:
svc-monitoring - Destination:
svc-orders-web-prod,svc-orders-app-prod,svc-orders-db-prod - Protocol: TCP, Ports: 9100 and 9200
- Source:
- DNS (critical, often forgotten)
- Source: all peer groups that use this environment (
peer-devops-prod,peer-support,svc-*) - Destination:
svc-dns-prodor a network containing10.10.0.10/32and10.10.0.11/32(the/32means a single IP address) - Protocol: UDP (primary), TCP (fallback); Port: 53 (standard DNS port)
- Source: all peer groups that use this environment (
Example policy configuration (API)
When creating policies via API, the configuration looks like this:
{
  "name": "Users to Web",
  "description": "Allow DevOps and Support to access orders web tier",
  "enabled": true,
  "source_groups": ["peer-devops-prod", "peer-support"],
  "destination_groups": ["svc-orders-web-prod"],
  "protocol": "tcp",
  "ports": ["443"]
}
The example above uses group names for readability. The actual API requires group IDs (UUIDs), not names. You can retrieve group IDs via the Groups API endpoint.
Deliberately not allowed
- Any
peer-*group to the database directly. - Database initiating connections to app or web tiers.
- Support laptops directly to the DB or app backend.
Critical DNS callout
Broken DNS is the most common cause of "NetBird is broken" complaints. For every environment where peers need internal resources or routed Networks, explicitly allow DNS traffic to the correct servers.
Verification checklist:
- Deleting the Default all-to-all policy does not break your pilot app
- Traffic Events in your SIEM show only expected flows to the app, DB, DNS, and monitoring
- Attempts to connect outside those flows are blocked and visible in logs
5. Connect private networks with routing peers
Use routing peers and Networks when you need to reach private subnets (LAN, VPC, on-premises) rather than only NetBird overlay peers.
Routes vs Networks: Legacy Routes bypass Access Control policies by default unless Access Control Groups are explicitly configured. The newer Networks feature (v0.35.0+) handles this automatically—resources only become visible to peers after a policy explicitly grants access. For Zero Trust implementations, we recommend using Networks instead of legacy Routes.
5.1 Requirements for a routing peer
A routing peer is a NetBird peer that:
- Has network access to one or more internal subnets (for example
10.10.0.0/16) - Is selected as a routing peer in a Network or Network Route configuration

5.2 Direction of traffic with routing peers
NetBird Network access policies are unidirectional. They allow traffic from NetBird peers toward the routing peer and the routed network. Replies to that traffic work as expected, but new connections cannot originate from the private network toward a NetBird peer through the routing peer.
If you need true bidirectional initiation between two endpoints, run NetBird on both machines and create an access policy that allows traffic in both directions.
If you need to access the routing peer itself (for example, to reach services like Pi-hole or a monitoring dashboard running on it), create a peer-to-peer access policy with the routing peer's group as the destination. See Routing Peers for details.
5.3 DNS for routed networks
Routed environments almost always rely on internal DNS (Domain Name System), which translates human-readable names like db.internal.example.com to IP addresses like 10.10.1.5. If peers can reach the IP range 10.10.0.0/16 but cannot resolve hostnames like db.internal.example.com, applications will fail because they typically use hostnames rather than IP addresses.
With Networks and domain resources, NetBird can route both IP ranges (like 10.10.0.0/16) and DNS-based resources (like *.corp.internal), and can forward DNS lookups through the routing peer.
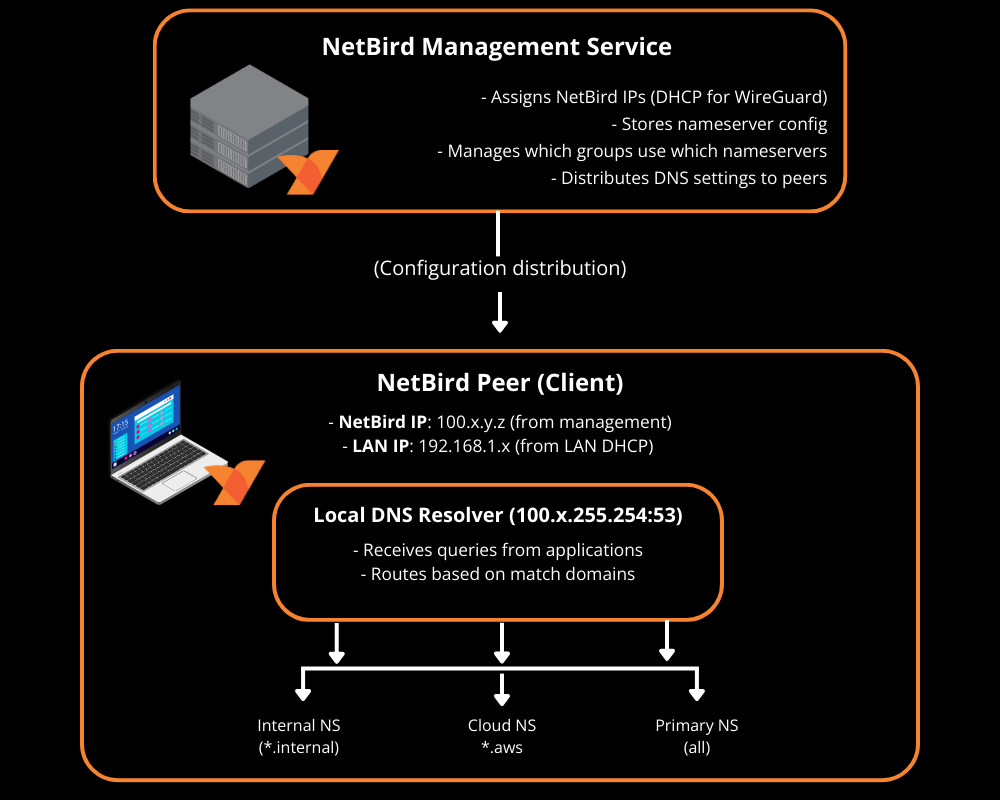
General rules:
- Create a Network that includes:
- IP ranges (for example
10.10.0.0/16- the/16means the first 16 bits are the network portion, allowing 65,536 IP addresses) - DNS resources (for example
db.internal.example.comfor a specific hostname, or*.corp.internalfor all subdomains) where appropriate
- IP ranges (for example
- Add a DNS server in NetBird with the right match domain (for example
corp.internal) under DNS → Nameservers. - Add explicit policies allowing peers to reach the DNS servers themselves (UDP and TCP 53 to the resolver IPs).
Starting with NetBird v0.59.0, the local DNS forwarder port changed from 5353 to 22054. The Management Service only applies the new port when all peers in the account run v0.59.0 or newer. If you have mixed client versions, DNS forwarding may behave differently across peers.
Verification checklist:
- Peers can connect to internal IPs behind the routing peer
- DNS names hosted inside those networks resolve correctly on NetBird peers
- Traffic Events show flows from peers to internal IPs and back without unexpected drops
6. High availability, masquerading, and scaling considerations
6.1 High availability for routing peers
You can assign multiple routing peers to the same Network or route to provide high availability. Clients will choose among them.
Selection is based on route priority (metric). The rules are:
- Each routing peer for a Network has a metric. Lower metrics are preferred, so the routing peer with the lowest metric handles traffic.
- If multiple routing peers share the same metric, the client prefers the routing peer with lower latency.
Practical recommendations:
- Use explicit priorities:
- Same region routing peer: metric 100
- Backup or cross-region routing peer: metric 200
- For critical Networks, run at least two routing peers in separate failure domains (different zones, racks, or hosts).
- Monitor routing peers with your existing monitoring plus NetBird events. If one fails, verify that clients start using the other peers.
- Verify HA behavior by simulating a failure and checking route selection with
netbird status -dand test traffic.
The same pattern applies to exit nodes that provide default routes for internet-bound traffic.
See Appendix B for a quick HA checklist.
6.2 Masquerading versus return routes
Masquerading (also called NAT masquerading or source NAT) controls how routed traffic appears to internal networks. When enabled, NetBird rewrites the source IP address of traffic so it appears to come from the routing peer's internal IP address instead of the original NetBird overlay IP.
With masquerading enabled, internal systems see traffic as coming from the routing peer's internal IP:
- Internal firewall log:
10.10.0.5 → 10.10.1.10:5432
This usually works out of the box because internal firewalls already trust the routing peer's subnet. NetBird enables masquerading by default.
With masquerading disabled, internal systems see the original NetBird overlay IP:
- Internal firewall log:
100.64.1.45 → 10.10.1.10:5432- where
100.64.1.45is a NetBird overlay address (always within100.64.0.0/10)
To make non-masqueraded traffic work you must:
- Add a route for the overlay range in your internal router or firewall, pointing to the routing peer's internal IP.
- Allow that traffic in internal firewall rules.
Examples for non-masquerade mode:
-
Linux router:
# Add a route: send all traffic destined for 100.64.0.0/10 # through the gateway at 10.10.0.5 (the routing peer's internal IP) ip route add 100.64.0.0/10 via 10.10.0.5 -
AWS VPC route table:
- Destination:
100.64.0.0/10(the NetBird overlay range) - Target: ENI (Elastic Network Interface) of the routing peer instance (the network interface attached to your EC2 instance running the routing peer)
- Destination:
Q1: Do you control the internal network router?
- No -> Must use Masquerading.
- Yes -> Q2: Do you need to see the actual user IP in app logs?
- No -> Use Masquerading.
- Yes -> Disable Masquerading + Add Return Routes.
Health checks and load balancers
If internal systems initiate traffic toward NetBird peers (health checks, callbacks), you must:
- Enable masquerading so return traffic is seen as coming from the routing peer, and
- Add a peer access policy from the routing peer group to the target peer group for the relevant ports
If you need real client IP visibility for logging while passing traffic through NetBird, keep masquerading disabled and rely on overlay IPs plus the route and firewall configuration above. If your compliance standards require logging the original source IP of the user, you must disable masquerading and configure return routes. If you are unsure, leave masquerading enabled.
6.3 Scaling and route selection
At larger scale, you will care about:
- Overlapping routes to different environments (for example, multiple
172.17.0.0/16networks) - Connection overhead for many peers
NetBird has route selection tools and a lazy connections feature for large networks. In practice:
- Use network/route selection to avoid accidental routing into the wrong VPC or site when CIDRs overlap. You can do this in the systray application or via the command line.
- Lazy connections reduce CPU and battery usage on devices by establishing tunnels only when traffic is sent, rather than maintaining keep-alive with every peer in the mesh. Note that lazy connections require NetBird client version 0.50.1 or later. Review the current scaling guidance and lazy connections documentation before rolling out to thousands of peers.
Verification checklist:
- Loss of a single routing peer does not break access to its Network
- Monitoring and SIEM show clean failover to backup routing peers
- Internal teams can still reason about traffic paths despite masquerading or overlay ranges
7. Visibility: Traffic Events, SIEM, and Control Center
7.1 Enable Traffic Events and streaming early
Enable these as soon as possible, ideally right after IdP integration:
- Traffic Events in the NetBird dashboard
- Activity event streaming to your SIEM or log platform
Where to configure: Activity → Traffic Events & Integrations → Event Streaming
Use them to:
- Discover real flows to and from your pilot resources
- Verify that new policies are actually used
- Detect blocked legitimate traffic after policy changes
7.2 Use the SIEM for discovery and verification
For each new Zero Trust scope:
- Create a temporary broad policy from the relevant source group to the target resource or Network.
- Run for 48 to 72 hours during normal use.
- In the SIEM:
- Filter by source group, destination group, and resource.
- Extract the actual ports and protocols used.
- Replace the broad policy with specific allow rules for those ports.
- Keep monitoring for new blocked flows.
This turns "guessing the flows" into a data-driven process.
7.3 Control Center for topology and policy review
NetBird's Control Center provides a topological view of who can reach what, based on policies, groups, and Networks. Access control policies can be edited directly from the Control Center.
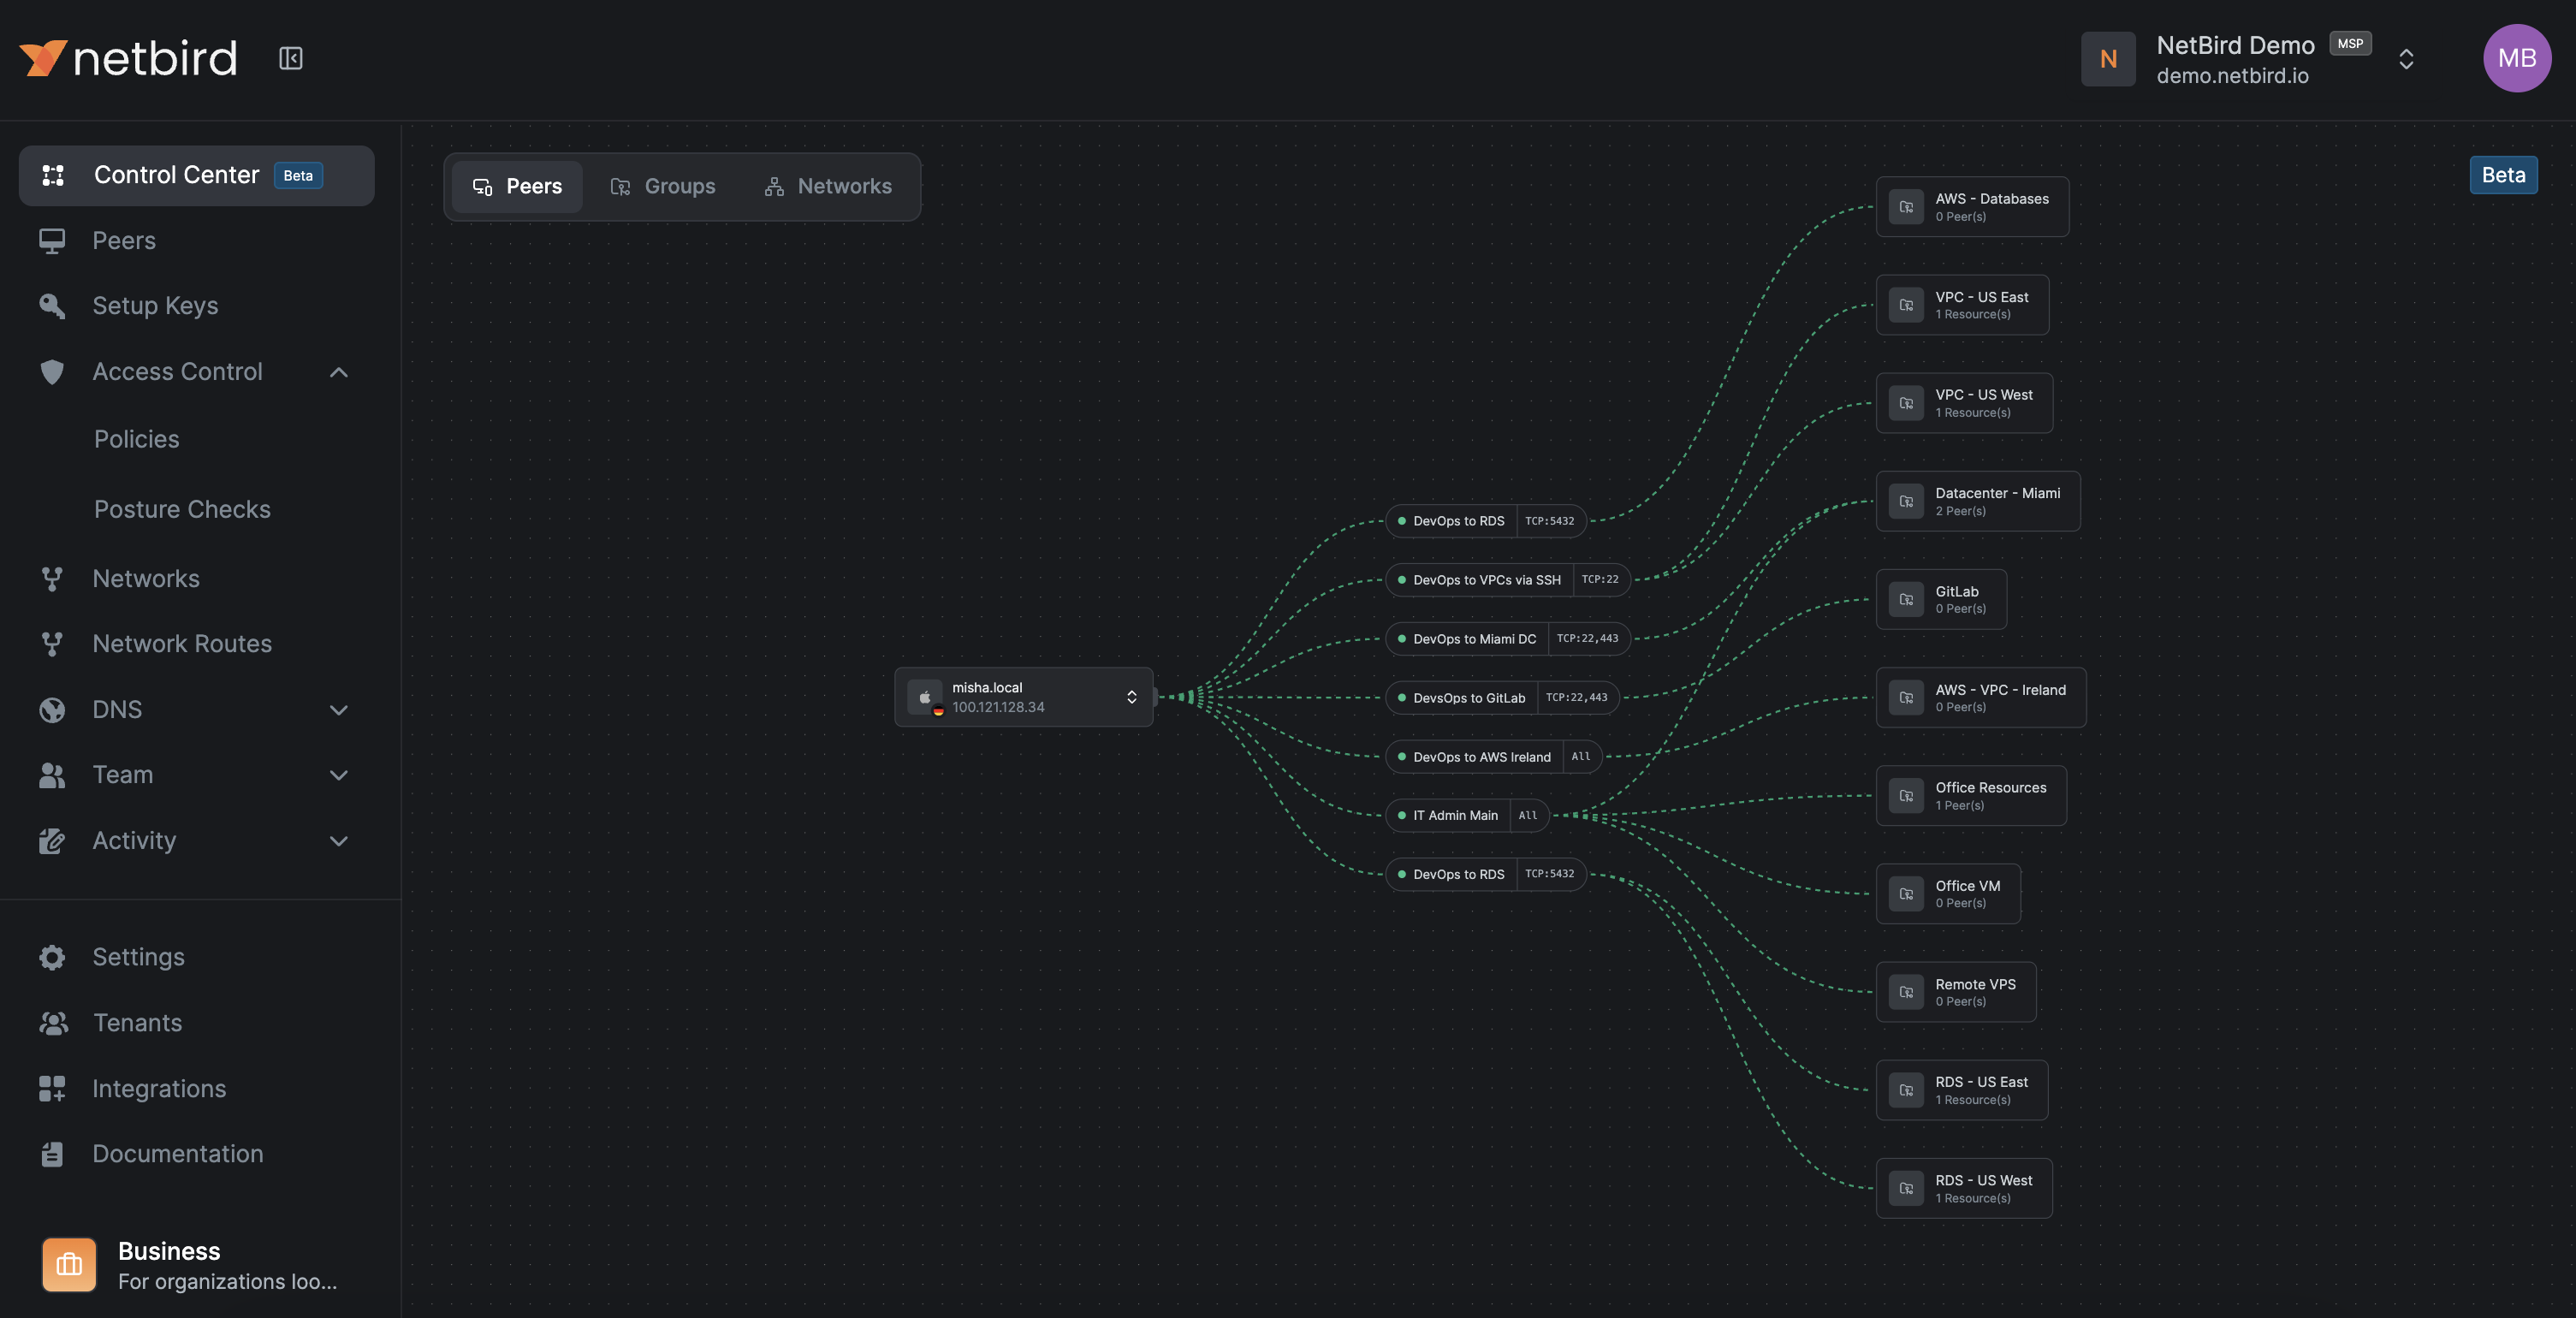
Where to access: Control Center in the dashboard.
Use it for:
- Peers view
- Select a peer and see which resources it can reach and through which policies.
- Users view
- Select a user and see all their peers and which resources they can access through which policies.
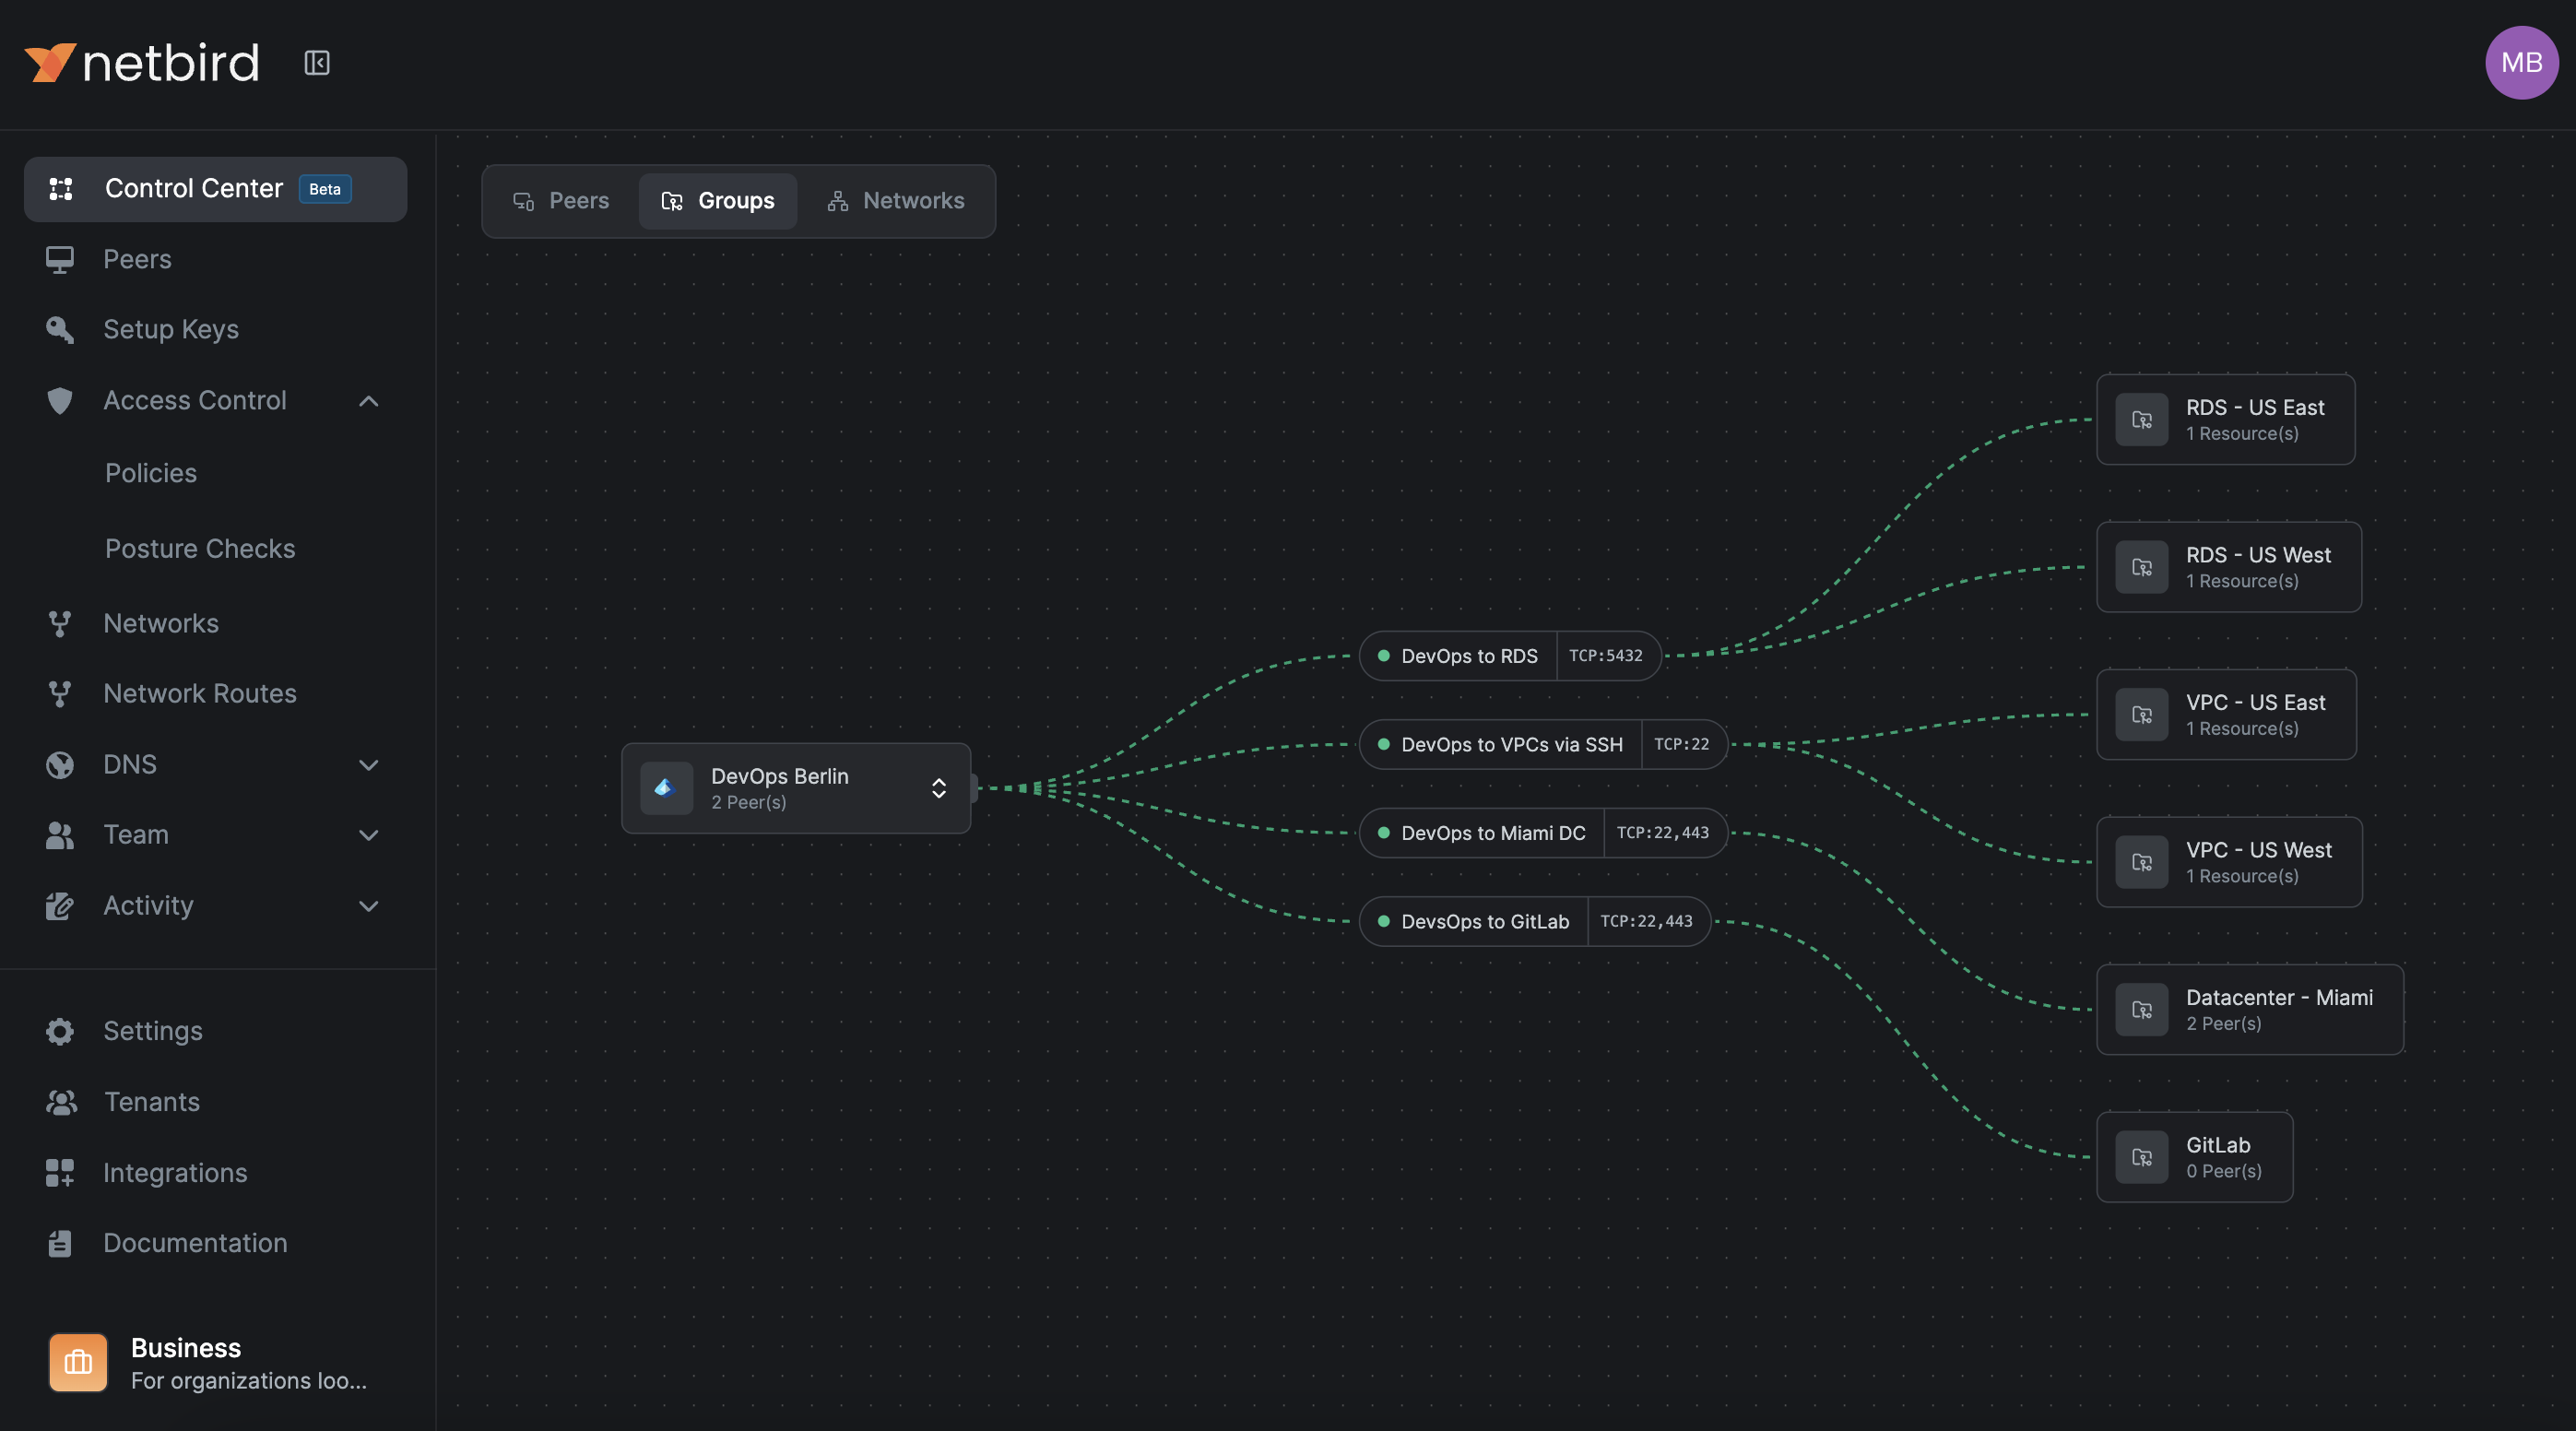
- Groups view
- Select a group and see which resources its members can reach and through which policies.

- Network view
- Select a Network and see which groups have access and on which ports.
- Large organizations
- Quickly spot redundant policies, overly broad access, and missing segmentation.
This is the right tool for periodic Zero Trust reviews and debugging complex access issues.
Verification checklist:
- Every policy change is visible in both Traffic Events and the Control Center graph
- You can answer "who can reach this database" without manually scanning long policy tables
8. Rollout strategy, rollback, and operations
8.1 Progressive rollout
Do not start with production.
For each pattern:
- Apply it to dev first:
- Use the same group and policy structure (
peer-devops-dev → svc-orders-web-dev, etc.).
- Use the same group and policy structure (
- Mirror to staging, refine there, then apply to prod.
- Keep group and policy names aligned across environments, only changing the
dev,stage,prodsuffix.
This keeps cognitive load low and reduces surprises in production.
8.2 Rollback plan
When you move from broad access to strict Zero Trust, have an explicit rollback plan.
-
Maintain one "break glass" access method (for example, a physical console or a separate VPN/bastion) that does not rely on NetBird during the initial setup phase.
-
Keep a known good emergency broad policy, for example:
peer-devops-prod → net-aws-euc1-prod [ALL]but keep it disabled. -
If production breaks and you cannot immediately identify the cause:
- Temporarily enable the emergency policy.
- Confirm that service has recovered.
- Investigate using Traffic Events, Control Center, and SIEM.
- Replace the emergency policy with a precise fix and disable it again.
-
Test the rollback once before you go live.
If someone deletes the Default all-to-all policy without a proper replacement, everything will stop. In that case:
- Quickly create a broad but scoped policy per critical environment.
- Tighten policies once things are stable.
8.3 Ongoing maintenance
To keep the system healthy over time:
-
Enforce group and policy naming consistently.
-
Example policy name pattern:
peer-devops-prod → svc-orders-db-prod [TCP/5432]
-
-
Use policy descriptions to record the business justification and owner:
- "Orders app backend to DB, owned by App Team X"
-
Periodically review:
- Unused groups
- Redundant policies
- Peers that have not connected recently
-
Keep an eye on:
- NetBird client versions (enforce minimum via posture checks)
- Routing peers' capacity and health
Verification checklist:
- You can tighten or add policies without fear because rollback is straightforward
- New applications follow the same pattern from the start
- Audits become about reviewing names and descriptions, not reverse-engineering firewall logic
9. Common failure modes and quick checks
This section provides practical checks and commands you can run on peers.
9.1 "Policy exists but connection is still blocked"
Most often:
- Posture check failing:
- Device OS or NetBird version does not meet the policy requirement.
- Required process (EDR, RMM) is not running.
- Group mismatch:
- The peer is not in the group you think it is (IdP group not synced, wrong setup key, manual group changes).
What to do:
- Check the policy and its posture checks in Access Control → Policies.
- Confirm the peer's group membership in the dashboard under Peers.
Useful commands on the peer:
# Check NetBird status
netbird status -d
9.2 "Connection works sometimes"
Common causes:
- Routing peer flapping:
- One of several routing peers is unhealthy, and clients sometimes pick the bad one.
- Overlapping routes:
- Two routes share the same CIDR, and the client sometimes picks the wrong one.
- Unstable underlying network:
- Wireless or mobile networks dropping connectivity.
What to do:
-
Check routing peers' health and logs.
-
Use network listing and selection on the client to see which routes are active:
# Networks (v0.35.0+) - recommended for Zero Trust netbird networks ls # Legacy Routes netbird routes ls -
Temporarily deselect problematic routes and see if the issue disappears.
# For Networks
netbird networks deselect "network_name"
netbird networks select "network_name"

# For legacy routes
netbird routes deselect "route_id"
netbird routes select "route_id"
9.3 "After deleting the Default policy, nothing works"
Cause:
- No replacement policies exist yet, and NetBird's deny-by-default behavior is kicking in.
Fix:
- Create a broad but scoped policy:
- For example
peer-devops-prod → svc-orders-*with required ports.
- For example
- Test that critical access works.
- Only then delete the Default policy and tighten further.
9.4 DNS resolution failures
Symptoms:
- Peers can ping IPs but cannot resolve hostnames.
- Applications complain about hostnames not found.
Likely causes:
- No policy allows traffic to internal DNS servers (UDP and TCP 53).
- DNS match domains for routed Networks are not configured correctly.
- DNS forwarder ports are blocked on or behind the routing peer.
Fix:
-
Add explicit DNS policies:
- Source: relevant peer groups
- Destination: DNS resolvers or DNS Networks
- Ports: UDP and TCP 53
-
Verify DNS routing configuration in Networks and match domains.
-
From a client, run DNS lookup commands and compare behavior with your expectations:
# nslookup: Basic DNS lookup tool (works on Windows, Linux, macOS) nslookup db.internal.example.com # dig: More detailed DNS query tool (Linux/macOS, or install on Windows) # The @10.10.0.10 specifies which DNS server to query dig @10.10.0.10 db.internal.example.com -
Linux:
resolvectl status(systemd-resolved command to see if the NetBird interface has the right DNS domains configured) -
Windows:
Get-DnsClientNrptPolicy(PowerShell command to see if Name Resolution Policy Table rules are active; these tell Windows which DNS server to use for specific domains)
For more detailed DNS troubleshooting steps, see the DNS Troubleshooting guide.
10. Best practices: Dashboard settings
These dashboard settings strengthen your Zero Trust security posture by adding layers of access control and authentication verification.
10.1 Authentication settings
Configure these settings to strengthen peer and user verification.
Where to configure: Settings → Authentication in the NetBird dashboard.
-
Manual peer approval
Require administrator approval before new peers can join the network. This prevents unauthorized devices from automatically connecting and gives you control over which devices gain access.
-
User approval
Require administrator approval for new user accounts before they can access NetBird. This ensures only authorized personnel can enroll devices and access resources.
-
Peer session expiration (24 hours or lower)
Configure peer sessions to expire after 24 hours or less, requiring users to re-authenticate regularly. This limits the window of opportunity if credentials are compromised and ensures access is periodically re-verified.
-
Global MFA (if your IdP does not enforce it)
Enable Multi-Factor Authentication at the NetBird level if your Identity Provider does not enforce MFA. This adds a second authentication factor to protect against credential theft and unauthorized access.
10.2 Permission settings
Configure these settings to restrict dashboard access.
Where to configure: Settings → Permissions in the NetBird dashboard.
-
Restrict dashboard for regular users
Limit dashboard access to administrators only, preventing regular users from viewing or modifying network configurations, policies, and peer information. This follows the principle of least privilege and reduces the risk of accidental or malicious configuration changes.
Appendix A: Naming and object cheat sheet
Peers
peer-<team>-<env>peer-devops-devpeer-devops-prodpeer-support-prod
Services
svc-<app>-<tier>-<env>svc-orders-web-prodsvc-orders-app-prodsvc-orders-db-prod
Networks
net-<provider/location>-<region/site>-<env>net-aws-euc1-prodnet-dc-dc1-lan
Policies
<source-group> → <dest-group> [<protocol>/<port or range>]peer-devops-prod → svc-orders-web-prod [TCP/443]svc-orders-app-prod → svc-orders-db-prod [TCP/5432]
DNS names
<resource>.internalor<service>.corp
Setup keys
setup-<env>-<purpose>setup-prod-serverssetup-stage-servers
Appendix B: Quick reference and commands
B.1 Common CLI commands
# Check detailed status
netbird status -d

# Networks (v0.35.0+) - the newer feature with policy-based access control
netbird networks ls

# Legacy Routes - may bypass Access Control unless explicitly configured
netbird routes ls
B.2 High availability for routing peers
- At least two routing peers per critical NetBird Network.
- Different failure domains (AZs, racks, hosts).
- Primary metric 100, backup metric 200.
- Monitor both NetBird health and OS-level metrics.