Reverse Proxy
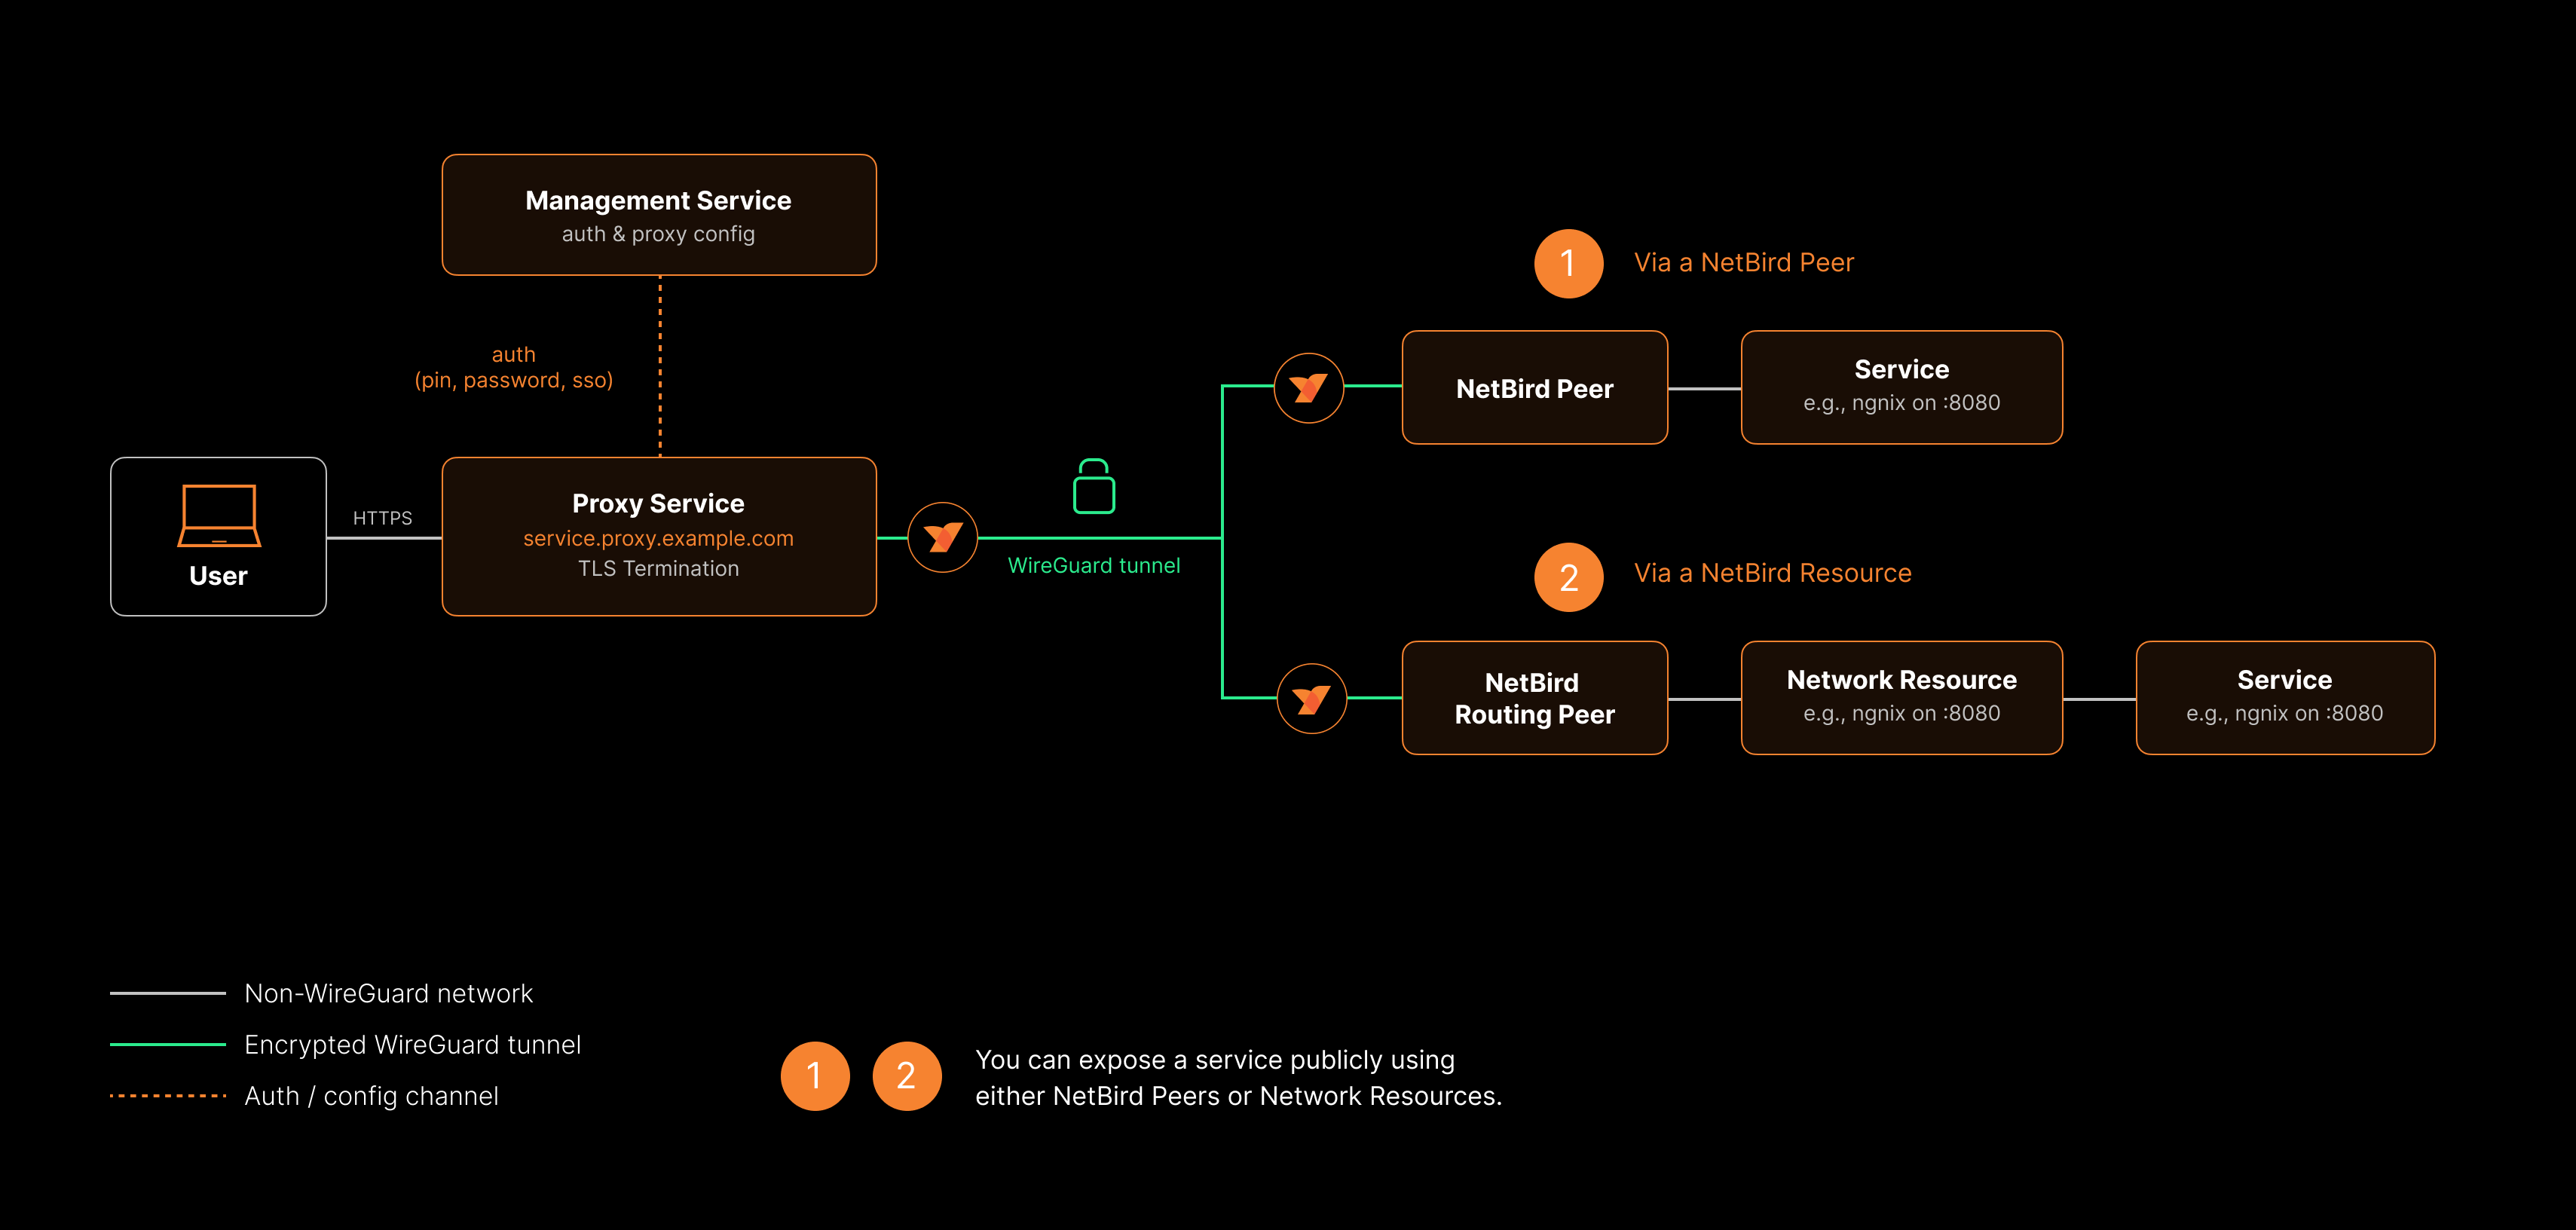
NetBird Reverse Proxy lets you expose internal services running on peers or behind network resources to the public internet. NetBird handles TLS termination, optional authentication and access restrictions, and proxies incoming traffic through the NetBird mesh to reach the target service, all without opening ports or configuring firewalls on your internal machines.
Availability: Reverse Proxy is currently in beta.
Self-hosted requirement: Self-hosted deployments must use Traefik as their external reverse proxy. Traefik is the only supported reverse proxy that provides TLS passthrough, which is required for the Reverse Proxy feature to function correctly.
The Reverse Proxy feature does not currently support Rosenpass. If your network relies on this feature, reverse proxy services will not function as expected.
How it works
When you create a reverse proxy service, NetBird provisions a public domain with an automatic TLS certificate. Incoming traffic to that domain is received at the NetBird proxy cluster, then forwarded through an encrypted NetBird tunnel to the target peer or network resource running your application. The target service only needs to be reachable within your NetBird network: it does not need a public IP address or open ports.
NetBird supports two categories of service:
- HTTP services operate at Layer 7. The proxy terminates TLS at the edge and forwards HTTP requests to your backend. This mode supports path-based routing, host header forwarding, redirect rewriting, and browser-based authentication (SSO, password, PIN).
- L4 services (TCP, UDP, TLS) operate at Layer 4. The proxy forwards raw connections or datagrams directly to your backend without inspecting application-layer content. TLS mode performs SNI-based routing, passing the encrypted connection through to the backend without terminating it.
You can optionally require authentication before users can reach the service, and restrict access by IP address or country. See Authentication for all available options.
Concepts
Services
A service is the core configuration unit of the Reverse Proxy. Each service maps a public domain to one or more internal targets and defines how traffic is authenticated and forwarded. A service consists of:
- Service mode - HTTP (Layer 7) or TCP/UDP/TLS (Layer 4)
- Domain - the public URL where the service is reachable
- Targets - one or more backend destinations that handle incoming requests
- Authentication - optional SSO, password, PIN, or header-based protection
- Access restrictions - optional IP CIDR, country, and CrowdSec IP reputation access control
- Settings - advanced options (varies by service mode)
- Enabled/Disabled toggle - turn the service on or off without deleting it
Service modes
The service mode determines how the proxy handles traffic between clients and your backend.
| Mode | Layer | Description |
|---|---|---|
| HTTP | L7 | TLS termination at the proxy, HTTP-level forwarding. Supports path-based routing, host header forwarding, redirect rewriting, and browser-based authentication (SSO, password, PIN). |
| TCP | L4 | Raw TCP relay. The proxy accepts TCP connections on a dedicated port and forwards them to your backend. |
| UDP | L4 | UDP relay with session tracking. The proxy accepts UDP packets on a dedicated port and forwards them to your backend. Sessions are reaped after an idle timeout. |
| TLS | L4 | TLS passthrough with SNI-based routing. The proxy inspects the TLS ClientHello to read the SNI hostname and forwards the encrypted connection to your backend without terminating TLS. |
L4 services (TCP, UDP, TLS) listen on a dedicated port on the proxy cluster. Depending on the cluster, the port may be auto-assigned or you can specify one manually. The proxy cluster's supports_custom_ports capability determines whether manual port selection is available.
L4 services do not support browser-based authentication (SSO, password, PIN) or header authentication because there is no HTTP layer. You can use access restrictions (IP CIDR, country, and CrowdSec rules) to protect L4 services.
Targets
A target defines where proxied traffic is sent within your NetBird network. Every target specifies a type and port. HTTP services additionally support path-based routing.
| Type | Description | How to select |
|---|---|---|
| Peer | A machine running the NetBird agent directly | Select from the peer list |
| Host | A network resource identified by an IP address | Select from your network resources |
| Domain | A network resource identified by a domain name | Select from your network resources |
| Subnet | A network resource within a CIDR range | Select from your network resources, then specify an IP within the range |
| Proxy Cluster | An upstream reached directly via the host network of the cluster's embedded NetBird proxy. Only available on clusters that report the Private capability. | Select the cluster from the picker, then enter a hostname or IP that the embedded proxy can resolve from its own host stack. |
Target properties vary by service mode:
HTTP services:
- Path (optional) - a URL path prefix for path-based routing (e.g.,
/api). See Path-based routing below. - Protocol -
HTTPorHTTPS, depending on what the backend service speaks - Port - the port on the target machine (defaults to
80for HTTP,443for HTTPS) - Enabled/Disabled toggle - individually enable or disable targets without removing them
L4 services (TCP, UDP, TLS):
- Type - same Peer, Host, Domain, or Subnet selection as HTTP services
- Port - the port on the target machine
- Enabled/Disabled toggle - individually enable or disable targets without removing them
L4 targets do not support path-based routing or HTTP/HTTPS protocol selection.
Domains
Every service needs a domain. The available domain types depend on whether you are using NetBird Cloud or a self-hosted deployment.
Cloud deployments provide free domains in the format:
{subdomain}.{nonce}.{cluster}.proxy.netbird.io
For example: myapp.abc123.eu.proxy.netbird.io where myapp is your chosen subdomain, abc123 is a nonce unique to your account, and eu is the proxy cluster region. These domains appear in the domain selector with a Free badge and are available immediately with no additional configuration.
Self-hosted deployments provide cluster domains in the format:
{subdomain}.{proxy-domain}
DNS records for certificates on self-hosted: For certificates to work properly, ensure you have the proper records set with your domain name registrar: an A record for your NetBird host (e.g. netbird → your server IP), plus CNAME records for proxy and *.proxy pointing to that host. See the self-hosted quickstart for the full table and setup.
For example: myapp.proxy.mycompany.com where myapp is your chosen subdomain and proxy.mycompany.com is the domain configured on your proxy instance(s) via the NB_PROXY_DOMAIN environment variable. These domains appear in the domain selector with a Cluster badge.
In both deployment types, the available domains are dynamically derived from the proxy instances currently connected to the management server. They are not pre-provisioned - they reflect whichever proxy servers are actively registered.
Custom domains work identically in both cloud and self-hosted deployments. You can use your own domain name (e.g., app.example.com) by creating a CNAME record that points to your proxy cluster address. See Custom Domains for setup instructions.
All domain types receive automatic TLS certificates managed by the proxy.
Authentication
You can protect a service with one or more authentication methods. When multiple methods are enabled, users can choose which one to use when accessing the service.
| Method | HTTP services | L4 services | Description |
|---|---|---|---|
| NetBird-Only Access | Yes | No | Restrict the service to peers in your own NetBird network. The proxy validates the request against your WireGuard tunnel and only allows in connections from peers that belong to the configured access groups. Available on clusters that advertise the Private capability. |
| SSO (Single Sign-On) | Yes | No | Authenticate via your identity provider using OIDC. Optionally restrict access to specific user groups. |
| Password | Yes | No | Protect with a shared password. |
| PIN Code | Yes | No | Protect with a numeric PIN code. |
| Header Authentication | Yes | No | Validate a static header value (API key, Bearer token, Basic auth). Useful for programmatic access. |
| Access Restrictions | Yes | Yes | Restrict access by IP CIDR range, country, or CrowdSec IP reputation. Works at the connection level, so it applies to all service modes. |
NetBird-Only Access turns the service into a private service: it replaces the operator-managed auth methods (SSO, password, PIN, header) on the same service. Use it when you want a service exposed only inside your NetBird mesh; combine the operator auth methods with each other when you want a service exposed publicly.
If you save a service with no authentication or access restrictions configured, the dashboard will display a warning. Public services are accessible to anyone on the internet who knows the URL.
For detailed configuration instructions, see Authentication.
Service statuses
After creating a service, it progresses through several statuses as NetBird provisions the domain and establishes connectivity:
| Status | Meaning |
|---|---|
pending | The service has been created and is being provisioned. |
certificate_pending | A TLS certificate is being issued for the domain. This applies when the proxy uses ACME (Let's Encrypt) to automatically provision certificates. |
active | The service is live and routing traffic to its targets. |
tunnel_not_created | The proxy cluster has not yet established a WireGuard tunnel to the target. |
certificate_failed | TLS certificate issuance failed. If the proxy uses ACME, verify that the ACME challenge port is accessible (port 443 for tls-alpn-01, port 80 for http-01) and that the domain resolves correctly. For static certificates, check that the certificate and key files are valid. |
error | A generic error occurred. Check the service configuration and target availability. |
Self-hosted proxy setup
Self-hosted deployments require a separate NetBird proxy instance (netbirdio/netbird-proxy) that connects to your management server via gRPC and handles TLS termination and traffic forwarding for your reverse proxy services.
Already set up? If you deployed NetBird using the setup script (getting-started.sh) starting from v0.65.0 and selected the built-in Traefik option, the proxy container is already included in your Docker Compose stack. You can skip straight to creating your first service.
Existing deployments - If you have an existing self-hosted deployment and want to add the proxy, follow the Enable Reverse Proxy migration guide. It covers generating an access token, adding the proxy container with Traefik TLS passthrough labels, setting up wildcard DNS, and verifying the setup.
TLS certificate configuration
The proxy supports three modes for TLS certificate management:
ACME mode (Let's Encrypt) - The proxy automatically provisions TLS certificates for each domain using Let's Encrypt. Enable this mode with:
| Environment variable | Description |
|---|---|
NB_PROXY_ACME_CERTIFICATES | Set to true to enable automatic certificate provisioning. |
NB_PROXY_ACME_CHALLENGE_TYPE | ACME challenge type (default: tls-alpn-01). The tls-alpn-01 challenge uses port 443 and does not require port 80. Alternatively, set to http-01 which requires port 80 to be accessible. |
When a certificate is successfully issued, the proxy notifies the management server and the service status changes to active.
TLS-ALPN-01 requirements
The default ACME challenge type (tls-alpn-01) validates domain ownership by responding on port 443 with a special TLS certificate containing the acme-tls/1 ALPN protocol. For this challenge to succeed, the following conditions must be met:
- Port 443 must be publicly reachable - Let's Encrypt connects to your server on port 443 to perform the challenge. If port 443 is blocked by a firewall or not forwarded correctly, certificate issuance will fail.
- No geo-blocking - Let's Encrypt validates from multiple global locations simultaneously. If your firewall or CDN blocks requests from non-local IP ranges, some or all validation attempts will fail and the certificate will not be issued.
- ALPN protocol support - If there is an additional proxy or load balancer in front of the NetBird proxy, it must support passing through the
acme-tls/1ALPN protocol. Traefik and Caddy handle this natively through TLS passthrough. Nginx, Apache, and some CDN providers (such as Cloudflare) may strip or fail to negotiate theacme-tls/1protocol, causing the challenge to fail.
If any of these requirements cannot be met in your environment, switch to the http-01 challenge type by setting NB_PROXY_ACME_CHALLENGE_TYPE=http-01. The HTTP-01 challenge validates over port 80 using a plain HTTP request and does not depend on ALPN protocol support. However, it requires port 80 to be accessible from the internet.
Static certificate mode - Provide your own certificate and key files. This is useful for certificates from a corporate CA or when you manage certificates externally. Configure with:
| Environment variable | Description |
|---|---|
NB_PROXY_CERTIFICATE_FILE | TLS certificate filename within the certificate directory (default: tls.crt) |
NB_PROXY_CERTIFICATE_KEY_FILE | TLS private key filename within the certificate directory (default: tls.key) |
NB_PROXY_CERTIFICATE_DIRECTORY | Directory where certificate files are stored (default: ./certs) |
Static certificates support hot-reload through file watching. When the certificate or key file changes on disk, the proxy picks up the new files automatically without requiring a restart.
Static mode is also how you run a proxy with no public inbound ports: issue the certificate out of band over the DNS-01 challenge and serve it here, so certificate issuance never needs port 80 or 443 exposed. See Private Proxy Without Public Inbound Ports.
Wildcard certificate mode - Point the proxy at a directory containing wildcard certificate and key pairs. The proxy loads all certificates from the directory, matches them against incoming SNI hostnames, and serves the appropriate wildcard certificate automatically. This is useful when you have a wildcard certificate (e.g., *.proxy.example.com) that should cover all services under that domain. Configure with:
| Environment variable | Description |
|---|---|
NB_PROXY_WILDCARD_CERT_DIR | Directory containing wildcard certificate and key pairs. The proxy reads all certificate files in this directory and matches them by SNI. |
Wildcard certificates support hot-reload through file watching. When certificate files in the directory are updated, the proxy reloads them automatically without requiring a restart. Services that match a loaded wildcard domain bypass ACME certificate provisioning entirely.
High availability
For self-hosted deployments, multiple proxy instances configured with the same NB_PROXY_DOMAIN value form a single proxy cluster, providing automatic failover. See Running Multiple Proxy Instances for setup instructions covering token management, TLS certificates, and monitoring across instances.
Traefik requirement
Self-hosted deployments must use Traefik as the external reverse proxy in front of the NetBird management server. Traefik is required because it supports TLS passthrough, which allows the NetBird proxy to handle TLS termination directly. Other reverse proxies that do not support TLS passthrough are not compatible with this feature.
Prerequisites
Before creating a reverse proxy service, make sure you have:
- At least one peer connected to your NetBird network, OR at least one network with resources and routing peers configured. See Networks for details.
- A domain to use. Free (cloud) or cluster (self-hosted) domains are available automatically, or you can add a custom domain.
- Self-hosted only: At least one proxy instance deployed and connected to your management server. See Self-hosted proxy setup above, or follow the Enable Reverse Proxy migration guide to add it to an existing deployment.
- Access to a NetBird account with the 'Services' permission module ('Network Admin' role or higher).
Quick start
Follow these steps to create your first reverse proxy service and expose an internal application to the internet.
Step 1: Open the Reverse Proxy page
Navigate to Reverse Proxy > Services in the NetBird dashboard and click Add Service.
Step 2: Configure service details
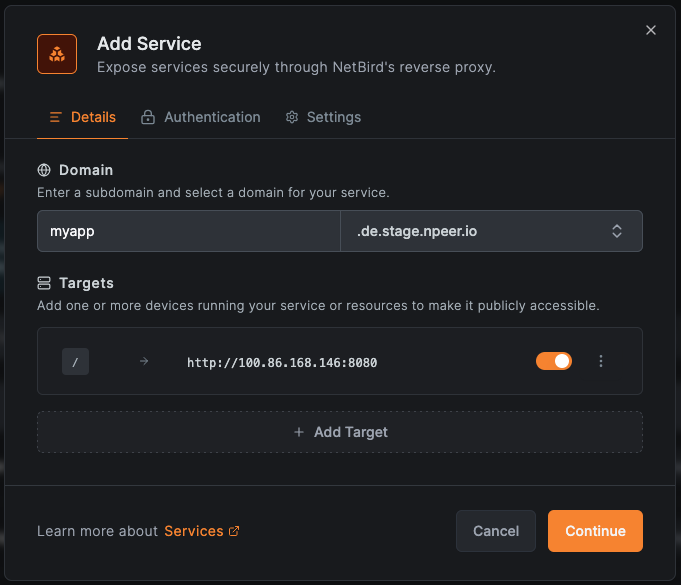
In the Details tab:
- Select a service mode. Choose HTTP for web applications, or TCP, UDP, or TLS for Layer 4 services. See Service modes for details on each mode.
- Enter a subdomain for your service (e.g.,
myapp). - Select a base domain. Cloud users see domains with a Free badge (e.g.,
abc123.eu.proxy.netbird.io). Self-hosted users see domains with a Cluster badge (e.g.,proxy.mycompany.com, based on their deployed proxy instances). You can also select a custom domain you have already configured. - For L4 services, set the listen port that the proxy will accept connections on. Some clusters auto-assign ports; others allow you to specify one manually.
- Click Add Target to define where traffic should be sent.
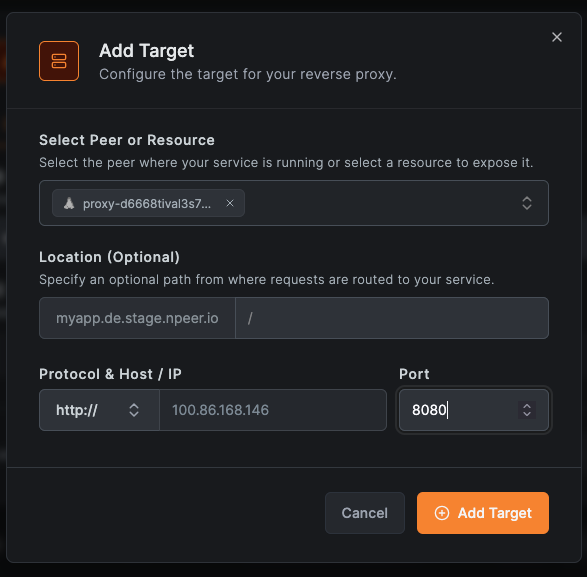
- In the target configuration, select the type (Peer, Host, Domain, Subnet, or Proxy Cluster), then choose the specific peer, resource, or cluster.
- For HTTP services, set the protocol (HTTP or HTTPS) and port for the target. Optionally, enter a path for path-based routing. For L4 services, set the target host/IP and port. For Proxy Cluster targets, the host field accepts any hostname or IP the cluster's embedded proxy can resolve from its own host stack — see Private services for details.
You can add multiple targets. HTTP services support path-based routing across targets.
Step 3: Configure authentication (HTTP only)
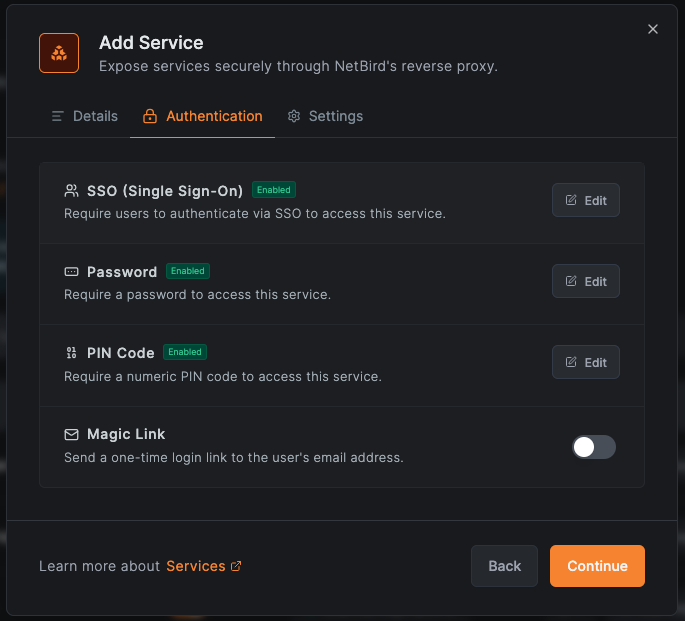
Switch to the Authentication tab to configure how users are authenticated before reaching your service. This tab is only available for HTTP services.
- Enable NetBird-Only Access to make the service reachable only from peers in the selected NetBird groups (private service). Only appears when the selected base domain is on a cluster that advertises the
Privatecapability. Picking this method hides the operator auth options below — the two modes are mutually exclusive. - Enable SSO to require users to authenticate through your identity provider. Optionally restrict access to specific groups.
- Enable Password and set a shared password.
- Enable PIN Code and set a numeric code.
- Enable Header Authentication to require a specific header value (API key, Bearer token, or Basic auth credentials). Useful for machine-to-machine access.
- Leave all methods disabled for public (unauthenticated) access.
You can enable multiple operator auth methods (SSO, password, PIN, header) simultaneously — users pick one to authenticate with. NetBird-Only Access is a different mode and replaces the operator auth set on that service.
Step 3b: Configure access control
Switch to the Access Control tab to restrict access by IP address, country, or IP reputation. This tab is available for all service modes (HTTP and L4).
- Add allowed CIDRs or blocked CIDRs to restrict by IP range.
- Add allowed countries or blocked countries to restrict by geographic location.
- Set CrowdSec IP Reputation to enforce or observe to block or monitor known malicious IPs (when available on the proxy cluster).
By default, restrictions of different types are combined with a logical AND: a connection must satisfy all of them (for example, come from an allowed CIDR and an allowed country) to be allowed through.
Access restrictions are evaluated before authentication: if a connection is blocked by an access restriction rule, it is rejected before any authentication check.
NetBird-Only services: when NetBird-Only Access is enabled on a service, an allow rule for the NetBird network range is applied automatically. Any rules you add on this tab are layered on top of that baseline — country and CrowdSec checks are skipped on the overlay path because the source address is always a NetBird CGNAT address.
Step 4: Configure advanced settings
Switch to the Settings tab to adjust advanced proxy behavior. The available settings depend on the service mode.
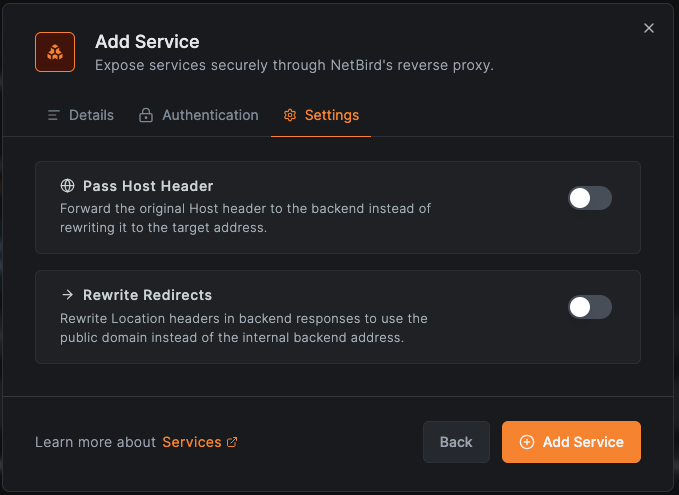
The per-service options differ between HTTP and L4 (TCP/UDP/TLS) services and apply at different points along the request path:
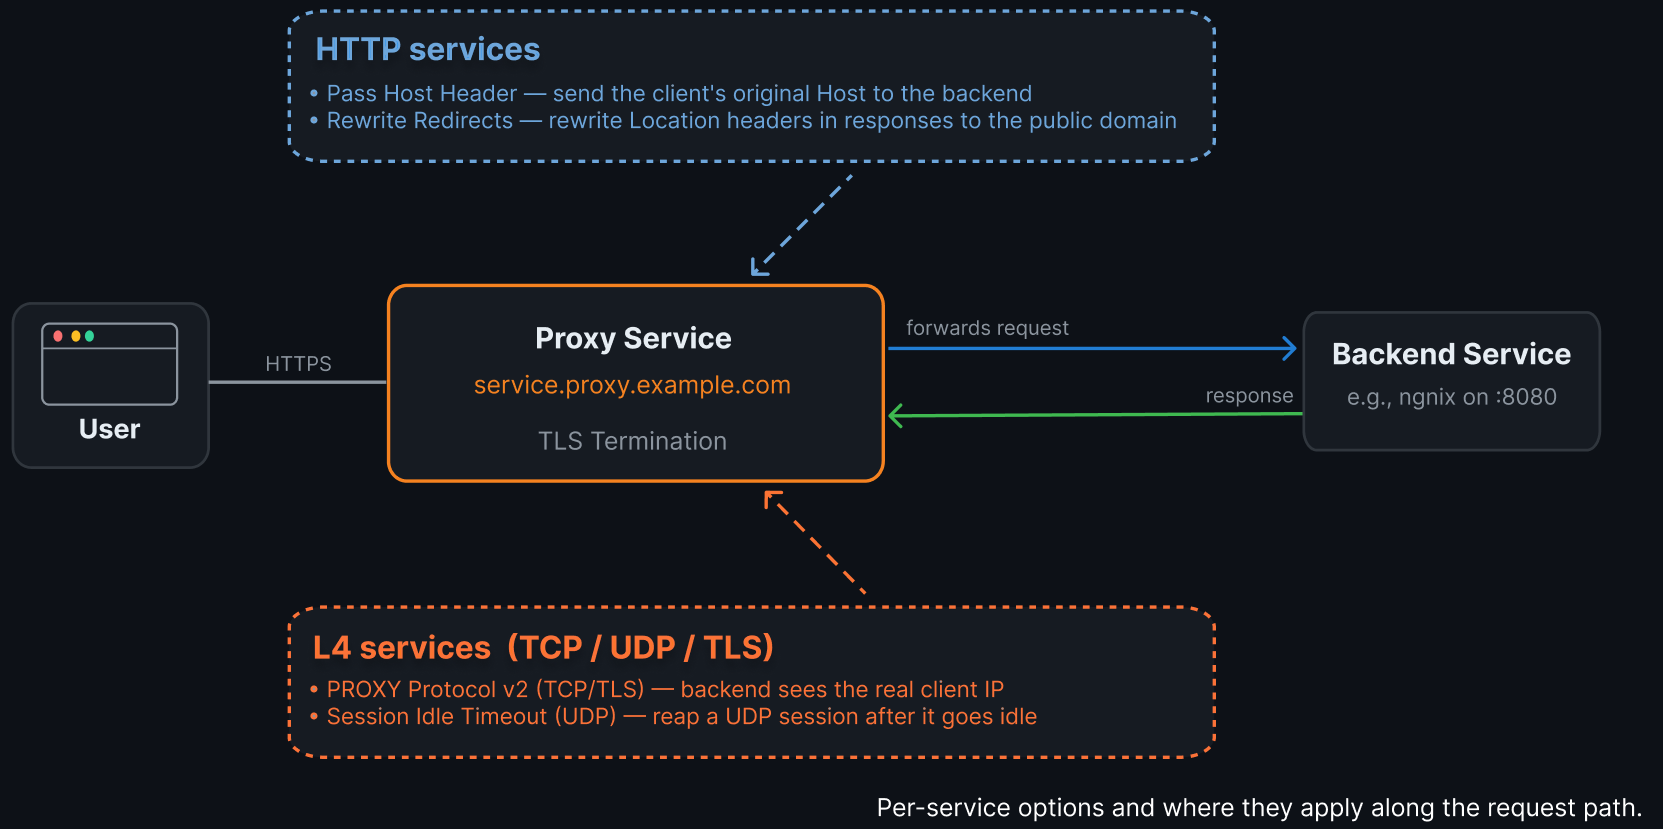
HTTP services:
- Pass Host Header - when enabled, the original
Hostheader from the client request is forwarded to the backend service instead of the target's hostname. This is useful when the backend application needs to know the public domain it is being accessed through. - Rewrite Redirects - when enabled,
Locationheaders in backend responses (used for HTTP redirects) are rewritten to use the public domain. This prevents users from being redirected to internal URLs that they cannot reach. - Direct Upstream (NetBird-Only services only) - dial the upstream from the proxy host's network stack instead of through the WireGuard tunnel. Off by default for Peer and Resource targets; locked on for Proxy Cluster targets because the cluster has no WireGuard endpoint to fall back to. Turn it on for peer/resource targets when the upstream is reachable from the proxy host without WireGuard (e.g., a sidecar on the same machine).
L4 services (TCP, UDP, TLS):
- PROXY Protocol (TCP/TLS only) - when enabled, the proxy sends a PROXY Protocol v2 header to the backend, allowing it to see the real client IP address. The backend must support PROXY Protocol to use this option.
- Session Idle Timeout (UDP only) - how long a UDP session can be idle before the proxy reaps it. Specified as a duration string (e.g.,
30s,2m). Defaults to 30 seconds.
Backend configuration may be required. If your backend service has a "trusted proxies", "known hosts", or "allowed networks" setting (common in Jellyfin, Home Assistant, Plex, Nextcloud, and others), you must configure it to trust the NetBird IP range. Without this, the backend may reject proxied requests or fail to read the real client IP. See Backend Service Configuration for details and per-service examples.
Step 5: Create the service
Click Add Service to create the reverse proxy service. NetBird will begin provisioning the TLS certificate and establishing the tunnel. Monitor the service status on the services list page until it shows active.
Managing services
Edit a service
Click on any service in the services list to open the edit modal. Make your changes across the Details, Authentication, or Settings tabs, then click Save Changes.
Enable or disable a service
Toggle the service on or off using the enabled/disabled switch. Disabling a service stops routing traffic to it without deleting the configuration, allowing you to quickly re-enable it later.
Delete a service
Delete a service to permanently remove it along with its domain and TLS certificate. This action cannot be undone.
Manage targets
Within a service, you can:
- Add targets - click Add Target to route traffic to additional backend services
- Remove targets - remove a target to stop routing traffic to that backend
- Enable or disable targets - toggle individual targets on or off without removing them from the service
Port allocation for L4 services
L4 services (TCP, UDP, TLS) require a dedicated port on the proxy cluster. How ports are assigned depends on whether the proxy cluster supports custom port selection:
- Custom port selection available: you choose the exact port the proxy listens on. This is useful when clients expect a well-known port (e.g., 5432 for PostgreSQL, 3306 for MySQL). Self-hosted proxy clusters support this when configured to allow it.
- Auto-assigned ports only: the proxy cluster automatically assigns an available port. This is the case for NetBird's shared cloud proxy clusters, where port allocation is managed to avoid conflicts between accounts. The assigned port is shown in the service details after creation.
The dashboard indicates whether a proxy cluster supports custom ports when you select the domain. If custom ports are not supported, the listen port field is read-only and populated after creation.
Each port on a proxy cluster can only be used by one service at a time. If you specify a port that is already in use by another service, creation will fail. L4 listen ports also cannot conflict with the proxy's tunnel port.
The listen port for an L4 service is separate from the target port. For example, a service could listen on port 15432 on the proxy cluster and forward traffic to port 5432 on the backend peer. Clients connect to the proxy cluster address on the listen port.
Self-hosted Docker deployments: The default Docker Compose configuration only routes port 443 (via Traefik TLS passthrough) to the proxy container. L4 services that listen on additional TCP or UDP ports require you to manually expose those ports in your docker-compose.yml. See the migration guide for instructions.
How services share ports
The proxy's main port always runs an SNI router that peeks at the TLS ClientHello to read the requested hostname, then routes the connection to the matching service. This allows multiple service modes to share the same port.
On the main port, HTTP and TLS services coexist via SNI routing:
- Each incoming connection is matched against configured domains.
- If the SNI hostname matches an HTTP service, the connection is forwarded to the HTTP reverse proxy for L7 handling.
- If the SNI hostname matches a TLS service, the encrypted connection is passed through directly to the backend without TLS termination.
- If the SNI hostname does not match any service, the connection falls through to the HTTP reverse proxy, which returns an error since no matching service exists.
- Connections with no SNI (e.g., TLS 1.3 with Encrypted Client Hello) follow the same fallback path.
Do not configure an HTTP and a TLS service with the same hostname. The HTTP route takes priority and the TLS service becomes unreachable. Use different domain names for each.
On custom ports, TLS and TCP services can coexist:
- TLS connections are matched by SNI and passed through to the backend.
- Connections that do not match any SNI route (or are not TLS at all) fall back to the TCP relay.
- This is useful for running a TLS passthrough alongside a plain TCP catch-all on the same port.
Path-based routing
When a service has multiple targets, you can assign each target a unique path prefix to route different URL paths to different backends. For example:
| Path | Target | Description |
|---|---|---|
/ | Peer A (port 3000) | Main web application |
/api | Peer B (port 8080) | API service |
/docs | Resource C (port 80) | Documentation server |
Incoming requests are matched against the configured path prefixes and forwarded to the corresponding target. Each path must be unique within a service.
This is useful for consolidating multiple internal services under a single public domain, reducing the number of domains and TLS certificates you need to manage.
Integration with Networks
If you have already configured Networks with resources and routing peers, you can expose a network resource directly from the Networks page.
Click the Expose Service button on any resource to open the reverse proxy creation modal with that resource pre-populated as a target. This provides a quick way to make an existing internal resource available on the public internet.
The Networks page also displays a badge on each resource indicating how many reverse proxy services reference it, giving you visibility into which resources are publicly exposed.
Expose from CLI
In addition to creating services through the dashboard, peers can expose local services directly from the command line using the netbird expose command. This creates a temporary (ephemeral) service that lives only as long as the command is running, useful for quick demos, development sharing, or temporary webhook endpoints.
netbird expose 8080
The command supports HTTP and L4 protocols (--protocol), optional authentication (--with-pin, --with-password, --with-user-groups), custom domains (--with-custom-domain), and name prefixes (--with-name-prefix). For L4 services, use --with-external-port to specify the listen port on the proxy cluster.
The Peer Expose feature must be enabled by an account administrator in Settings > Clients before peers can use this command.
For the complete guide including setup, authentication options, session lifecycle, troubleshooting, and examples, see Expose from CLI.
Related pages
- Expose from CLI - expose local services from the command line using
netbird expose - Multiple Proxy Instances - deploy multiple proxy instances for high availability and redundancy
- Custom Domains - configure your own domain names for reverse proxy services
- Authentication - SSO, password, PIN, header authentication, and access restrictions
- Access Logs - monitor and audit traffic to your reverse proxy services
- Networks - configure internal networks and resources
- Access Control - manage policies that control access to your network
Get started
- Make sure to star us on GitHub
- Follow us on X
- Join our Slack Channel
- NetBird latest release on GitHub