Reverse Proxy Authentication and Access Restrictions
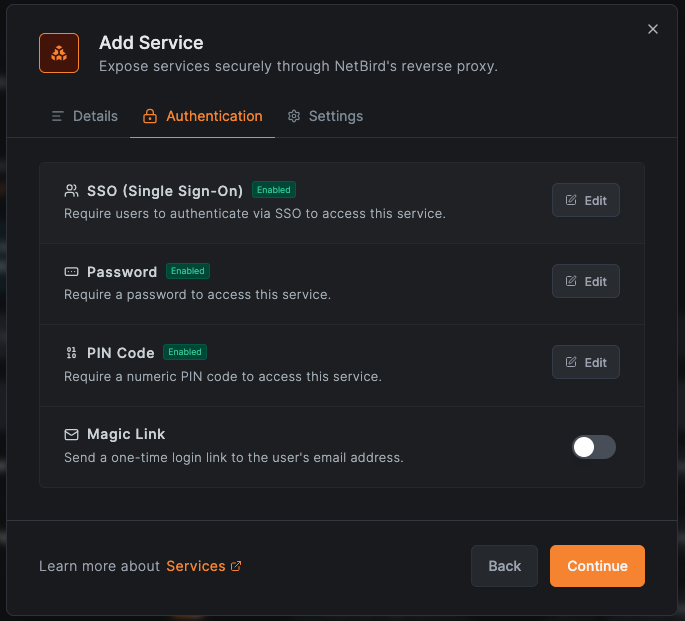
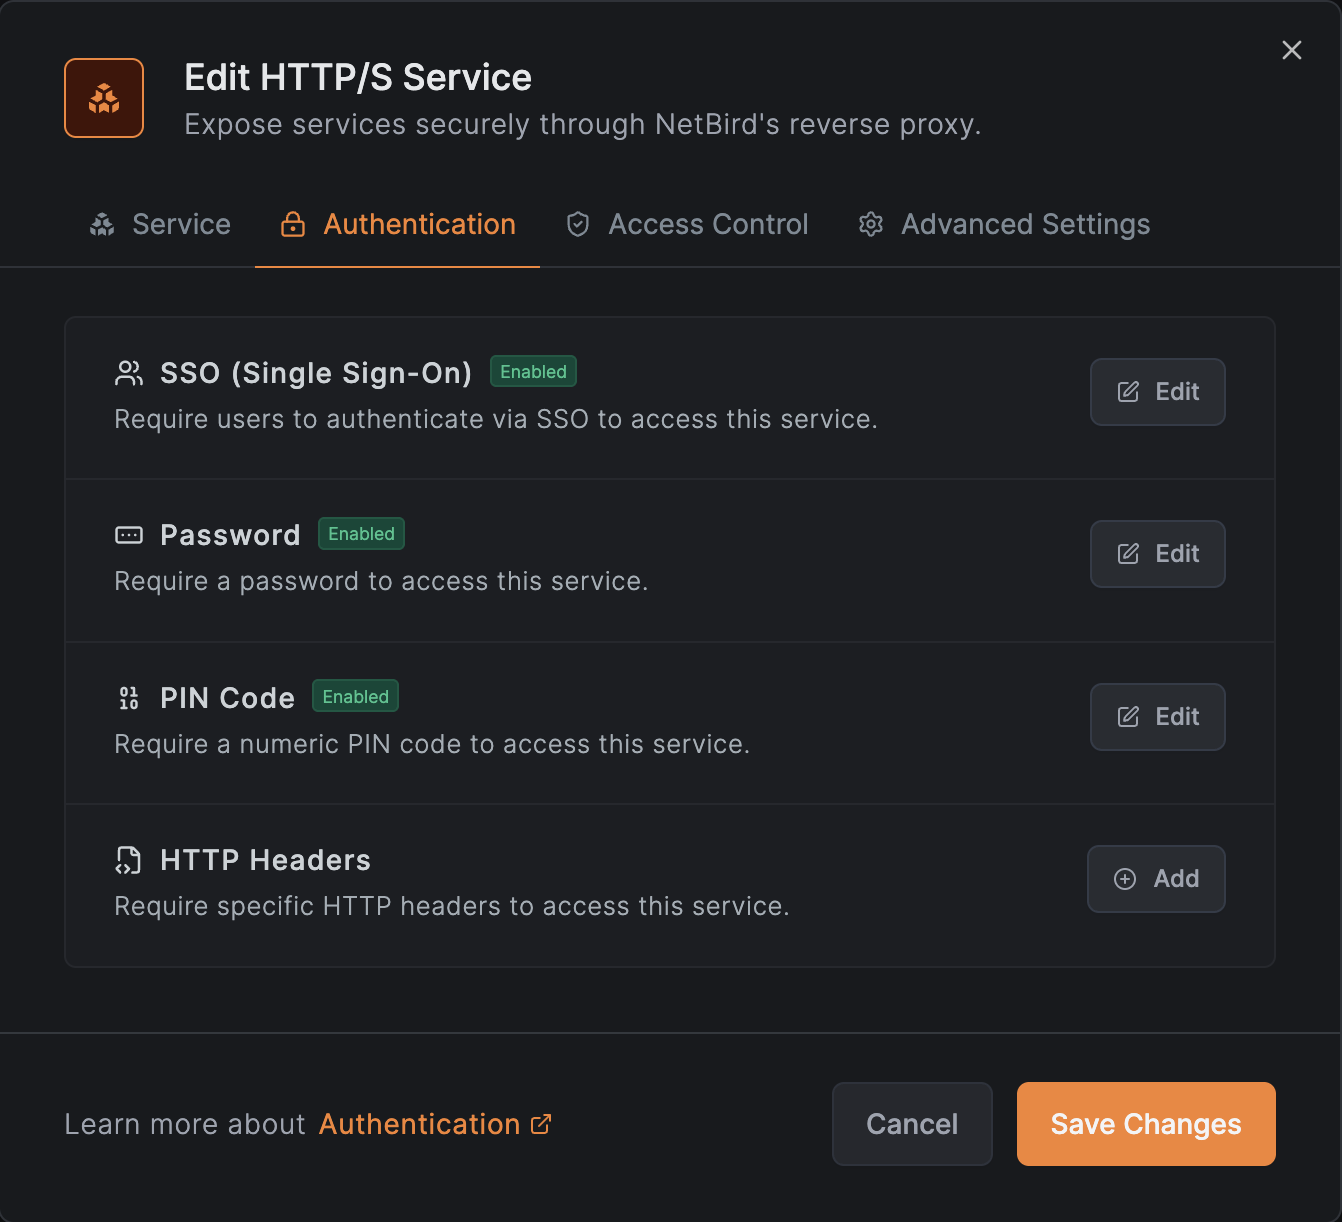
NetBird Reverse Proxy supports multiple authentication methods and connection-level access restrictions to control who can access your exposed services. You can enable one or more methods on each service, or leave a service completely public. Authentication and access restrictions are configured per service in the Authentication tab when creating or editing a service.
Authentication methods
NetBird offers two families of authentication, suited to different access patterns:
- Operator auth — SSO, password, PIN, and header authentication. Designed for public services where the proxy fronts an internal app for the open internet and you want to gate it with credentials of your choosing. Multiple methods can be enabled on the same service; users pick which one to use.
- NetBird-Only Access — Designed for private services that should never be reachable from the public internet. The proxy only lets in requests that come from a peer in your NetBird network and whose owner belongs to the configured access groups. Available on clusters that advertise the
Privatecapability.
NetBird-Only Access is mutually exclusive with the operator auth methods on the same service. When NetBird-Only is enabled, the SSO/password/PIN/header rows are hidden — the trust boundary is the WireGuard tunnel, not an operator credential.
All HTTP-layer methods (SSO, password, PIN, header, and NetBird-Only Access) require HTTP (Layer 7) and are only available for HTTP services. For L4 services (TCP, UDP, TLS), use access restrictions to control access.
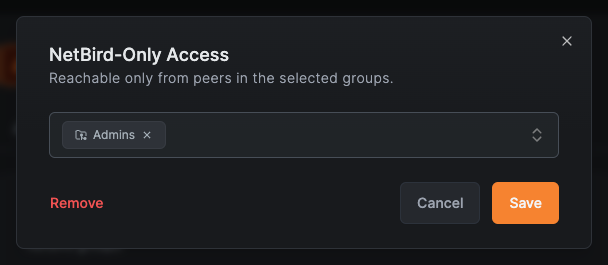
NetBird-Only Access (private services)
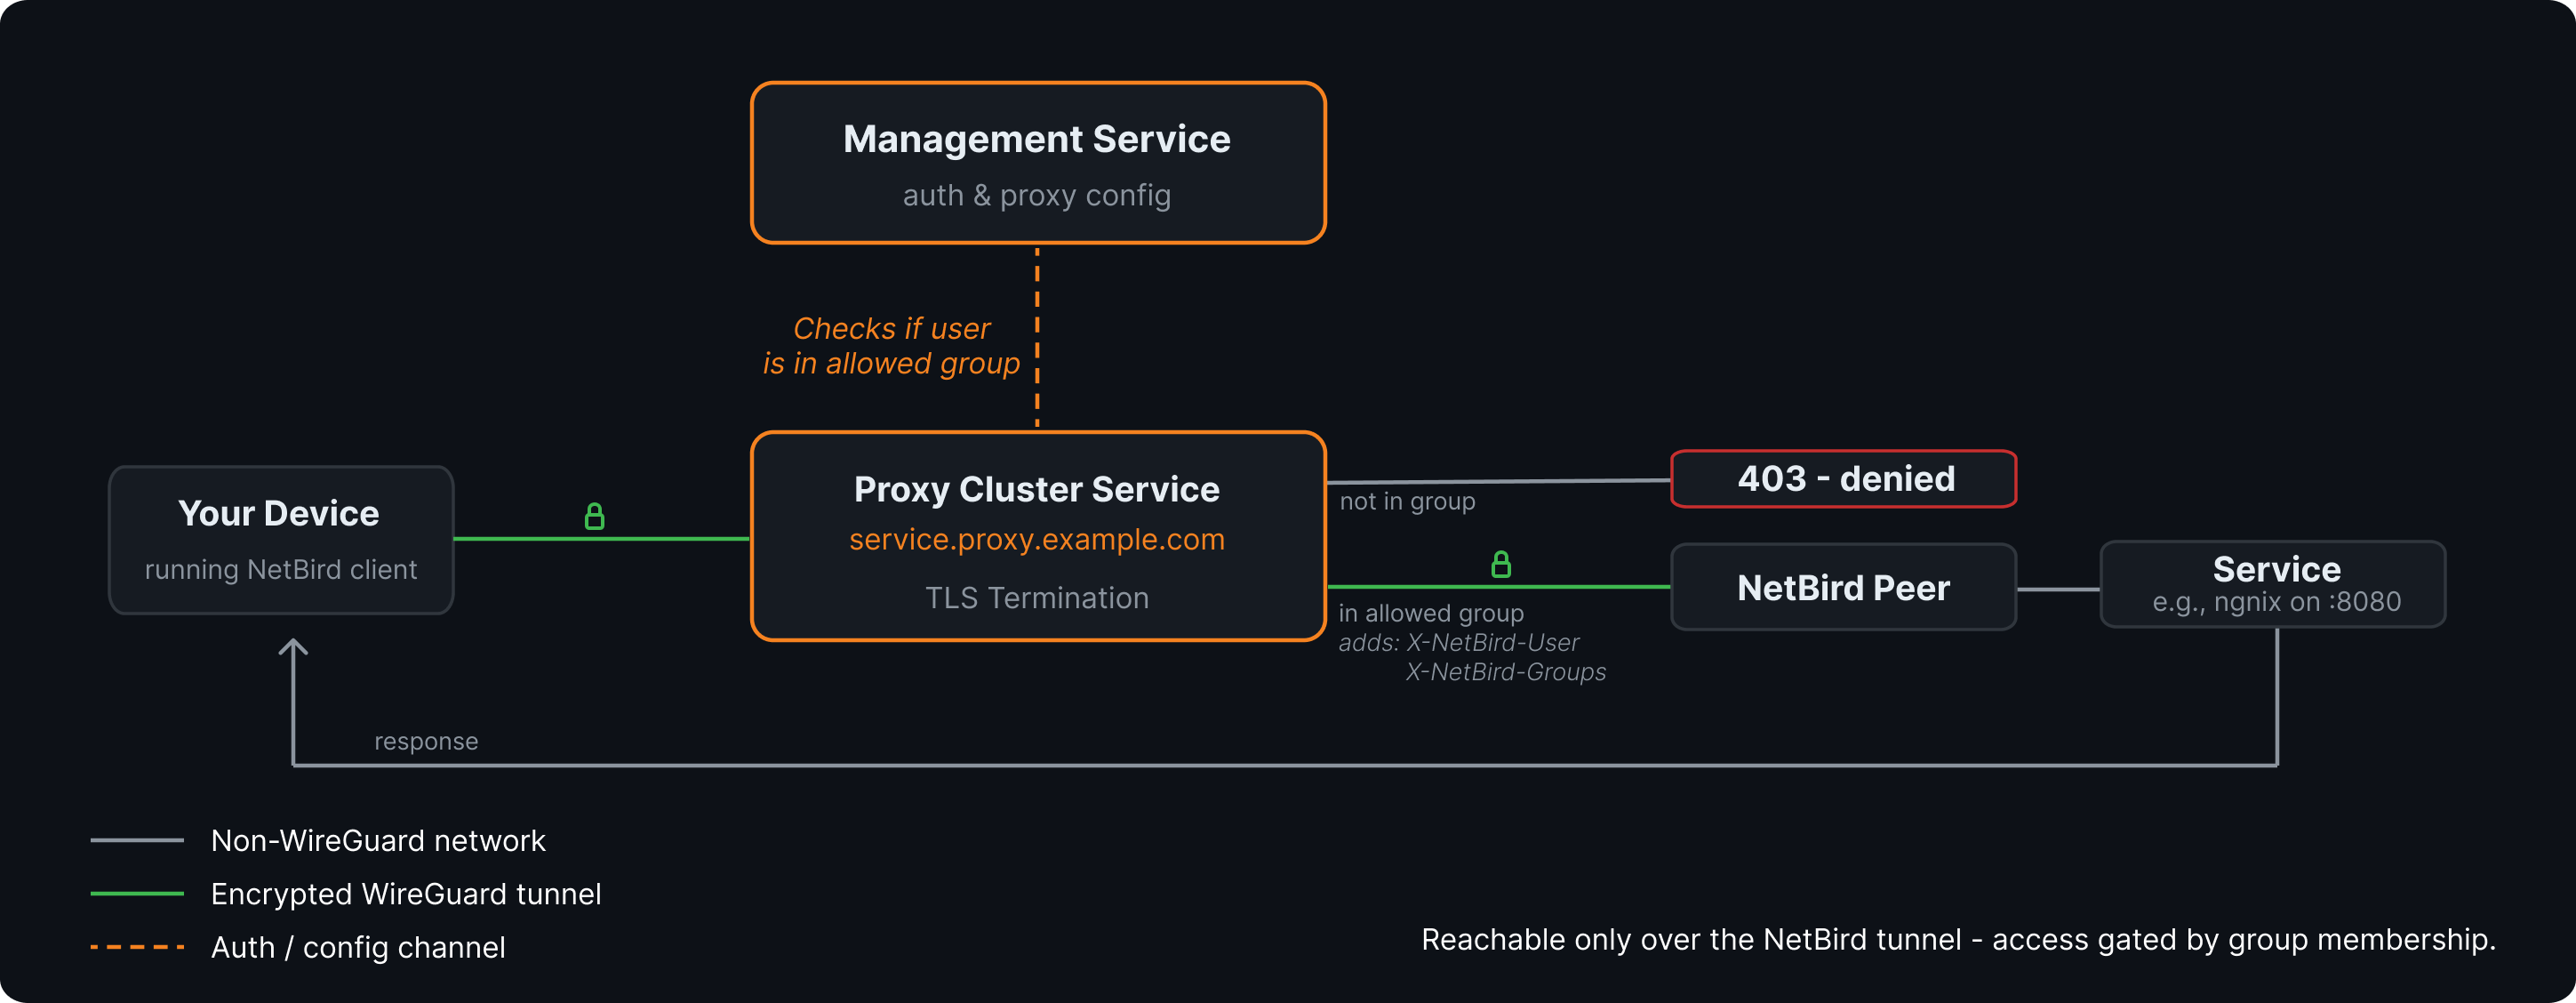
NetBird-Only Access restricts the service to peers running inside your own NetBird network. Unlike SSO or password, there is no login page — the proxy verifies the client through its WireGuard tunnel before serving any traffic. Clients that are not on a NetBird peer in your account cannot reach the service at all.
How it works:
- The proxy receives an inbound HTTP request and resolves the source address back to a NetBird peer using its embedded
netbird proxyclient. Requests with no peer-of-origin are rejected. - The owning user's groups are checked against the service's access groups. If the user is not in any of them, the request is rejected with
403. - The request is forwarded to the backend with two extra headers identifying the caller — see Identity headers stamped on upstream requests.
By default the proxy reaches the backend over the encrypted WireGuard tunnel through a NetBird peer — the service is reachable only from inside your NetBird network, and access is gated by group membership:
For services that target a Proxy Cluster (or have Direct Upstream enabled), the proxy dials the backend directly from its own host network stack instead of through a peer — see Private services.
Access groups:
When you enable NetBird-Only Access you must pick at least one access group. Only peers whose owning user (or the peer itself, for user-less peers like cluster proxies) is in one of those groups can reach the service. The service-save button stays disabled until you pick a group.
Cluster capability requirement:
NetBird-Only Access is only available on clusters that report the Private capability — that is, clusters where at least one connected proxy runs embedded in a NetBird client (netbird proxy) and serves over a WireGuard tunnel. The toggle on the Authentication tab is grey when the selected base domain belongs to a cluster without that capability, with a tooltip explaining the requirement.
NetBird Cloud's shared clusters do not currently advertise the Private capability. To use NetBird-Only Access:
- NetBird Cloud: run your own account cluster. The BYOP proxy joins your mesh as an embedded peer and gives the cluster the
Privatecapability automatically. - Self-hosted: deploy at least one proxy instance in embedded mode (
netbird proxy). See the BYOP guide — the same setup applies to a management-wide proxy.
Default access-control baseline:
Enabling NetBird-Only Access applies an implicit allow rule for the NetBird network range on the Access Control tab — additional CIDR rules you add are layered on top of that baseline. Country and CrowdSec checks are skipped on the overlay path because the source address is always a NetBird CGNAT address with no meaningful geo or reputation data.
Identity headers stamped on upstream requests:
When a request is forwarded to the backend, the proxy injects two headers identifying the authenticated caller:
| Header | Value |
|---|---|
X-NetBird-User | Display identity of the calling user — email when the peer is attached to a user, peer name otherwise |
X-NetBird-Groups | Comma-separated list of group display names the user belongs to. Falls back to group IDs at positions where the display name was unavailable at session-mint time |
Any client-supplied X-NetBird-User or X-NetBird-Groups headers are stripped from the inbound request before the proxy stamps its own — clients cannot impersonate a user by setting the header. Backends can read these headers safely and use them to drive per-user authorization, logging, or personalization. See Backend Service Configuration for example backend integrations.
Best for: internal tools that should only be reachable from a company-managed device, admin consoles, dashboards, dev/staging endpoints, and any service where you want the WireGuard tunnel to be the trust boundary instead of an operator-managed password or IdP.
SSO (Single Sign-On)
SSO authentication requires users to authenticate through your identity provider (IdP) using OIDC before they can access the service. When a user visits the service URL, they are redirected to your IdP login page. After successful authentication, they are granted access to the service.
You can optionally restrict access to specific distribution groups from your IdP. When groups are configured, only users who belong to at least one of the selected groups are allowed through after authenticating.
Key details:
- Users authenticate via your existing identity provider (OIDC)
- Sessions last 24 hours before re-authentication is required
- Optionally restrict access to specific distribution groups synced from your IdP
- When no groups are selected, any authenticated user in your organization can access the service
Self-hosted deployments: SSO authentication uses whichever OIDC provider is configured in your management server. If you use the built-in embedded IdP, SSO works automatically. If you use an external identity provider (Auth0, Okta, Keycloak, etc.) without the embedded IdP, you must register the reverse proxy callback URL with your IdP before SSO will work. See the Enable Reverse Proxy migration guide for step-by-step instructions.
Best for: Team services where you want to leverage existing identity management, internal tools that require user-level accountability, and services where you need group-based access control.
Password
Password authentication protects a service with a shared password that you define. When a user visits the service URL, they are prompted to enter the password before they can proceed. Passwords are securely hashed using Argon2id on the backend - the plaintext password is never stored.
Key details:
- Set a shared password when configuring the service
- Users must enter the correct password to access the service
- Passwords are hashed with Argon2id before being stored
- Sessions last 24 hours before re-authentication is required
Best for: Simple shared access to internal tools, staging environments, or services shared with external partners who do not have accounts in your identity provider.
PIN Code
PIN code authentication works similarly to password authentication but is limited to numeric input. When a user visits the service URL, they are prompted to enter the PIN code. PINs are securely hashed using Argon2id on the backend, just like passwords.
Key details:
- Set a numeric PIN code when configuring the service
- Users must enter the correct PIN to access the service
- PINs are hashed with Argon2id before being stored
- Sessions last 24 hours before re-authentication is required
Best for: Quick access scenarios, kiosk-style interfaces, or situations where a simple numeric code is easier to share than a full password.
Header Authentication
Header authentication validates a static header value on each request. This is designed for programmatic or machine-to-machine access where clients can include a custom HTTP header with their requests. The proxy checks the header before forwarding the request to your backend and strips the header so that authentication credentials are not leaked to the backend.
NetBird supports three header presets to simplify configuration:
| Preset | Header | Value format | Example value |
|---|---|---|---|
| Basic Auth | Authorization | Basic base64(username:password) | Basic dXNlcjpwYXNz |
| Bearer Token | Authorization | Bearer <token> | Bearer my-secret-token |
| Custom Header | Any header name you choose | Any value | X-API-Key: my-api-key |
You can configure multiple header entries on a single service. If multiple headers are configured, a request that matches any one of them is granted access (OR logic).
Key details:
- Header values are hashed with Argon2id before being stored, the same as passwords and PINs. The plaintext value is never stored.
- The matching header is stripped from the request before it is forwarded to the backend.
- Sessions last 24 hours before re-authentication is required.
- Header authentication works at the HTTP level, so it is available for HTTP services. It is not available for L4 services.
Best for: API clients, CI/CD pipelines, webhooks, monitoring probes, and any scenario where a browser-based login flow is not practical. Also useful alongside SSO: team members authenticate via SSO in a browser, while automated systems use header auth.
No authentication (public access)
Services can also be configured without any authentication. When no authentication method is enabled, anyone with the service URL can access it without any restrictions.
When you save a service with no authentication configured, the dashboard displays a warning: "This service will be publicly accessible to everyone on the internet without any restrictions." You must confirm before the service is saved. Make sure this is intentional before proceeding.
Best for: Public-facing websites, APIs that handle their own authentication internally, or services that are intentionally open to the internet.
Combining authentication methods
You can enable multiple operator auth methods on a single service simultaneously. When more than one is active, users authenticate using any of the enabled methods — they choose which one to use when accessing the service.
For example, you could enable both SSO and Password on the same service. Team members who have accounts in your identity provider can authenticate with SSO, while external partners or contractors can use a shared password. This gives you flexibility without requiring everyone to be in your IdP.
Common combinations include:
| Combination | Use case |
|---|---|
| SSO + Password | Team members use SSO; external collaborators use a shared password |
| SSO + Header Auth | Team members authenticate in a browser; automated systems use an API key |
| SSO + PIN Code | Team members use SSO; quick access via PIN for specific scenarios |
| Password + PIN Code | Different shared credentials for different groups of users |
| Any operator auth + Access Restrictions | IP/country restrictions as a first layer, then authentication for identity |
NetBird-Only Access does not combine with operator auth on the same service. It is the protection mechanism for a private service — the WireGuard tunnel is the trust boundary. If you need a single backend reachable both privately (mesh peers) and publicly (with operator auth), expose it as two services on different subdomains.
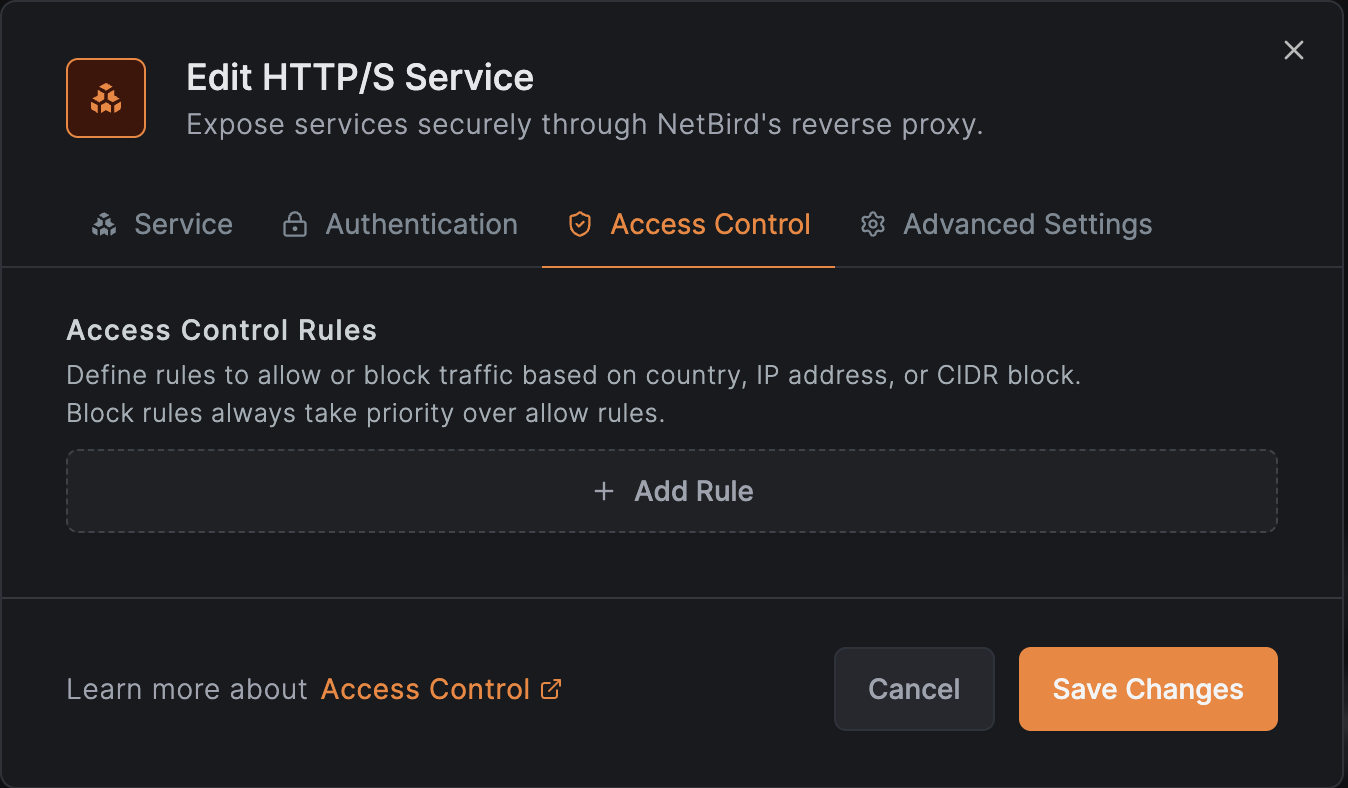
Access restrictions
Access restrictions control which connections are allowed to reach your service based on the client's IP address, geographic location, or IP reputation. Unlike authentication methods, access restrictions operate at the connection level and work for both HTTP and L4 services.
Access restrictions are evaluated before authentication. If a connection is blocked by an access restriction rule, it is rejected immediately without any authentication check.
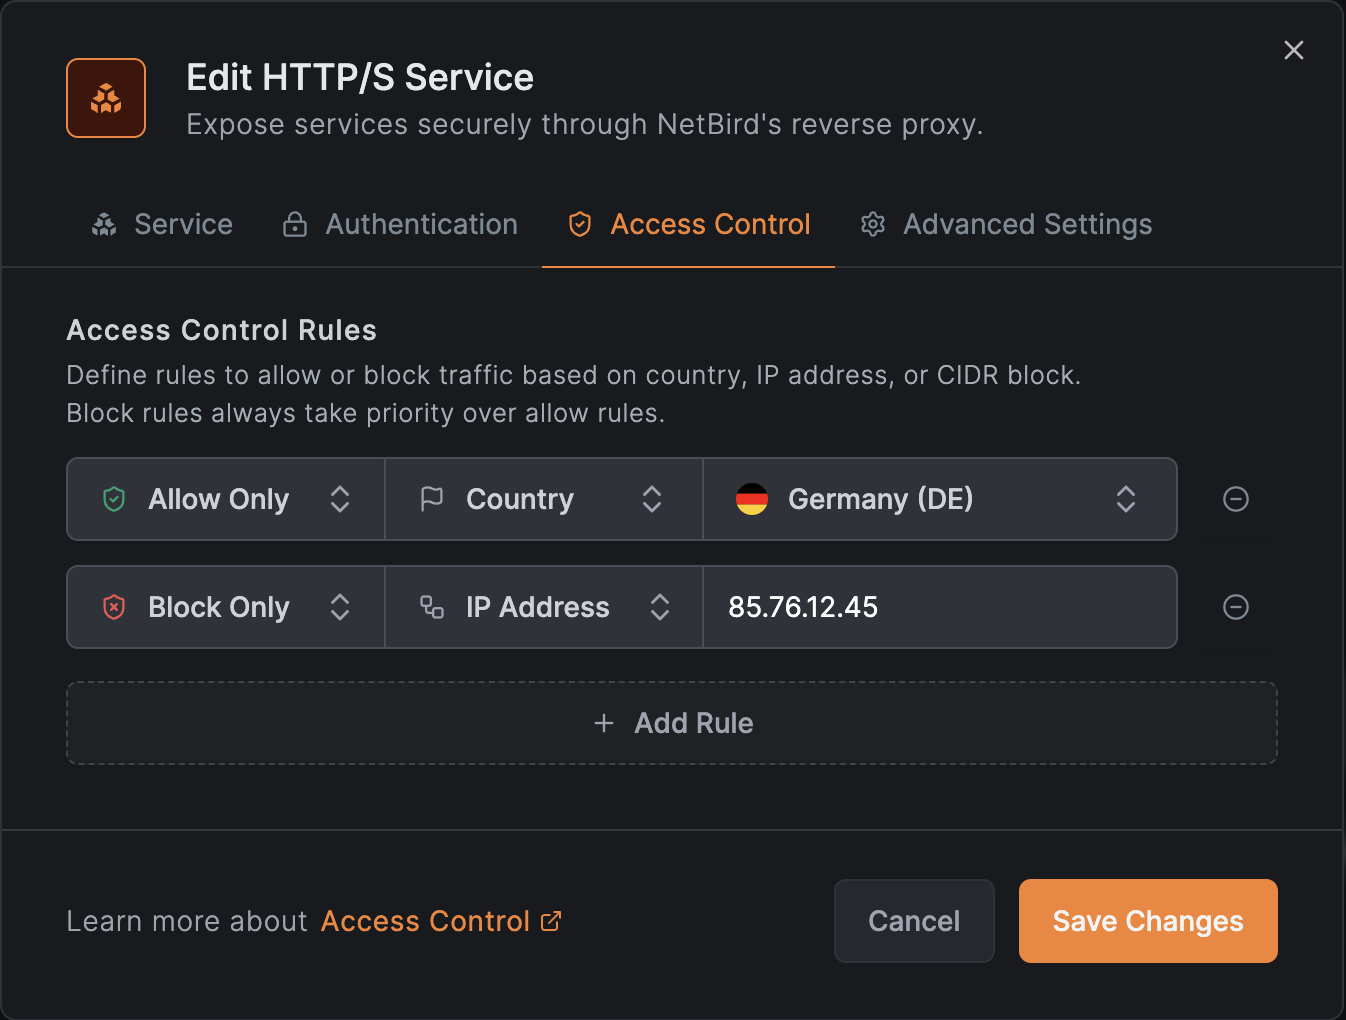
IP CIDR restrictions
You can define IP allowlists and blocklists using CIDR notation:
- Allowed CIDRs: if non-empty, only connections from IPs matching these CIDRs are permitted. All other IPs are rejected.
- Blocked CIDRs: connections from IPs matching these CIDRs are rejected. Evaluated after the allowed list.
The evaluation order is: if an allowed list is present, the IP must match it first. Then the blocked list is checked. This means you can use an allowed list to broadly permit a range, then use the blocked list to carve out exceptions.
Example: allow your office network but block a specific subnet:
| Field | Value |
|---|---|
| Allowed CIDRs | 203.0.113.0/24 |
| Blocked CIDRs | 203.0.113.128/25 |
Country restrictions
You can restrict access based on the client's country, determined by GeoIP lookup on the source IP address:
- Allowed countries: if non-empty, only connections from these countries are permitted. Specify ISO 3166-1 alpha-2 country codes (e.g.,
US,DE,GB). - Blocked countries: connections from these countries are rejected.
The evaluation logic mirrors CIDR restrictions: if an allowed list is present, the country must match. Then the blocked list is checked.
Country restrictions require a GeoIP database. On self-hosted deployments, the proxy must have the MaxMind GeoLite2 database configured. If the database is unavailable and country restrictions are configured, all connections are denied (fail-closed). See Geolocation Database for setup instructions.
GeoIP accuracy depends on the database quality and the client's IP address. VPN and proxy users may appear from a different country than their physical location.
CrowdSec IP reputation
CrowdSec is an open-source security engine that maintains a community-curated database of known malicious IP addresses. When enabled, the proxy checks every incoming client IP against a local cache of CrowdSec decisions and blocks connections from flagged addresses.
CrowdSec operates in one of three modes per service:
| Mode | Behavior |
|---|---|
| Off | CrowdSec checks are disabled for this service (default). |
| Enforce | Connections from flagged IPs are denied immediately. If the CrowdSec bouncer has not completed its initial sync, all connections are denied (fail-closed). |
| Observe | Connections from flagged IPs are logged in access logs with an observe-mode badge but not blocked. Use this to evaluate the impact before switching to enforce. See Reviewing observe-mode verdicts for how to audit them. |
CrowdSec decisions include different remediation types (ban, captcha, throttle). The proxy treats all types as connection denials in enforce mode: there is no captcha challenge or rate limiting. The specific decision type is recorded in the access logs so you can distinguish between them when reviewing traffic.
CrowdSec is only available when the proxy cluster has CrowdSec configured. If the cluster does not support CrowdSec, the option will not appear in the Access Control tab. For self-hosted deployments, see the CrowdSec setup guide to enable it.
Combining restrictions with authentication
Access restrictions and authentication methods are independent layers:
- Connection arrives at the proxy.
- Access restrictions are evaluated first: IP CIDRs, then country, then CrowdSec. If the connection is blocked at any layer, it is rejected with no further processing.
- Authentication is evaluated next (for HTTP services): SSO, password, PIN, or header auth.
- If both layers pass, the request is forwarded to the backend.
This layered approach lets you, for example, restrict a service to your corporate IP ranges while still requiring SSO for identity verification. Or you can use access restrictions as the sole protection for an L4 service that cannot use browser-based auth.
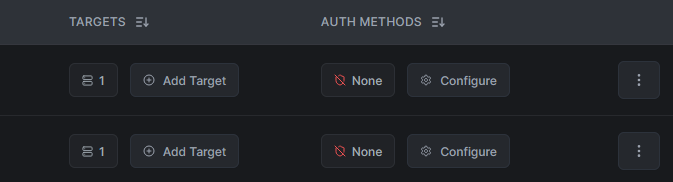
Configuring authentication
Authentication and access control are configured in separate tabs of the service creation or edit modal. Navigate to Reverse Proxy > Services, then either click Add Service to create a new service or click an existing service to edit it.
- Authentication tab (HTTP services only): SSO, password, PIN, and header authentication
- Access Control tab (all service modes): IP CIDR and country restrictions
Setting up NetBird-Only Access (private services)
- Open the service modal (create or edit).
- Confirm the selected base domain is on a cluster that reports the Private capability — the NetBird-Only Access row in the next step is greyed out otherwise. See Cluster capability requirement above for how to enable it on your cluster.
- Switch to the Authentication tab.
- Click NetBird-Only Access.
- In the modal, pick one or more access groups. Only peers whose owning user is in one of these groups can reach the service. The Enable button stays disabled until at least one group is selected.
- Click Enable, then Save Changes on the service.
To remove NetBird-Only Access, reopen the modal and click Remove. The service immediately reverts to the operator-auth flow (defaulting to no auth) — re-enable SSO, password, PIN, or header auth as needed before saving.
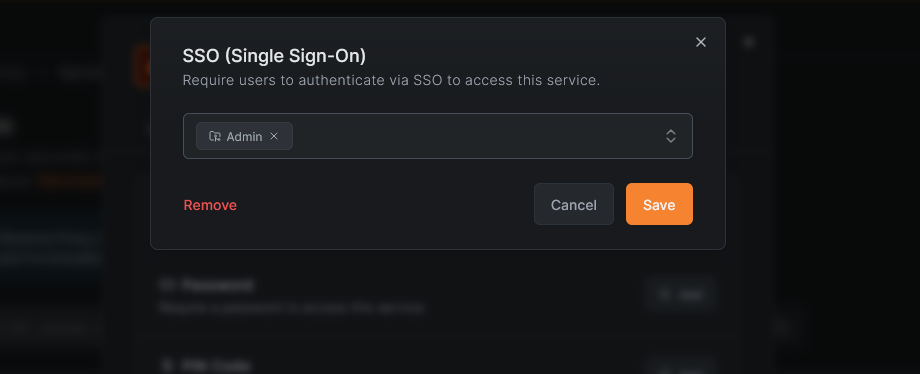
Setting up SSO
- Open the service modal (create or edit).
- Switch to the Authentication tab.
- Click SSO (Single Sign-On).
- Enable SSO using the toggle.
- Optionally, select one or more distribution groups to restrict access to specific users. If no groups are selected, all authenticated users in your organization can access the service.
- Click Save (or Save Changes when editing).
Distribution groups are synced from your identity provider. If you do not see the groups you expect, check your IdP sync configuration or Single Sign-On setup.
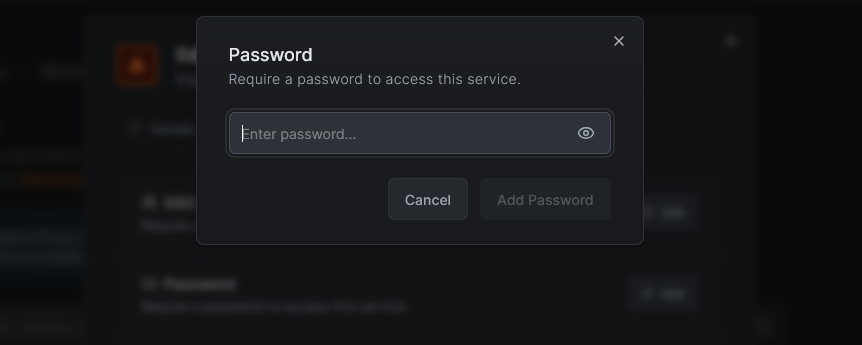
Setting up a password
- Open the service modal (create or edit).
- Switch to the Authentication tab.
- Click Password.
- Enter a password in the input field.
- Click Save (or Save Changes when editing).
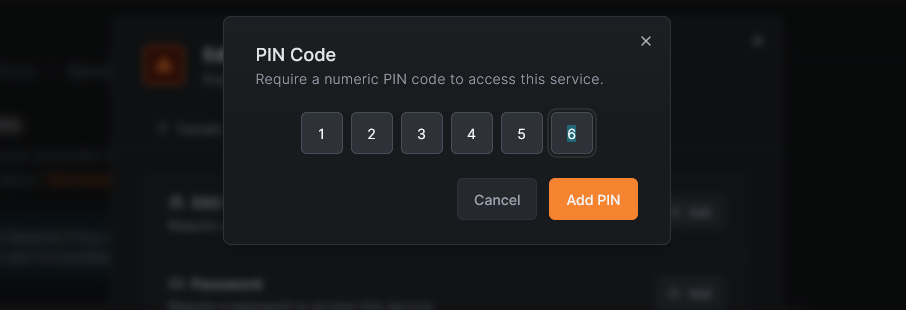
Setting up a PIN code
- Open the service modal (create or edit).
- Switch to the Authentication tab.
- Click PIN Code.
- Enter a numeric PIN in the input field.
- Click Save (or Save Changes when editing).
Setting up header authentication
- Open the service modal (create or edit).
- Switch to the Authentication tab.
- Click Header Auth.
- Select a preset type: Basic Auth, Bearer Token, or Custom Header.
- Fill in the required fields:
- For Basic Auth: enter a username and password. The value is automatically encoded as
Basic base64(username:password). - For Bearer Token: enter the token value. The value is automatically prefixed with
Bearer. - For Custom Header: enter the header name (e.g.,
X-API-Key) and the expected value.
- For Basic Auth: enter a username and password. The value is automatically encoded as
- To add additional headers, click Add Another Header. Any matching header grants access.
- Click Save (or Save Changes when editing).
Setting up access restrictions
- Open the service modal (create or edit).
- Switch to the Access Control tab. This tab is available for all service modes (HTTP and L4).
- To restrict by IP:
- Enter CIDRs in the Allowed CIDRs field to create an allowlist (e.g.,
10.0.0.0/8,203.0.113.0/24). - Enter CIDRs in the Blocked CIDRs field to create a blocklist.
- Enter CIDRs in the Allowed CIDRs field to create an allowlist (e.g.,
- To restrict by country:
- Select countries in the Allowed Countries field to create a country allowlist.
- Select countries in the Blocked Countries field to create a country blocklist.
- To enable CrowdSec IP reputation (when available):
- Set the CrowdSec IP Reputation dropdown to Enforce or Observe.
- Click Save (or Save Changes when editing).
Access restrictions apply immediately to new connections. Existing connections that were established before the restriction was added are not affected until they reconnect.
Restriction evaluation order
Access restrictions are evaluated as a pipeline. Each layer can only further restrict: a denial at any layer is final and short-circuits later layers. No layer can relax a denial from an earlier one.
| Layer | What it checks | On deny |
|---|---|---|
| 1. CIDR | Allowlist/blocklist by IP range | Stops here, country and CrowdSec are skipped |
| 2. Country | Allowlist/blocklist by geolocation | Stops here, CrowdSec is skipped |
| 3. CrowdSec | IP reputation against decision cache | Blocks (enforce) or logs (observe) |
Examples:
| Config | Client IP | Result | Reason |
|---|---|---|---|
Allow 10.0.0.0/8 + CrowdSec enforce | 10.1.2.3 (CrowdSec banned) | Denied | crowdsec_ban |
Allow 10.0.0.0/8 + CrowdSec enforce | 10.2.3.4 (clean) | Allowed | Passed all layers |
Allow 10.0.0.0/8 + CrowdSec enforce | 192.168.1.1 | Denied | ip_restricted (CIDR deny, CrowdSec never runs) |
Block 10.1.0.0/16 + CrowdSec enforce | 10.1.2.3 (CrowdSec banned) | Denied | ip_restricted (CIDR deny takes precedence) |
| Allow country US + CrowdSec enforce | 1.2.3.4 US (CrowdSec banned) | Denied | crowdsec_ban |
| Allow country US + CrowdSec enforce | 5.6.7.8 CN | Denied | country_restricted (country deny, CrowdSec never runs) |
Allow 10.0.0.0/8 + CrowdSec observe | 10.1.2.3 (CrowdSec banned) | Allowed | Ban logged but not enforced |
Removing authentication
To remove an authentication method from a service:
- Open the service modal by clicking the service in the services list.
- Switch to the Authentication tab.
- Click on the authentication method you want to remove.
- Use the Remove option to disable it.
- Click Save Changes.
If you remove all authentication methods, the service becomes publicly accessible. The dashboard will display a warning before saving, as described in the No authentication section above.
Session management
Authenticated sessions for reverse proxy services are managed using JWT (JSON Web Token) technology. Here is how sessions work:
- Token signing: Sessions use JWT tokens signed with Ed25519 key pairs. Each service has its own unique key pair, ensuring that tokens for one service cannot be used to access another.
- Session duration: Authenticated sessions expire after 24 hours. After expiry, users must re-authenticate using whichever method they originally used.
- Scope: Sessions are scoped to individual services. Authenticating with one service does not grant access to other services, even if they use the same authentication method.
Related pages
- Reverse Proxy Overview - learn how the reverse proxy feature works and create your first service
- Custom Domains - configure your own domain names for reverse proxy services
- Access Logs - monitor and audit traffic to your reverse proxy services
- Single Sign-On - configure your identity provider for SSO across NetBird
- Provision Users and Groups - sync users and groups from your identity provider
- Geolocation Database - configure MaxMind GeoLite2 for country-based access restrictions (self-hosted)
- CrowdSec Setup - enable CrowdSec IP reputation on a self-hosted proxy