Bring Your Own Proxy
Bring Your Own Proxy (BYOP) lets a NetBird account run its own reverse proxy on its own infrastructure. The proxy connects to NetBird's management service like any other proxy, but is bound to a single account: only that account's services route through it, and no other account on the same management instance can register against the same domain.
It is the option to choose when you want:
- Full control over traffic — proxied traffic terminates on infrastructure you operate, not on shared proxy clusters managed by the platform.
- Specific geographic placement — pick the region and provider you need (regulatory, latency, residency).
- Your own TLS / domain — the proxy issues certificates directly via Let's Encrypt for a wildcard under a domain you own.
In the dashboard, BYOP proxies live under Reverse Proxy > Clusters and appear as account clusters. See Shared and account clusters for the full distinction.
Availability: BYOP is currently in beta and follows the Reverse Proxy feature lifecycle. It works on any NetBird deployment whose management instance has account-scoped proxy tokens enabled — both NetBird Cloud and self-hosted NetBird with the feature deployed.
Not the same as the management-wide self-hosted proxy. If you run your own NetBird management server and want a single proxy that serves every account on it, follow Self-hosted proxy setup instead — that proxy is configured with a management-wide token and has no per-account isolation. BYOP is the opposite model: every BYOP proxy is account-scoped from the gRPC layer up, and is registered with an account-scoped token. Both models can coexist on the same management instance.
Shared and account clusters
A cluster is a group of one or more proxy instances that serve the same apex domain (NB_PROXY_DOMAIN). Every service registers against exactly one cluster, and traffic to subdomain.cluster-apex is routed to any healthy proxy in that cluster.
NetBird recognises two cluster types, distinguished by the type field on the /api/reverse-proxies/clusters response and by the icon next to the cluster name in the dashboard:
Shared cluster (type: "shared") | Account cluster (type: "account") | |
|---|---|---|
| Who runs it | NetBird (Cloud) or the operator of a self-hosted management instance | The account itself (BYOP) |
| Who can use it | Every account on the management instance | Only the account that registered it |
| Apex domain | Provided by the platform (e.g. eu.proxy.netbird.io); subdomains are minted per service | Provided by the account (e.g. proxy.company.com); the account owns the DNS |
| TLS | Managed by the platform | Issued by the proxy you run (ACME by default, or your own certs) |
| Registration token | Management-wide proxy token | Account-scoped proxy token (one per account) |
| Geographic placement | Wherever the platform runs proxies | Wherever you choose to run the container |
| Reserved across the instance | Yes — no account cluster can register against the same apex | Yes — once registered, the apex is unavailable to other accounts and to shared proxies |
| Visible to other accounts | Yes, as an available cluster in their service-creation flow | No — only the owning account sees it |
| Delete from dashboard | Not allowed | Allowed (account owner only) |
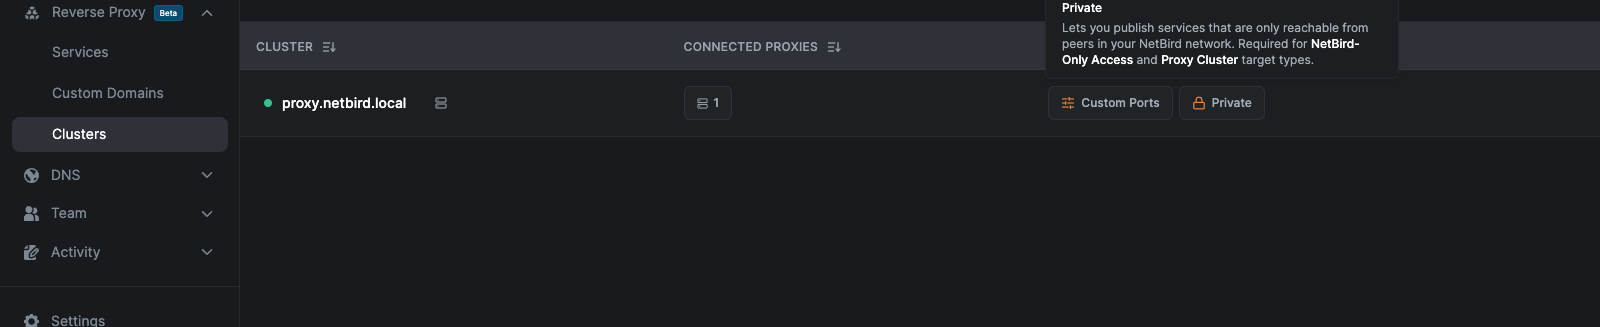
Both cluster types appear together on the Clusters page. The Type badge next to the cluster name marks each row as shared or account, the Status column shows whether at least one proxy in the cluster has heartbeated within the last two minutes, and the Features column lists the capabilities reported by the connected proxies:
| Feature badge | Meaning |
|---|---|
| Custom Ports | The cluster can bind arbitrary TCP/UDP listen ports for L4 services. |
| Subdomain Required | Services on this cluster must use a subdomain — the bare cluster apex is not addressable. |
| CrowdSec | The cluster has CrowdSec IP-reputation configured across all active proxies. |
| Private | The cluster can publish services that are only reachable from peers in your NetBird network. Required to enable NetBird-Only Access and the Proxy Cluster target type on services. Activated when at least one connected proxy in the cluster runs as an embedded NetBird peer (netbird proxy). |
When creating a service you pick a base domain from any cluster you can reach: shared clusters are always available; account clusters appear only for the account that owns them. There is no functional difference at the data-plane — services on either cluster type behave identically once a request lands. The choice is operational: shared clusters are zero-effort, account clusters give you control over location, TLS, and the data path.
The rest of this page describes how to set up an account cluster. If you want to use a shared cluster, no setup is required — pick the platform-provided domain in Reverse Proxy > Services > Add Service.
How it works
A BYOP proxy is an instance of the same netbirdio/reverse-proxy Docker image used elsewhere, but registered with the management server through an account-scoped proxy access token. The token carries your account ID; the management server enforces it on every gRPC call from the proxy:
- Only services from your account are streamed to the proxy.
- The cluster address (your
NB_PROXY_DOMAIN) is reserved across the management instance: no other account, and no management-wide self-hosted proxy on the same management, can register a proxy on the same domain. - Revoking the token disconnects all proxies registered with it within roughly one heartbeat interval (~60 seconds).
- Deleting a self-hosted proxy from the dashboard removes its database record and hides the cluster from the API and dashboard. A proxy process that is still running keeps its existing gRPC stream open until it is stopped or its token is revoked, but it will no longer appear in the cluster list.
Once registered, your BYOP proxy:
- Receives a stream of service mappings (only services that target your cluster domain).
- Provisions Let's Encrypt certificates for each domain it serves (or uses static / wildcard certificates you mount in).
- Joins your NetBird mesh as embedded WireGuard peers (one per account — in BYOP, that's just yours) and forwards traffic to backend peers or network resources over the tunnel.
You can run multiple BYOP proxy instances with the same token and the same NB_PROXY_DOMAIN to form an HA cluster — DNS round-robin or your own load balancer in front, and management routes services to all connected proxies in the cluster.
Prerequisites
Before you start, make sure you have:
- A NetBird account with Network Admin (or higher) access on a management instance that supports BYOP — the Services permission is required to create proxy tokens and manage account clusters.
- A server with a public IP that can accept inbound TCP traffic on port 443 (clients connect here, and Let's Encrypt's default
tls-alpn-01challenge validates here). Port 80 is only needed if you switch the ACME challenge tohttp-01. For HA, repeat for every replica behind the same domain. - Docker installed and running on that server.
- A domain you control that you can point at the server. You will configure two
Arecords:proxy-domainand*.proxy-domain.
Port 443 must be reachable from the public internet for the default tls-alpn-01 challenge. Let's Encrypt validates over port 443 with a special ALPN protocol. If your environment can't expose port 443 to Let's Encrypt's validation servers, switch to http-01 (see TLS configuration below — that mode requires port 80 instead) or supply your own certificates. To run with no public inbound ports at all, issue certificates over DNS-01 and serve them statically — see Private Proxy Without Public Inbound Ports.
Setup walkthrough
NetBird's dashboard provides a three-step wizard that generates the proxy token, shows the DNS records to add, and emits a ready-to-run docker run command. You can also drive the same flow through the API — see Set up a BYOP proxy from the API.
Step 1: Open Clusters and start the wizard
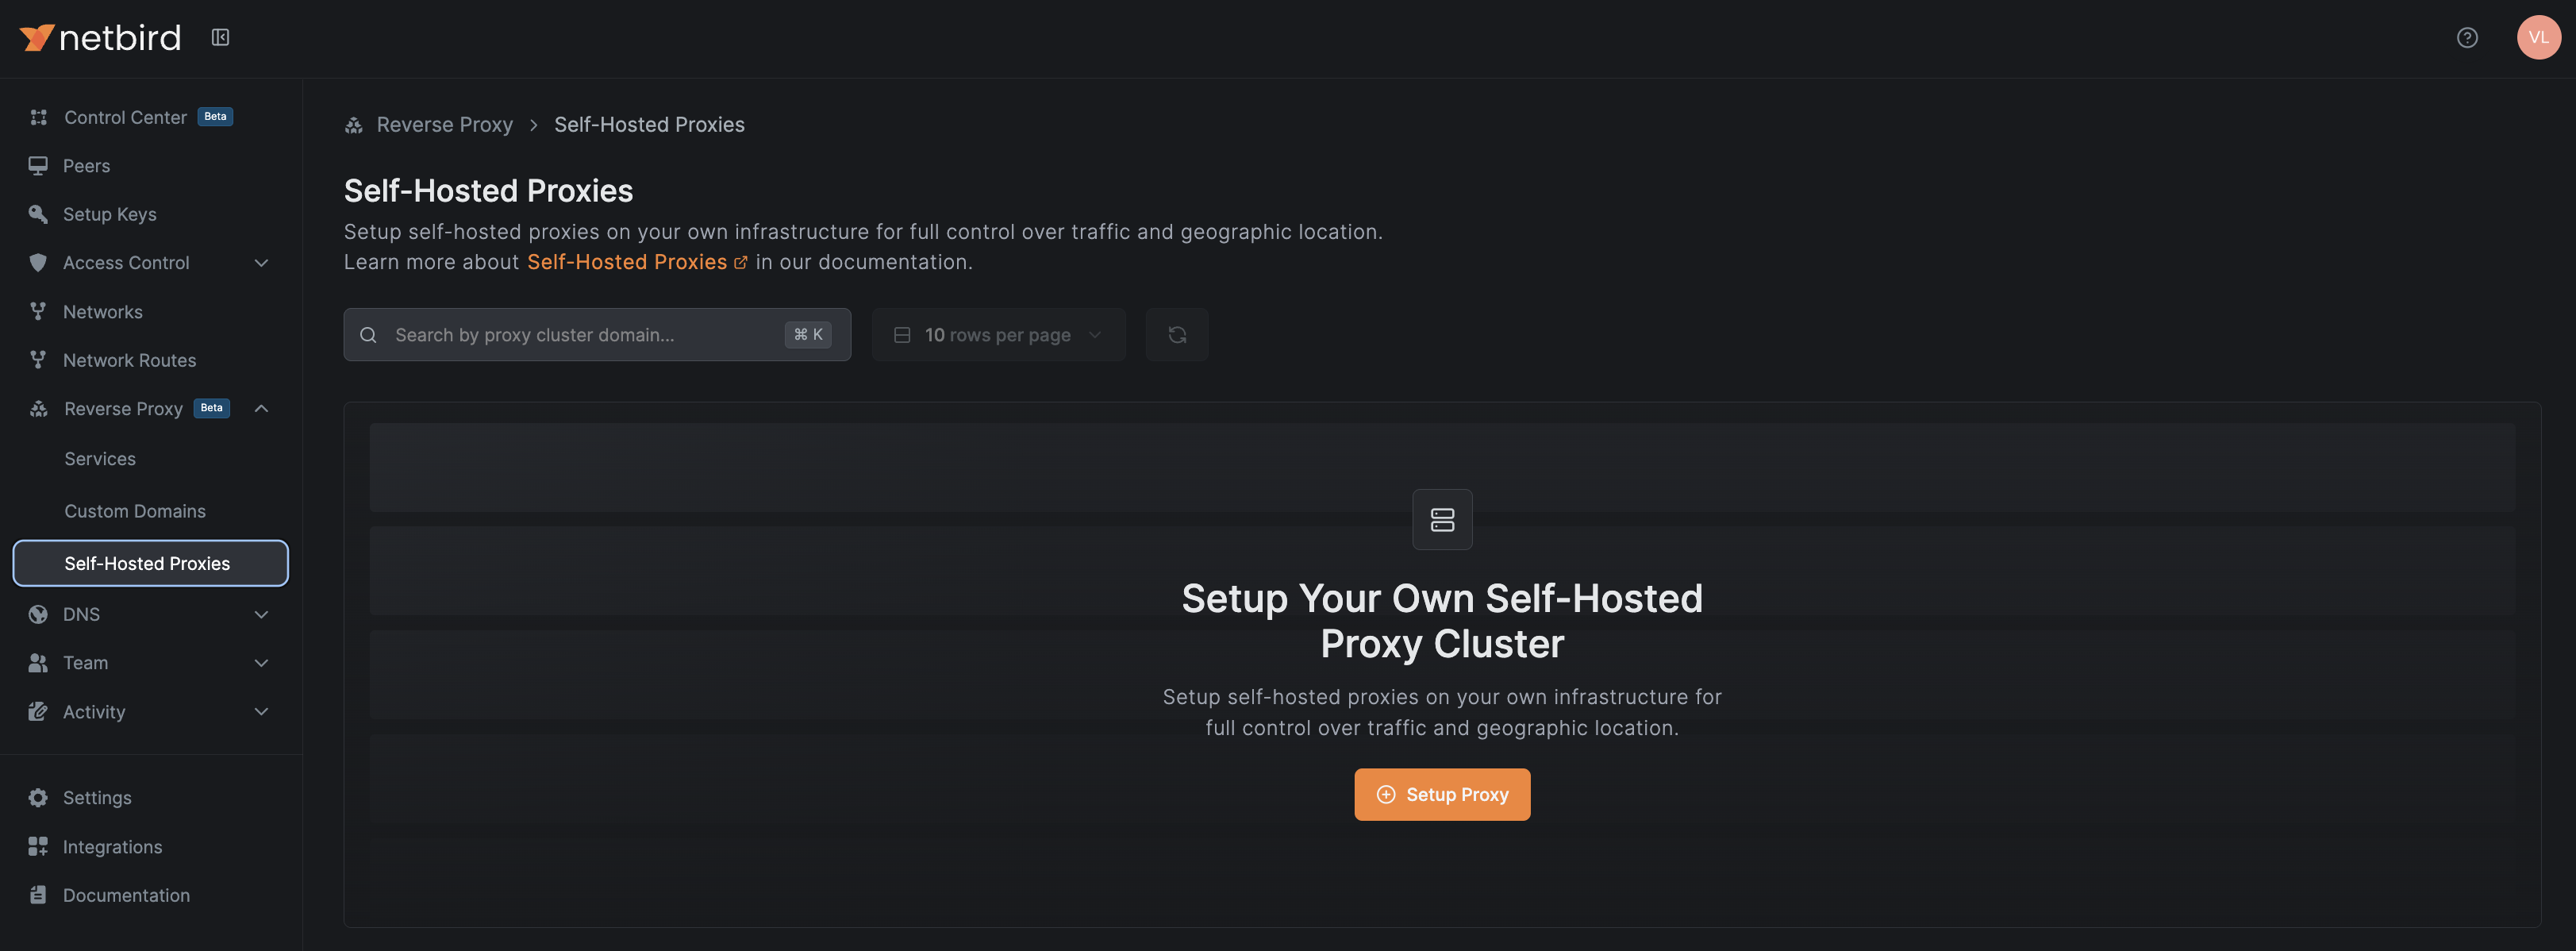
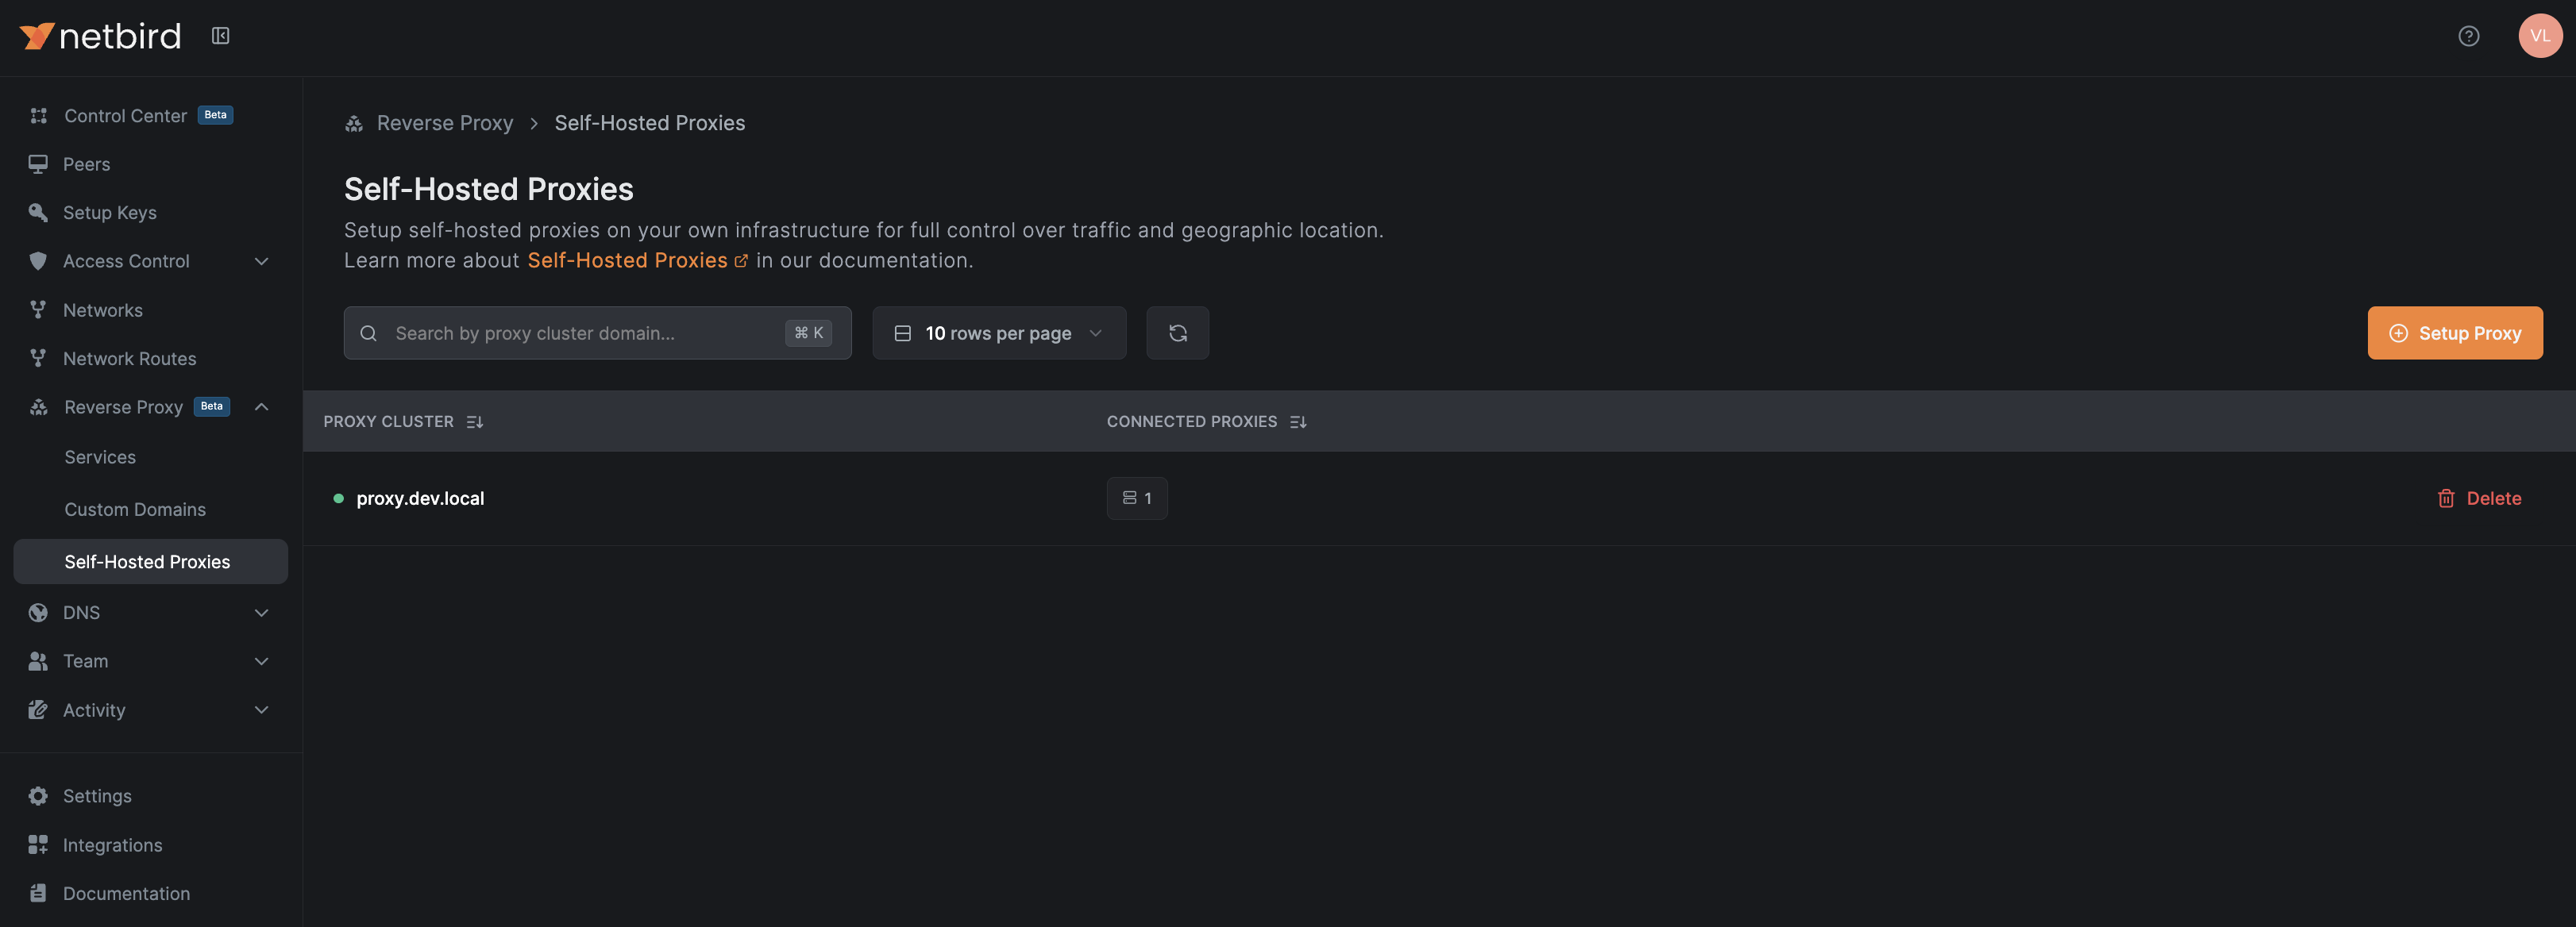
Navigate to Reverse Proxy > Clusters in the NetBird dashboard. The table lists every cluster your account can reach — both the shared platform clusters and any account clusters you've already set up.
Click Setup Self-Hosted Cluster to open the wizard.
Step 2: Choose your domain
In the Domain tab, enter the domain that this proxy cluster will be reachable on, e.g., proxy.company.com. This becomes the proxy's NB_PROXY_DOMAIN and the suffix of every public service URL hosted on it ({subdomain}.proxy.company.com).
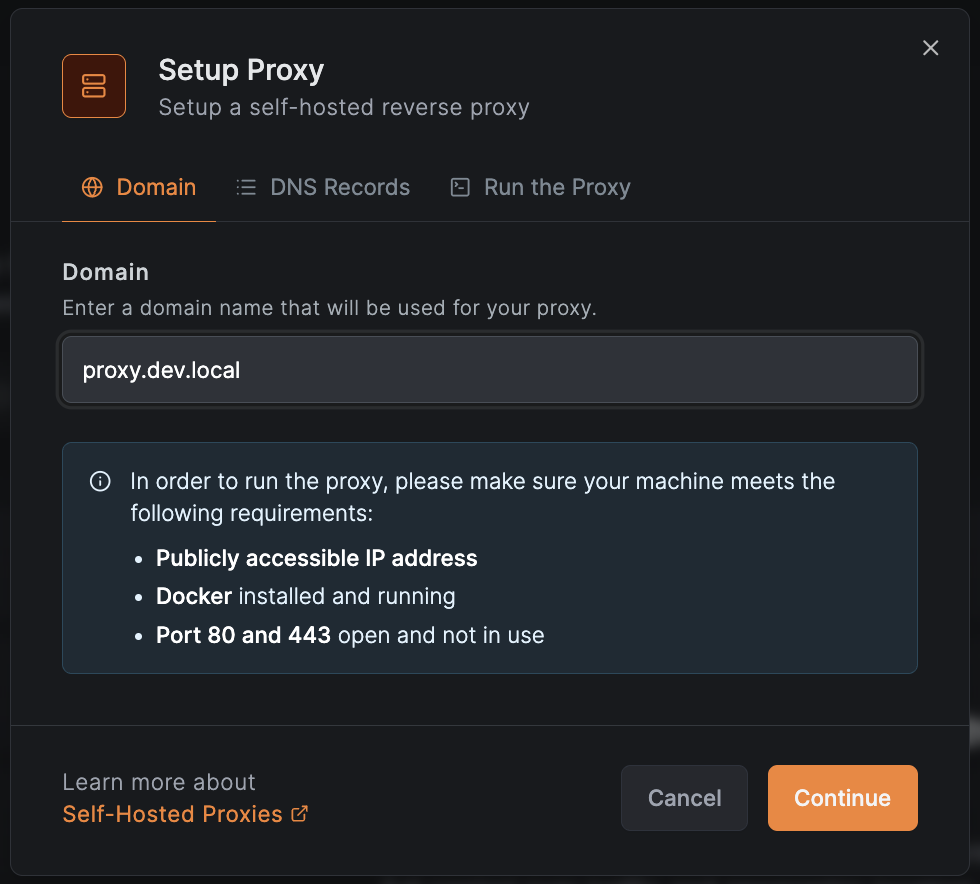
The wizard reminds you of the host requirements — public IP, Docker, ports 80 and 443 free. Click Continue to move to the DNS step.
Step 3: Configure DNS records
In the DNS Records tab, add the two A records shown in the table at your domain registrar:
| Type | Name | Content |
|---|---|---|
| A | proxy.company.com | Your machine's public IP |
| CNAME | *.proxy.company.com | proxy.company.com |
The wildcard record is required so that every service domain ({subdomain}.proxy.company.com) resolves to your proxy. If you run an HA cluster, point both records at all replicas (round-robin) or at the IP of a load balancer / floating IP that fronts them.
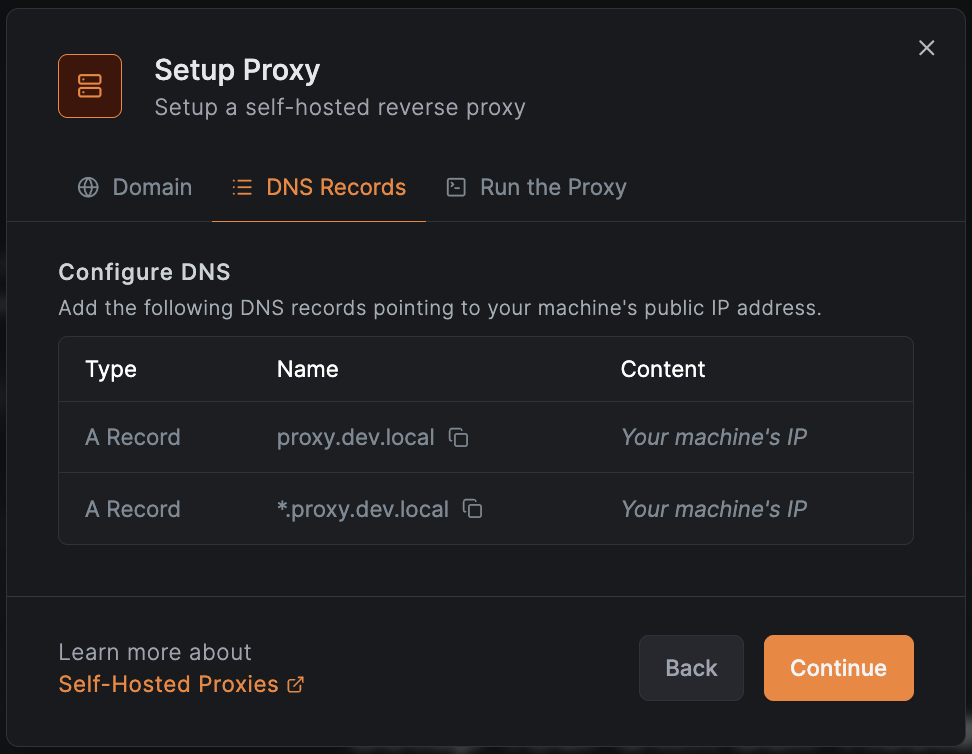
DNS changes take effect once they propagate. For Let's Encrypt to issue certificates, both records must resolve to the proxy's reachable IP.
Click Continue to move to the install step.
Step 4: Run the proxy
Switching to the Run the Proxy tab automatically generates a one-time, account-scoped proxy token and embeds it into a ready-to-run docker run command:
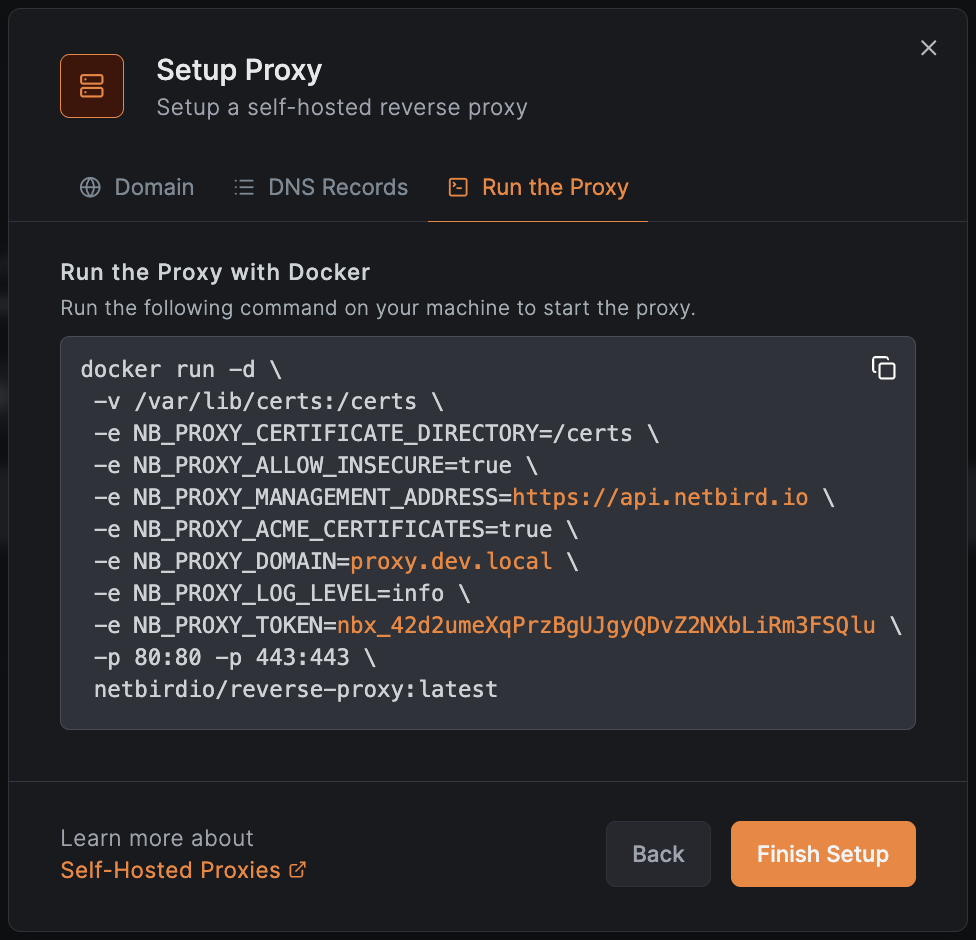
docker run -d \
 -v /var/lib/certs:/certs \
 -e NB_PROXY_CERTIFICATE_DIRECTORY=/certs \
 -e NB_PROXY_ALLOW_INSECURE=true \
 -e NB_PROXY_MANAGEMENT_ADDRESS=https://api.netbird.io \
 -e NB_PROXY_ACME_CERTIFICATES=true \
 -e NB_PROXY_DOMAIN=proxy.company.com \
 -e NB_PROXY_LOG_LEVEL=info \
 -e NB_PROXY_TOKEN=nbx_... \
 -p 80:80 -p 443:443 \
 netbirdio/reverse-proxy:latest
The wizard substitutes NB_PROXY_MANAGEMENT_ADDRESS based on the dashboard's configured management endpoint — https://api.netbird.io for NetBird Cloud, or your own management URL on a self-hosted deployment. The example above shows the Cloud value; if you're on self-hosted you will see your URL there.
The plain proxy token is shown only once — at the moment it's generated. Copy the entire docker run block and store it somewhere safe before closing the modal. If you lose it, revoke the token and generate a new one (see Manage tokens).
NB_PROXY_ALLOW_INSECURE=true allows the proxy's gRPC client to dial a management server without TLS. When NB_PROXY_MANAGEMENT_ADDRESS is an https:// URL the gRPC dial is TLS regardless, so the flag is a no-op there — leave it as-is in the wizard's command. The flag only matters if you point NB_PROXY_MANAGEMENT_ADDRESS at an http:// endpoint (e.g., for local testing); do not run such a setup in production.
The -p 80:80 mapping is only needed if you switch to the http-01 ACME challenge (see TLS configuration). With the default tls-alpn-01 challenge you can drop it and publish only -p 443:443.
Run the command on your server. The container will:
- Connect to NetBird's management server (
https://api.netbird.iofor NetBird Cloud, or the management URL of your self-hosted deployment) over gRPC and authenticate with the token. The wizard fills this in based on the dashboard's configured management endpoint. - Register itself as a proxy in your account's
proxy.company.comcluster. - Begin requesting Let's Encrypt certificates for each service hostname under that cluster.
Click Finish Setup to close the wizard.
Step 5: Verify the proxy is connected
Back on the Clusters page, the new account cluster appears once the proxy registers, with a count of connected proxies and an Online badge. A non-zero connected count means at least one replica is alive and exchanging mappings with management.
You can also check the proxy's own health probe — by default it binds to localhost:8080 on the proxy host, so run this on the box itself:
curl -s http://localhost:8080/healthz
Healthy output reports management_connected: true and initial_sync_complete: true. To probe from another host, override the bind address with NB_PROXY_HEALTH_ADDRESS=:8080 and publish the port from the container.
Use the proxy for services
Once the cluster is connected, your BYOP domain shows up in the service creation flow as a regular Cluster option in the domain picker.
- Go to Reverse Proxy > Services > Add Service.
- Choose a subdomain and pick your BYOP domain (
proxy.company.com) as the base domain. - Configure targets, authentication, and access restrictions as you would for any other reverse proxy service. See Reverse Proxy overview for service mode, target, and authentication details.
Traffic to subdomain.proxy.company.com is now received by your BYOP proxy, terminated locally with a Let's Encrypt certificate, and forwarded over WireGuard to the target peer or network resource.
Private services (NetBird-Only Access)
A BYOP cluster whose proxy runs embedded as a NetBird peer (netbird proxy mode — the default for the netbirdio/reverse-proxy image) reports the Private capability if started with the flag --private or environment variable NB_PROXY_PRIVATE=true. With that capability set, the cluster unlocks two new options anywhere it is selected:
- NetBird-Only Access on the service's Authentication tab — turn the service into a private service that only peers in your NetBird network can reach. See NetBird-Only Access for the full behaviour, identity-header semantics, and access-group rules.
- Proxy Cluster in the target picker — point the service at a hostname or IP that the embedded proxy can resolve directly from its own host stack (without WireGuard), with Direct Upstream locked on. Useful when the upstream is co-located with the BYOP proxy and you do not need (or want) to route it through the mesh.
With a Proxy Cluster target (or Direct Upstream enabled on a peer/resource target), the service is still reachable only over the NetBird tunnel and still gated by group membership, but the proxy reaches the upstream directly via its host network stack — no WireGuard peer is required between the proxy and the backend:
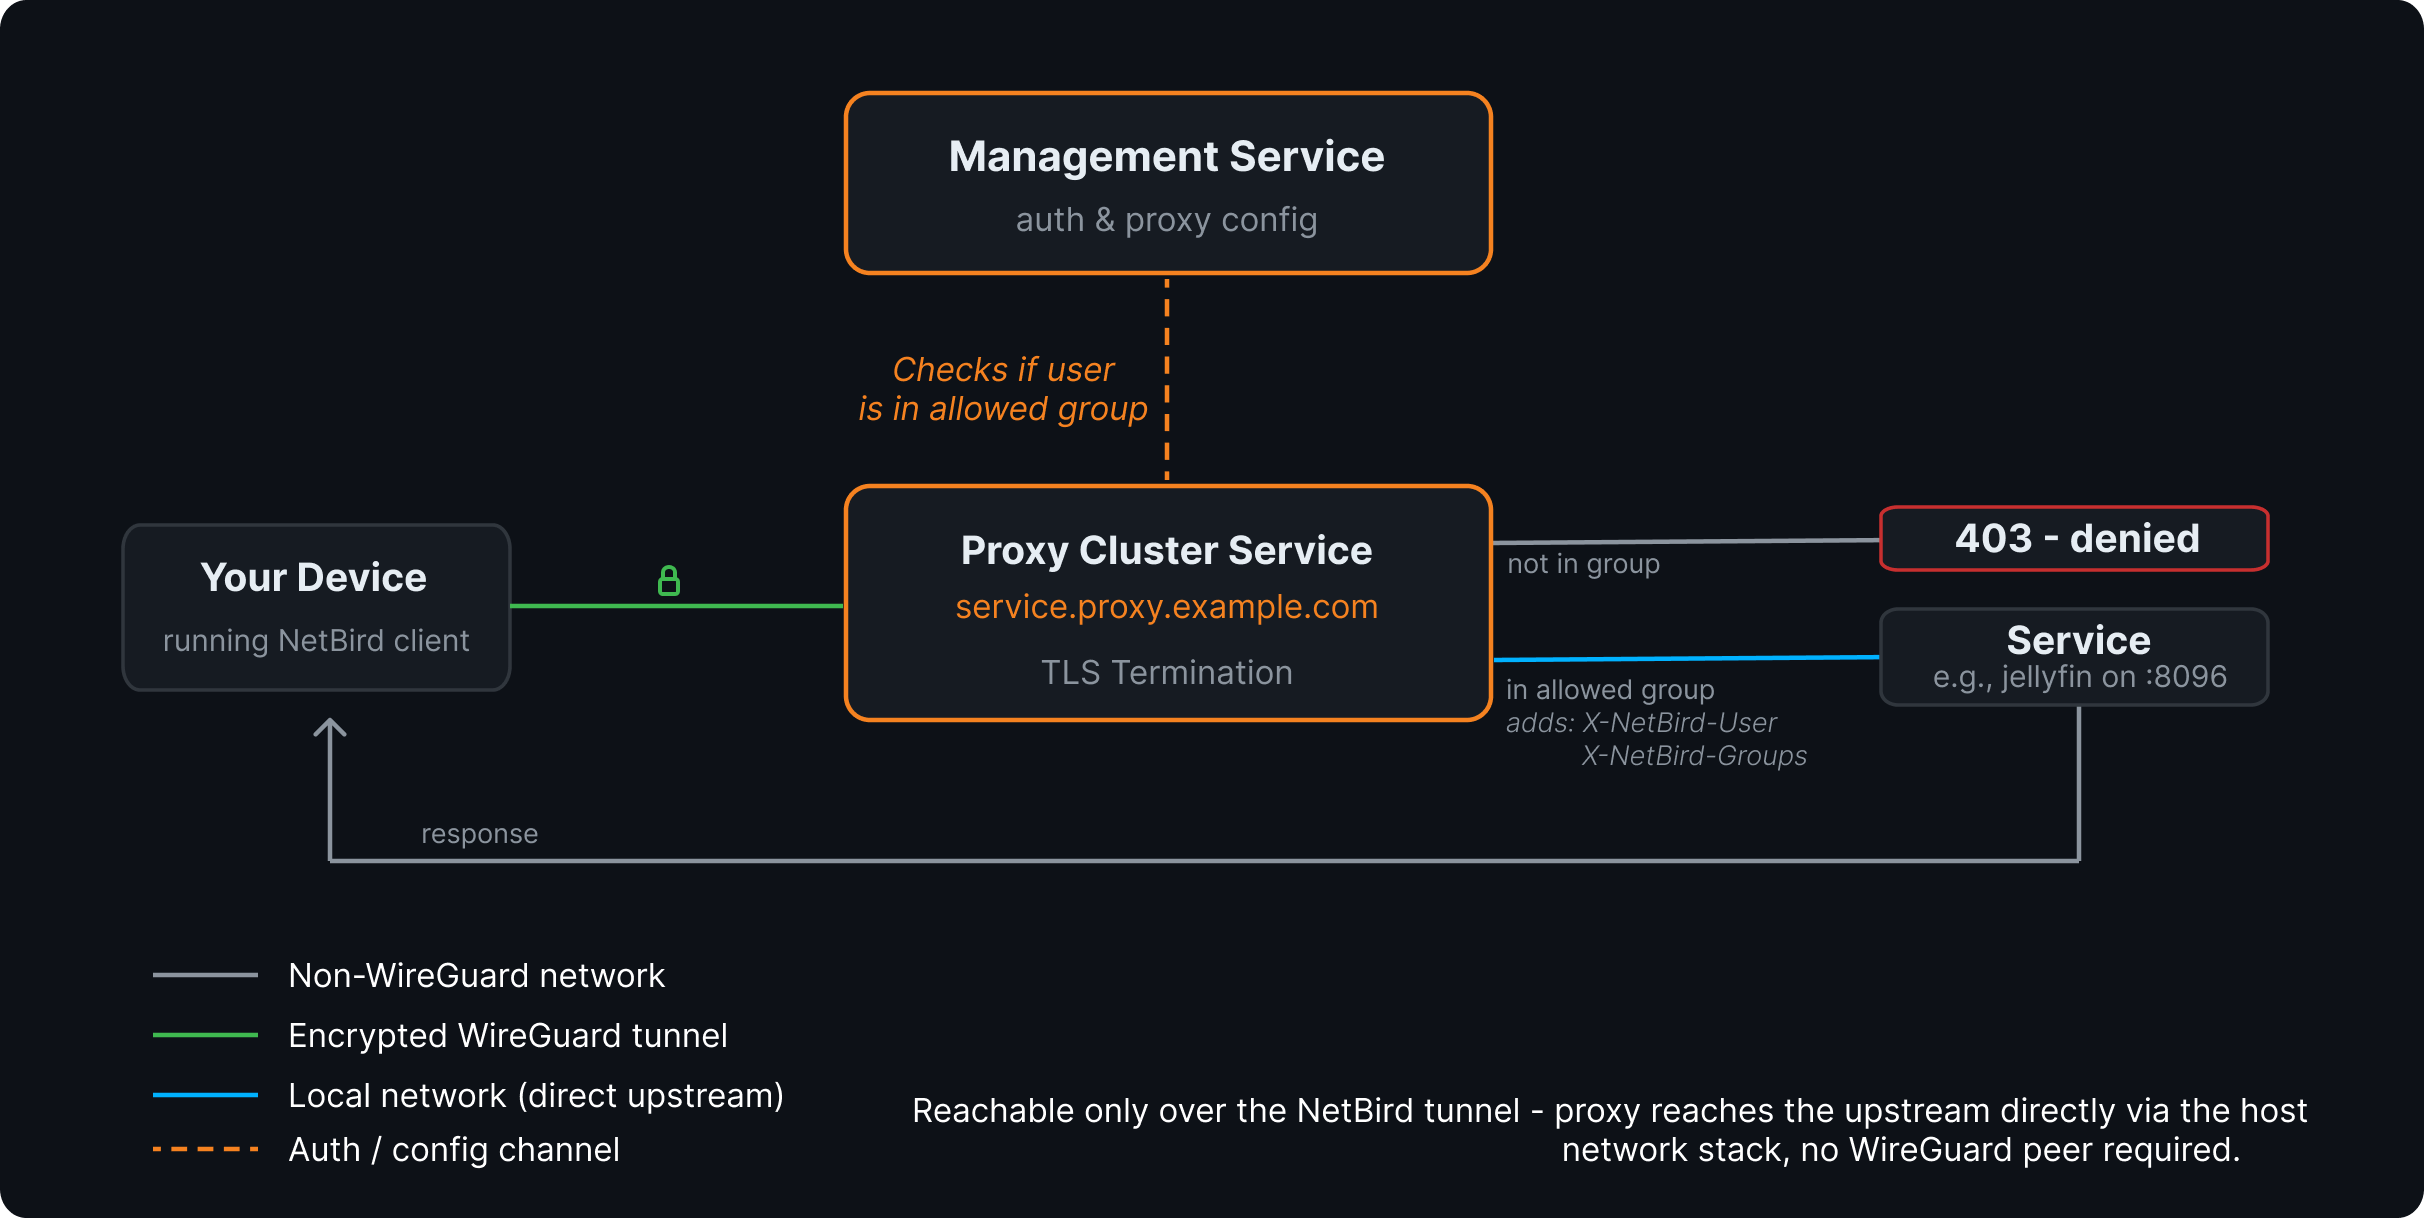
NetBird Cloud's shared clusters do not currently advertise Private. Running your own BYOP cluster is the supported way to enable private services for an account on Cloud. For self-hosted, the same applies — the proxy must be running with the flag set.
When the selected base domain does not advertise the Private capability:
- The NetBird-Only Access row on the Authentication tab is greyed out, with a tooltip explaining the requirement.
- The Proxy Cluster option is hidden from the target picker.
- Direct Upstream is locked off in service settings.
To verify the capability is set, check the cluster row on the Clusters page — a Private badge appears in the Features column when at least one connected proxy is running in embedded mode.
High availability
Run multiple proxy replicas with the same NB_PROXY_TOKEN and same NB_PROXY_DOMAIN to form an HA cluster within your account. Each replica:
- Registers itself with management as part of the same cluster.
- Receives the full set of service mappings for the cluster.
- Maintains its own WireGuard tunnels to backend peers.
For DNS, point both A records at all replica IPs (round-robin) or at a load balancer / floating IP that fronts them. For TLS, see Sharing certificates across replicas.
For broader operational guidance — token rotation, cert lock methods, monitoring — see Running Multiple Proxy Instances. The same operational patterns apply, with the caveat that BYOP cluster scope is your account, not the whole management instance.
TLS configuration
The Docker command produced by the wizard uses ACME (Let's Encrypt) with the tls-alpn-01 challenge by default. That mode needs only port 443 open and works without an additional HTTP listener.
Other modes are supported by the same image. To switch challenge type, supply your own certificates, or use a wildcard certificate, set the corresponding environment variables. The variables documented in TLS certificate configuration apply identically to BYOP — only the management endpoint and the account-scoped token make BYOP different from a management-wide self-hosted proxy.
The most common adjustments:
| Goal | Variable / value |
|---|---|
| Use Let's Encrypt with port 80 instead of port 443 | NB_PROXY_ACME_CHALLENGE_TYPE=http-01 |
| Provide your own certificate and key | unset NB_PROXY_ACME_CERTIFICATES, mount cert + key into NB_PROXY_CERTIFICATE_DIRECTORY (defaults: tls.crt, tls.key) |
Use a wildcard certificate for *.proxy.company.com | NB_PROXY_WILDCARD_CERT_DIR=/certs/wildcard |
| Run with no public inbound ports (issue certs over DNS-01) | see Private Proxy Without Public Inbound Ports |
Sharing certificates across replicas
When multiple replicas use ACME, share NB_PROXY_CERTIFICATE_DIRECTORY between them (e.g., a network volume) so they don't re-issue the same certificate from each replica and hit Let's Encrypt rate limits. The proxy uses a cross-replica lock to coordinate issuance — NB_PROXY_CERT_LOCK_METHOD defaults to auto, which detects the right backend; set it explicitly to flock for shared filesystems or k8s-lease for Kubernetes deployments if auto-detection picks the wrong one.
Set up a BYOP proxy from the API
If you prefer the API over the wizard, the flow is two calls plus the docker run:
1. Create an account-scoped proxy token. Replace <MANAGEMENT_URL> with https://api.netbird.io for NetBird Cloud, or with the management URL of your self-hosted deployment. Save the plain_token from the response — it's shown only this once.
curl -X POST <MANAGEMENT_URL>/api/reverse-proxies/proxy-tokens \
  -H "Authorization: Token <PAT>" \
  -H "Content-Type: application/json" \
  -d '{
    "name": "byop-eu-west",
    "expires_in": 0
  }'
expires_in is in seconds; 0 means never expires. Pick a meaningful name — it appears in the token list and is helpful when revoking.
2. Configure the two A records for your domain (see Step 3 above).
3. Run the proxy with the token from step 1:
docker run -d \
 -v /var/lib/certs:/certs \
 -e NB_PROXY_CERTIFICATE_DIRECTORY=/certs \
 -e NB_PROXY_MANAGEMENT_ADDRESS=<MANAGEMENT_URL> \
 -e NB_PROXY_ACME_CERTIFICATES=true \
 -e NB_PROXY_DOMAIN=proxy.company.com \
 -e NB_PROXY_TOKEN=<plain_token_from_step_1> \
 -p 80:80 -p 443:443 \
 netbirdio/reverse-proxy:latest
4. Verify with GET /api/reverse-proxies/clusters (BYOP clusters return "type": "account"; platform-managed clusters return "type": "shared") or check the Clusters page in the dashboard.
Manage proxies and tokens
Manage clusters
The Clusters page lists each cluster reachable from your account, its Online status, the count of currently connected proxies, and the feature flags (custom ports, subdomain requirement, CrowdSec, private) reported by its proxies. The same data is available via GET /api/reverse-proxies/clusters — each entry carries a type field ("account" for BYOP clusters you own, "shared" for platform-managed clusters). The Delete action is only available on account clusters. From the page you can:
- Refresh to pull fresh status.
- Delete an account cluster — this removes the cluster's database record and hides it from the API and dashboard. The same is exposed as
DELETE /api/reverse-proxies/clusters/{clusterAddress}. Note that any proxy process still running with the cluster's token keeps its gRPC stream open until you stop it or revoke the token. To fully tear down an account cluster, delete it and either stop the proxy container or revoke its token.
Manage tokens
Proxy tokens are independent of proxy registrations: one token can register many proxies (HA), and revoking the token disconnects all of them. You can list, create, and revoke tokens via the API (replace <MANAGEMENT_URL> with https://api.netbird.io for NetBird Cloud, or your self-hosted deployment's management URL):
# List tokens
curl <MANAGEMENT_URL>/api/reverse-proxies/proxy-tokens \
  -H "Authorization: Token <PAT>"

# Revoke a token
curl -X DELETE <MANAGEMENT_URL>/api/reverse-proxies/proxy-tokens/<tokenId> \
  -H "Authorization: Token <PAT>"
Within roughly one heartbeat interval (60 seconds) of a revoke, every proxy registered with that token loses its gRPC stream and its services stop being served. Restart the proxy with a new token to bring it back.
Troubleshooting
| Symptom | Likely cause | Fix |
|---|---|---|
Proxy logs show Unauthenticated immediately after start | Wrong or missing NB_PROXY_TOKEN, or token revoked | Generate a new token in the dashboard or API and restart with the new value |
Proxy logs show cluster address ... is already in use | Another account, or a management-wide self-hosted proxy on the same management, already owns this cluster domain | Pick a domain that no other account or management-wide proxy on this management is using — cluster domains are reserved across the management instance |
Service stuck in certificate_pending | ACME challenge cannot complete: ports blocked, DNS not propagated, or geo-blocking on validation traffic | Verify both A records resolve correctly; ensure ports 80/443 are reachable from anywhere; switch to http-01 if tls-alpn-01 fails. See TLS-ALPN-01 requirements |
Service stays in tunnel_not_created | Proxy can reach management but cannot reach the target peer over WireGuard | Confirm the target peer is online (netbird status) and policies allow connectivity from the proxy's embedded peer. The proxy creates one embedded peer per account on first service mapping |
| Proxy disconnects roughly one minute after start | Token was revoked or expired (the heartbeat checks token validity every minute and tears down the gRPC stream when it fails) | Generate a new token, restart the proxy |
Setup Self-Hosted Cluster button greyed out | Account user lacks the services:create permission | Ask a Network Admin (or higher) to set up the cluster or grant the role |
For deeper debugging, raise the log level to debug or trace (NB_PROXY_LOG_LEVEL=debug) and consult the proxy's /healthz endpoint.
Related pages
- Reverse Proxy overview — service modes, targets, authentication, and access restrictions.
- Custom Domains — use your own apex/subdomain for individual services on top of any cluster, including BYOP.
- Authentication — SSO, password, PIN, header, and access restrictions.
- Access Logs — auditing for traffic going through your proxies.
- Running Multiple Proxy Instances — operational patterns for HA proxy clusters.