Cloud to On-Premise Access (VPN-to-Site)
This guide shows how to connect cloud workloads to on-premise databases and services using the Networks feature.
For the mental model — see How Routing Peers Work — Mental model.
What You'll Achieve
After following this guide, your cloud applications will be able to securely access on-premise databases, APIs, and services without exposing them to the public internet.
Cloud VM ────► NetBird Tunnel ────► Routing Peer ────► Database Server
(peer)                               (on-prem)         (no NetBird)
Prerequisites
- A NetBird cloud account or self-hosted instance
- Access to deploy VMs or containers in your cloud environment
- Network configuration permissions in your cloud VPC
Step 1: Find Your On-Premise Subnet
Before configuring NetBird, identify your data center network's subnet.
On your routing peer device, run:
# Linux
ip route | grep -E "^[0-9]"
Look for your local subnet, typically something like 10.100.0.0/24.
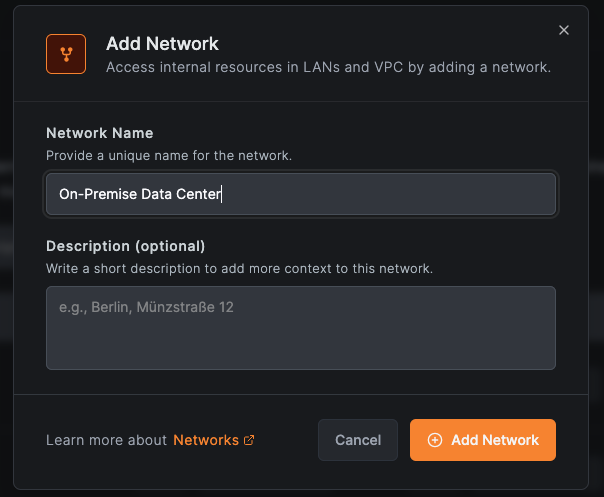
Step 2: Create a Network for On-Premise Resources
- Go to Networks in the NetBird dashboard
- Click Add Network
- Name it "On-Premise Data Center" and click Save
Step 3: Add Your Database as a Resource
- In your new network, click Add Resource
- In the Resource tab, enter a name like "Database Servers"
- Enter your database subnet or specific IP (e.g.,
10.100.0.0/24or10.100.0.50/32) - Expand Additional Options and under Resource Groups, create a group called
on-prem-databases - Click Continue to proceed to the Access Control tab
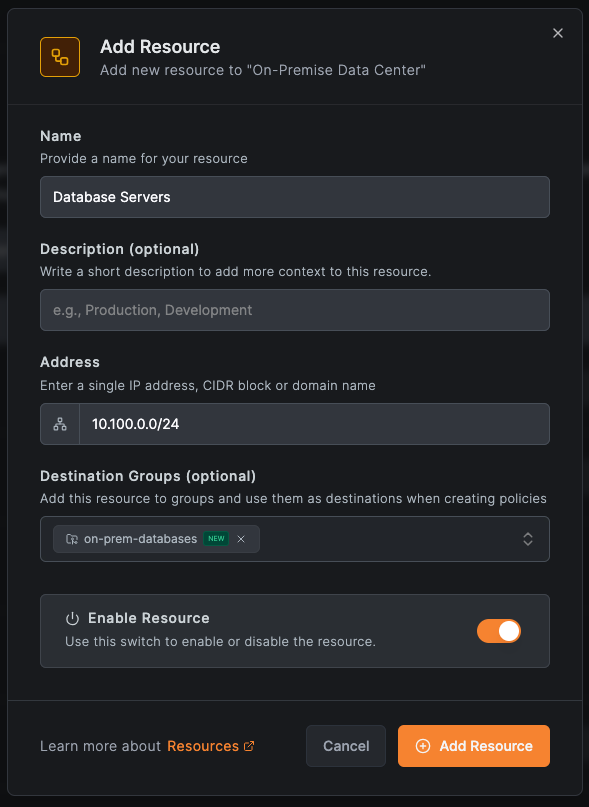
For more granular access, add specific database IPs instead of the entire subnet. For example, add 10.100.0.50/32 to only allow access to your production database.
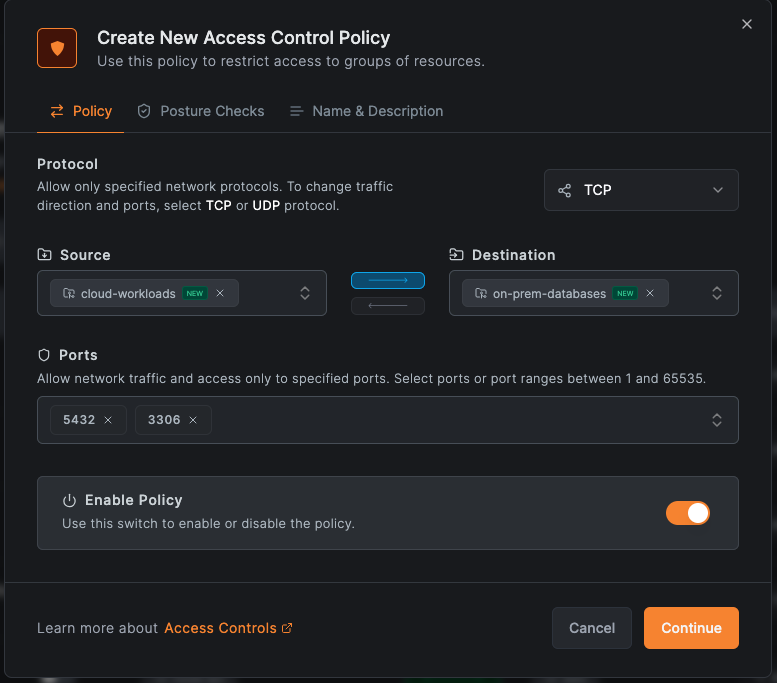
Step 4: Create an Access Policy
- In the Access Control tab, click Add Policy
- Set Source to "
cloud-workloads" (you'll create this group in the next step) - Set Destination to
on-prem-databases - Set Protocol to TCP
- Set Ports to the database ports (e.g.,
5432for PostgreSQL,3306for MySQL) - Name it "Cloud to Database Access" and click Add Policy
- Click Add Resource to save the resource with its policy
Step 5: Set Up the Routing Peer On-Premise
The routing peer forwards traffic from NetBird to your data center network. Install NetBird on a server that can reach the database:
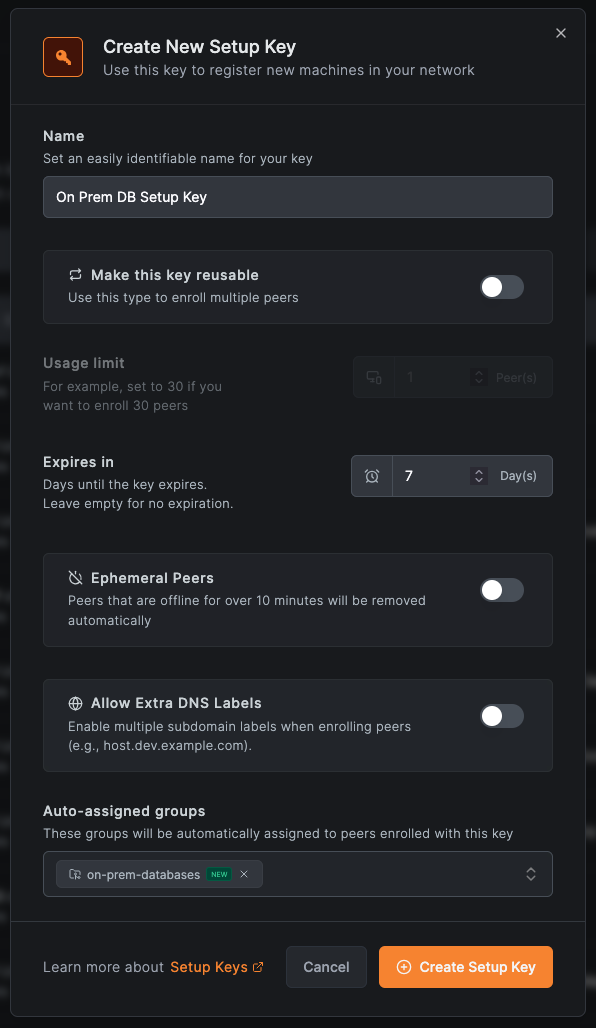
- In the NetBird dashboard, go to Setup Keys
- Create a new setup key (one-time use recommended). Add
on-prem-databasesto Auto-assigned groups and click Create Setup Key.
You can also add groups to peers manually after setup. Go to Peers, select the peer, and add groups under Assigned Groups.
- On your on-premise server, run:
curl -fsSL https://pkgs.netbird.io/install.sh | sh
sudo netbird up --setup-key YOUR_SETUP_KEY
- In the Networks view, click Add Routing Peer on your On-Premise Data Center network
- Select your new peer and click Add Routing Peer
Step 6: Deploy NetBird on cloud-workloads
cloud-workloadsCreate a setup key for your cloud workloads:
- In the NetBird dashboard, go to Setup Keys
- Create a new setup key. Add "
cloud-workloads" to Auto-assigned groups and click Create Setup Key.
For VMs:
curl -fsSL https://pkgs.netbird.io/install.sh | sh
sudo netbird up --setup-key YOUR_CLOUD_SETUP_KEY
For containers (Docker Compose):
services:
  netbird:
    image: netbirdio/netbird:latest
    network_mode: host
    cap_add:
      - NET_ADMIN
    environment:
      - NB_SETUP_KEY=YOUR_SETUP_KEY
    volumes:
      - netbird-config:/etc/netbird
    restart: unless-stopped

volumes:
  netbird-config:
For Kubernetes:
Use the NetBird Kubernetes Operator for production deployments.
Step 7: Verify Cloud Workload Group Assignment
After deploying NetBird on your cloud workloads:
- Go to Peers in the NetBird dashboard
- Verify your cloud workloads appear and are assigned to the "
cloud-workloads" group - If using a setup key with auto-assigned groups, this happens automatically
Step 8: Configure Your Application
Update your application's database connection to use the on-premise IP:
# Example: Python with PostgreSQL
conn = psycopg2.connect(
    host="10.100.0.50",  # On-premise database IP
    dbname="production",
    user="app_user",
    password="secure_password"
)
Your cloud application can now securely access the on-premise database.
Cloud-Specific Considerations
AWS
- Use VPC endpoints where possible for AWS services
- Security groups must allow traffic from the NetBird routing peer
- Consider using an Auto Scaling group for the routing peer with a static ENI
GCP
- Firewall rules must allow traffic from the routing peer's internal IP
- Use instance groups for high availability
- Enable IP forwarding on the routing peer instance
Azure
- Network security groups must allow traffic from the routing peer
- Consider using a Virtual Machine Scale Set for HA
- Enable IP forwarding on the routing peer NIC
Best Practices
Security
- Use dedicated setup keys per environment (e.g.,
dev-workloads,staging-workloads,prod-workloads) - Restrict access policies to specific ports and protocols
- Enable activity logging for compliance
High Availability
- Deploy multiple routing peers and configure failover
- Monitor routing peer health with your existing tools or set up Notifications to get alerted when a routing peer disconnects
- Use cloud-native load balancing where appropriate
Performance
- Place routing peers close to the resources they serve
- Use direct peering where possible (NetBird will automatically optimize paths)
- Monitor latency and throughput between environments
Troubleshooting
Cloud workload can't reach on-premise:
- Verify the routing peer is online:
netbird status - Check the routing peer can reach the target:
ping 10.100.0.50 - Verify access policies are configured correctly
High latency:
- Check routing peer placement and network connectivity
- Verify traffic is using direct peer-to-peer connections (not relays)
- Review cloud network configuration for bottlenecks
Next Steps
- Need Multi-Cloud Site-to-Site? If you need to connect cloud VPCs across providers, see Site-to-Site: Cloud
- Advanced configuration: See Advanced Configuration for masquerade options and detailed access control