

Clientless RDP Access for Third Parties
Updated
A common blocker when replacing a VPN or an RDP gateway with NetBird: some of
the people who need access do not work for you. An outsourced firm's devices
are managed by someone else, and installing the NetBird client on them is
often not an option. Today those users typically connect through an RDP
gateway or, worse, straight to an exposed port 3389.
This guide shows how to retire that gateway using the
NetBird Reverse Proxy: you publish the internal RDP
host as a TCP service, and the third party keeps the exact workflow they have
today, a saved .rdp file, now pointed at a NetBird proxy address. No
software on their devices, no gateway to maintain, and no inbound ports on
your network.
What You'll Achieve
Contractor device ──► NetBird proxy ──► NetBird tunnel ──► routing peer ──► RDP host
  (no NetBird,          (public TCP service,                 (peer)          (10.10.20.15:3389)
   saved .rdp file)      IP allowlisted)
After following this guide, users at a third-party firm can open a .rdp
file and reach an internal Windows host, while the host itself needs no
public IP address and no open inbound ports.
When Not to Use This
If you can install the NetBird client on the connecting devices, do that instead: enrolled users get identity-based access policies, posture checks, and per-user audit, which this clientless path cannot provide. Use the reverse proxy only when installing the client is genuinely off the table.
This guide also assumes the third party connects from fixed office networks. A TCP service cannot put a login page in front of the connection (see the boundary below), so an IP allowlist is the main gate. If their users work from changing networks, prefer enrolling their devices or placing a browser-based RDP portal (a web application) behind an HTTP reverse proxy service, where SSO authentication does apply.
Two Ways to Publish RDP
There are two proxy deployments this can run on, and they differ in ways that matter for RDP specifically:
| NetBird Cloud shared proxy | Bring Your Own Proxy | |
|---|---|---|
| Setup effort | None, works immediately | You run the proxy container |
| Listen port | Assigned automatically (high port) | Your choice, including 3389 |
| RDP transport | TCP only | TCP, plus RDP's optional UDP transport |
| Best for | Fast rollout, few users | Standard ports, smoother sessions, more control |
The UDP difference comes from port mechanics: RDP's UDP transport must reach the server on the same port number as the TCP connection. On the shared cluster every service gets its own auto-assigned port, so a UDP service can never land on the TCP service's port; clients detect the missing UDP path and continue over TCP automatically. On a BYOP cluster you bind a TCP and a UDP service to the same custom port, and Windows clients then negotiate the UDP transport through the proxy.
Both use cases below share the same resource setup, access restrictions, and verification; only the service creation step differs.
Example Setup
One example runs through this guide:
- RDP host:
10.10.20.15, a Windows machine on the server subnet10.10.20.0/24, RDP enabled with Network Level Authentication (NLA) - Routing peer (
site-router): a Linux machine on the same subnet, running the NetBird client - Third-party firm: an outsourced contractor whose office egress IP is
203.0.113.40
Prerequisites
- The RDP host reachable inside your NetBird network: either it runs the NetBird client itself, or it sits behind a routing peer as a network resource. This guide uses the resource shape; see Networks for the concepts.
- The third-party firm's office egress IP addresses (ask them, or check your current gateway's logs).
- For the BYOP use case only: a host for the proxy container, set up per Bring Your Own Proxy.
Step 1: Make the RDP Host a Network Resource
Skip this step if the RDP host already runs the NetBird client; you will select it directly as a Peer target when creating the service.
- In the dashboard, go to Networks and create a network, for example
office-servers. - Add a resource for the single host
10.10.20.15. Prefer a single-host resource over the whole subnet: the proxy should be able to reach exactly the machines you publish, nothing else. - Add
site-routeras the routing peer.
No access policy toward the resource is needed: a reverse proxy service reaches its target through the proxy's own tunnel, not through your peer access policies. The reverse also holds, and it is easy to miss; see Two Mistakes to Avoid.
Use Case A: NetBird Cloud Shared Proxy
The fastest path: no proxy infrastructure of your own, TCP-only sessions.
Follow the service creation steps with these choices:
- Set the service mode to TCP. RDP is not a web application, so an HTTP service will not work.
- Add a target: type Host, select the
10.10.20.15resource, port3389. - Create the service and note the address and listen port the service
shows, for example
contractor-rdp.eu1.netbird.services:18623. The listen port is assigned automatically and cannot be chosen.
RDP's optional UDP transport is not available on this path (see Two Ways to Publish RDP); clients fall back to TCP-only on their own, so nothing needs configuring.
Use Case B: Bring Your Own Proxy
Your own proxy cluster: custom ports (including 3389 itself, so the .rdp
file needs no port at all) and RDP's UDP transport for smoother sessions.
- Register and run your proxy per Bring Your Own Proxy, including its TLS setup: the proxy itself always needs a certificate configured to start, even though no certificate is issued for L4 service domains (the proxy terminates no TLS for RDP).
- Create a TCP service: target type Host, the
10.10.20.15resource, target port3389, and set the listen port to3389. - Create a second service, mode UDP, same target and ports. A TCP and a UDP service may share a listen port; every proxy replica in the cluster binds both listeners.
Windows clients now negotiate the UDP transport automatically alongside TCP (the connection info dialog shows "UDP is enabled"). If you later remove the UDP service, sessions degrade to TCP-only silently; nothing breaks.
Step 2: Restrict Who Can Connect
This step is the same for both use cases.
This step is not optional. A TCP service has no login page, so until you restrict it, anyone on the internet who finds the address can start an RDP handshake with your host.
- Open the service's Access Control tab (for the BYOP pair: on both services).
- Add an IP allow rule for the firm's egress addresses only:
203.0.113.40/32.
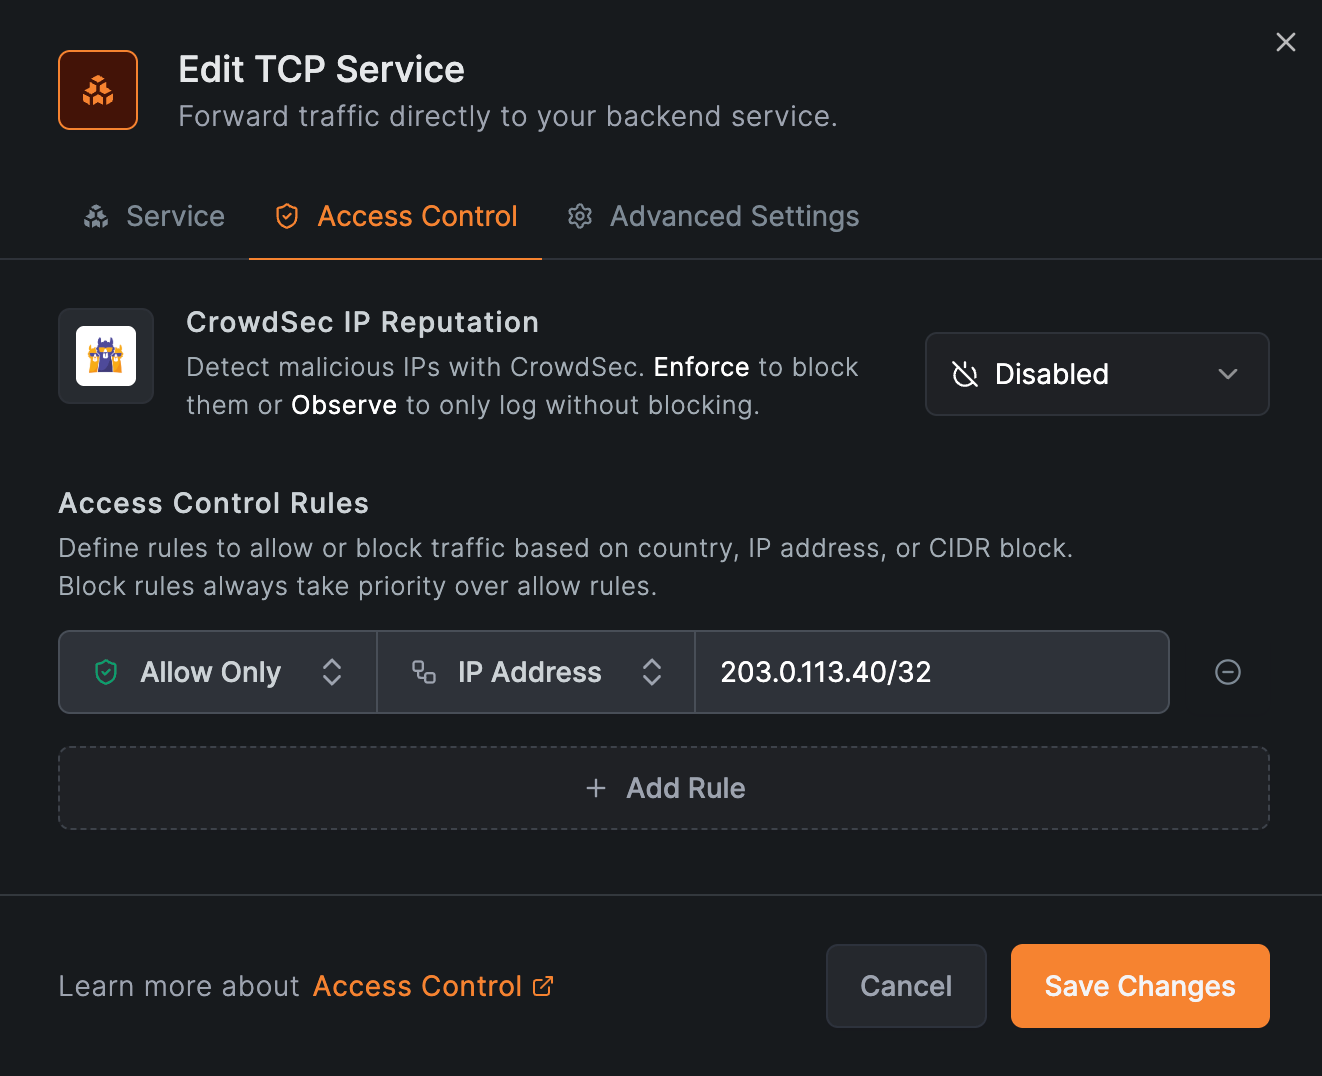
With a strict single-IP allowlist like this one, that rule alone does the work. If your allow rules are broader (country rules or wide CIDR ranges), also set CrowdSec IP Reputation to Enforce to drop connections from known-malicious sources within the allowed range. See access restrictions for the full options.
Step 3: Hand Over the .rdp File
Send the firm a .rdp file pointing at the service address. For the shared
proxy, include the assigned port. For BYOP on port 3389 no port is
needed, but the service's domain must resolve to your proxy host - for a
raw TCP service the domain is otherwise only a label:
full address:s:contractor-rdp.eu1.netbird.services:18623
username:s:CORP\contractor01
Their users open the file and enter their Windows credentials, exactly as they did against the RDP gateway.
Step 4: Verify
From a machine on the firm's allowlisted network (or with your own IP
temporarily added to the allow rule), open the .rdp file and confirm the
session works end to end.
Then verify the restriction: from any other network, the same file must fail to connect. If it connects from everywhere, revisit Step 2 before handing anything over.
Two Mistakes to Avoid
Do not delete and recreate a shared-cluster service once .rdp files are
distributed. A recreated service gets a new automatically assigned listen
port, and every distributed .rdp file breaks. The port is stable for the
lifetime of the service object, including disable/enable cycles and edits,
so to pause access, disable the service instead of deleting it. (BYOP
services with explicit ports do not have this problem.)
Publishing a service is itself an access grant. The proxy's path to its target does not appear in, and is not gated by, your access control policies. Reviewing policies will not surface what the reverse proxy exposes; review the service list on the Reverse Proxy page as part of any access audit.
Security Boundaries
Know exactly what protects this endpoint, and what does not:
- No user authentication at the proxy. SSO, password, and PIN authentication are HTTP-only and do not apply to TCP or UDP services. The layers that remain are the access restrictions and the RDP host's own login (keep NLA enabled, enforce strong passwords and account lockout).
- The RDP host's protocol stack is reachable pre-authentication from allowlisted addresses. Keep the host patched; RDP vulnerabilities have historically been exploitable before login.
- Traffic hairpins through the proxy. Expect added latency roughly equal to the round trip from the user to the proxy plus the proxy to your site. On a BYOP proxy you control where that hop sits; either way, test from the firm's actual location during rollout.
Summary
The third-party firm's users open the same .rdp file they always have, now
pointing at the proxy address. The proxy accepts connections only from
203.0.113.40, carries them through the NetBird tunnel to site-router,
and delivers them to 10.10.20.15:3389, where Windows authentication takes
over. On the shared cloud proxy that session is TCP-only on an assigned
port; on a Bring Your Own Proxy cluster it runs on port 3389 with the UDP
transport as well. The RDP gateway is retired, and nothing in your network
accepts inbound connections from the internet.