Microsoft and Entra ID SSO with NetBird Self-Hosted (Legacy)
Updated
Use Microsoft accounts for authentication with NetBird. This supports both personal Microsoft accounts and Microsoft Entra ID (formerly Azure AD) for work and school accounts.
Standalone Setup (Advanced)
NetBird includes built-in local user management powered by an embedded IdP, allowing you to create and manage users directly without requiring an external identity provider. You can also add multiple external identity providers alongside local users, giving users multiple login options.
We highly recommend using the simpler setup that adds Microsoft as an external IdP directly in the NetBird Management Dashboard. This approach requires minimal configuration, works alongside local users, and doesn't require replacing your embedded IdP. See the Management Setup (Recommended) section in the main Microsoft Entra ID documentation.
The standalone setup below replaces your embedded IdP entirely and is only recommended for experienced Microsoft Entra ID administrators who need full control over authentication and user management.
Use Microsoft Entra ID as your primary identity provider instead of NetBird's embedded IdP. This option gives you full control over authentication and user management, is recommended for experienced Microsoft Entra ID administrators as it also requires additional setup and ongoing maintenance.
For most deployments, the embedded IdP is the simpler choice — it's built into NetBird, fully integrated, and requires minimal configuration to get started. For this implementation, go back up to the Management Setup (Recommended) section above.
If you prefer to have full control over authentication, consider self-hosted alternatives like PocketID.
Prerequisites
- An Azure account with appropriate permissions
- Docker and Docker Compose for NetBird
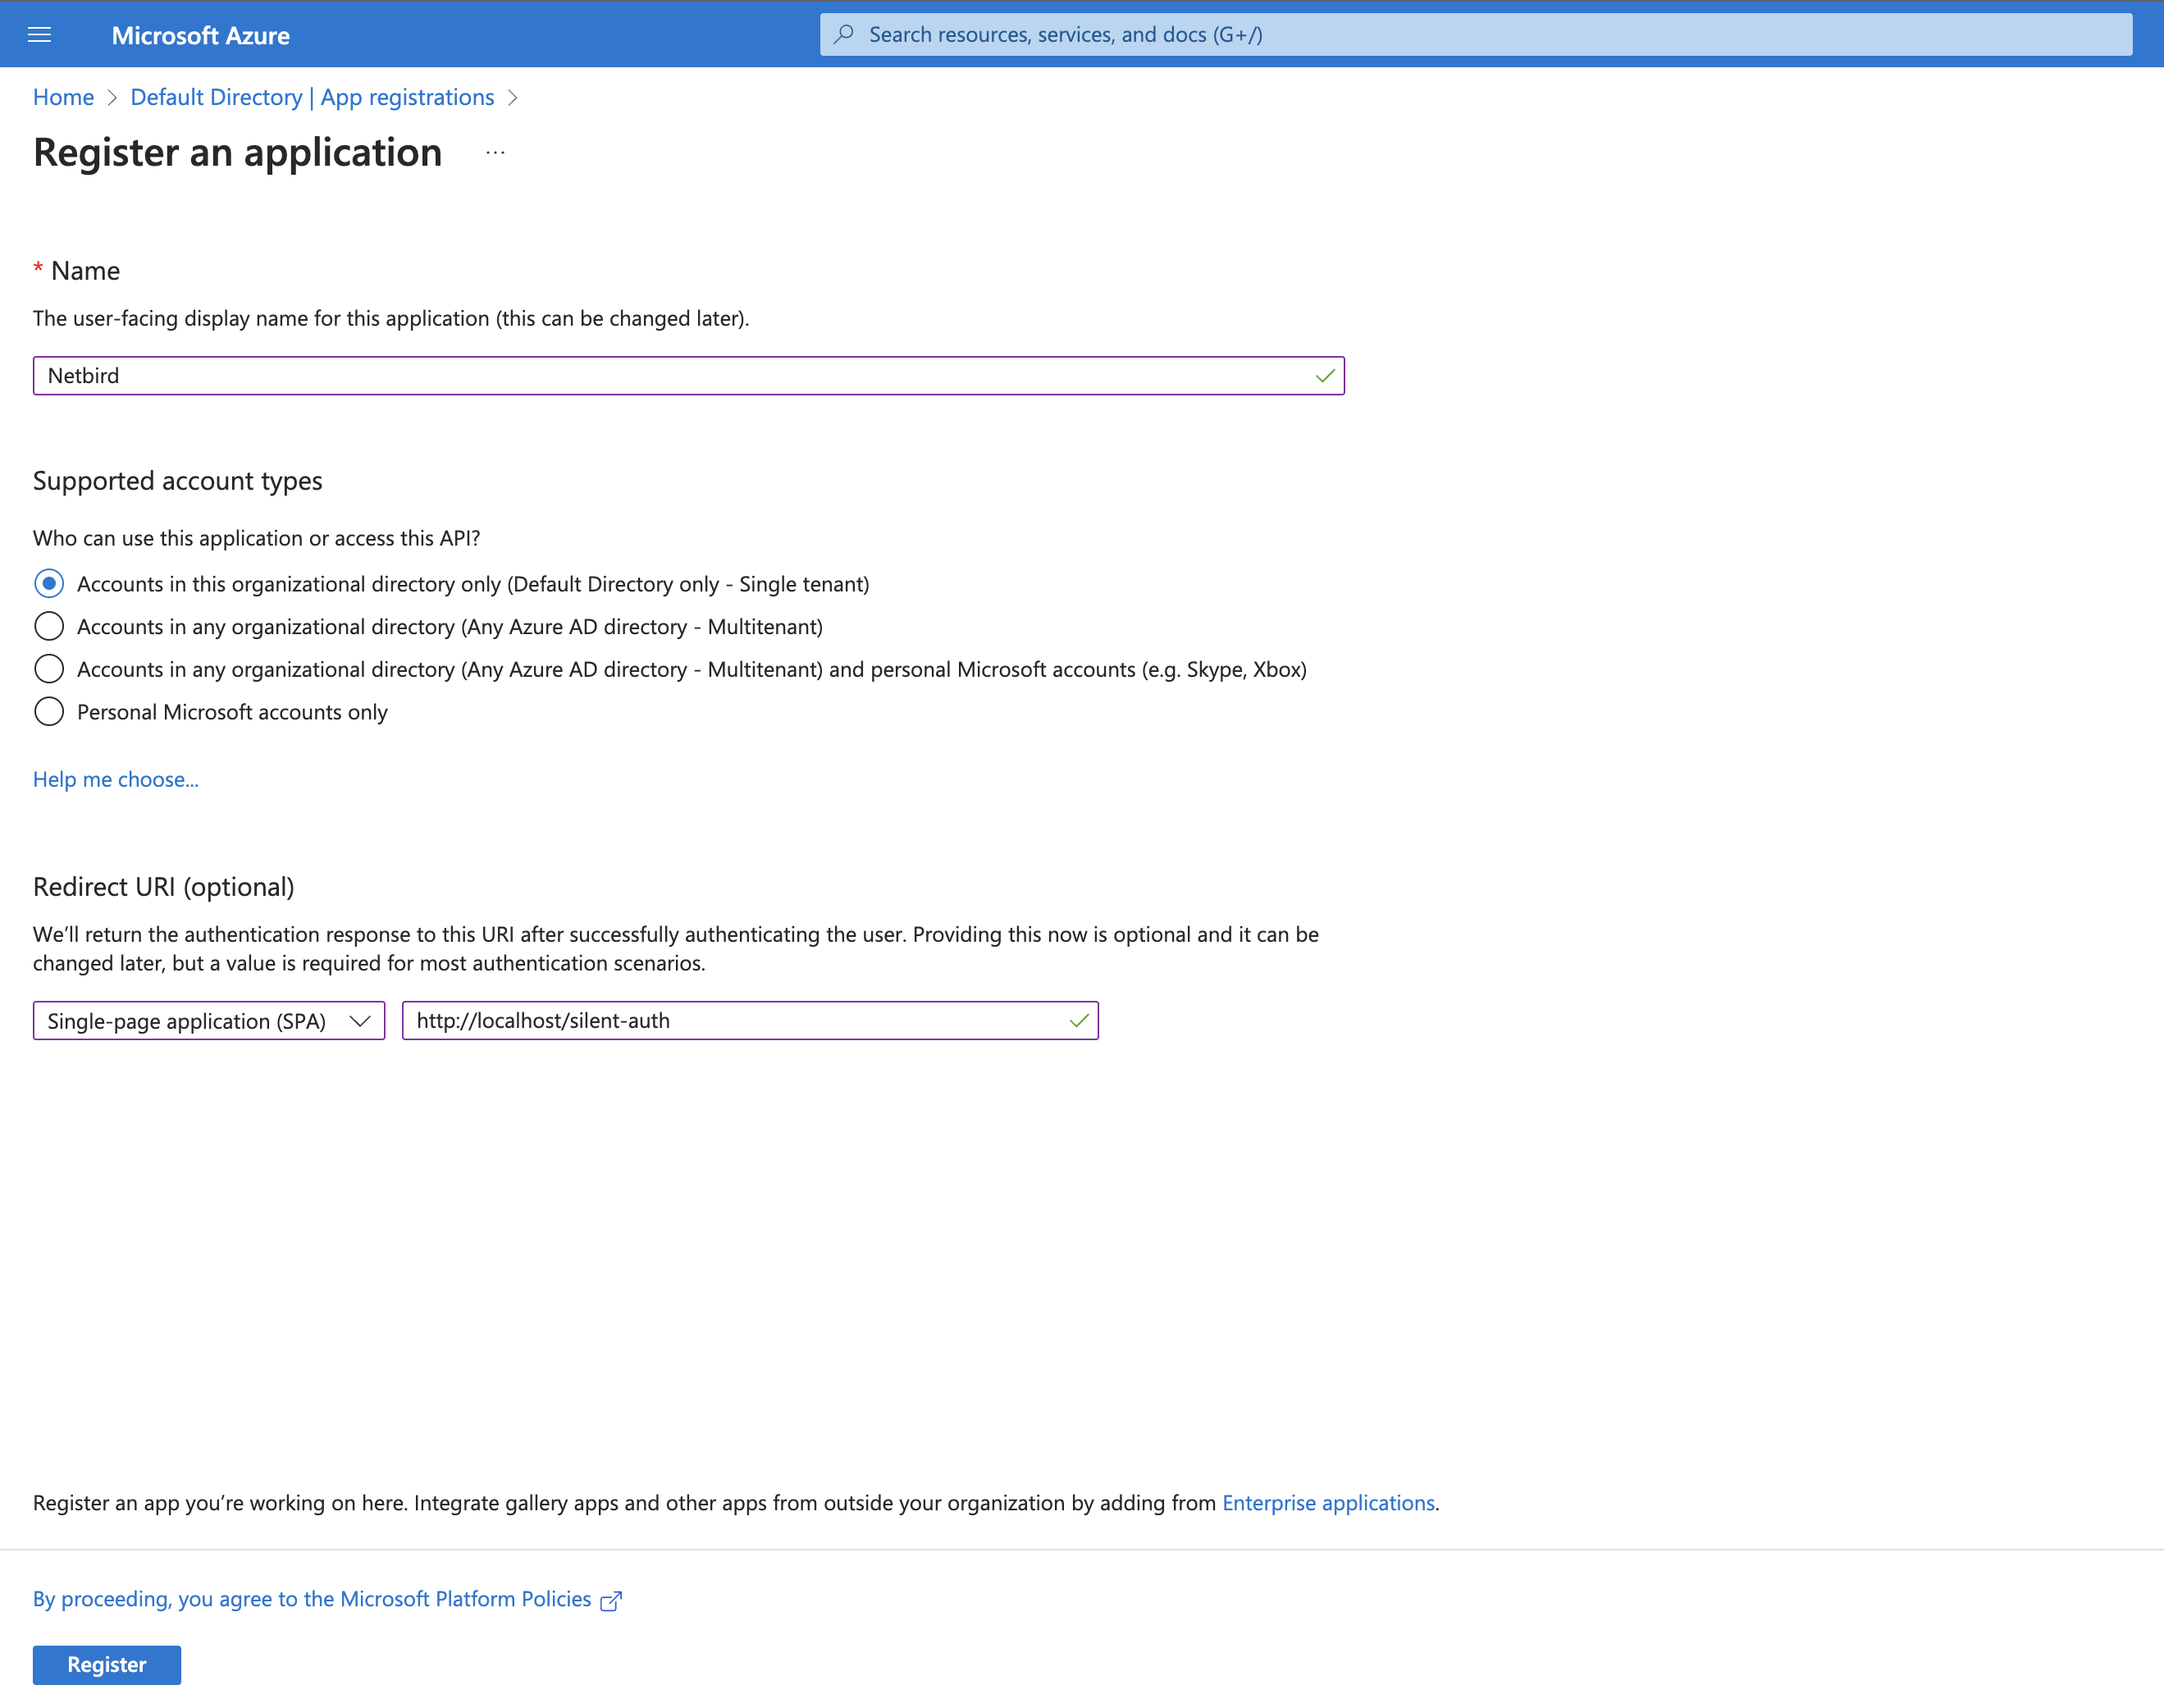
Step 1: Create and Configure Azure AD Application
- Navigate to Azure Active Directory
- Click App Registrations → + New registration
- Fill in:
- Name:
Netbird - Supported account types:
Accounts in this organizational directory only (Default Directory only - Single tenant) - Redirect URI: Select
Single-page application (SPA)and enterhttps://<yournetbirddomain.com>/silent-auth
- Name:
- Click Register
- After registration, note the Application (client) ID from the Overview page (you'll need this in Step 3)
Step 2: Configure Platform Settings
- Click Authentication on the left menu
- Under Single-page application, add another URI:
https://<yournetbirddomain.com>/auth
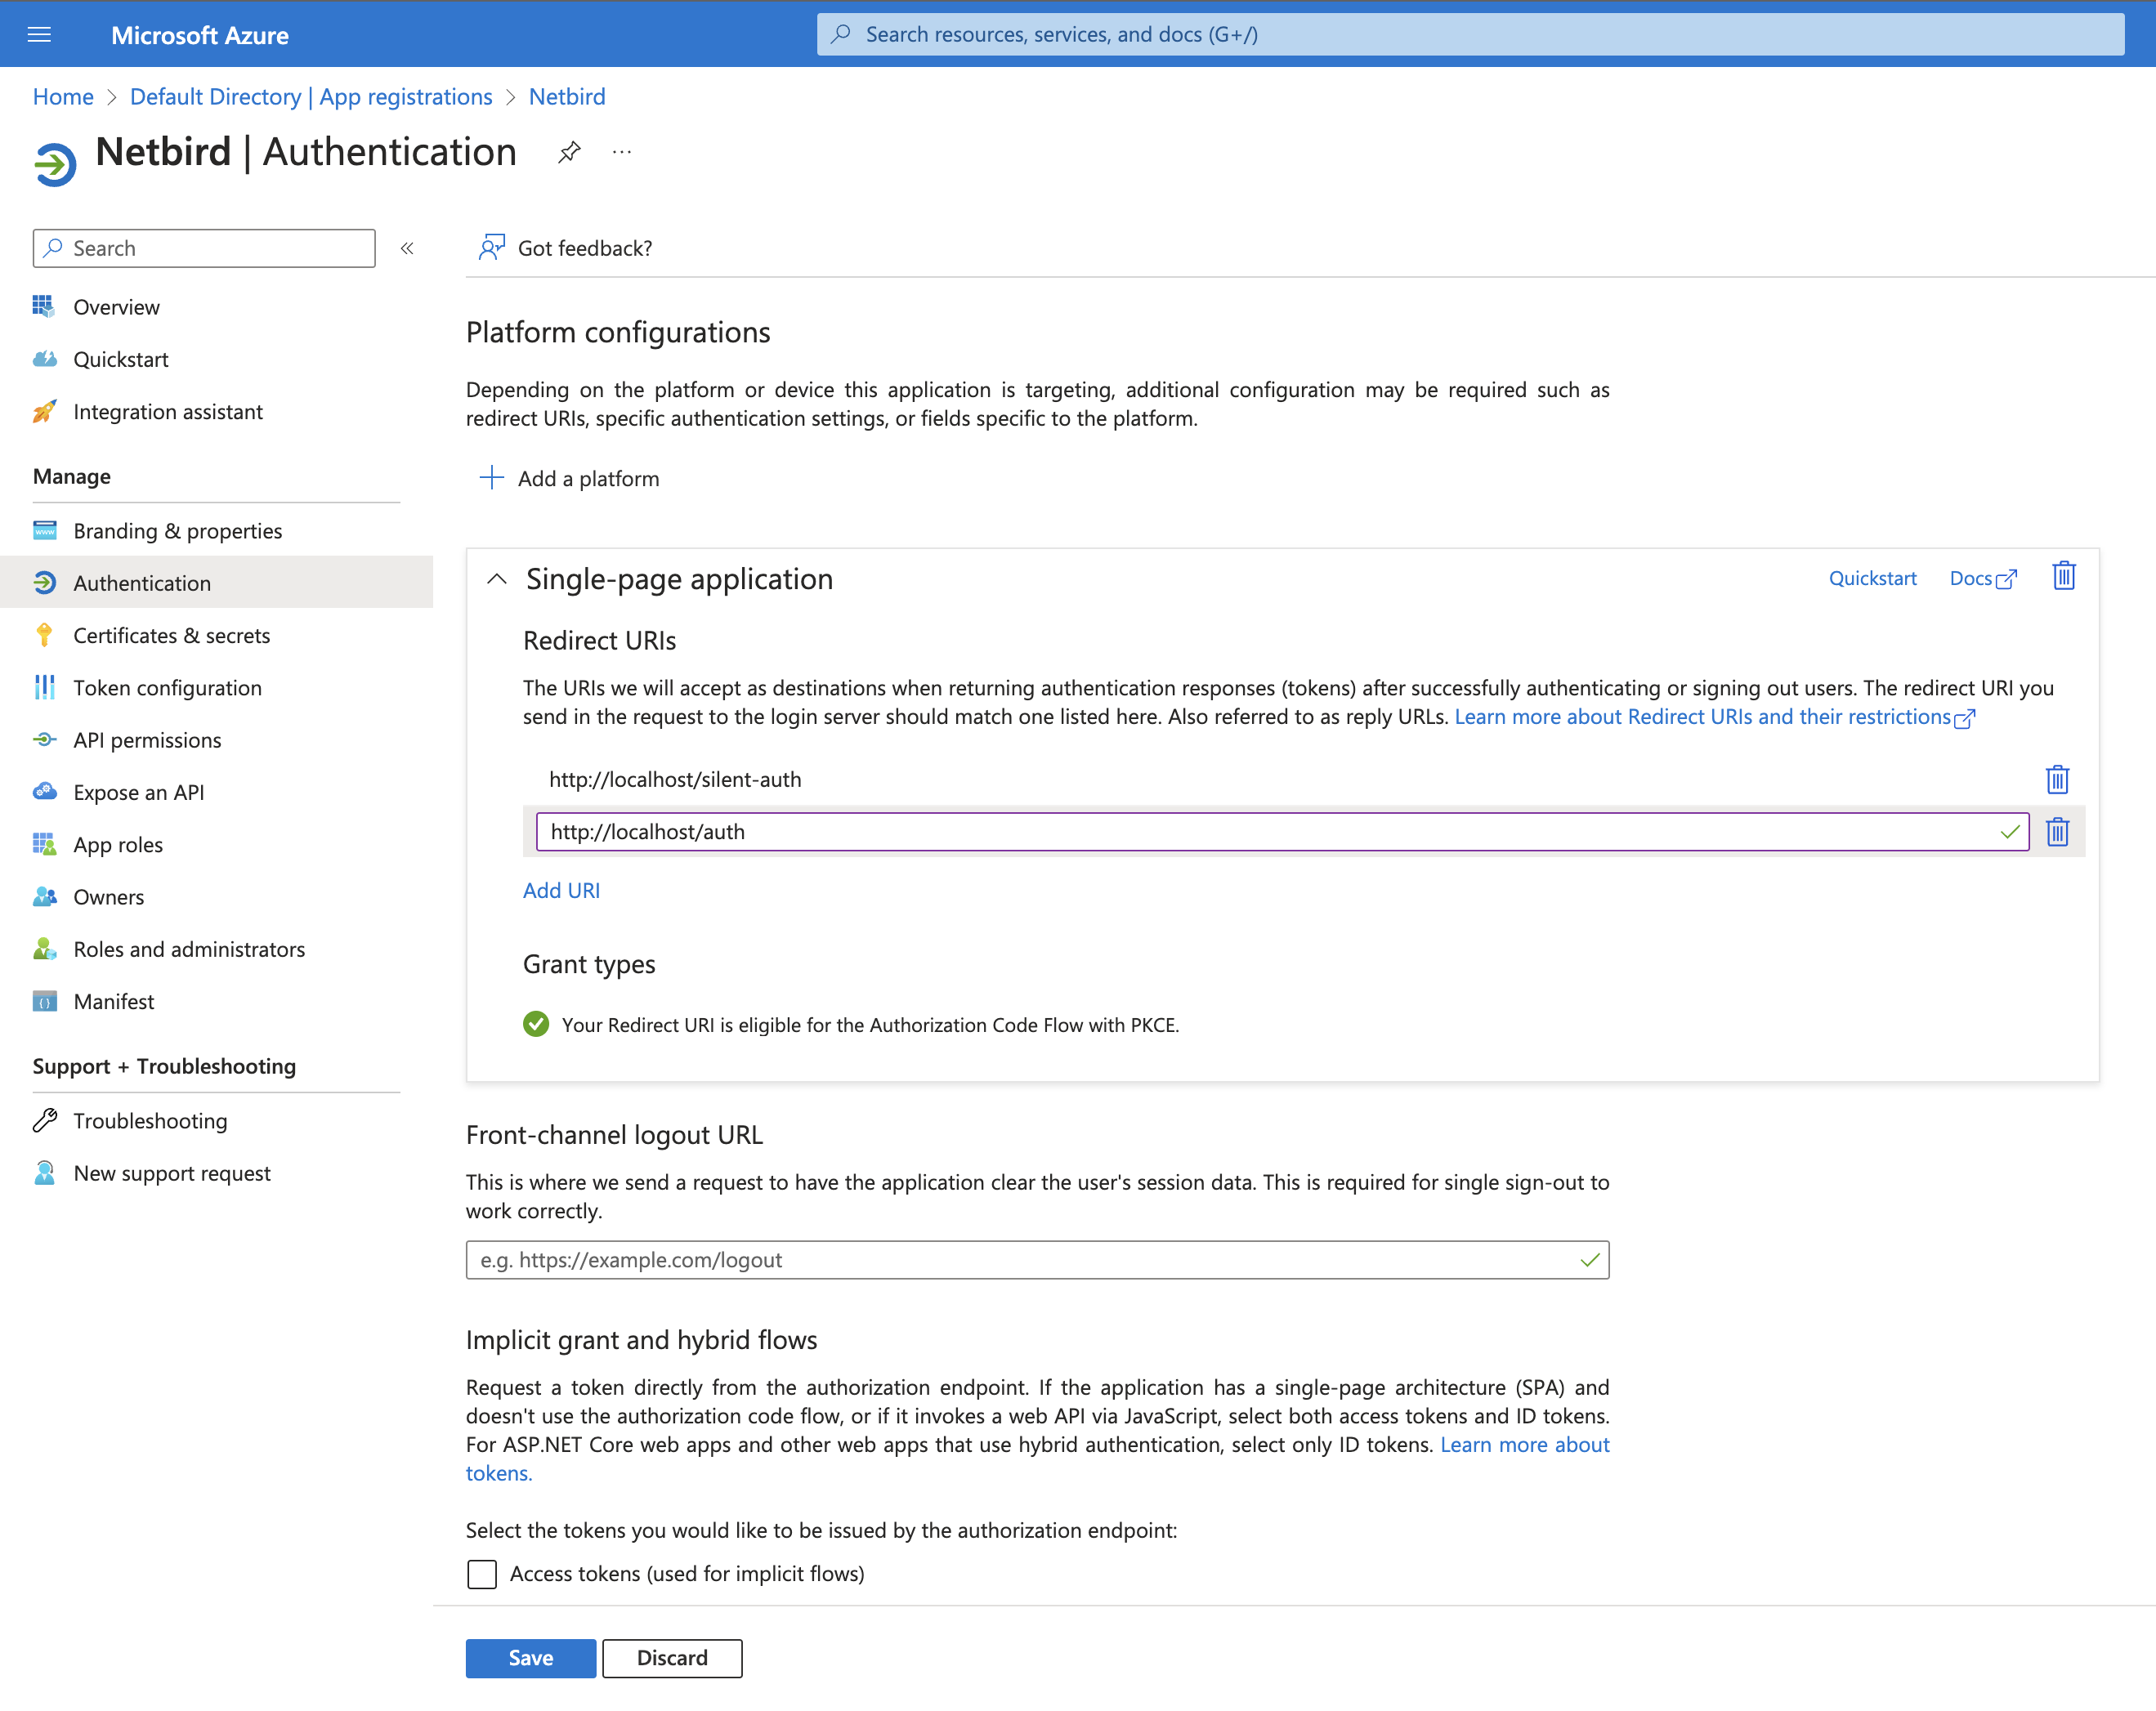
- Scroll down and configure options as shown:
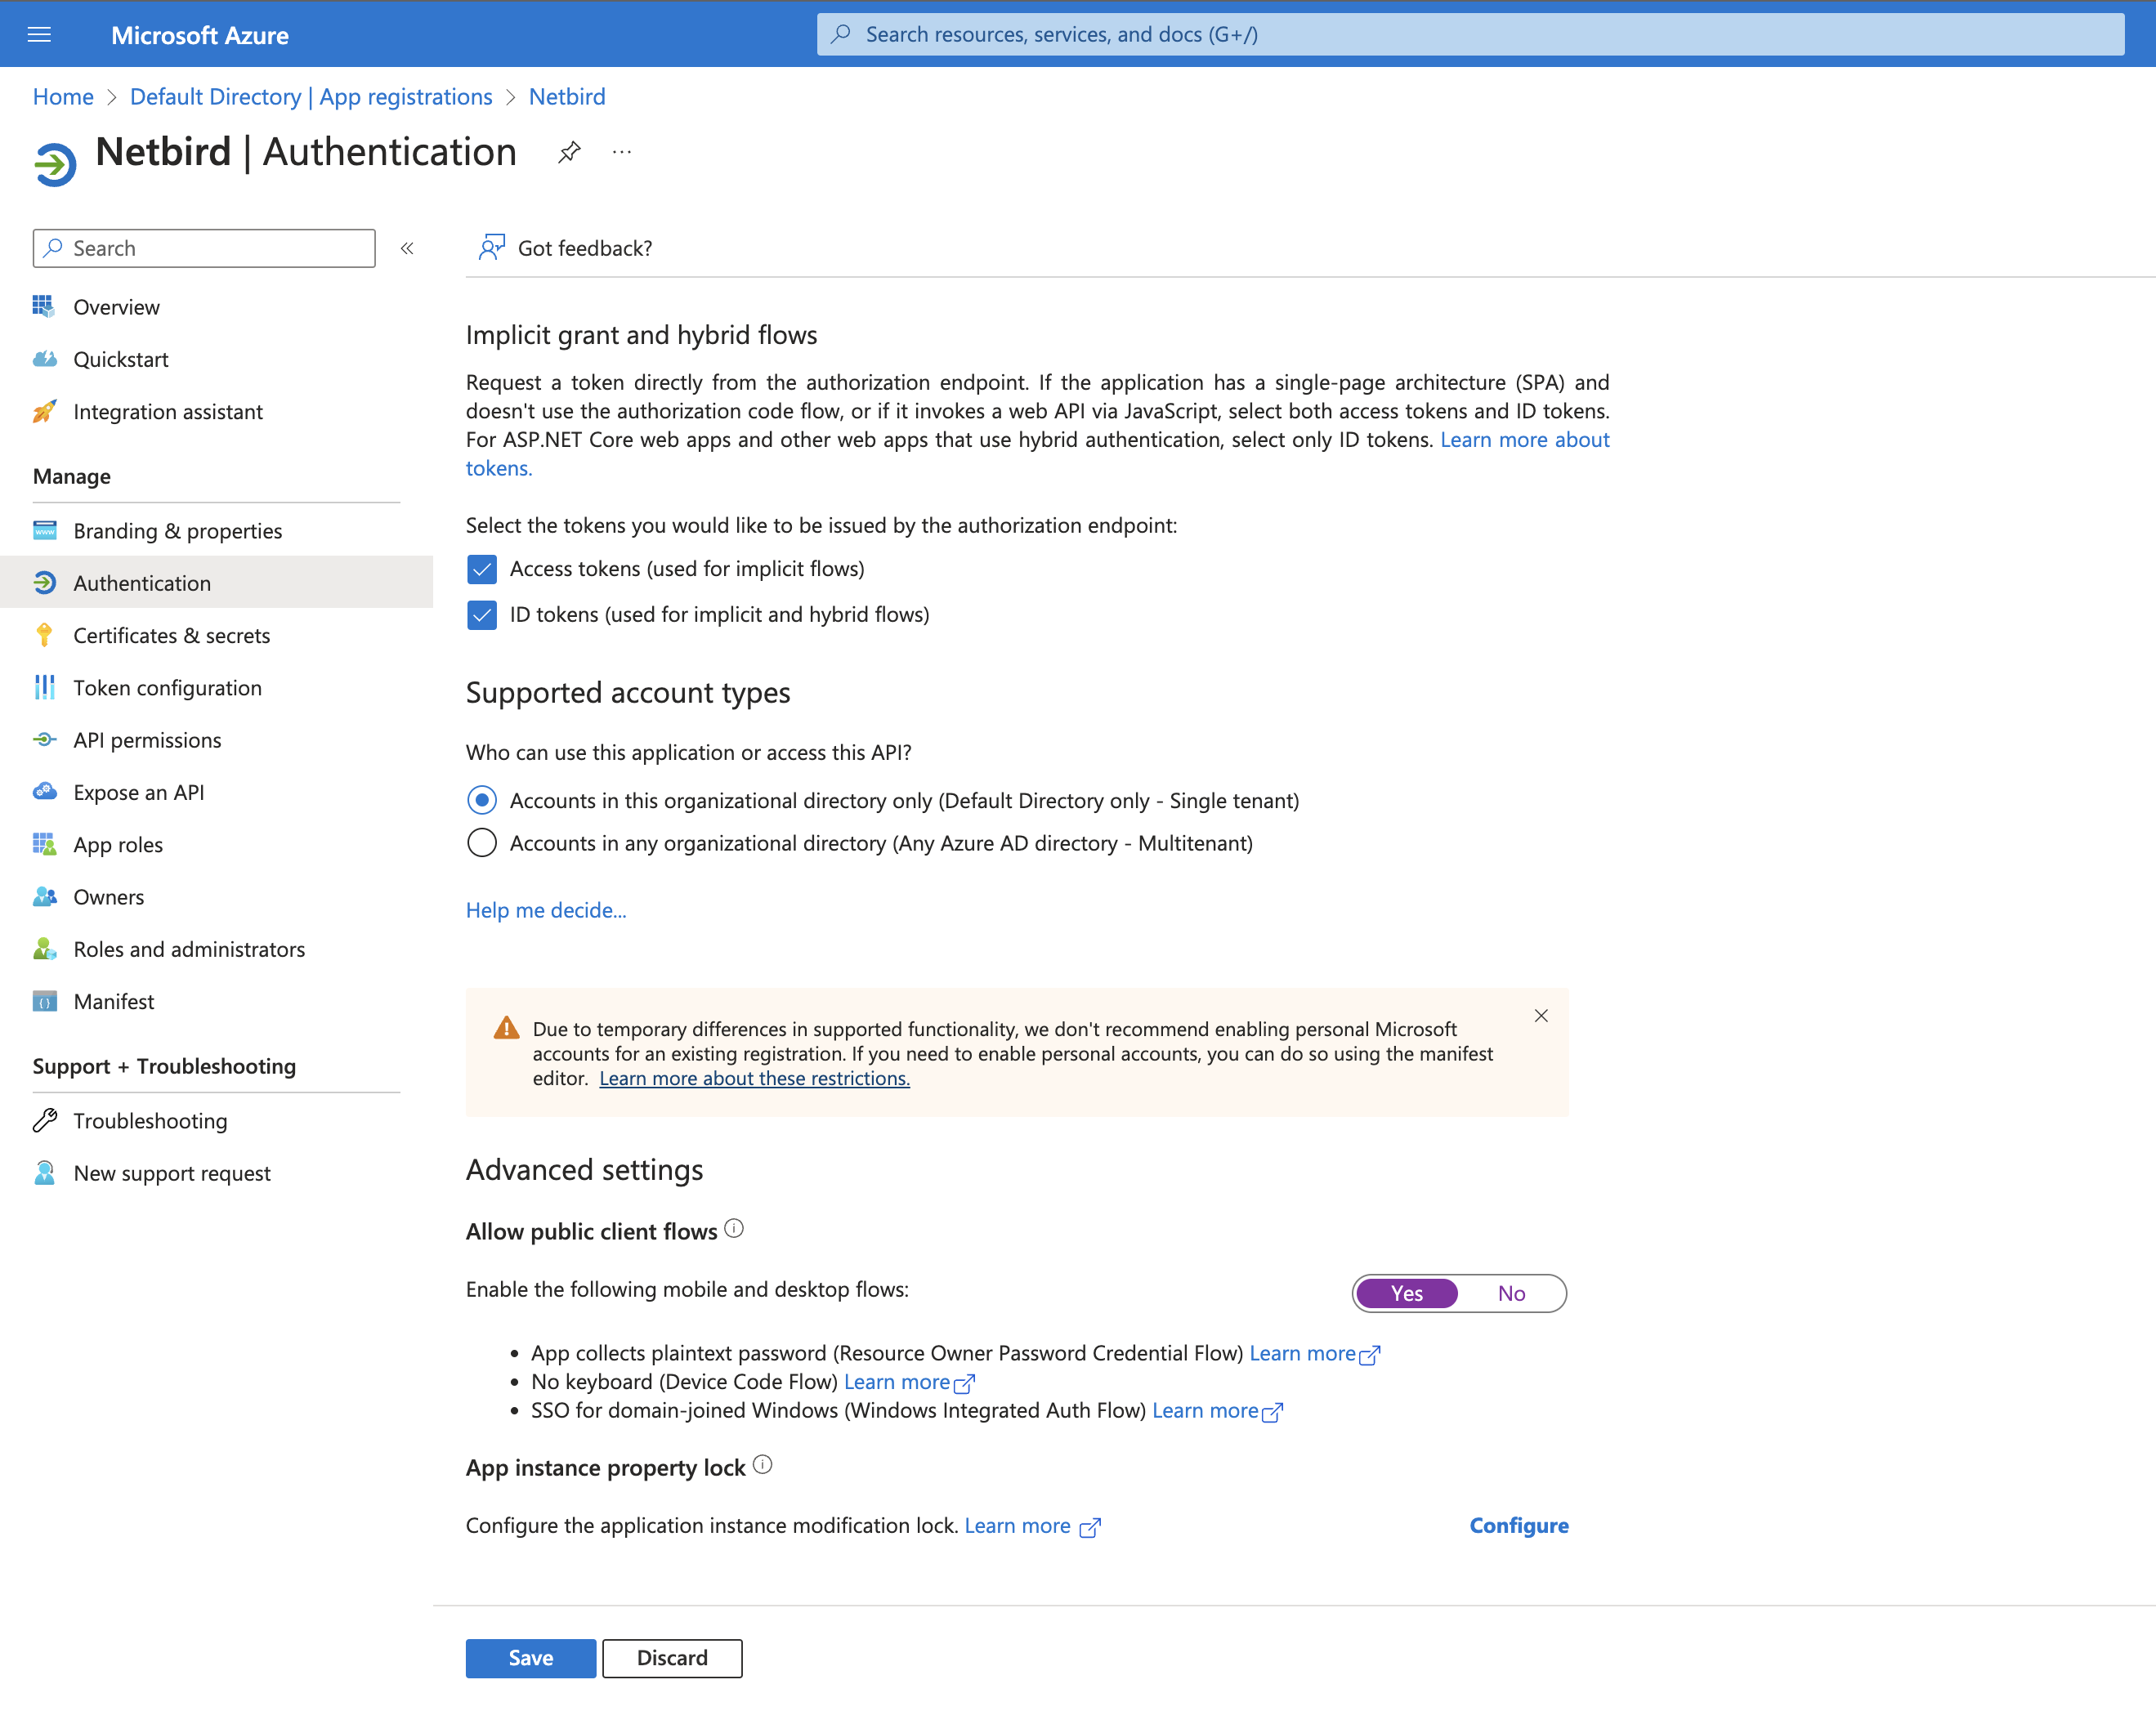
- Click Add a Platform → Mobile and desktop applications
- Add custom redirect URI:
http://localhost:53000 - Click Configure
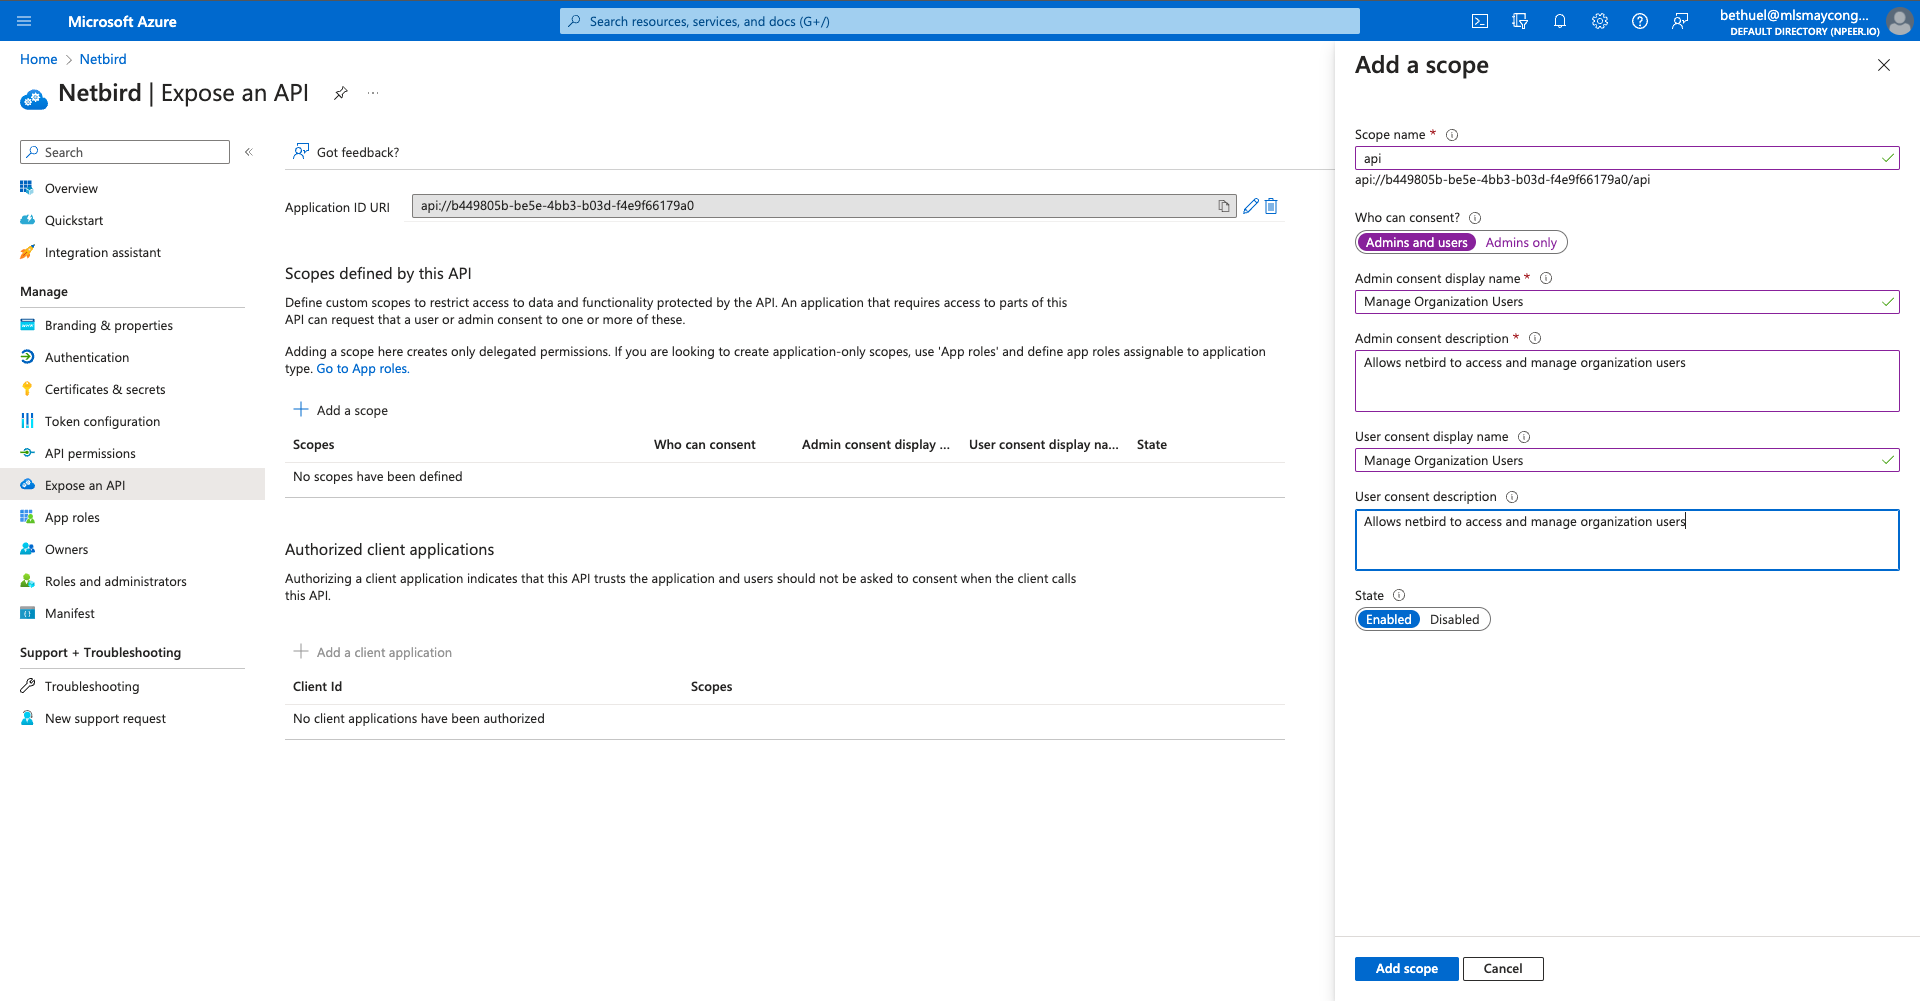
Step 3: Create Application Scope
- Click Expose an API on the left menu
- Under Application ID URI, click Set then Save
- Click + Add a Scope
- Fill in:
- Scope name:
api
- Scope name:
- Click Add scope
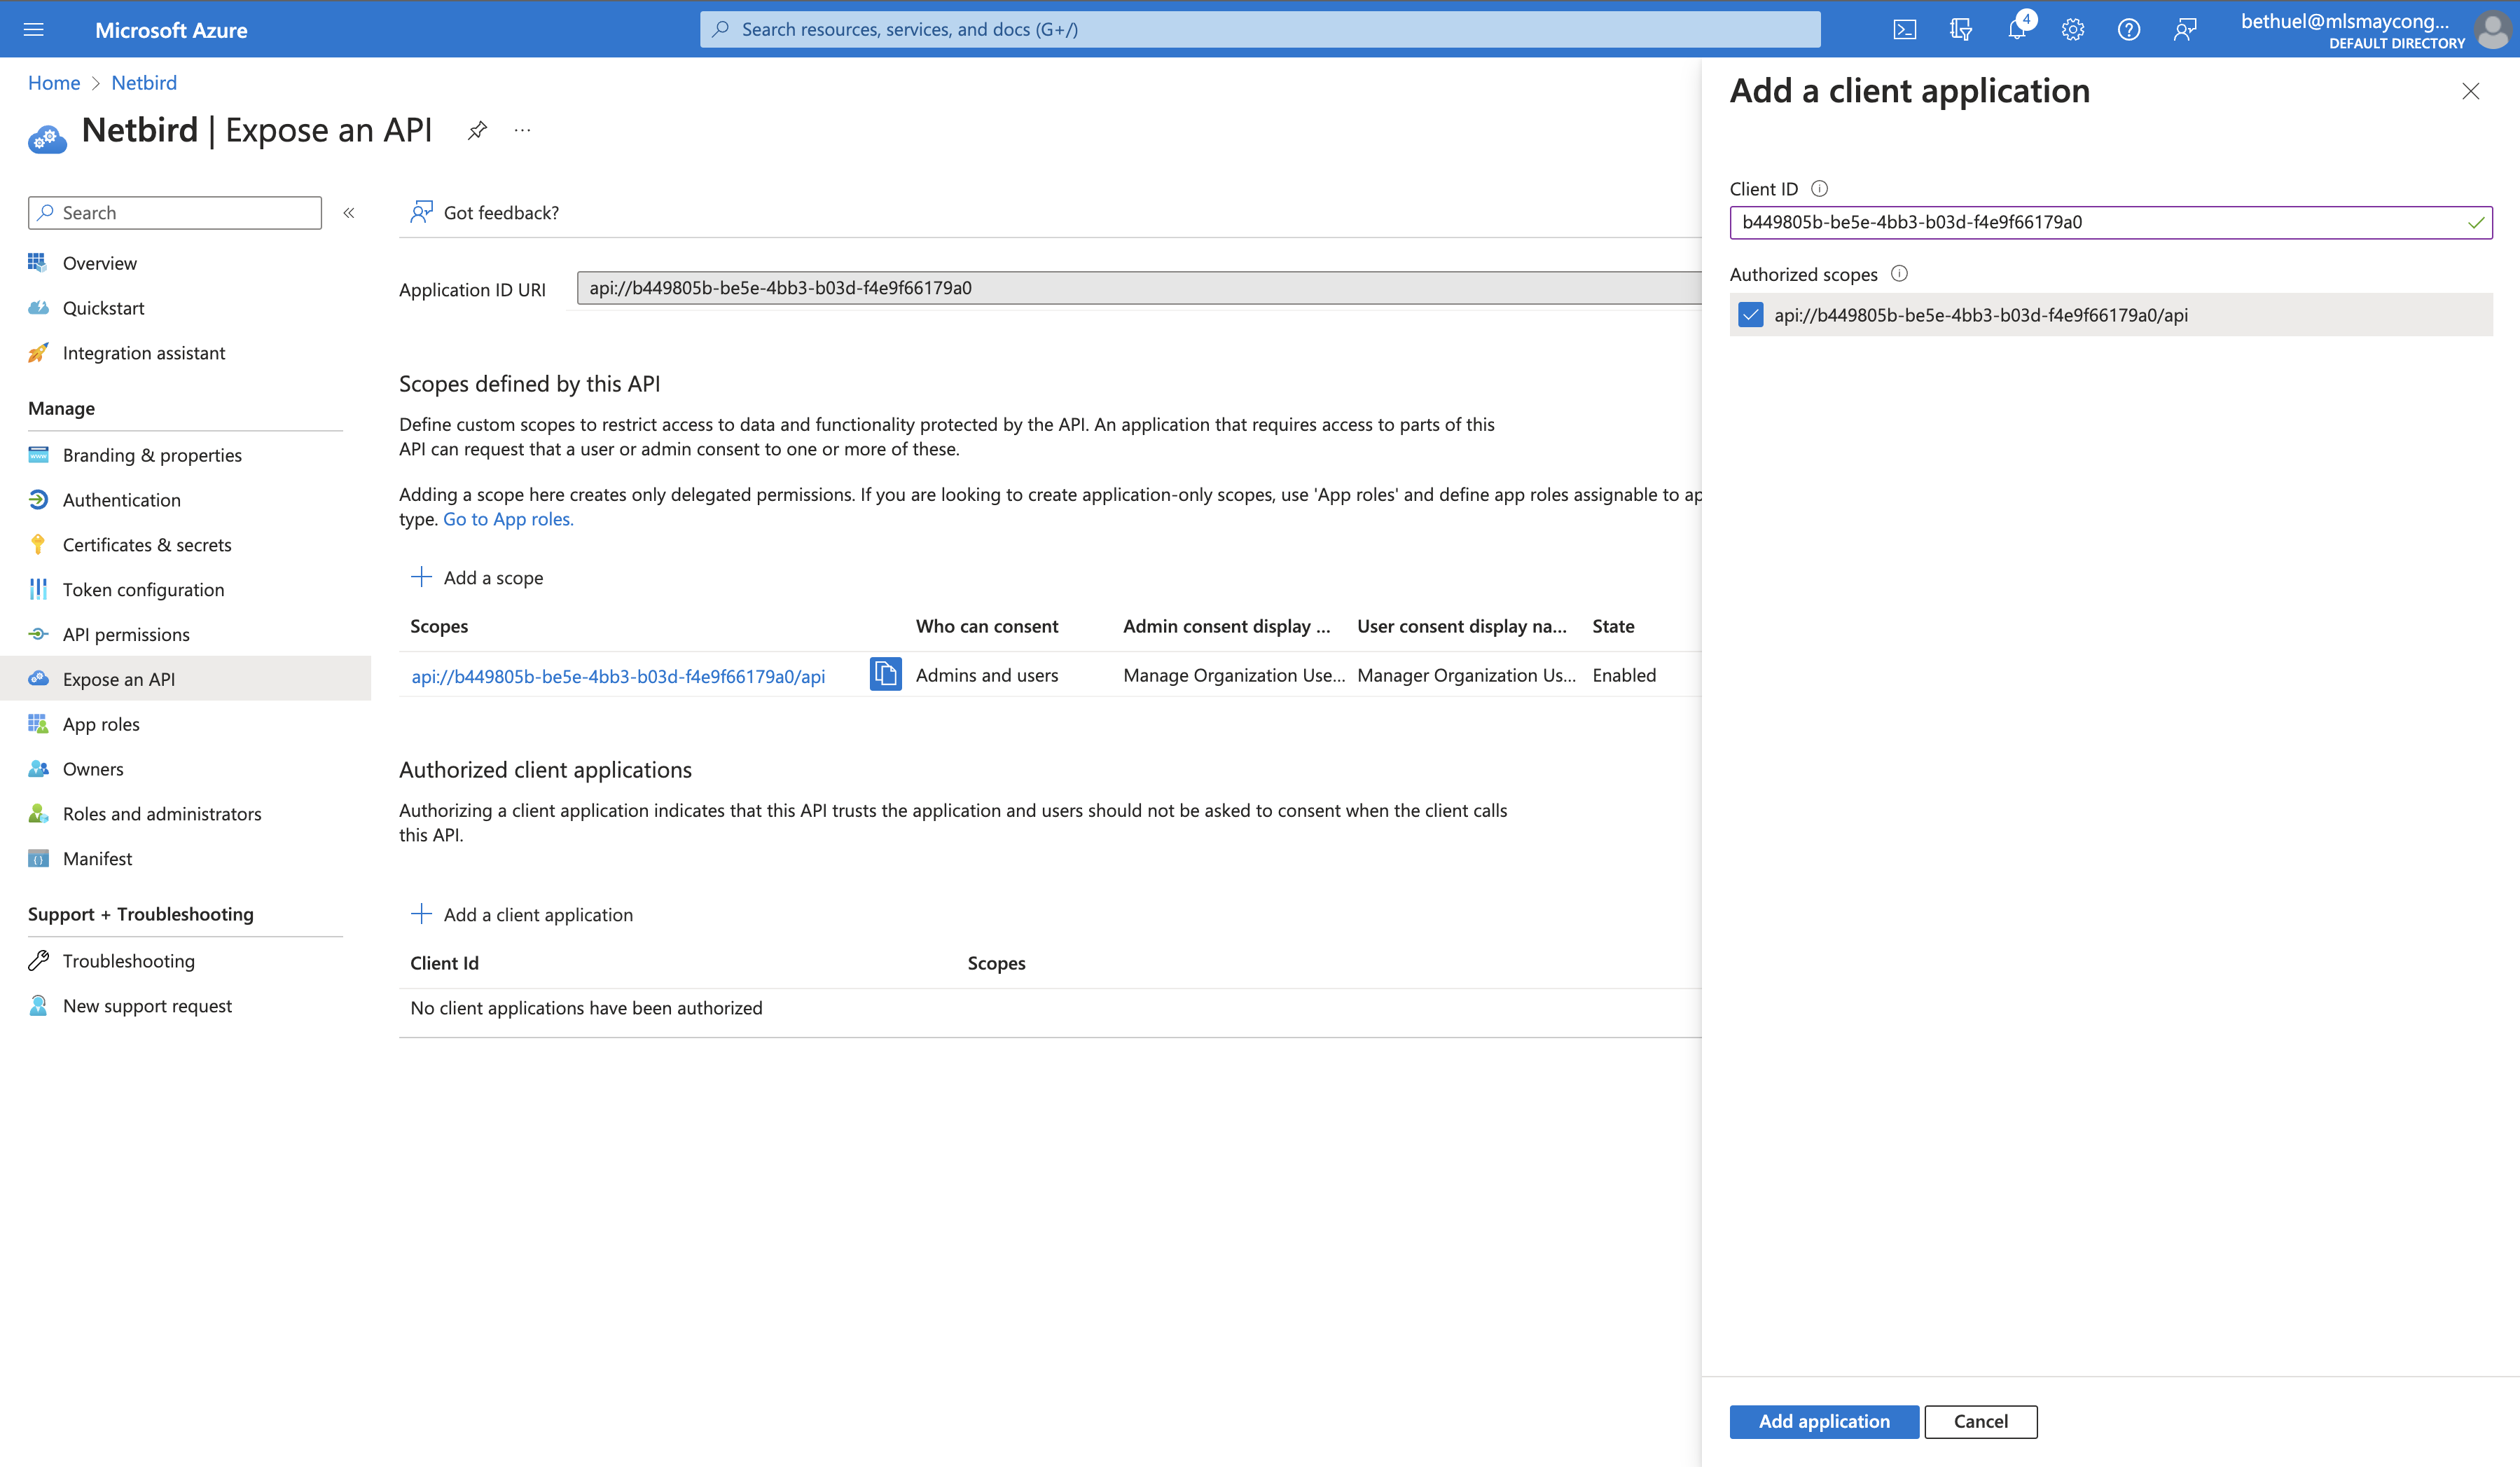
- Under Authorized client applications, click + Add a client application
- Enter your Client ID (the Application (client) ID you noted when creating the app registration in Step 1)
- Click Add application
Step 4: Add API Permissions
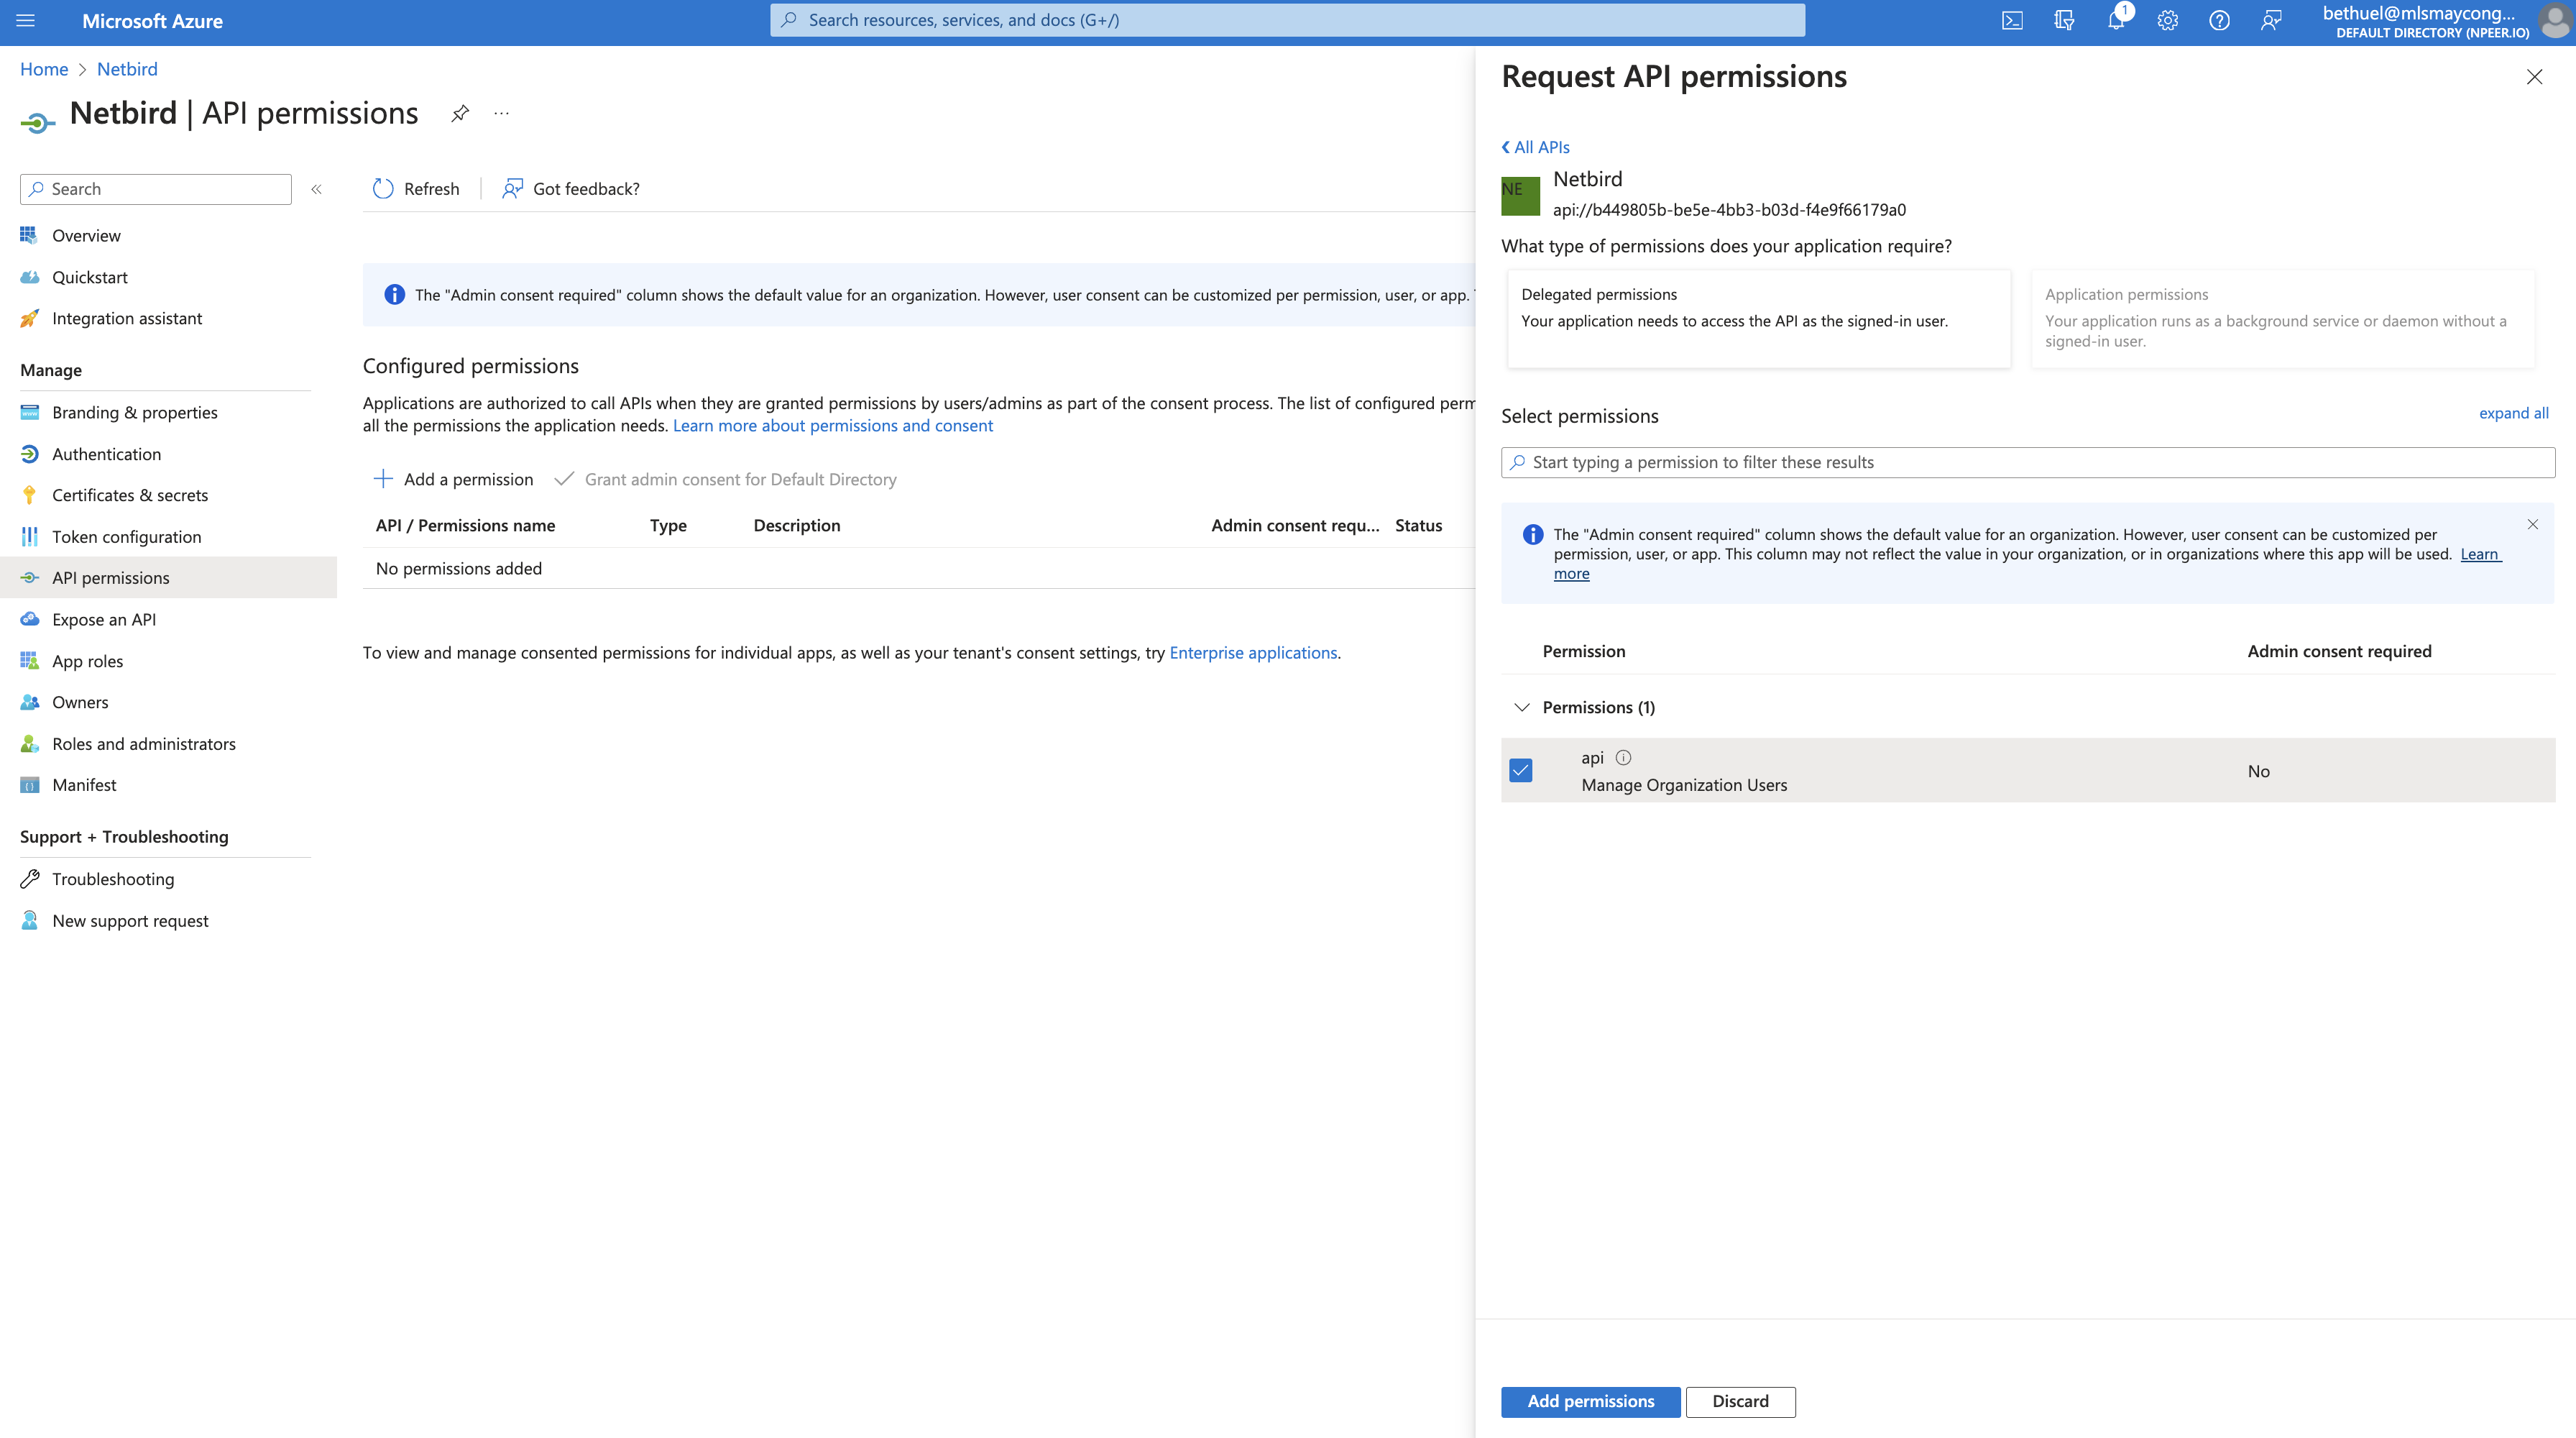
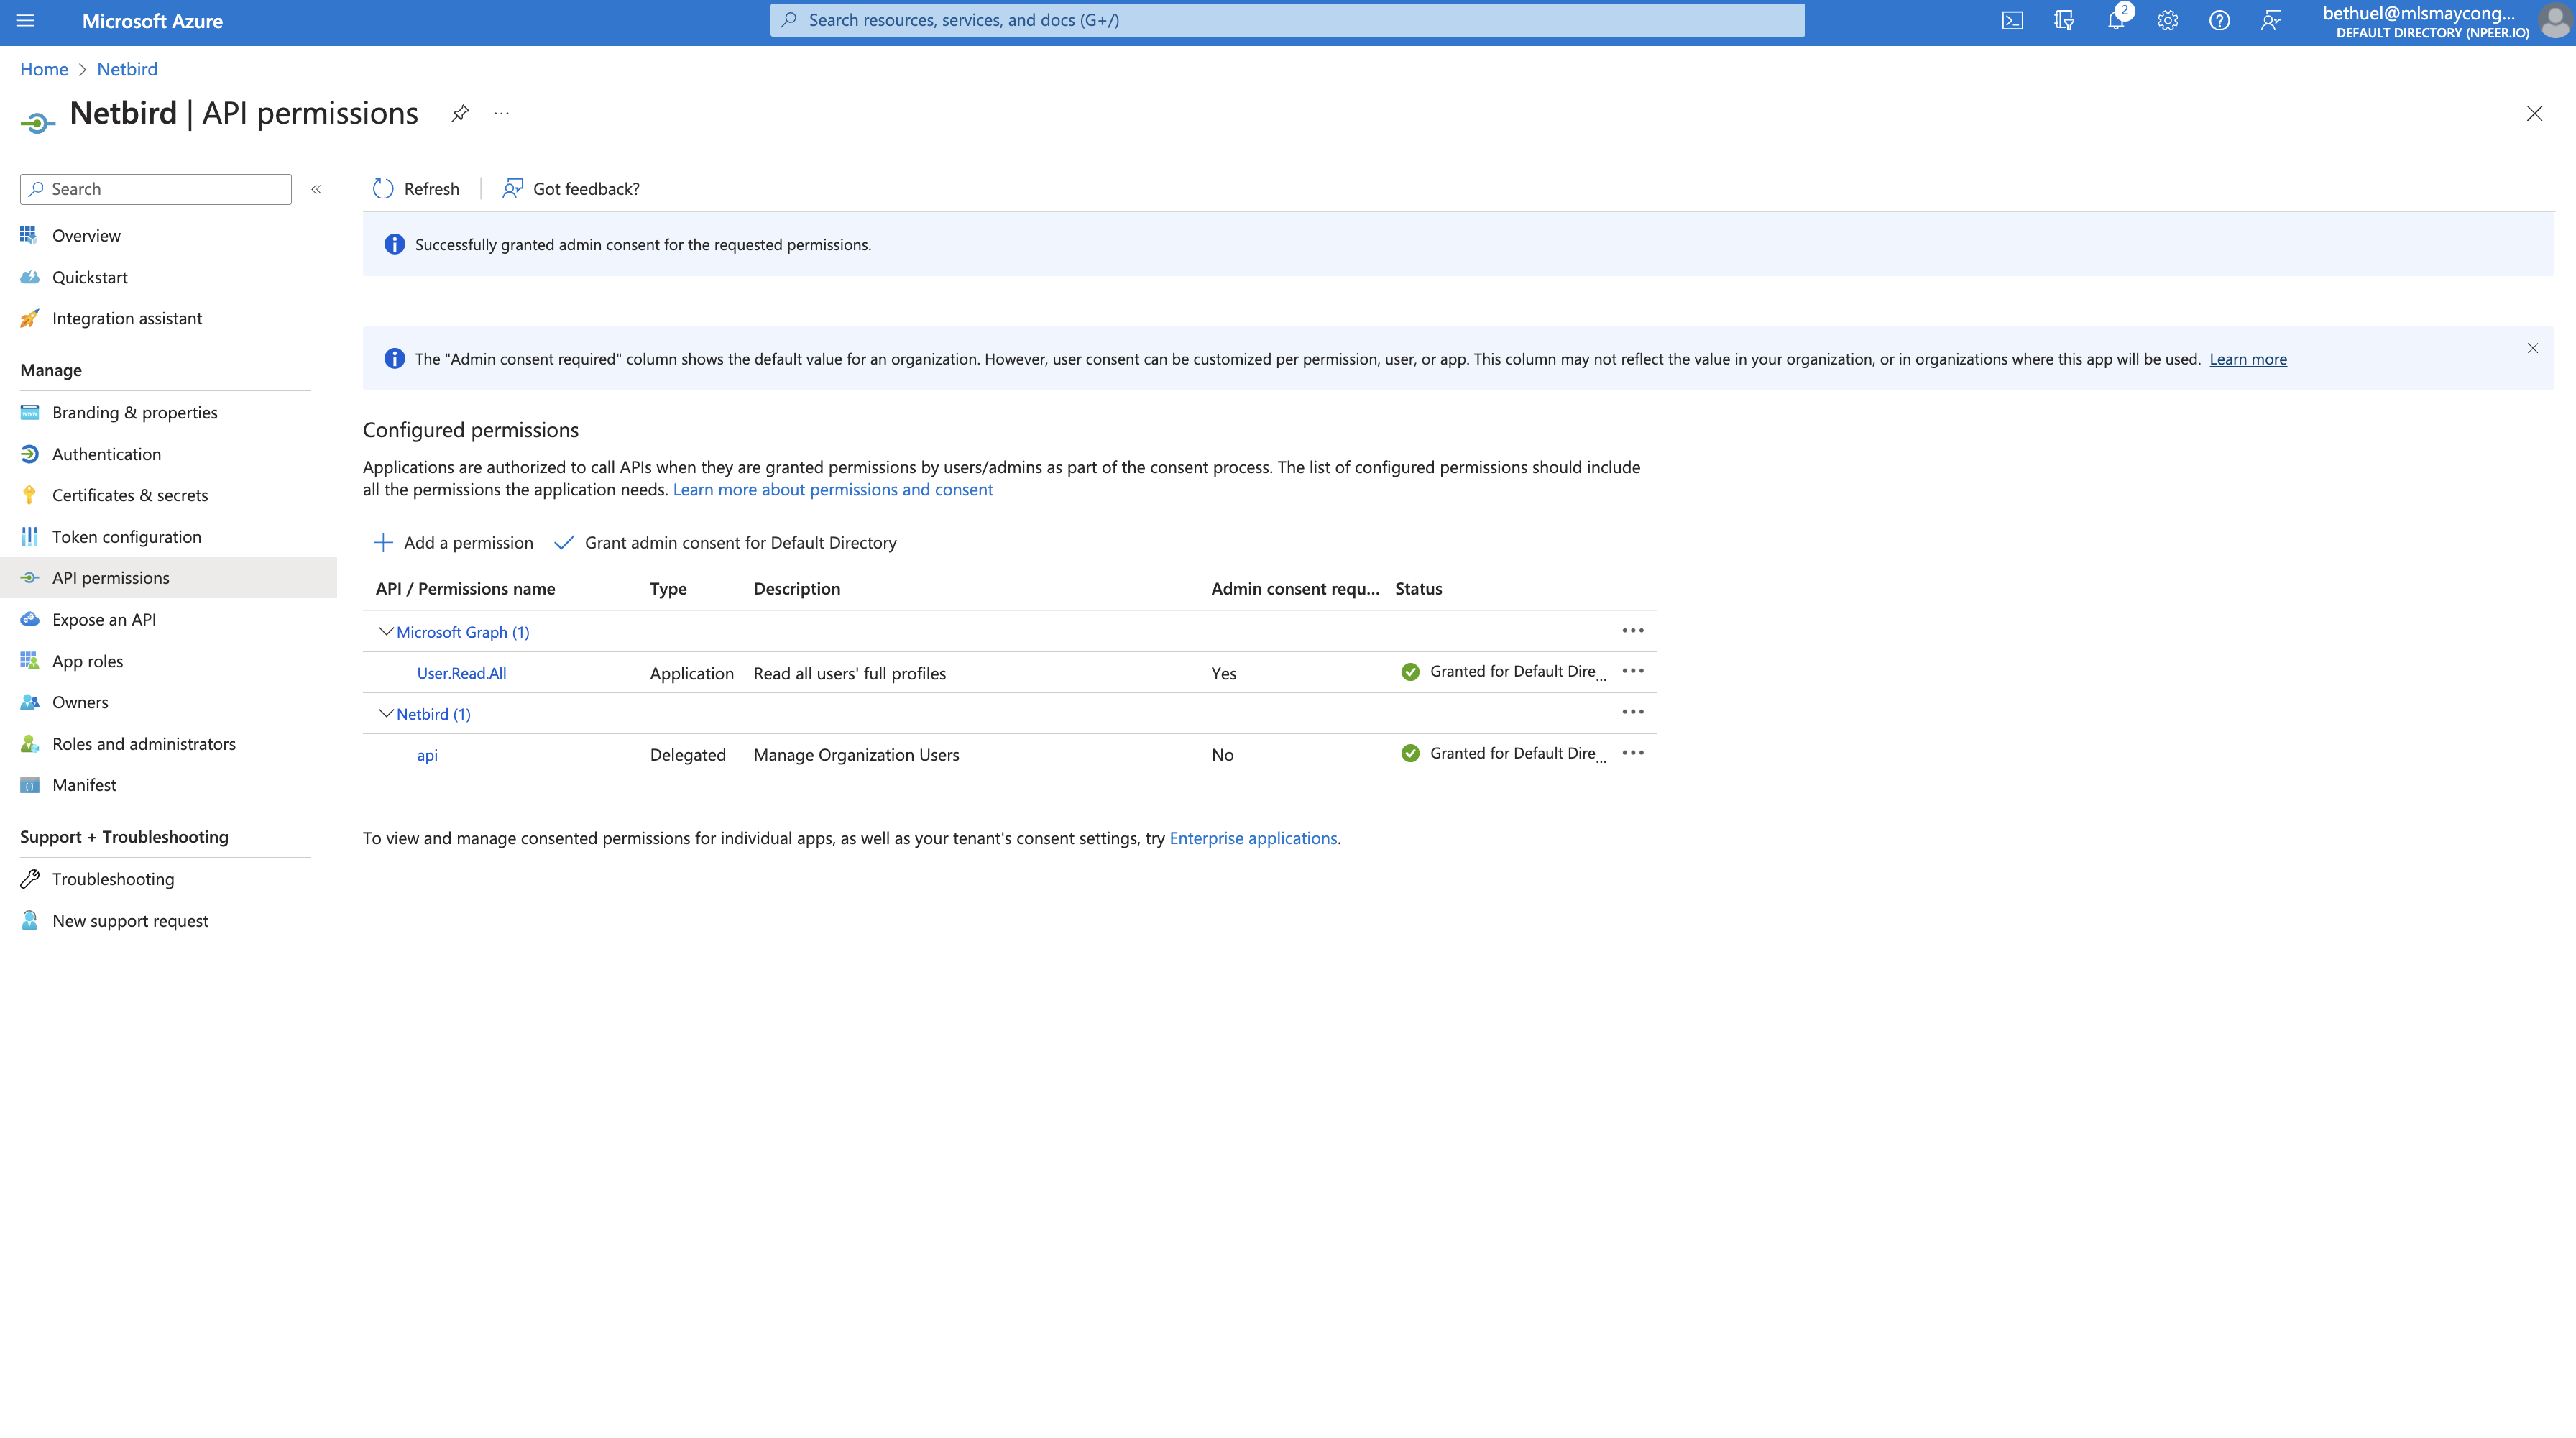
- Click API permissions on the left menu
- Click Add a permission
- Select My APIs tab → Netbird → check
apipermission → Add permissions
- Click Add a permission again
- Select Microsoft Graph → Application permissions
- Search for
User.Readand selectUser.Read.All - Click Add permissions

- Click Grant admin consent for Default Directory → Yes
Step 5: Update Token Version
- Click Manifest on the left menu
- Find
requestedAccessTokenVersionand change fromnullto2 - Click Save
Step 6: Generate Client Secret
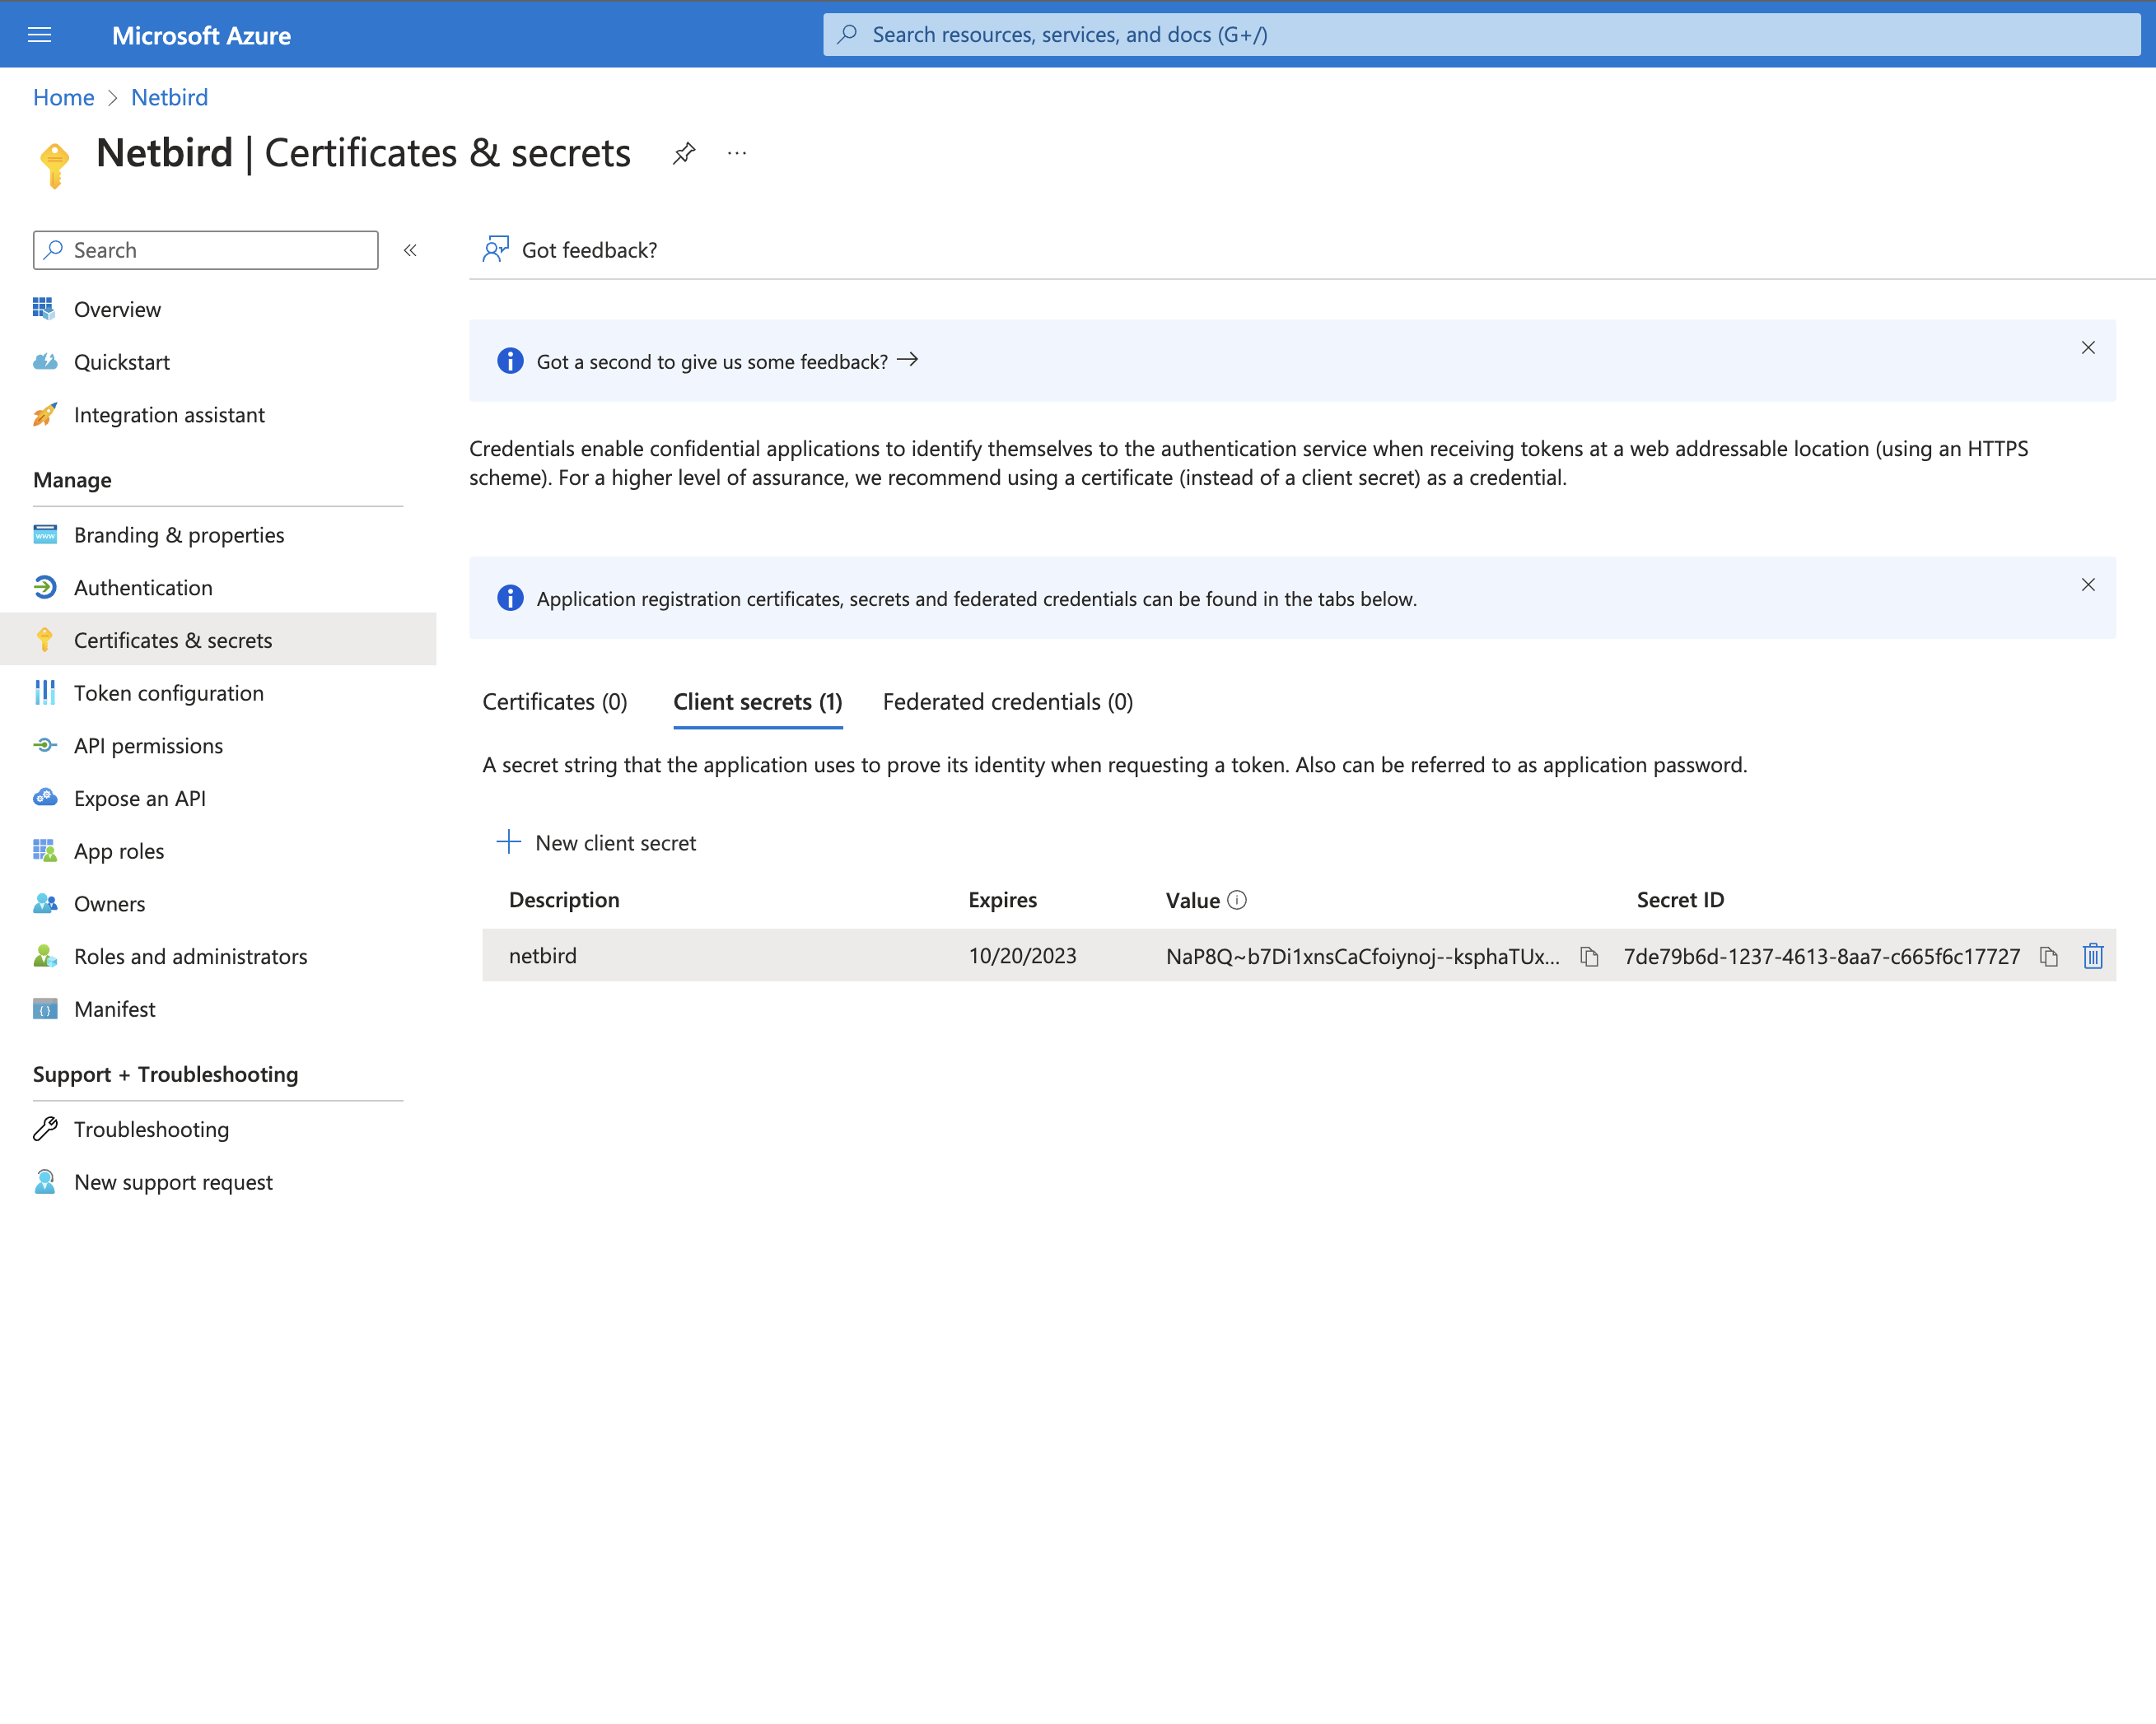
- Click Certificates & secrets on the left menu
- Click New client secret
- Fill in:
- Description:
Netbird
- Description:
- Click Add
- Copy the Value immediately
- Click Overview and note:
- Application (client) ID
- Object ID
- Directory (tenant) ID
Step 7: Configure NetBird
Your authority OIDC configuration will be available at:
https://login.microsoftonline.com/<Directory (tenant) ID>/v2.0/.well-known/openid-configuration
Double-check if the endpoint returns a JSON response by calling it from your browser.
Set properties in the setup.env file:
NETBIRD_DOMAIN="<YOUR_DOMAIN>"
NETBIRD_AUTH_OIDC_CONFIGURATION_ENDPOINT="https://login.microsoftonline.com/<Directory (tenant) ID>/v2.0/.well-known/openid-configuration"
NETBIRD_USE_AUTH0=false
NETBIRD_AUTH_CLIENT_ID="<Application (client) ID>"
NETBIRD_AUTH_SUPPORTED_SCOPES="openid profile email offline_access User.Read api://<Application (client) ID>/api"
NETBIRD_AUTH_AUDIENCE="<Application (client) ID>"
NETBIRD_AUTH_REDIRECT_URI="/auth"
NETBIRD_AUTH_SILENT_REDIRECT_URI="/silent-auth"
NETBIRD_AUTH_USER_ID_CLAIM="oid"
NETBIRD_TOKEN_SOURCE="idToken"

NETBIRD_AUTH_DEVICE_AUTH_PROVIDER="none"

NETBIRD_MGMT_IDP="azure"
NETBIRD_IDP_MGMT_CLIENT_ID="<Application (client) ID>"
NETBIRD_IDP_MGMT_CLIENT_SECRET="<CLIENT_SECRET>"
NETBIRD_IDP_MGMT_EXTRA_OBJECT_ID="<Object ID>"
NETBIRD_IDP_MGMT_EXTRA_GRAPH_API_ENDPOINT="https://graph.microsoft.com/v1.0"
Step 8: Continue with NetBird Setup
You've configured all required resources in Azure AD. Continue with the NetBird Self-hosting Guide.
Troubleshooting
"AADSTS50011: The redirect URI specified in the request does not match"
- Ensure the redirect URI in Azure exactly matches what NetBird provides
- Check platform type (SPA vs Mobile/Desktop)
- Verify no trailing slashes
"AADSTS700016: Application not found"
- Verify the Application (client) ID is correct
- Check tenant ID for single-tenant apps
- Ensure the app registration is in the correct directory
Users from wrong tenant signing in
- Use single-tenant configuration for organization-only access
- Verify "Supported account types" setting in app registration
Token validation errors
- Ensure
requestedAccessTokenVersionis set to2in the manifest - Verify all scopes are properly configured
- Check that admin consent was granted
NetBird includes built-in local user management powered by an embedded IdP, allowing you to create and manage users directly without requiring an external identity provider. You can also add multiple external identity providers alongside local users, giving users multiple login options.
We highly recommend using the simpler setup that adds Microsoft as an external IdP directly in the NetBird Management Dashboard. This approach requires minimal configuration, works alongside local users, and doesn't require replacing your embedded IdP. See the Management Setup (Recommended) section in the main Microsoft Entra ID documentation.