Local User Management
Updated
NetBird's Management service includes built-in user management, allowing you to create and manage local users directly without requiring an external identity provider. This functionality is powered by an embedded Dex server.
Starting with version 0.62, NetBird no longer requires an external identity provider. The Management service now supports creating and managing local users directly, so you can get started without setting up Zitadel, Keycloak, or any other IdP.
With local user management, you can:
- Create local users directly from the NetBird Dashboard
- Add external identity providers (Google, Microsoft, Okta, etc.) through the Dashboard UI
- Configure multiple IdPs simultaneously, users see all providers as login options
- Simplify your deployment with fewer containers and reduced resource requirements
- Get started faster with no additional IdP setup required
Local user management is powered by an embedded Dex server running within the NetBird Management service, requiring no additional containers or databases.
When to Use Local Users
Local user management is ideal for:
| Use Case | Why Local Users Work |
|---|---|
| Homelabs | Simple setup, minimal resources, no external dependencies |
| Small teams | Easy user management, quick onboarding |
| Proof of concept | Get started in minutes, upgrade path available |
| Air-gapped environments | No external service dependencies |
| Development/testing | Fast iteration, simple reset |
Consider a standalone external IdP if you need:
- SCIM user provisioning (Enterprise feature)
- Complex user lifecycle management
- Integration with existing enterprise SSO infrastructure
- Specific IdP features not available via OIDC connectors
Configuration
Enabling Embedded IdP
The embedded IdP is enabled by default when using the getting-started.sh quickstart script and requires no manual configuration.
Combined setup (config.yaml)
The embedded IdP is always enabled in the combined setup and cannot be disabled. The relevant settings in config.yaml are:
server:
  auth:
    issuer: "https://netbird.example.com/oauth2"
    localAuthDisabled: false
    signKeyRefreshEnabled: true
    dashboardRedirectURIs:
      - "https://netbird.example.com/nb-auth"
      - "https://netbird.example.com/nb-silent-auth"
    cliRedirectURIs:
      - "http://localhost:53000/"

  store:
    encryptionKey: "<auto-generated-key>"
For a full list of available configuration options, see the config.yaml.example reference file.
Older multi-container setup (management.json)
This section applies to deployments using the older multi-container architecture. If you deployed using getting-started.sh, you are on the combined setup and should use the config.yaml instructions above. See the migration guide to upgrade.
Update your management.json:
{
  "EmbeddedIdP": {
    "Enabled": true,
    "DataDir": "/var/lib/netbird/idp"
  },
  "EncryptionKey": "<auto-generated-base64-key>"
}
Or configure via environment variables on the management container:
environment:
  - NETBIRD_EMBEDDED_IDP_ENABLED=true
  - NETBIRD_EMBEDDED_IDP_DATA_DIR=/var/lib/netbird/idp
  - NETBIRD_ENCRYPTION_KEY=${ENCRYPTION_KEY}
Generating an Encryption Key
If you need to generate an encryption key manually:
openssl rand -base64 32
Store your encryption key securely. If lost, encrypted user data (emails, names) cannot be recovered. Include it in your backup procedures.
User Management
Inviting Users via Dashboard
You can invite users via a secure invite link, allowing them to set their own password.
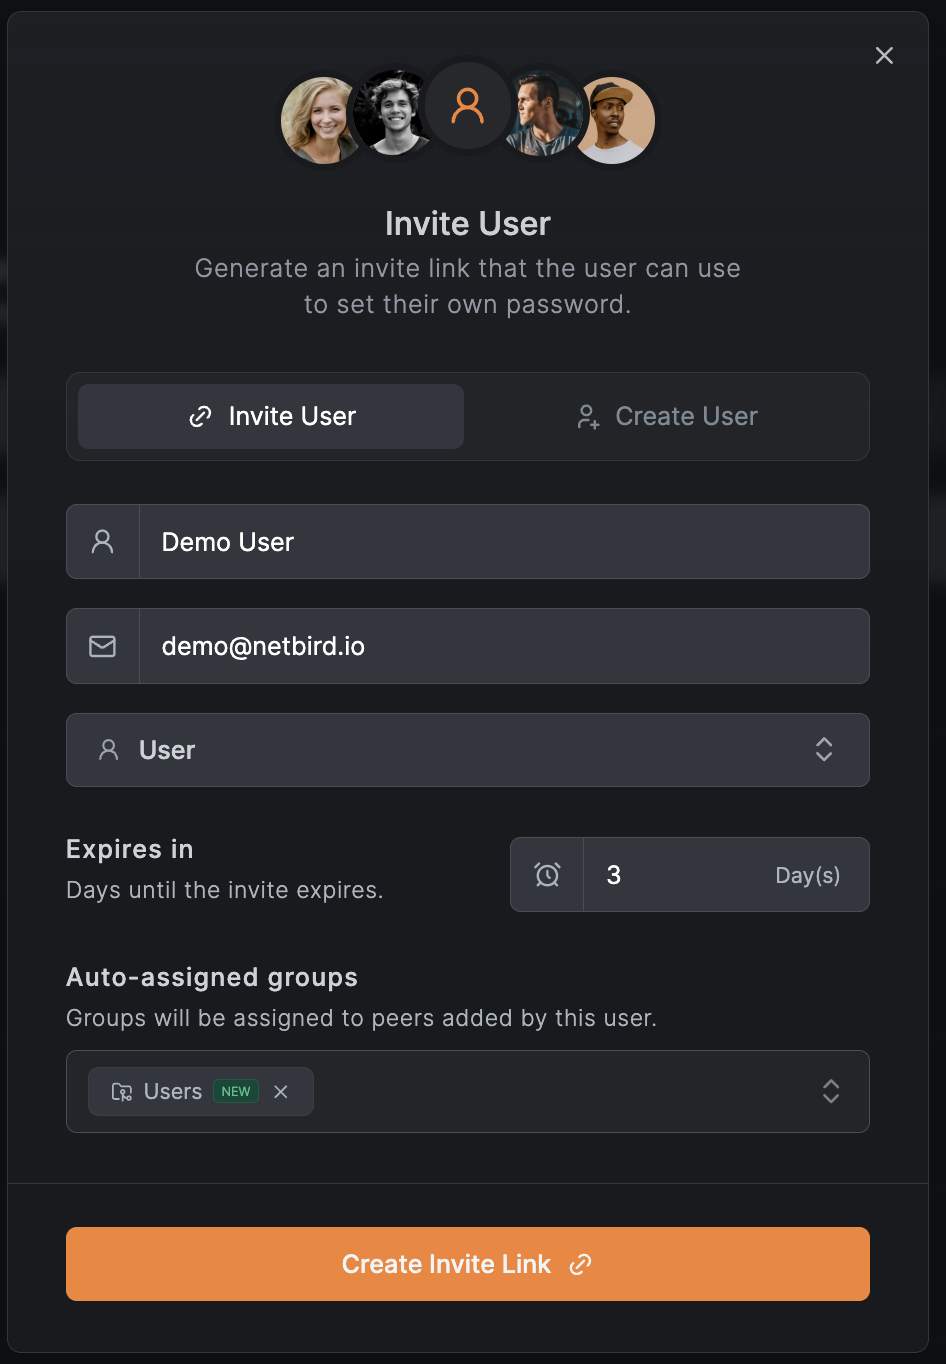
- Navigate to Team → Users
- Click Add User
- Select the Invite User tab
- Fill in the user details:
- Name (required) - Display name
- Email (required) - User's email address
- Role - User role (User, Admin, etc.)
- Expires in - Number of days until the invite link expires (default: 3 days)
- Auto-assigned groups (optional) - Groups to assign when the user joins
- Click Create Invite Link
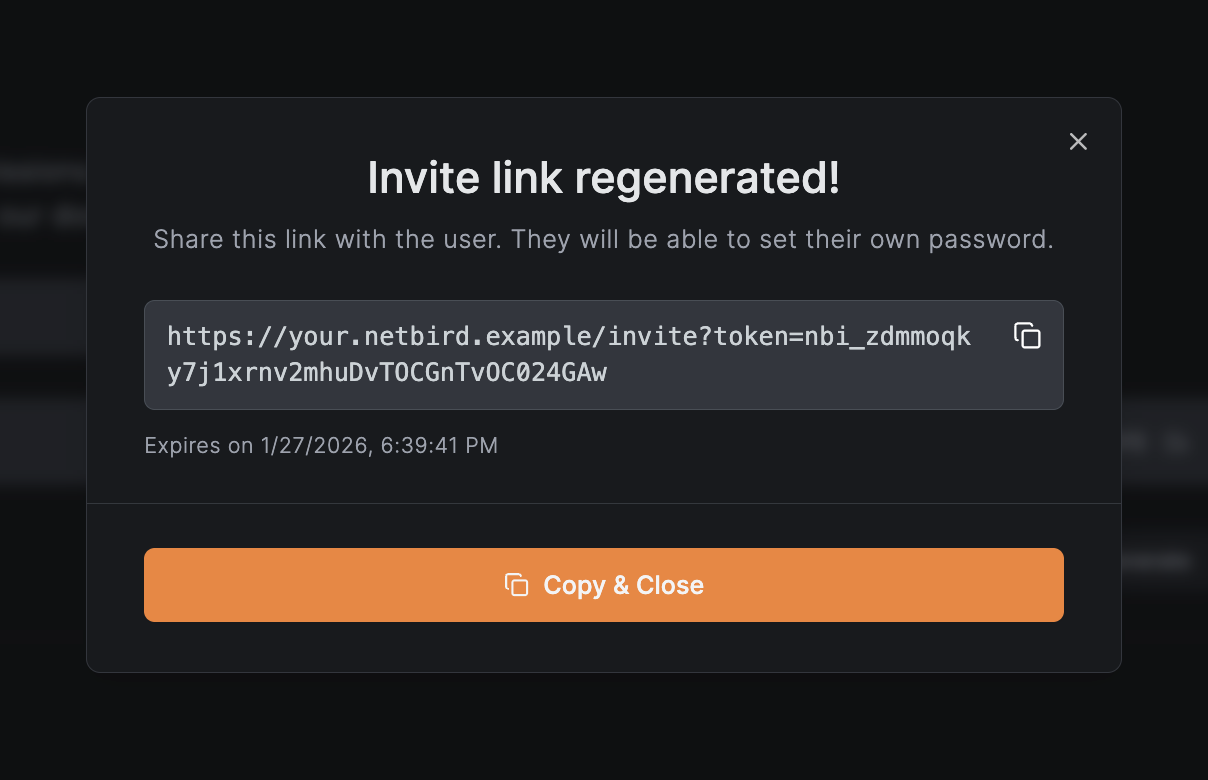
After creation, a modal displays:
- The invite link that you can share with the user
- The expiration date of the invite
- Copy & Close button to copy the link
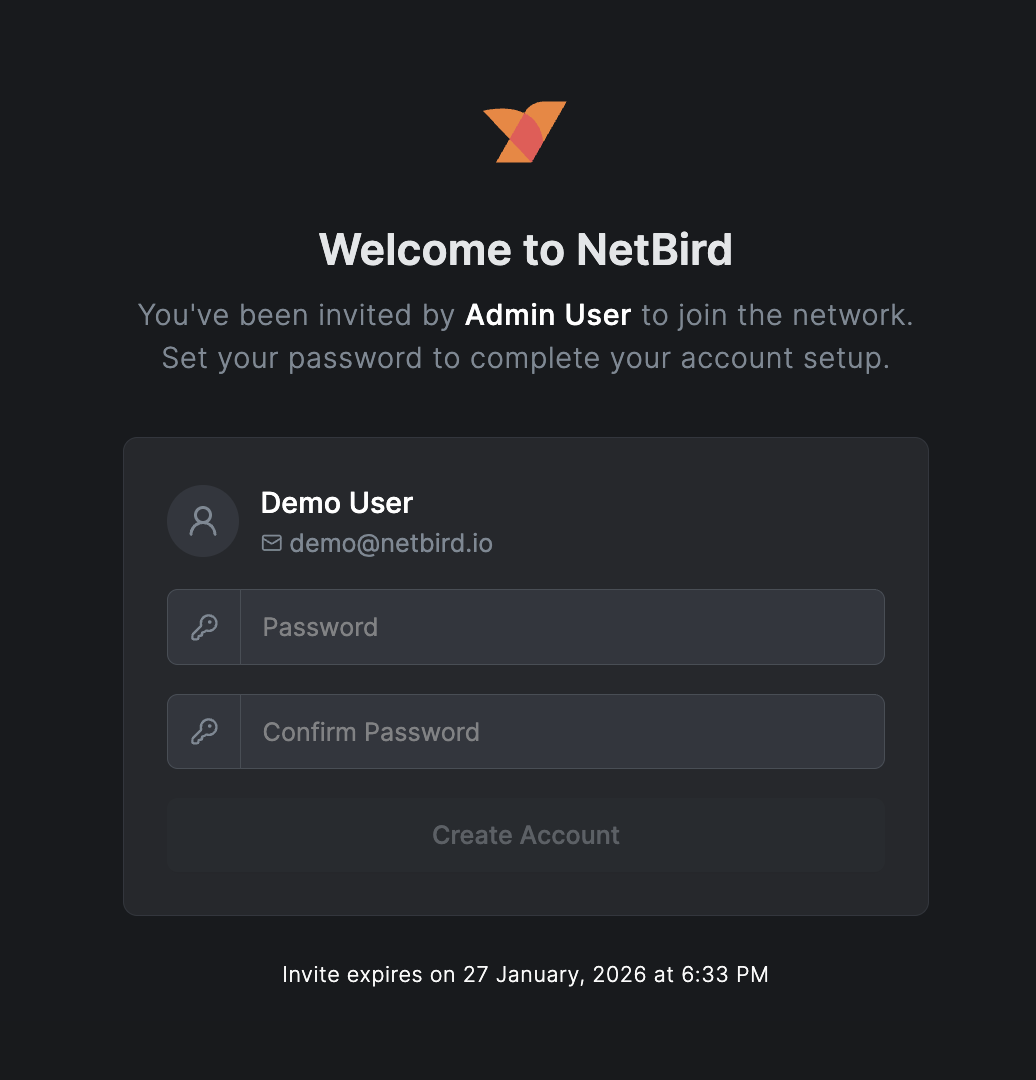
The invited user can then:
- Open the invite link in their browser
- Set their own password
- Log in to NetBird with their new credentials
Managing Pending Invites
To view and manage pending invites:
- Navigate to Team → Users
- Click Show Invites to switch to the invites view
From the invites view, you can:
- Regenerate an invite link if it has expired or needs to be resent
- Delete an invite to revoke access before it's accepted
When an invite link is regenerated, the previous link becomes invalid. Only the new link can be used to complete registration.
Creating Users via Dashboard
As an alternative to inviting users, you can create users with a generated password:
- Navigate to Team → Users
- Click Add User
- Select the Create User tab
- Fill in the user details:
- Email (required) - User's email address for login
- Name (required) - Display name
- Groups (optional) - Auto-assign to groups
- Click Create
After creation, a modal displays with:
- The generated password with a copy button
- Warning: "This password will only be shown once. Please copy it now."
- Copy & Close button to copy password and dismiss
The generated password is only shown once at creation time. It cannot be retrieved later. Make sure to copy it and share it securely with the user.
Inviting Users via API
curl -X POST "https://netbird.example.com/api/users/invites" \
  -H "Authorization: Bearer ${TOKEN}" \
  -H "Content-Type: application/json" \
  -d '{
    "email": "user@example.com",
    "name": "New User",
    "role": "user",
    "auto_groups": ["group-id-1"],
    "expires_in": 259200
  }'
The expires_in field specifies the invite validity period in seconds (e.g., 259200 = 3 days).
Response:
{
  "id": "invite-abc123",
  "email": "user@example.com",
  "name": "New User",
  "role": "user",
  "invite_link": "abc123-token-xyz",
  "invite_expires_at": "2024-01-10T12:00:00Z",
  "auto_groups": ["group-id-1"]
}
Construct the full invite URL by appending the token to your dashboard URL:
https://netbird.example.com/invite?token=abc123-token-xyz
Changing User Passwords
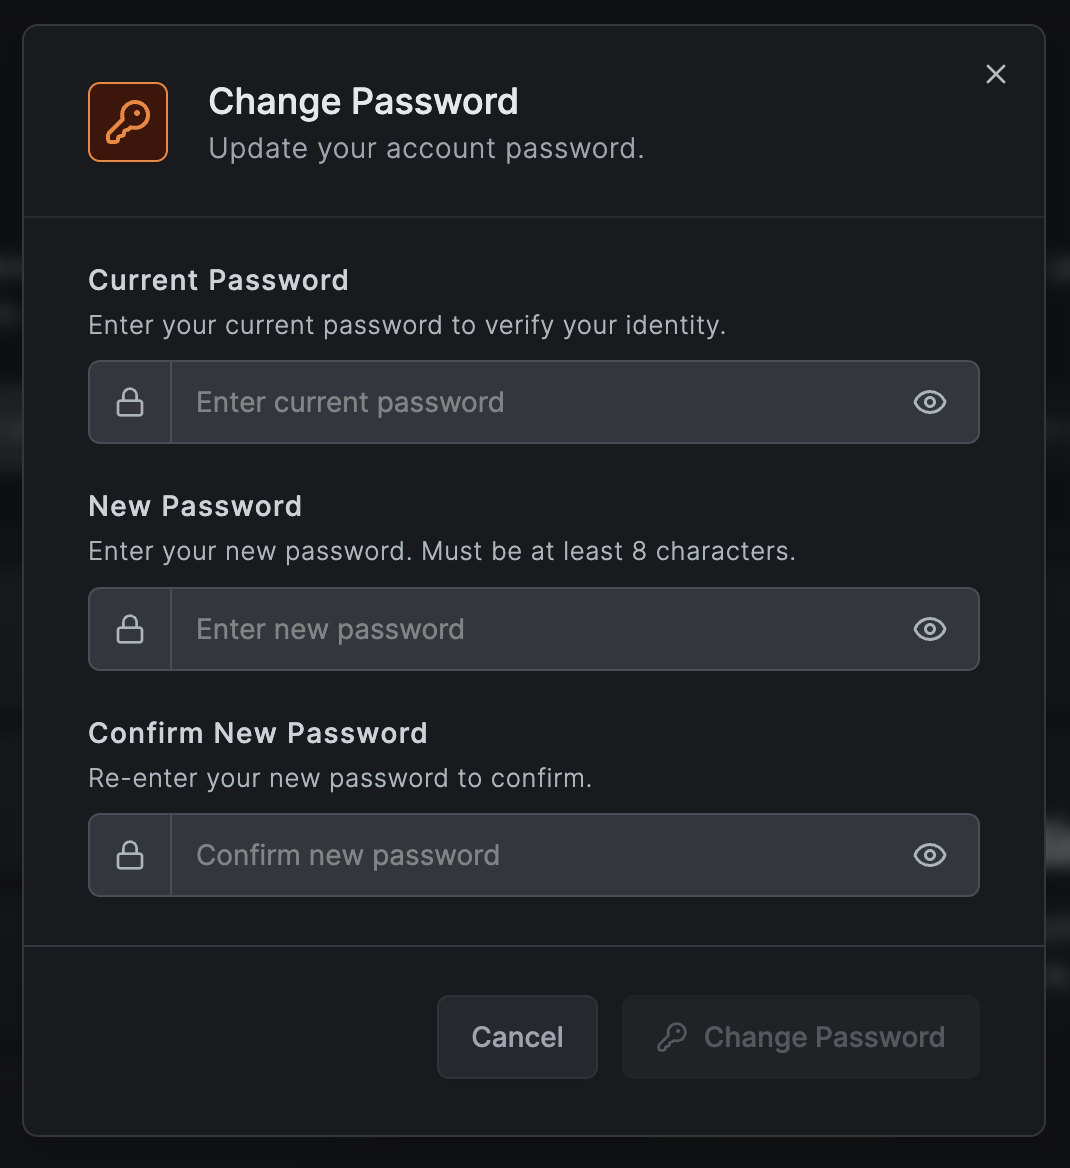
The Change Password feature allows local users on self-hosted NetBird deployments to update their account password directly from the dashboard.
This feature is available when:
- The deployment is self-hosted (not NetBird's hosted platform)
- The user authenticates via local authentication
Users authenticated through SSO/OIDC providers will not see this option.
How to Use:
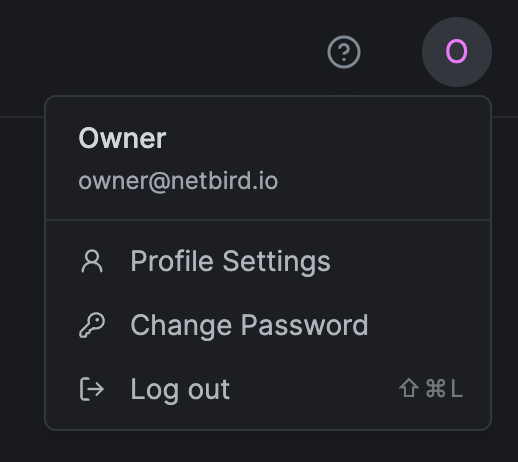
- Click your avatar in the top-right corner of the dashboard
- Select "Change Password" from the dropdown menu
- Enter your current password to verify your identity
- Enter your new password (minimum 8 characters)
- Confirm your new password
- Click "Change Password" or press Enter
Password Requirements
- Minimum length: eight characters
- New password and confirmation must match
User IdP Badges
In the Users table, each user shows a badge indicating their identity provider:
- Users created locally show no badge (or "Local" badge)
- Users who authenticated via an external connector show that provider's icon (Google, Microsoft, etc.)
- The badge links to the
idp_idfield in the user record
Creating Users via API
curl -X POST "https://netbird.example.com/api/users" \
  -H "Authorization: Bearer ${TOKEN}" \
  -H "Content-Type: application/json" \
  -d '{
    "email": "user@example.com",
    "name": "New User",
    "auto_groups": ["group-id-1"]
  }'
Response includes the generated password:
{
  "id": "user-abc123",
  "email": "user@example.com",
  "name": "New User",
  "role": "user",
  "status": "active",
  "password": "generated-password-here"
}
The password field is only included when creating users with embedded IdP. Store it immediately—it won't be returned in subsequent API calls.
User Roles
Users created through the embedded IdP can be assigned roles:
| Role | Permissions |
|---|---|
| Owner | Full administrative access, cannot be demoted |
| Admin | Manage users, peers, policies, and settings |
| User | Connect devices, view assigned resources |
Instance Setup (First Run)
When NetBird starts with the embedded IdP and no existing accounts, the Dashboard redirects to the /setup route and displays the Instance Setup Wizard:
- The Dashboard checks
GET /instanceforsetup_required: true - If setup is required, users are redirected to
/setup - The wizard collects:
- Email address (required)
- Password (required, minimum 8 characters)
- Name (optional)
- On submit, the owner account is created via
POST /instance/setup - User is redirected to login with the credentials they just created
The /setup route is unauthenticated and only accessible when setup_required is true. Once setup is complete, accessing /setup returns a 412 error and redirects to login.
Setup API
For automated deployments, you can complete setup via API:
# Check if setup is required
curl "https://netbird.example.com/api/instance"

# Response when setup is needed:
{
  "setup_required": true
}

# Complete setup
curl -X POST "https://netbird.example.com/api/setup" \
  -H "Content-Type: application/json" \
  -d '{
    "email": "admin@example.com",
    "password": "securepassword123",
    "name": "Admin User"
  }'

# Response:
{
  "user_id": "user-abc123",
  "account_id": "account-xyz789"
}
Data Encryption
The embedded IdP encrypts sensitive user data at rest:
| Field | Encryption |
|---|---|
| AES-256-GCM | |
| Name | AES-256-GCM |
| Password | bcrypt hash (via Dex) |
The encryption key is configured in config.yaml (server.store.encryptionKey) or management.json (EncryptionKey) for older multi-container setups. It should be:
- Generated using a cryptographically secure random generator
- Stored securely (not in version control)
- Included in backup procedures
- Rotated according to your security policies
Security Considerations
Password Requirements
Default password requirements for local users:
- Minimum 8 characters
- No specific complexity requirements (consider your security policy)
Session Management
- JWT tokens are issued upon successful authentication
- Token expiration follows OIDC best practices
- Device authorization flow available for CLI clients
Audit Logging
User authentication events are logged in the activity log:
- Login attempts (successful and failed)
- User creation/deletion
- Connector configuration changes
Troubleshooting
"Embedded IdP not available" error
For the combined setup, the embedded IdP is always enabled. For older multi-container setups, ensure EmbeddedIdP.Enabled is true in management.json and restart the Management service.
Users can't log in
- Check server logs:
docker compose logs netbird-server(ordocker compose logs managementfor older multi-container setups) - Verify the encryption key hasn't changed
- Confirm the user exists: Check Team → Users in Dashboard
Disabling Embedded IdP
The embedded IdP cannot be disabled in the combined setup. If you want to use only external identity providers, you can disable local authentication instead and add your external IdP through the Dashboard UI.
Older multi-container setup (management.json)
To switch from embedded IdP to a standalone external IdP on the older multi-container setup:
-
Configure your external IdP following the Advanced guide
-
Update
management.json:{ "EmbeddedIdP": { "Enabled": false }, "HttpConfig": { "OIDCConfigEndpoint": "https://your-idp.example.com/.well-known/openid-configuration" } } -
Restart the Management service
-
Users will need to re-authenticate with the new IdP
Disabling the embedded IdP will invalidate all local user accounts. Ensure users have accounts in the external IdP before switching.