Keycloak SSO with NetBird Self-Hosted (Advanced)
Updated
Keycloak is an open-source Identity and Access Management solution maintained by Red Hat. It provides single sign-on, social login, user federation, fine-grained authorization, and supports OpenID Connect, OAuth 2.0, and SAML 2.0 protocols.
Standalone Setup (Advanced)
NetBird includes built-in local user management powered by an embedded IdP, allowing you to create and manage users directly without requiring an external identity provider. You can also add multiple external identity providers alongside local users, giving users multiple login options.
We highly recommend using the simpler setup that adds Keycloak as an external IdP directly in the NetBird Management Dashboard. This approach requires minimal configuration, works alongside local users, and doesn't require replacing your embedded IdP. See the Management Setup (Recommended) section in the main Keycloak documentation.
The standalone setup below replaces your embedded IdP entirely and is only recommended for experienced Keycloak administrators who need full control over authentication and user management.
Use Keycloak as your primary identity provider instead of NetBird's embedded IdP. This option gives you full control over authentication and user management, is recommended for experienced Keycloak administrators as it also requires additional setup and ongoing maintenance.
For most deployments, the embedded IdP is the simpler choice — it's built into NetBird, fully integrated, and requires minimal configuration to get started. For this implementation, go back up to the Management Setup (Recommended) section above.
If you prefer not to self-host an Identity and Access Management solution, you could use a managed alternative like Auth0.
Expected Result
After completing this guide, you can log in to your self-hosted NetBird Dashboard and add machines to your network using the Interactive SSO Login feature over Keycloak.
Prerequisites
- Keycloak instance running with SSL
- Docker and Docker Compose for NetBird
Step 1: Check Your Keycloak Instance
Ensure your Keycloak instance is available at https://YOUR-KEYCLOAK-HOST-AND-PORT with SSL enabled.
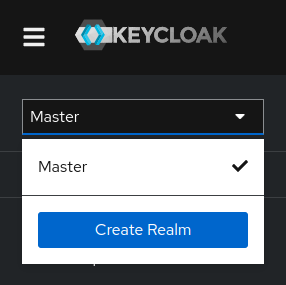
Step 2: Create a Realm
- Open the Keycloak Admin Console
- Hover over the dropdown in the top-left corner where it says
Master - Click Create Realm
- Fill in:
- Realm name:
netbird
- Realm name:
- Click Create
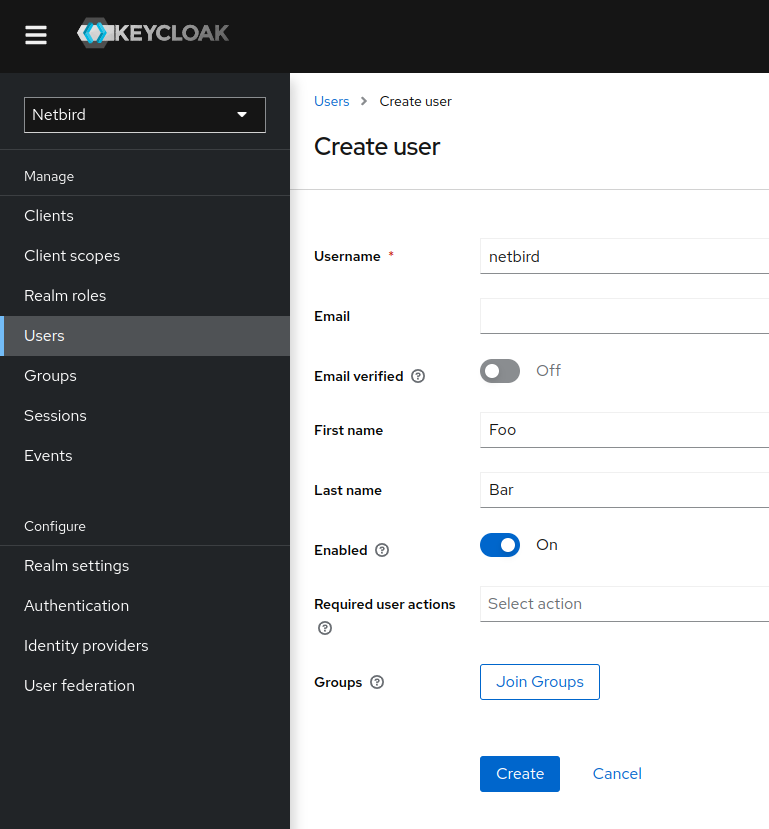
Step 3: Create a User
- Make sure the selected realm is
netbird - Click Users (left-hand menu)
- Click Create new user
- Fill in:
- Username:
netbird
- Username:
- Click Create
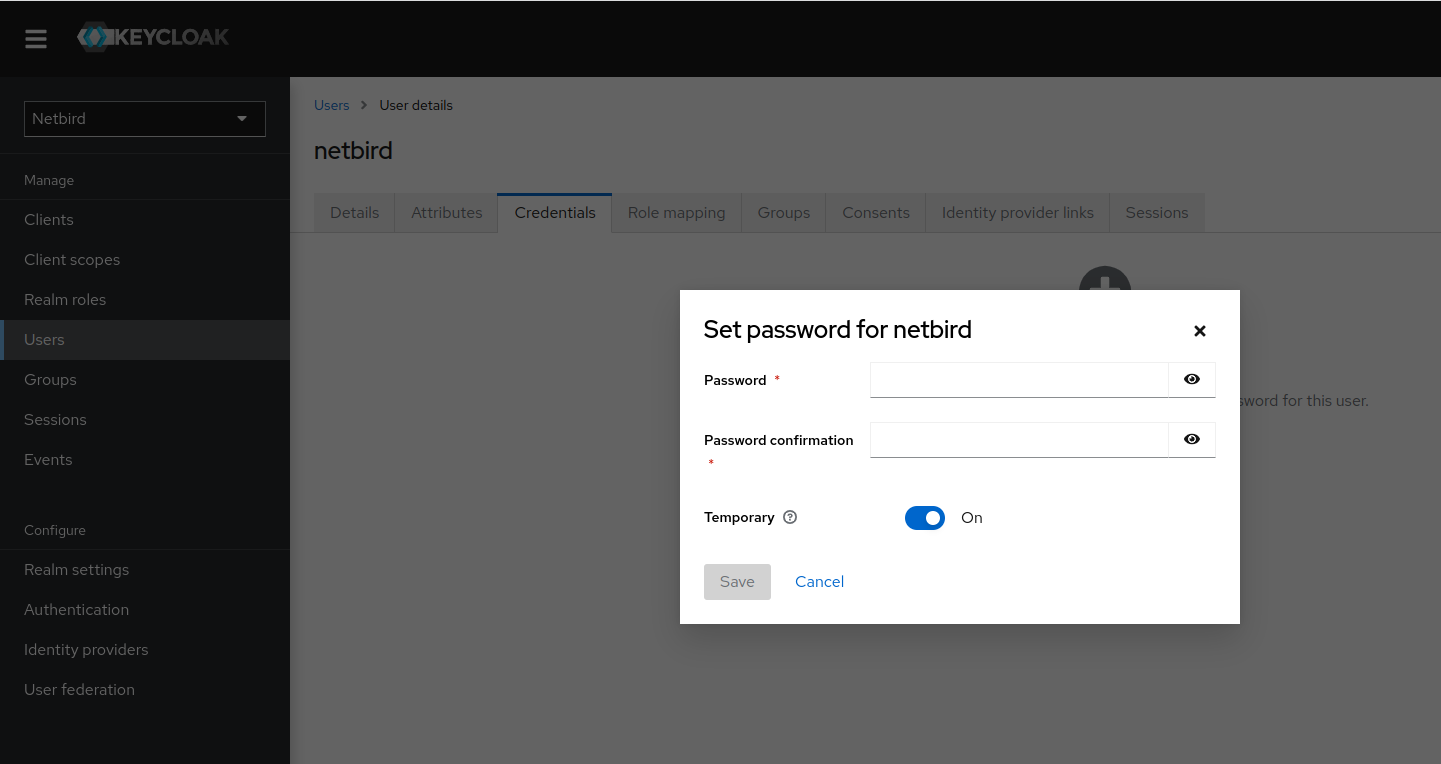
- Click Credentials tab
- Click Set password
- Fill in the password and set Temporary to
Off - Click Save
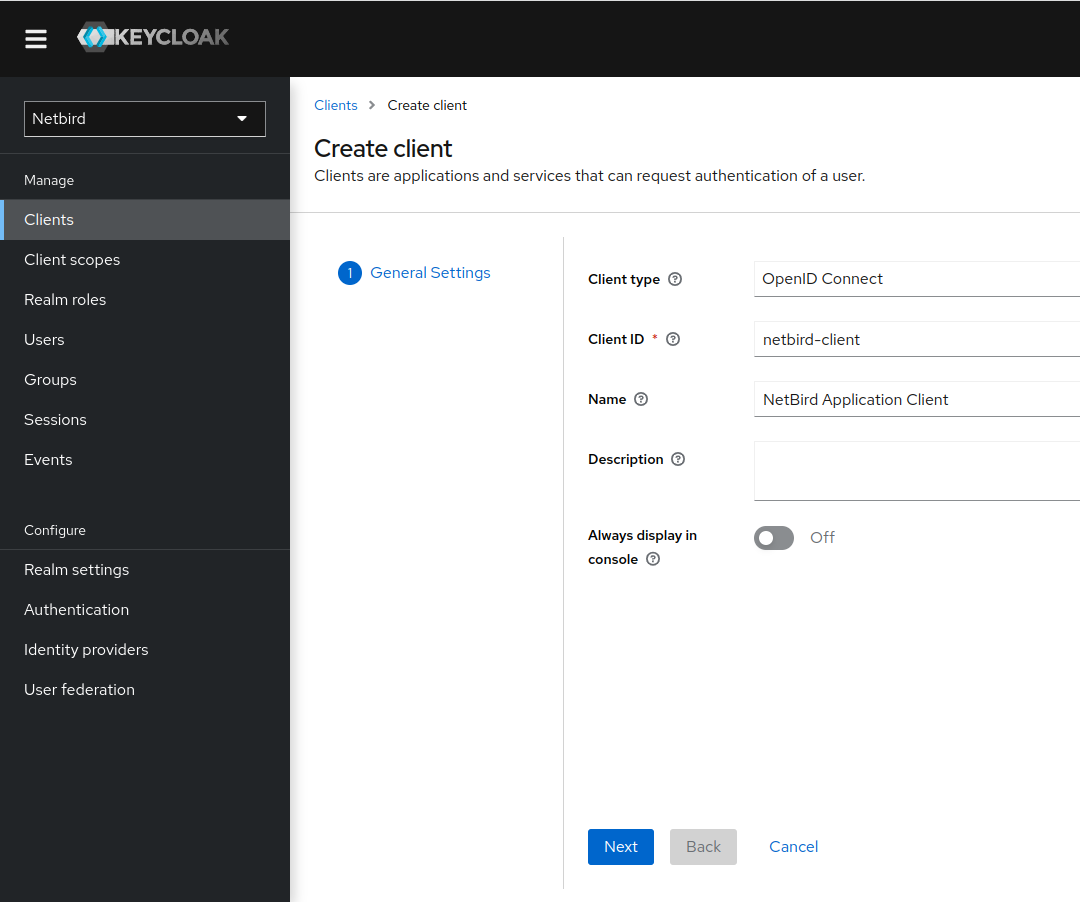
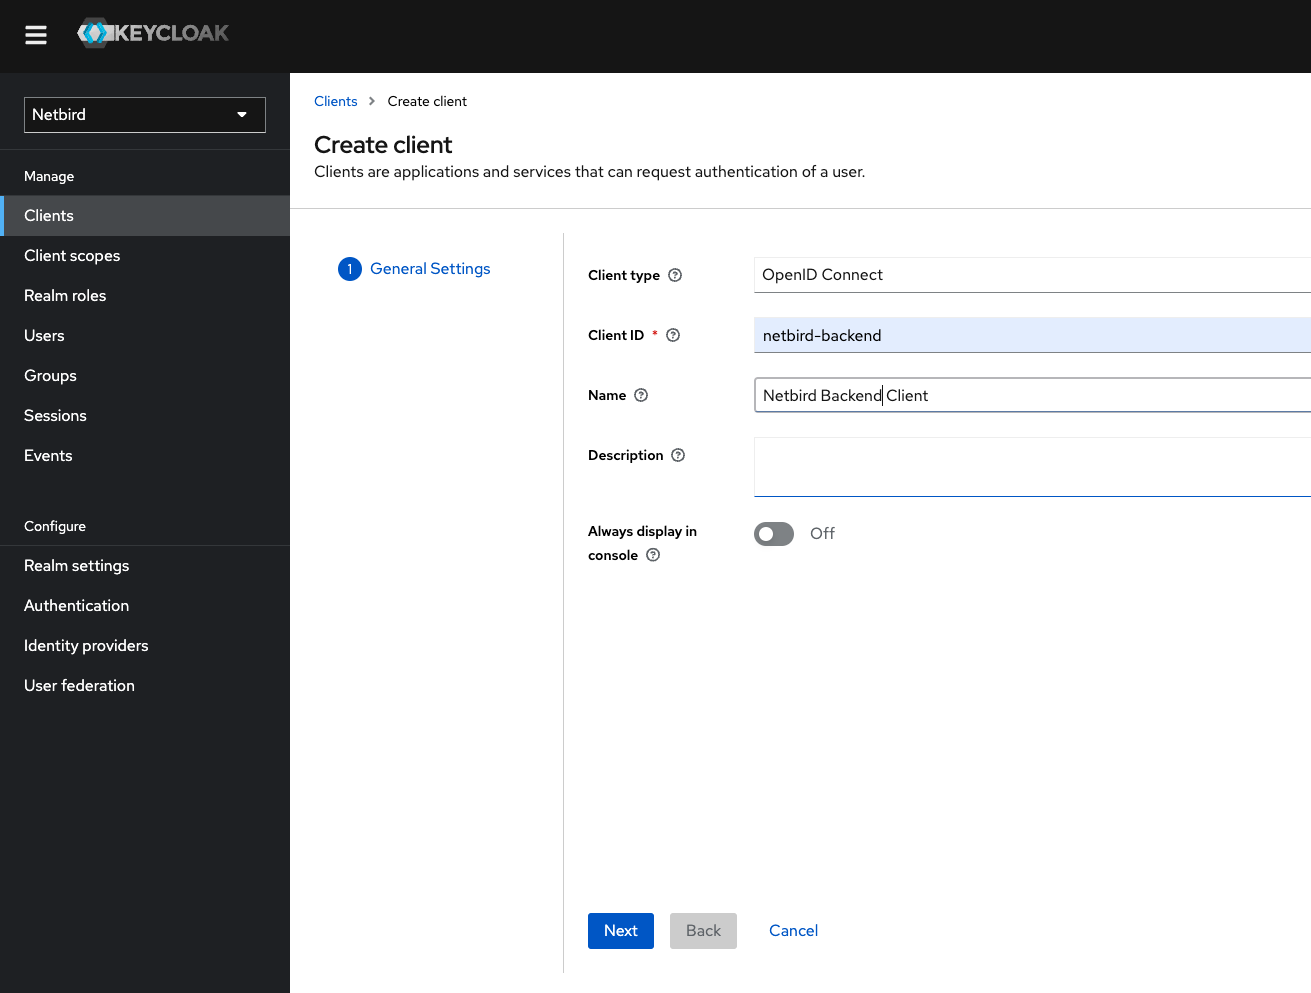
Step 4: Create NetBird Client
- Click Clients → Create client
- Fill in:
- Client Type:
OpenID Connect - Client ID:
netbird-client
- Client Type:
- Click Next
- Enable the authentication options as shown:
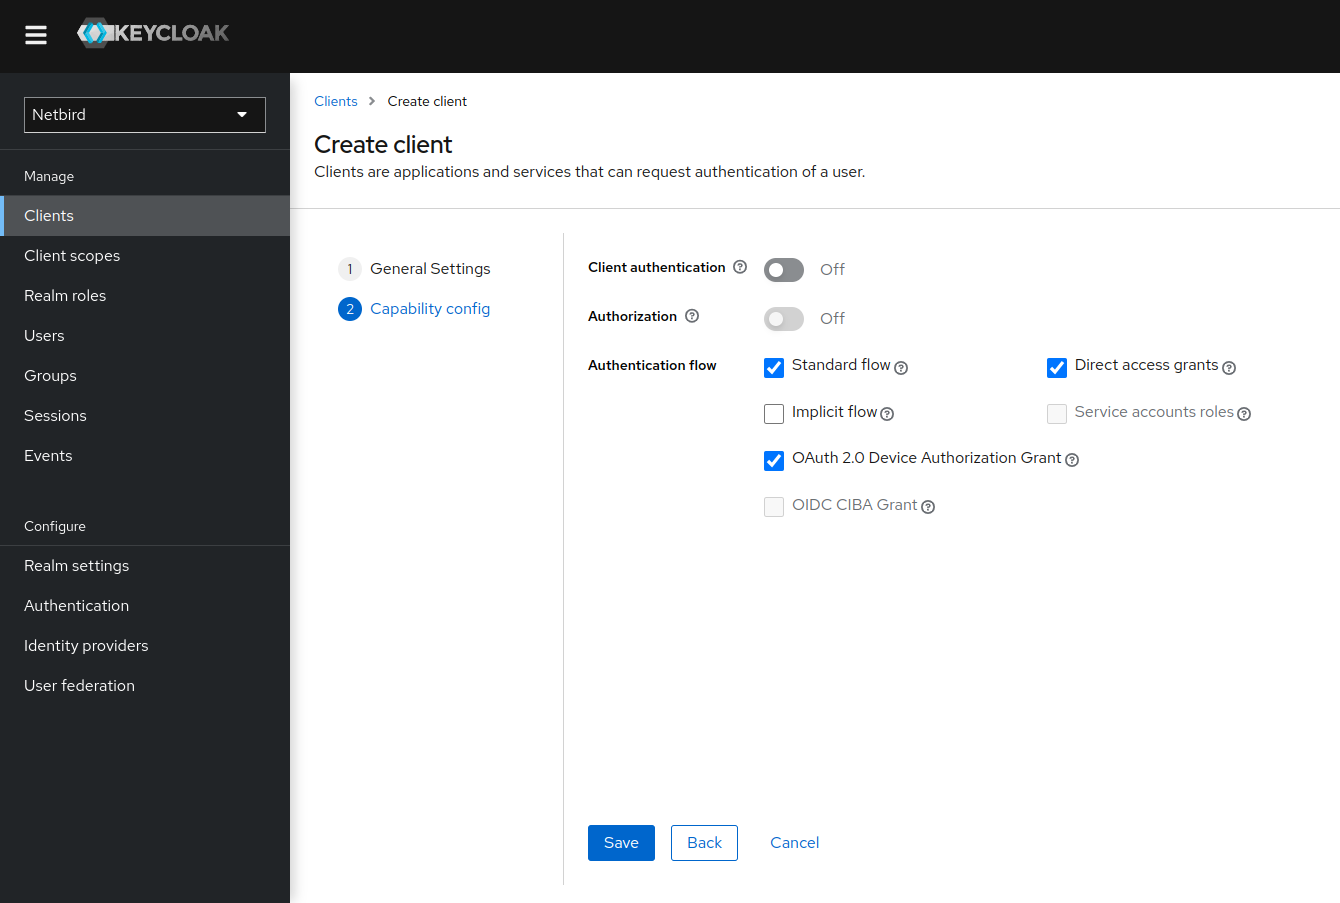
- Click Save
Step 5: Configure Client Access Settings
- Go to Clients → netbird-client
- In Access Settings, fill in:
- Root URL:
https://YOUR_DOMAIN/ - Valid redirect URIs:
https://YOUR_DOMAIN/*andhttp://localhost:53000 - Valid post logout redirect URIs:
https://YOUR_DOMAIN/* - Web origins:
+
- Root URL:
- Click Save

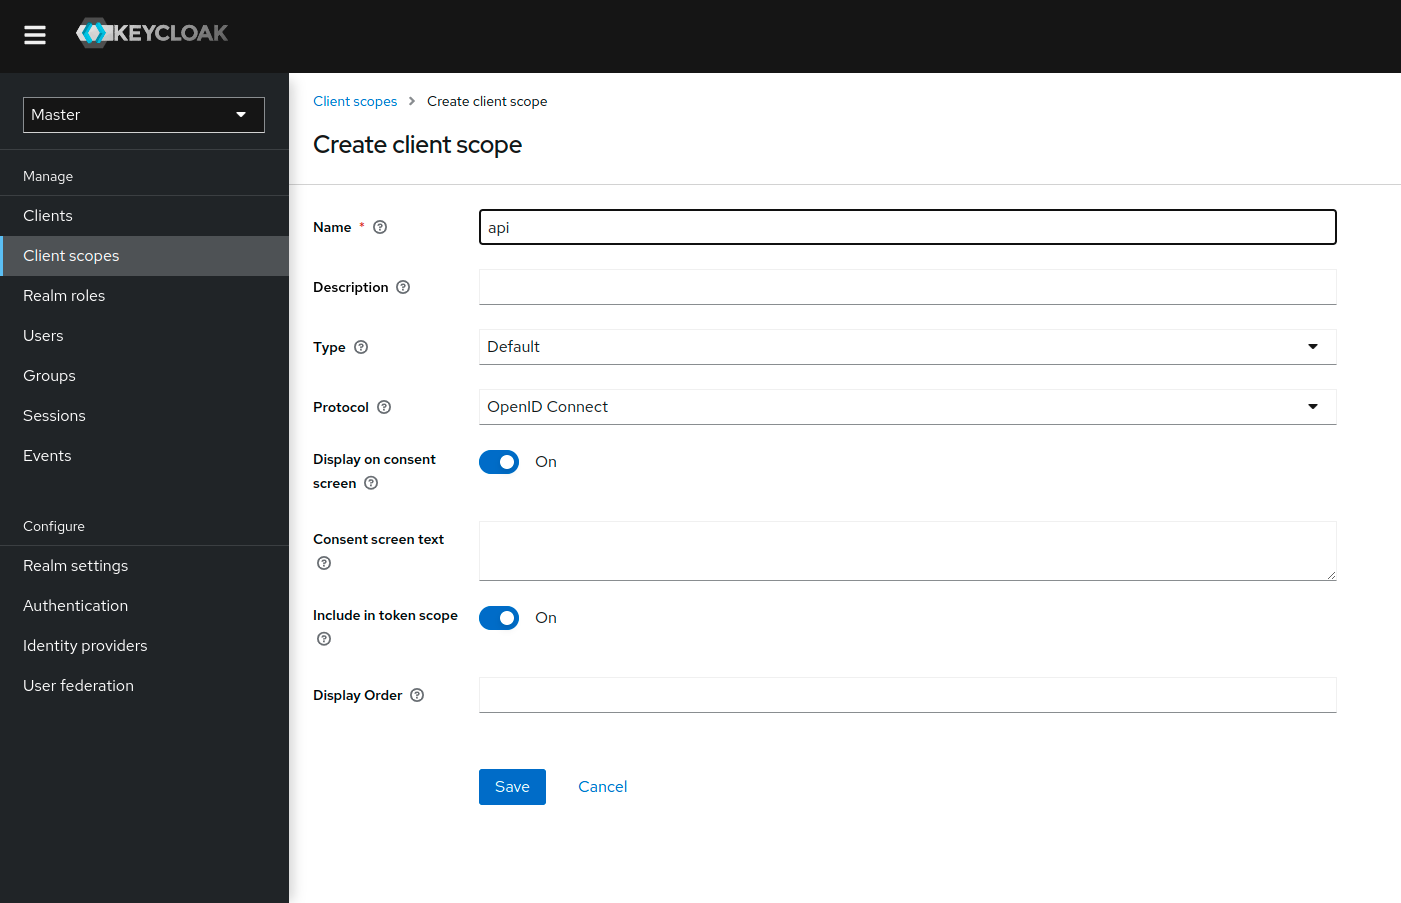
Step 6: Create Client Scope
- Click Client scopes (left-hand menu)
- Click Create client scope
- Fill in:
- Name:
api - Type:
Default - Protocol:
OpenID Connect
- Name:
- Click Save
- Switch to the Mappers tab
- Click Configure a new mapper
- Choose Audience mapping
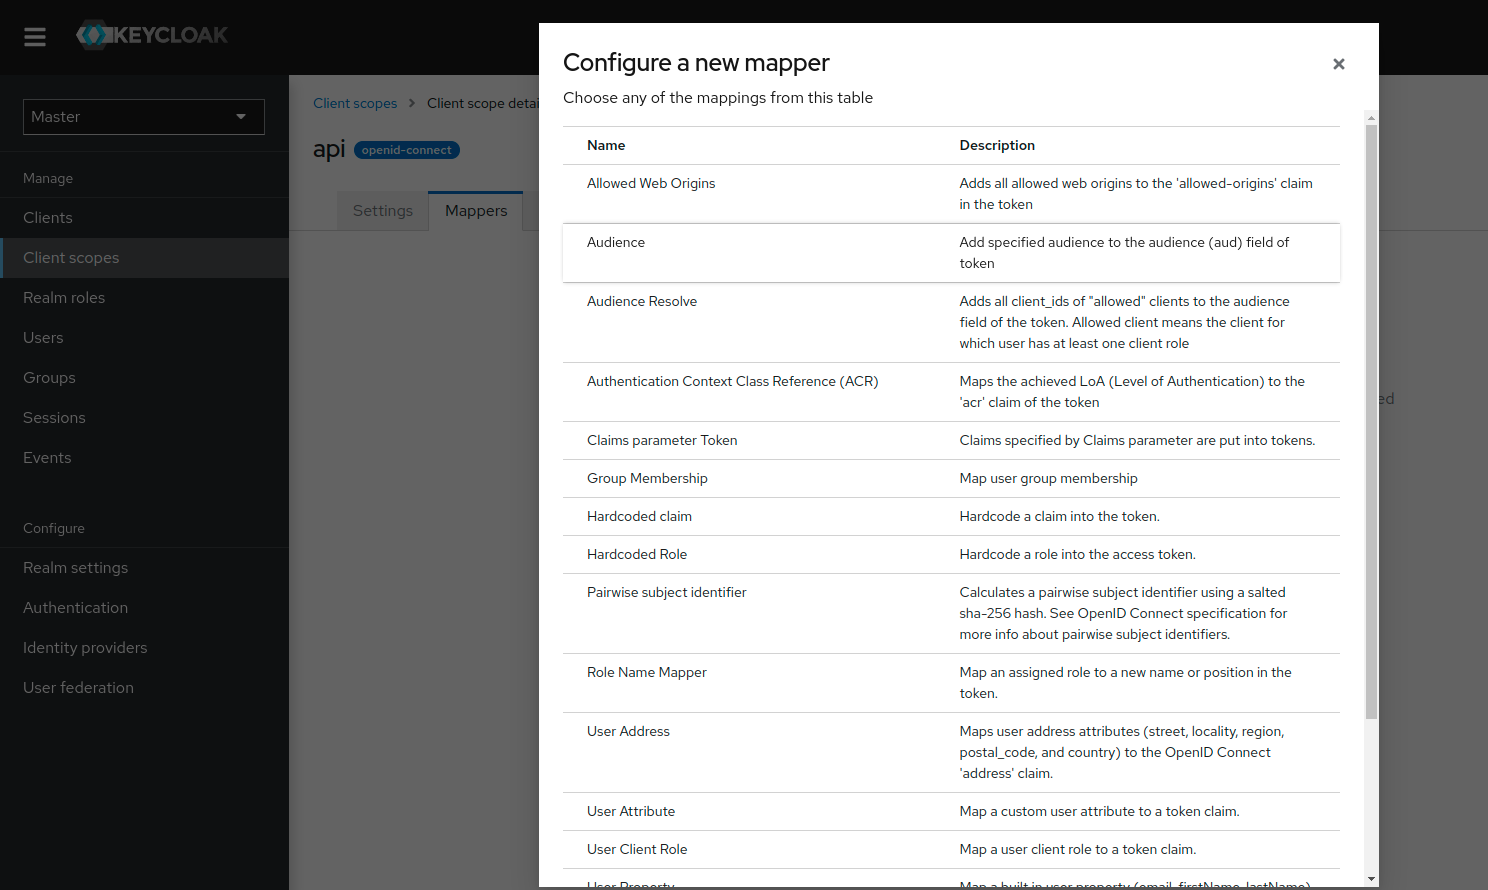
- Fill in:
- Name:
Audience for NetBird Management API - Included Client Audience:
netbird-client - Add to access token:
On
- Name:
- Click Save

Step 7: Add Client Scope to NetBird Client
- Go to Clients → netbird-client
- Switch to Client scopes tab
- Click Add client scope
- Choose
api - Click Add choosing
Default

Step 8: Create NetBird-Backend Client
- Click Clients → Create client
- Fill in:
- Client Type:
OpenID Connect - Client ID:
netbird-backend
- Client Type:
- Click Next
- Enable authentication as shown:
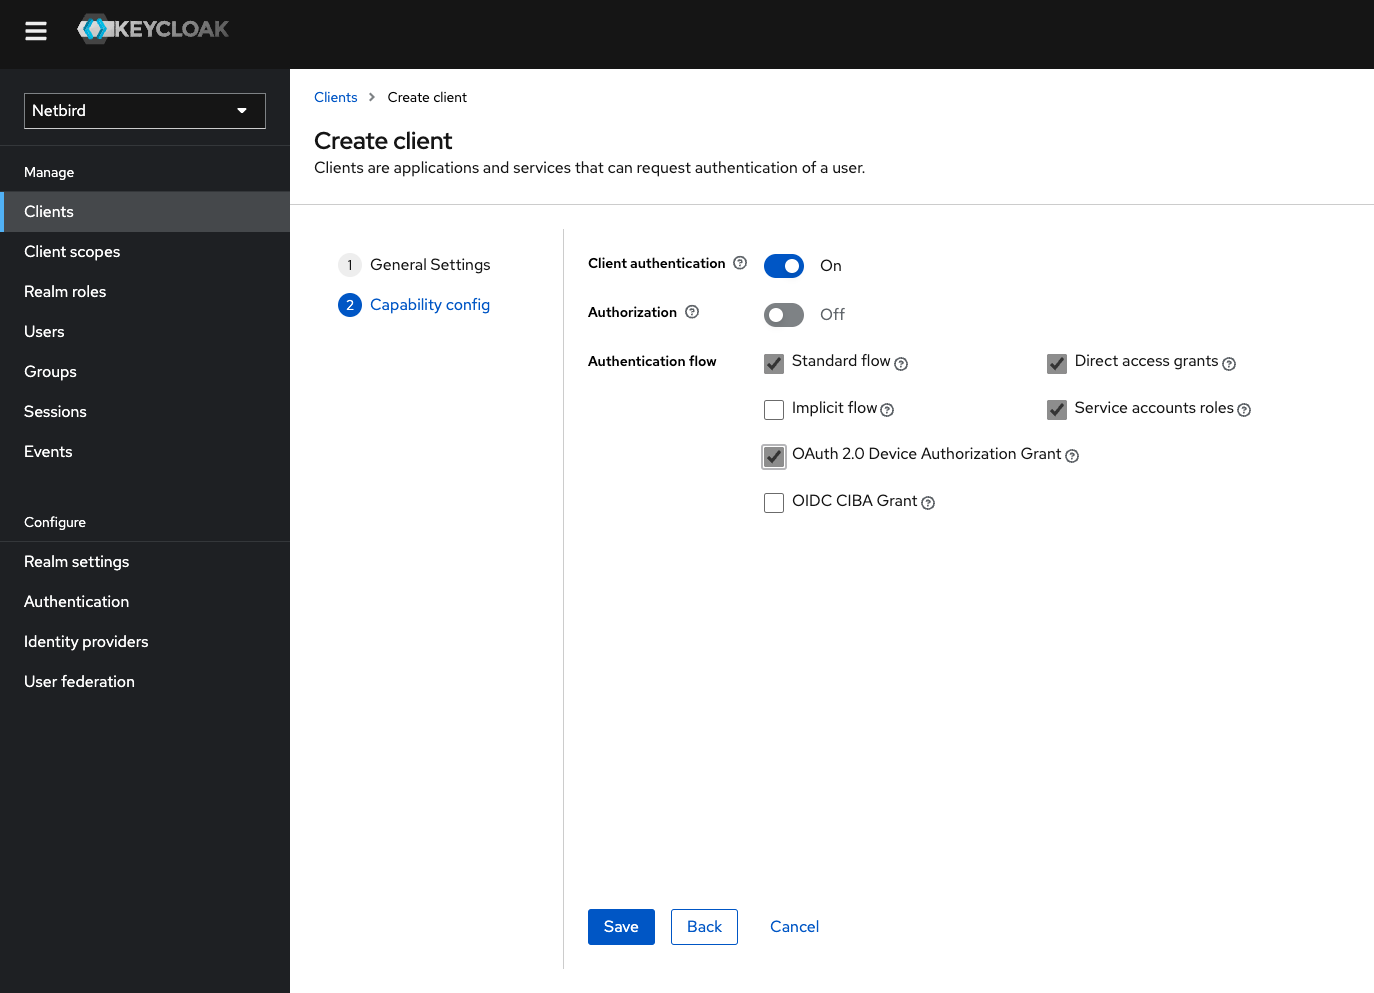
- Click Save
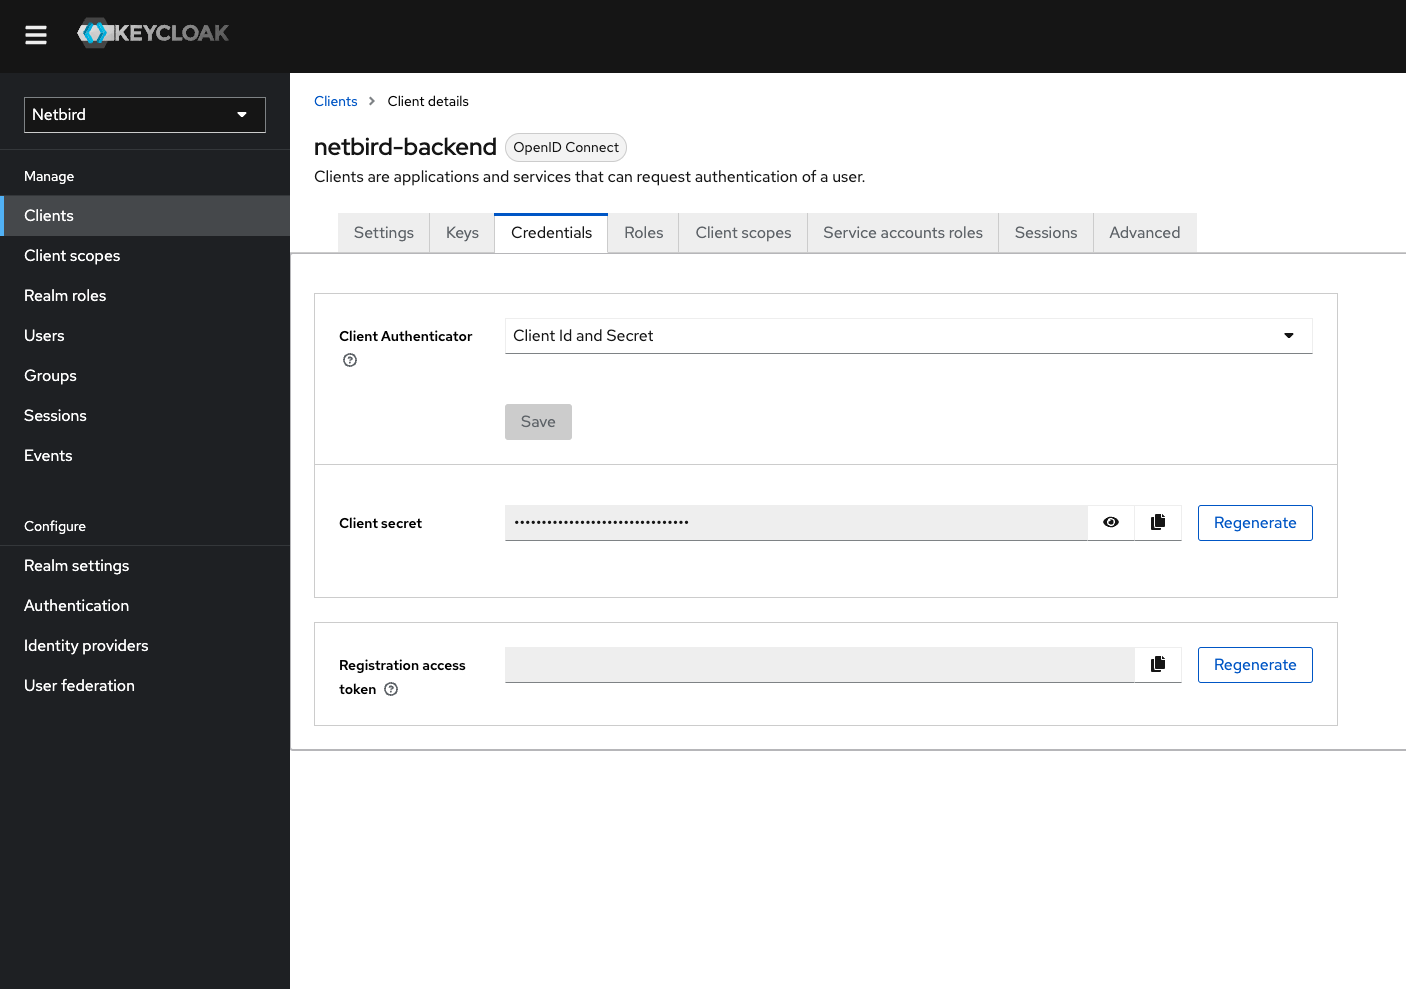
- Go to Credentials tab
- Copy the Client secret
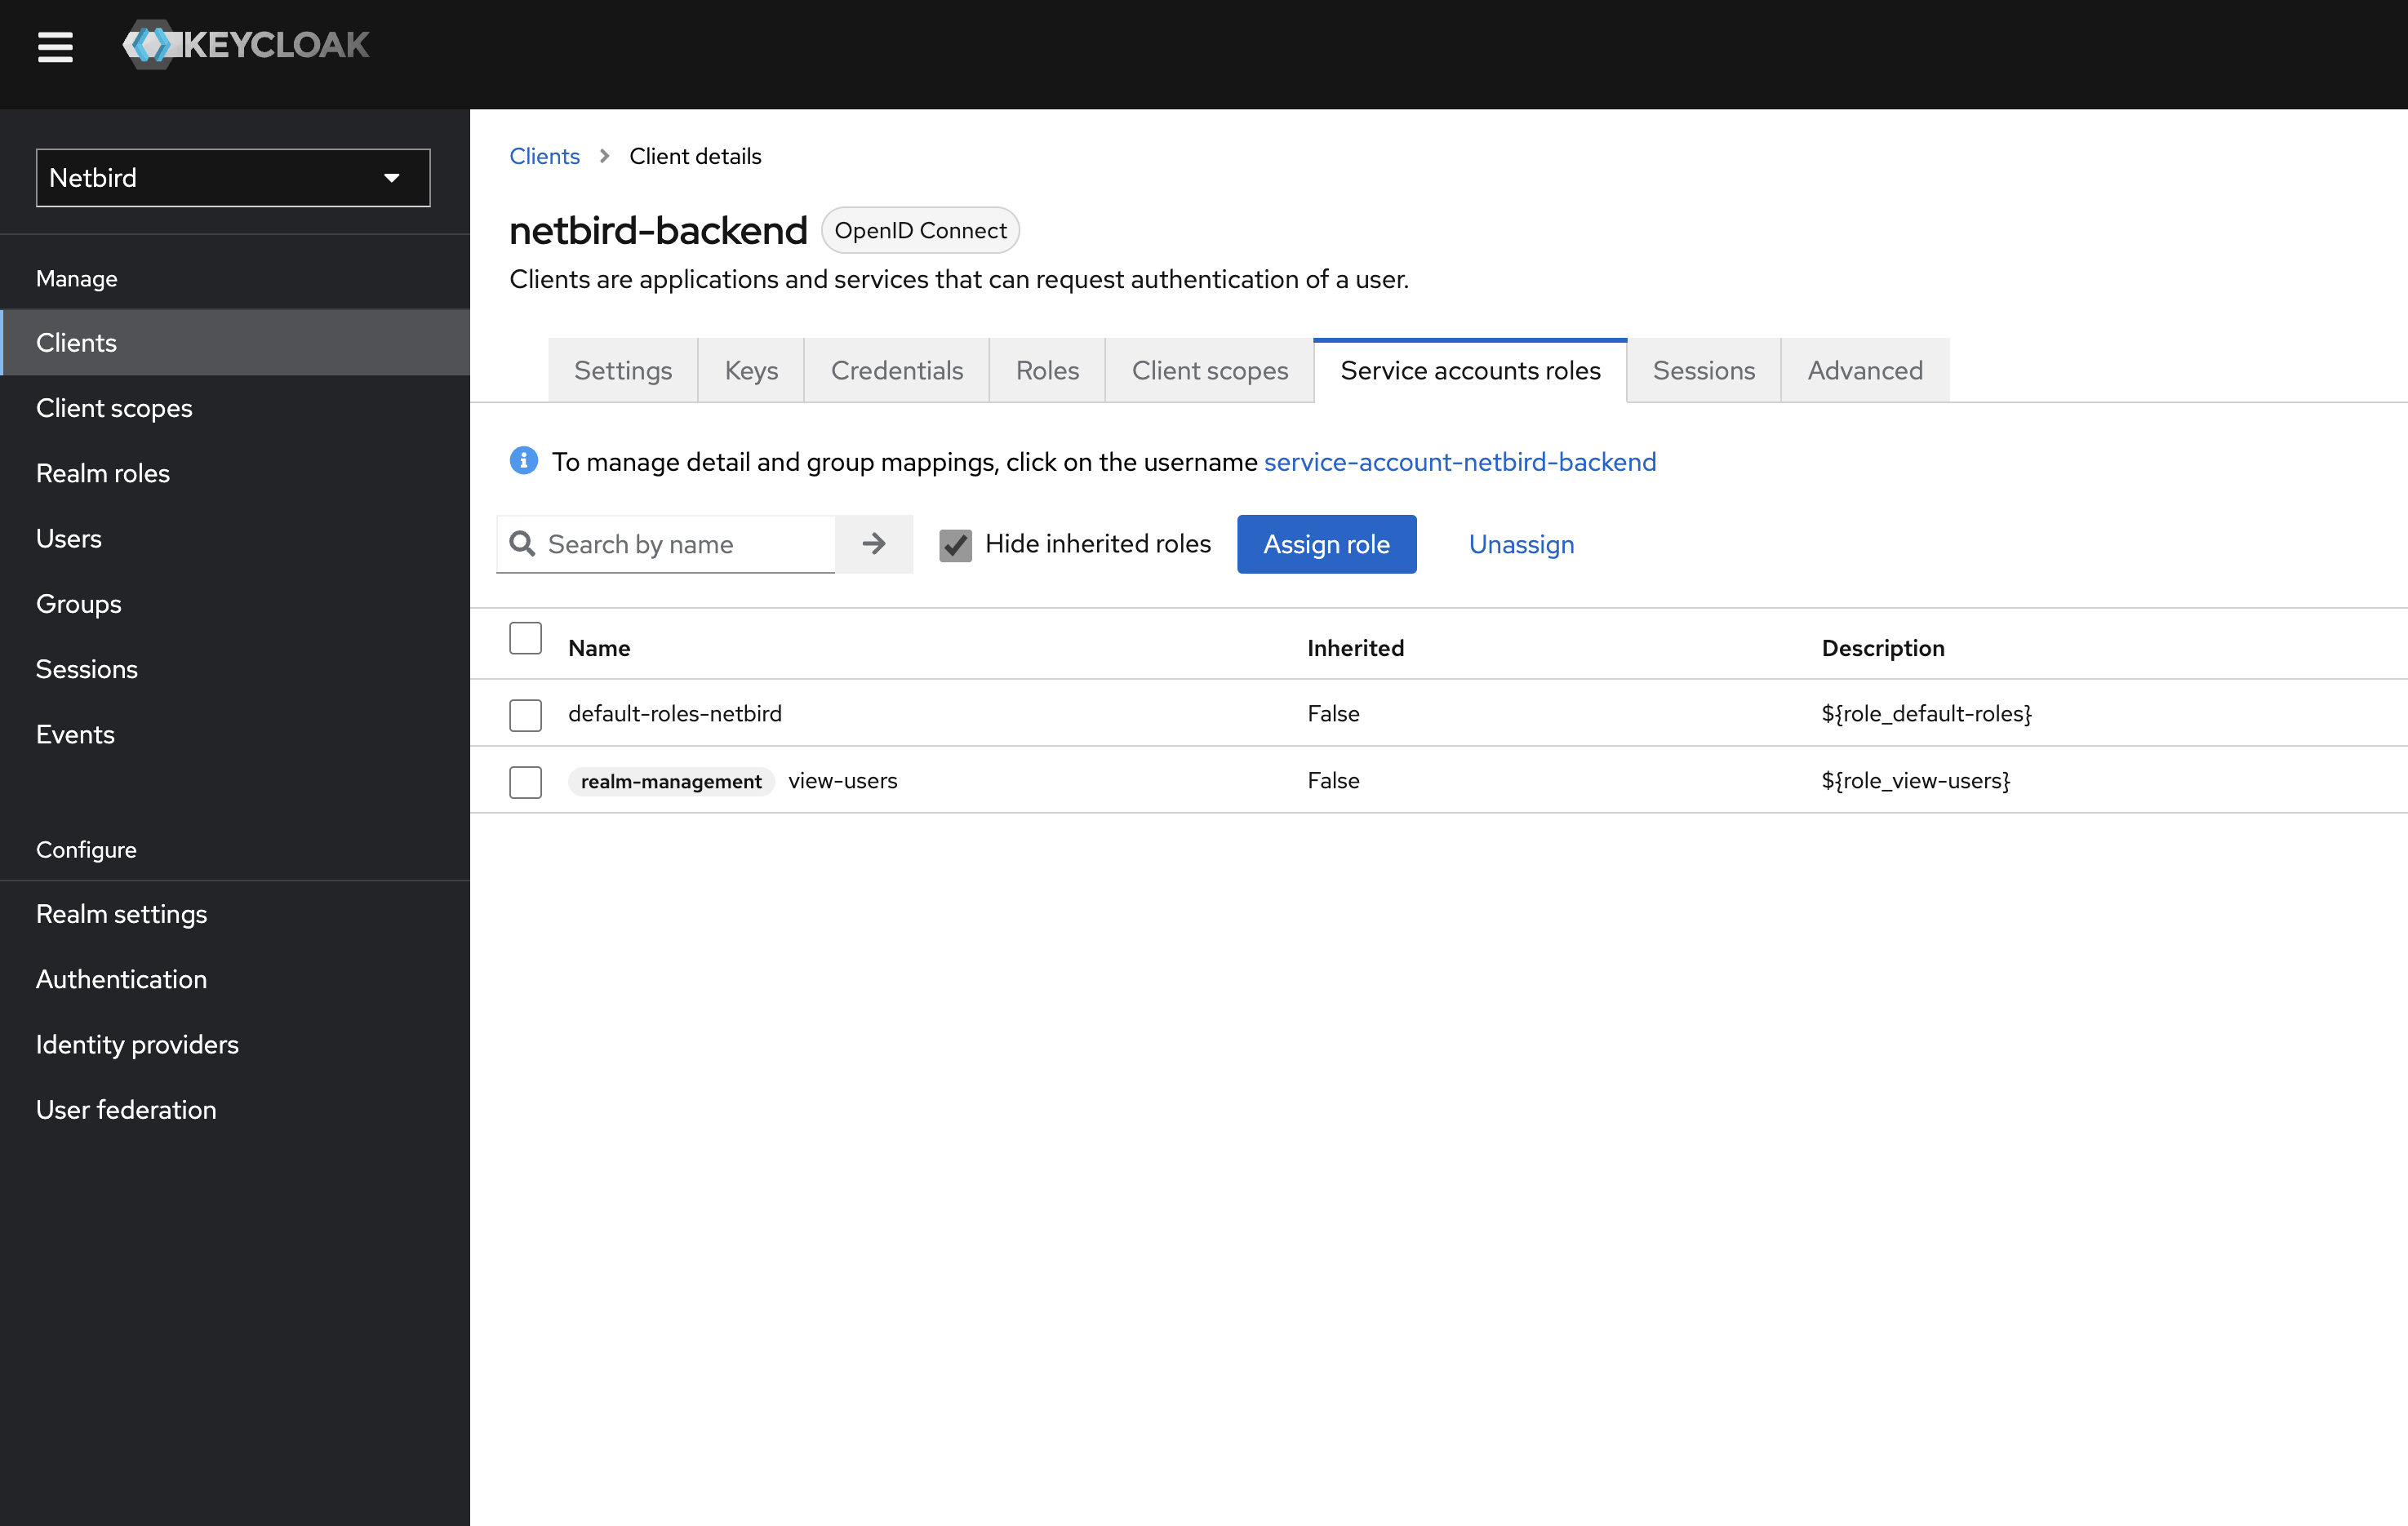
Step 9: Add View-Users Role
- Go to Clients → netbird-backend
- Switch to Service accounts roles tab
- Click Assign roles
- Select Filter by clients and search for
view-users
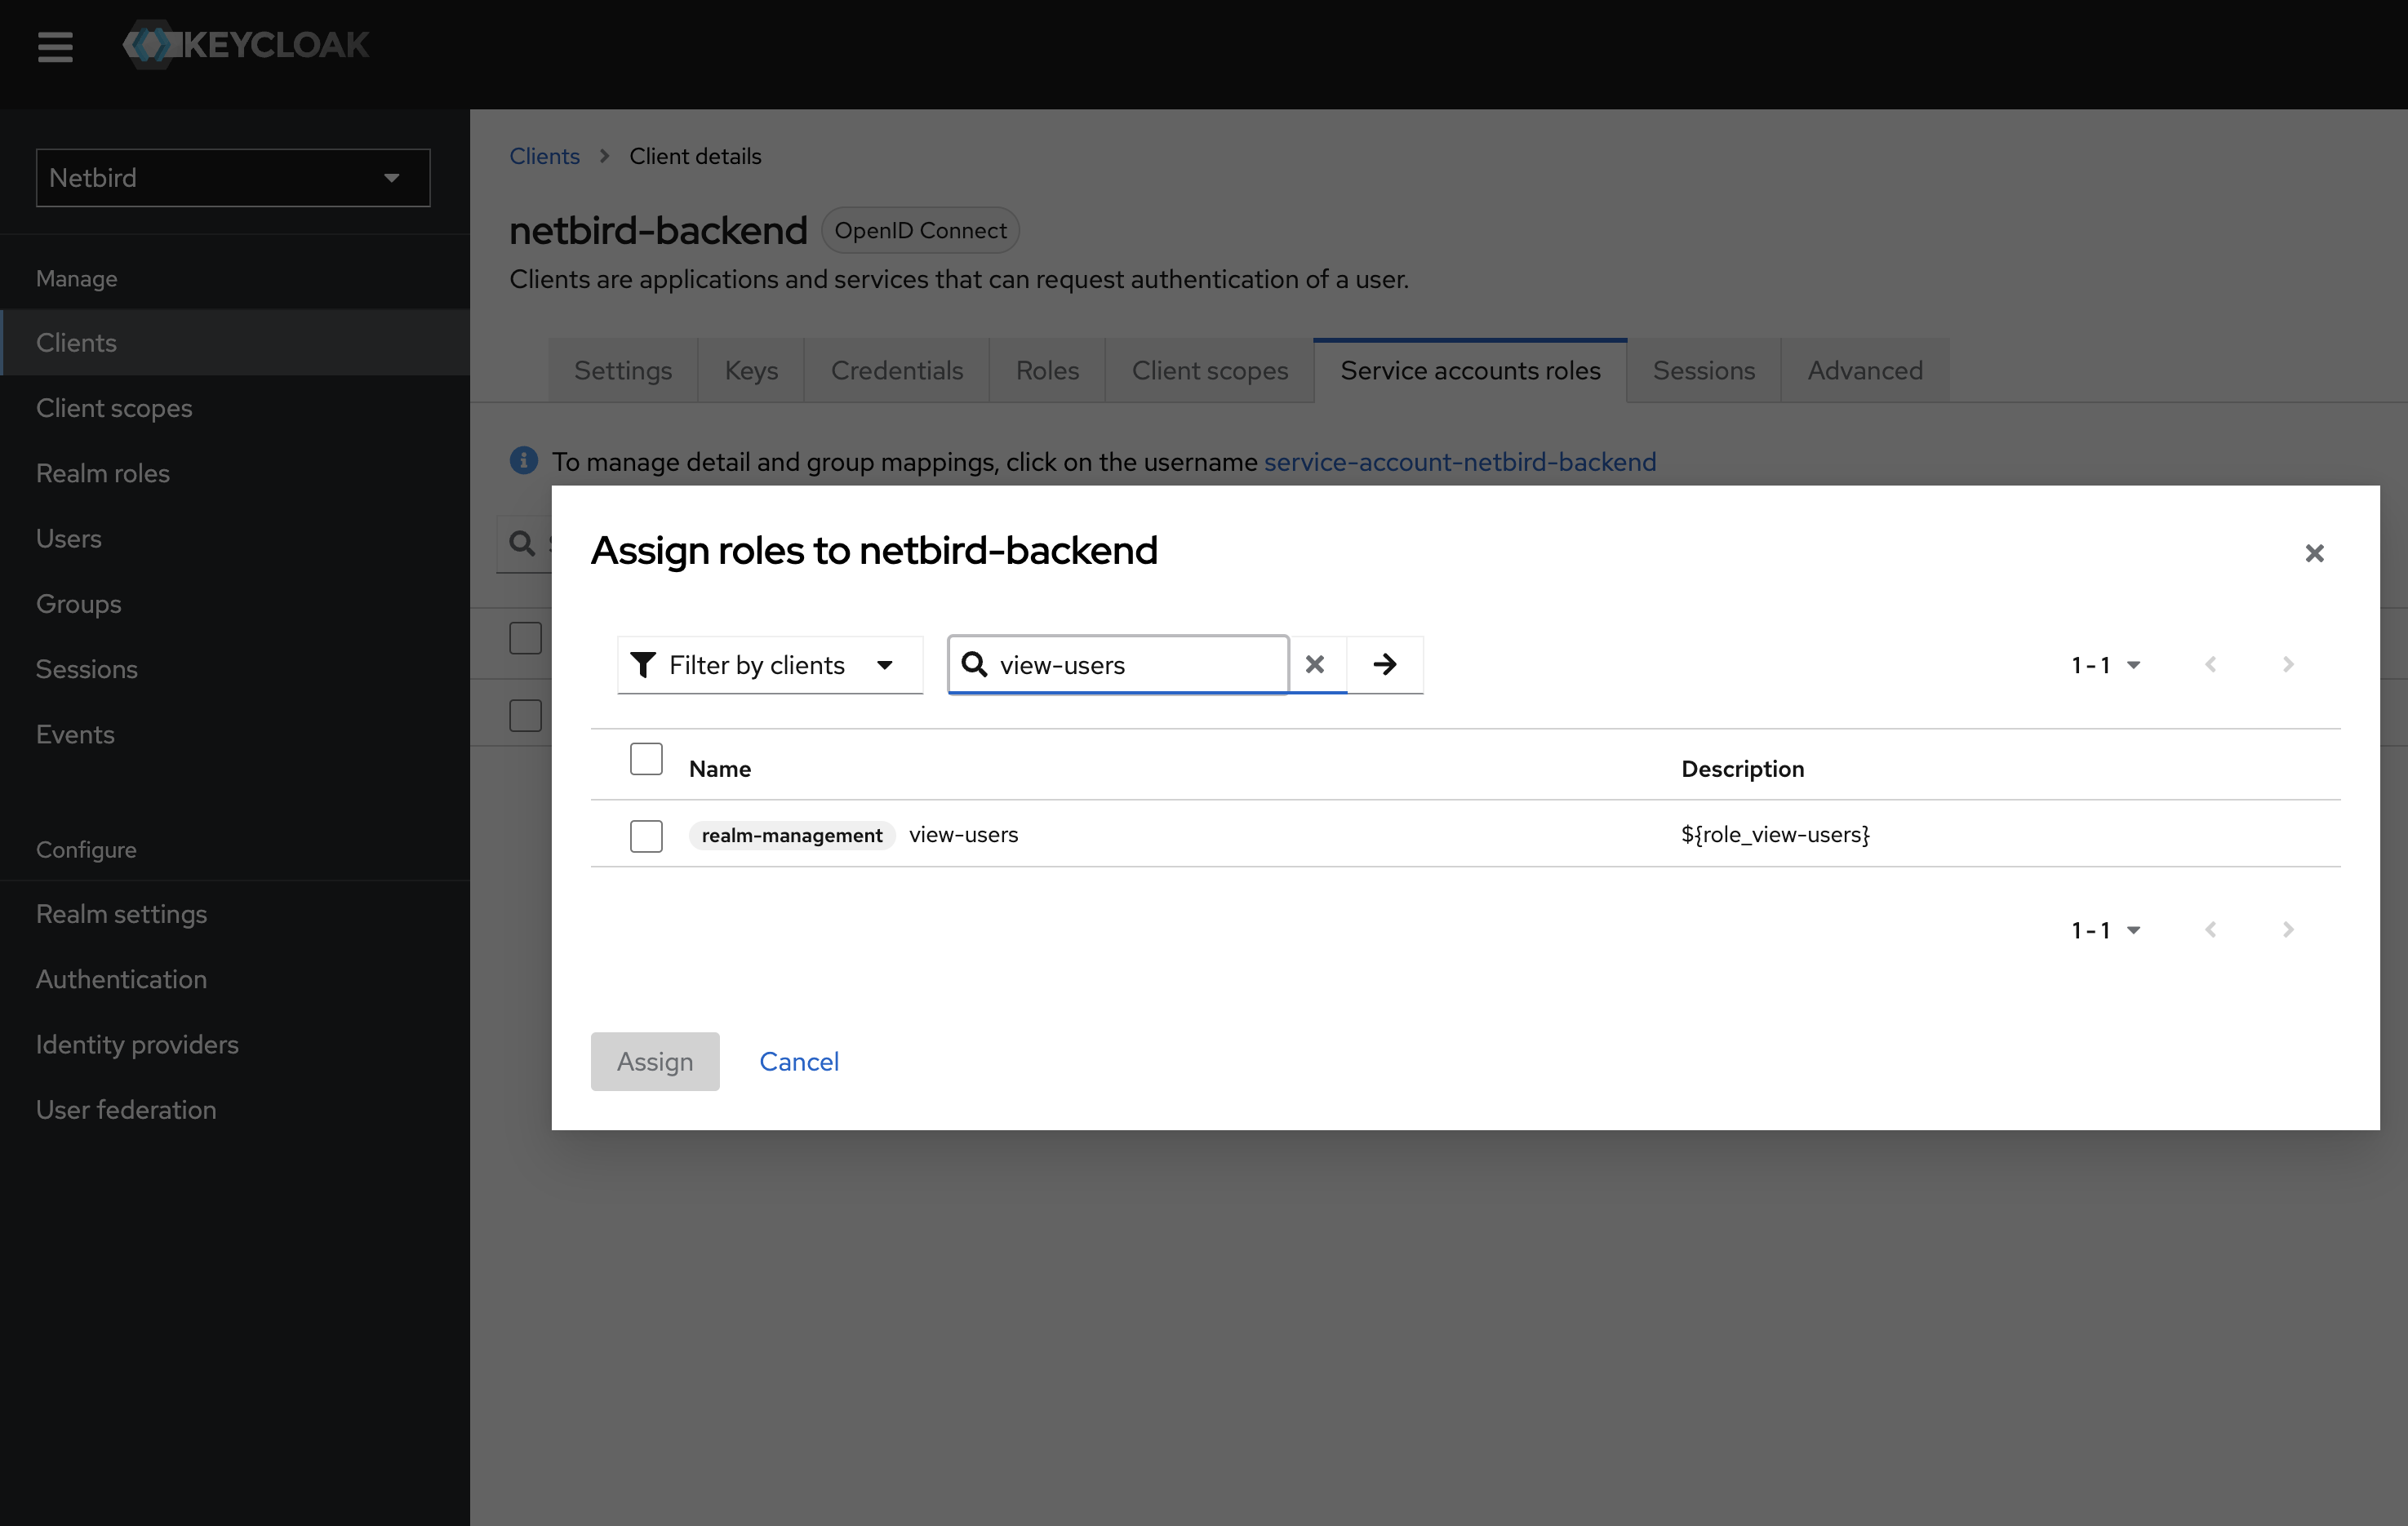
- Check the role checkbox and click Assign
Optional: To enable automatic user deletion from Keycloak when deleted from NetBird, add the --user-delete-from-idp flag to the management startup command and assign the manage-users role instead.
Step 10: Configure NetBird
Your authority OIDC configuration will be available at:
https://<YOUR_KEYCLOAK_HOST_AND_PORT>/realms/netbird/.well-known/openid-configuration
Double-check if the endpoint returns a JSON response by calling it from your browser.
Set properties in the setup.env file:
NETBIRD_AUTH_OIDC_CONFIGURATION_ENDPOINT="https://<YOUR_KEYCLOAK_HOST_AND_PORT>/realms/netbird/.well-known/openid-configuration"
NETBIRD_USE_AUTH0=false
NETBIRD_AUTH_CLIENT_ID="netbird-client"
NETBIRD_AUTH_SUPPORTED_SCOPES="openid profile email offline_access api"
NETBIRD_AUTH_AUDIENCE="netbird-client"

NETBIRD_AUTH_DEVICE_AUTH_CLIENT_ID="netbird-client"
NETBIRD_AUTH_DEVICE_AUTH_AUDIENCE="netbird-client"

NETBIRD_MGMT_IDP="keycloak"
NETBIRD_IDP_MGMT_CLIENT_ID="netbird-backend"
NETBIRD_IDP_MGMT_CLIENT_SECRET="<NETBIRD_BACKEND_CLIENT_SECRET>"
NETBIRD_IDP_MGMT_EXTRA_ADMIN_ENDPOINT="https://<YOUR_KEYCLOAK_HOST_AND_PORT>/admin/realms/netbird"
Make sure your Keycloak instance uses HTTPS. Otherwise, the setup won't work.
Step 11: Continue with NetBird Setup
You've configured all required resources in Keycloak. Continue with the NetBird Self-hosting Guide.
Troubleshooting
"Invalid token" errors
- Verify the issuer URL includes
/realms/your-realm - Ensure the client ID matches in both Keycloak and NetBird
- Check clock synchronization between servers
Users not appearing in NetBird
- Verify the backend client has
view-usersrole