PocketID SSO with NetBird Self-Hosted (Advanced)
PocketID is a simplified identity management solution designed for self-hosted environments, offering a lightweight and easy-to-deploy option for authentication.
PocketID is secure and effective but makes some tradeoffs in terms of features. Notably, it does not allow scoping the access of API Tokens. Keep careful track of the token used by NetBird for management.
Standalone Setup (Advanced)
NetBird includes built-in local user management powered by an embedded IdP, allowing you to create and manage users directly without requiring an external identity provider. You can also add multiple external identity providers alongside local users, giving users multiple login options.
We highly recommend using the simpler setup that adds PocketID as an external IdP directly in the NetBird Management Dashboard. This approach requires minimal configuration, works alongside local users, and doesn't require replacing your embedded IdP. See the Management Setup (Recommended) section in the main PocketID documentation.
The standalone setup below replaces your embedded IdP entirely and is only recommended for experienced PocketID administrators who need full control over authentication and user management.
Use PocketID as your primary identity provider instead of NetBird's embedded IdP. This option gives you full control over authentication and user management, is recommended for experienced PocketID administrators as it also requires additional setup and ongoing maintenance.
For most deployments, the embedded IdP is the simpler choice — it's built into NetBird, fully integrated, and requires minimal configuration to get started. For this implementation, go back up to the Management Setup (Recommended) section above.
Prerequisites
- PocketID instance running with SSL
- Docker and Docker Compose for NetBird
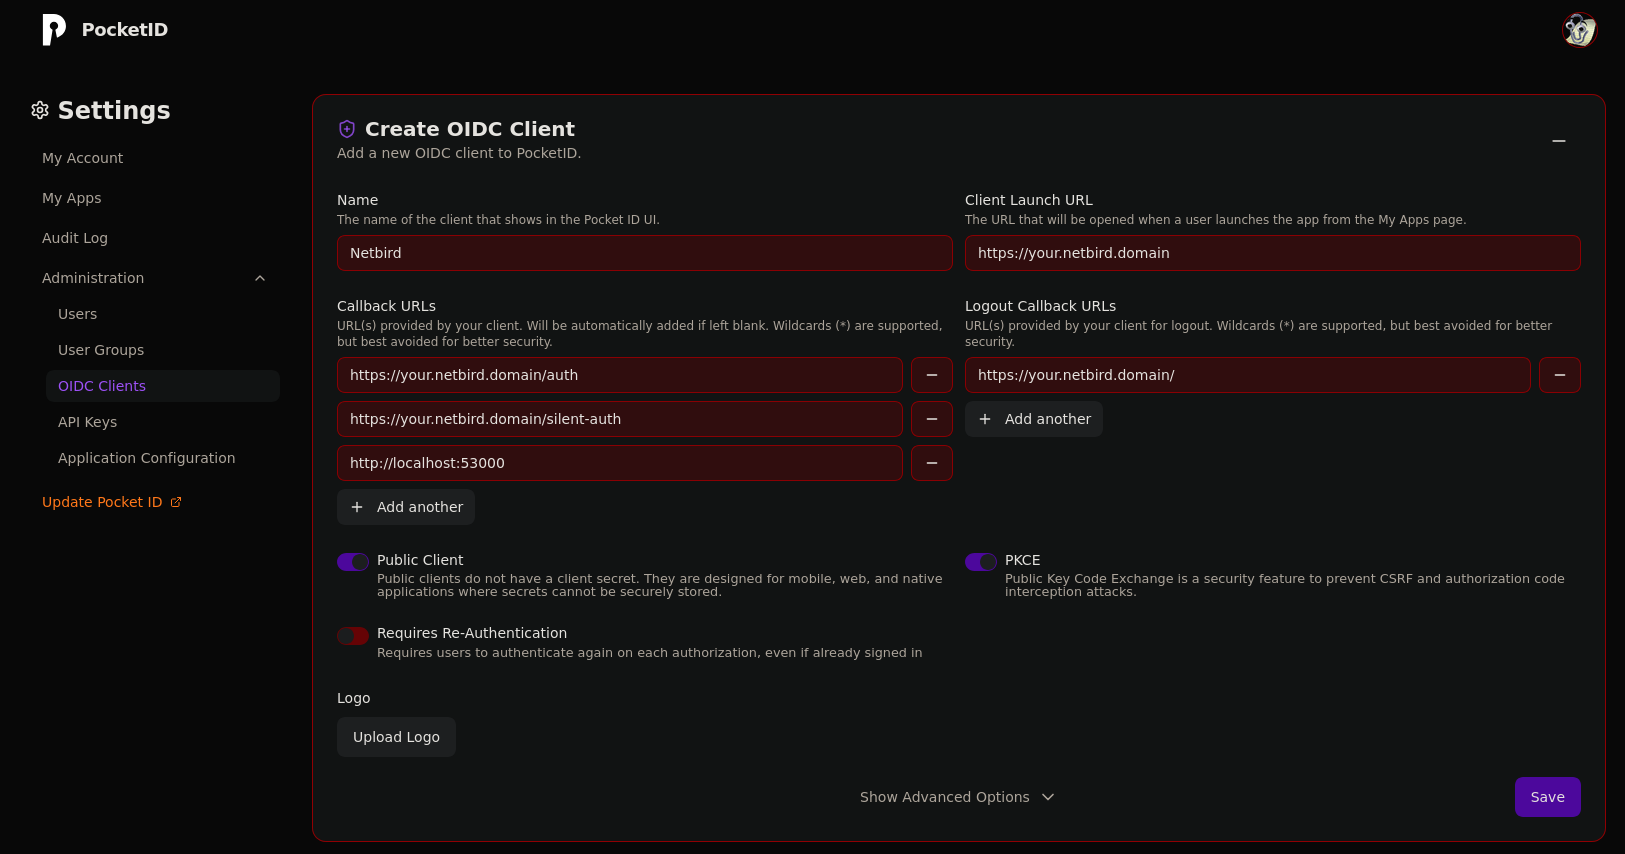
Step 1: Create and Configure PocketID Application
- Navigate to PocketID console
- Click the Administration dropdown, then select OIDC Clients
- Fill in the form:
- Name:
NetBird - Client Launch URL:
https://<domain> - Callback URLs:
http://localhost:53000https://<domain>/authhttps://<domain>/silent-auth
- Logout Callback URL:
https://<domain>/ - Public Client: On
- PKCE: On
- Name:
- Click Save
- Copy Client ID for later use
Step 2: Create API Token
- Click Administration dropdown, then select API Keys
- Click Add API Key
- Fill in:
- Name:
NetBird Management Token - Expires At: Pick a date in the future
- Description:
NetBird Management Token
- Name:
- Click Save

- Copy API Key for later use
Step 3: Configure NetBird
Your authority OIDC configuration will be available at:
https://<YOUR_POCKETID_HOST_AND_PORT>/.well-known/openid-configuration
Double-check if the endpoint returns a JSON response by calling it from your browser.
Set properties in the setup.env file:
NETBIRD_AUTH_OIDC_CONFIGURATION_ENDPOINT="https://<YOUR_POCKETID_HOST_AND_PORT>/.well-known/openid-configuration"
NETBIRD_USE_AUTH0=false
NETBIRD_AUTH_CLIENT_ID="<CLIENT_ID>"
NETBIRD_AUTH_SUPPORTED_SCOPES="openid profile email groups"
NETBIRD_AUTH_AUDIENCE="<CLIENT_ID>"
NETBIRD_AUTH_REDIRECT_URI="/auth"
NETBIRD_AUTH_SILENT_REDIRECT_URI="/silent-auth"
NETBIRD_TOKEN_SOURCE="idToken"

NETBIRD_AUTH_DEVICE_AUTH_PROVIDER="none"
NETBIRD_AUTH_DEVICE_AUTH_CLIENT_ID="<CLIENT_ID>"
NETBIRD_AUTH_DEVICE_AUTH_AUDIENCE="<CLIENT_ID>"
NETBIRD_AUTH_DEVICE_AUTH_SCOPE="openid profile email groups"
NETBIRD_AUTH_DEVICE_AUTH_USE_ID_TOKEN=true

NETBIRD_MGMT_IDP="pocketid"
NETBIRD_IDP_MGMT_CLIENT_ID="netbird"
NETBIRD_IDP_MGMT_EXTRA_MANAGEMENT_ENDPOINT="https://<YOUR_POCKETID_HOST_AND_PORT>"
NETBIRD_IDP_MGMT_EXTRA_API_TOKEN="<API_TOKEN>"
Step 4: Continue with NetBird Setup
You've configured all required resources in PocketID. Continue with the NetBird Self-hosting Guide.
Troubleshooting
API token not working
- Verify the token hasn't expired
- Ensure the token was created by an admin user
Device authorization not available
- PocketID has limited device auth support
- Set
NETBIRD_AUTH_DEVICE_AUTH_PROVIDER="none"if issues persist