DNS Aliases for Routed Networks
This guide explains how to use Custom DNS Zones with NetBird's Networks to provide easy-to-remember DNS names for resources in private networks.
Custom DNS Zones work seamlessly with NetBird's Networks feature to provide friendly DNS names for resources behind routing peers. This eliminates the need to remember IP addresses when accessing private network resources, creating a professional enterprise-like experience.
How It Works
The Challenge
Imagine you're a developer who needs to connect to a PostgreSQL database in your company's data center. The database is at IP address 192.168.0.68, accessible through a NetBird routing peer. You might write connection strings like this:
psql -h 192.168.0.68 -U admin
This works, but it's problematic:
- Hard to remember: Which IP is the database? Which is the API? Which is staging vs. production?
- Difficult to update: If the database moves to a new IP, every developer needs to update their configurations
- Not team-friendly: New team members need to maintain a list of IP addresses for internal services
The Solution
DNS Aliases with Custom DNS Zones solve this by giving your private network resources friendly, memorable DNS names. Instead of 192.168.0.68, your developers connect to postgres.netbird.internal or simply postgres.
How the DNS Resolution Works
Here's what happens when you set up a DNS Alias and a developer tries to connect to postgres.netbird.internal:
Setup (One-Time):
- Admin creates a Custom DNS Zone called
netbird.internalin the NetBird dashboard - Admin adds an A record:
postgres→192.168.0.68(the actual database IP on the private network) - Zone is distributed to the developer's distribution group (e.g., dev)
When a developer connects:
- Developer's laptop queries
postgres.netbird.internal - NetBird's DNS resolver on the laptop receives the query
- Custom Zone record is matched: NetBird finds the A record:
postgres.netbird.internal→192.168.0.68 - DNS response returned: The IP
192.168.0.68is returned to the application - Routing kicks in: Traffic to
192.168.0.68is automatically routed through the NetBird routing peer that has access to the192.168.0.0/24network - Connection established: The application connects successfully to the database
Step-by-Step Guide
This guide will walk you through a common use case: providing DNS names for a PostgreSQL database and an internal wiki hosted in a private data center.
Network Setup:
- NetBird Peers: Devices organized into groups, such as a
devfor developers. - Routing Peer: A gateway server in the data center.
- Private Network: Subnet
192.168.0.0/24with internal services:- PostgreSQL Database:
192.168.0.68 - Internal Wiki:
192.168.0.78
- PostgreSQL Database:
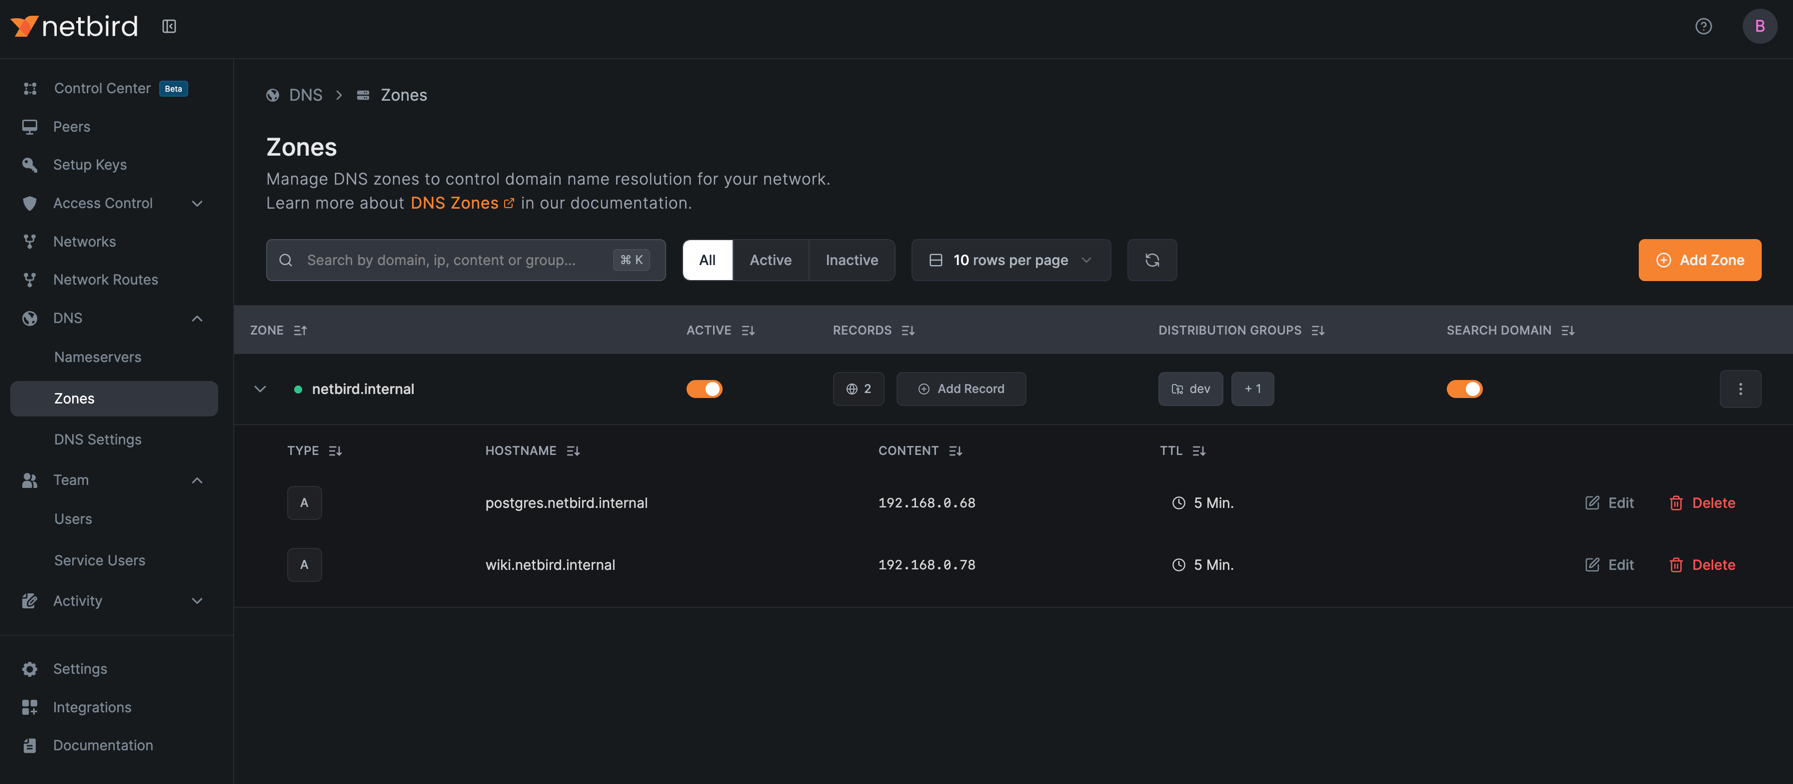
Step 1: Create a Custom DNS Zone
First, create a Custom DNS Zone to manage the DNS records for your private services.
- Navigate to DNS > Zones in the NetBird dashboard.
- Click Add Zone.
- Configure the zone:
- Domain:
netbird.internal. - Distribution Groups: Select the groups that should have access to this DNS zone (e.g.,
dev,internal-services). - Enable Search Domain: Keep this enabled to allow using short names (e.g.,
postgresinstead ofpostgres.netbird.internal).
- Domain:
- Click Add Zone.

Step 2: Add DNS Records
Next, add DNS records for each of your services.
-
Click on the newly created zone to view its details.
-
Click Add Record and create the following records:
PostgreSQL Database (A Record):
- Name:
postgres - Type:
A - Value:
192.168.0.68
Internal Wiki (A Record):
- Name:
wiki - Type:
A - Value:
192.168.0.78
- Name:
Step 3: Configure Network Routing
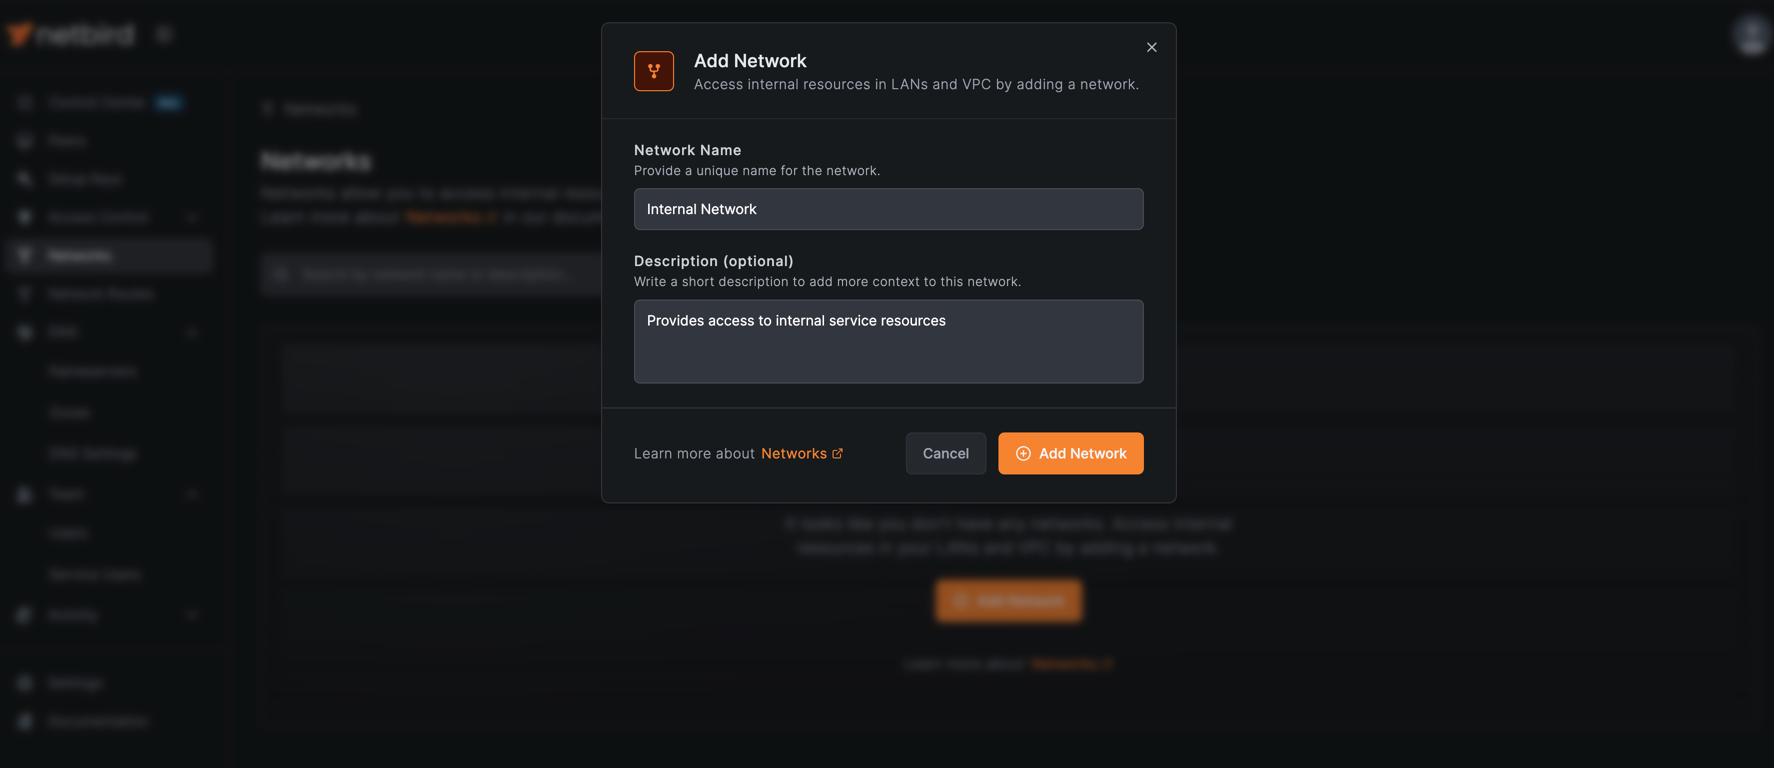
To enable access to your private resources, you need to set up a network with routing peers that can reach the private network where your PostgreSQL database and Wiki are hosted.
Create a Network
- Navigate to Network Routing > Networks in the NetBird dashboard.
- Click Add Network to start the network creation wizard.
- Fill out the network details:
- Name:
Internal Network - Description:
Provides access to internal service resources
- Name:
- Click Add Network.
Add Network Resources
Add a wildcard resource that will match all services in your DNS zone.
- Click Add Resource and configure:
- Name:
Internal Wiki - Address:
wiki.netbird.internal - Groups: Assign to a resource group (e.g.,
internal-services)
- Name:
- Click Add Resource.

Repeat the same steps to add the Internal Postgres resource with the address postgres.netbird.internal.
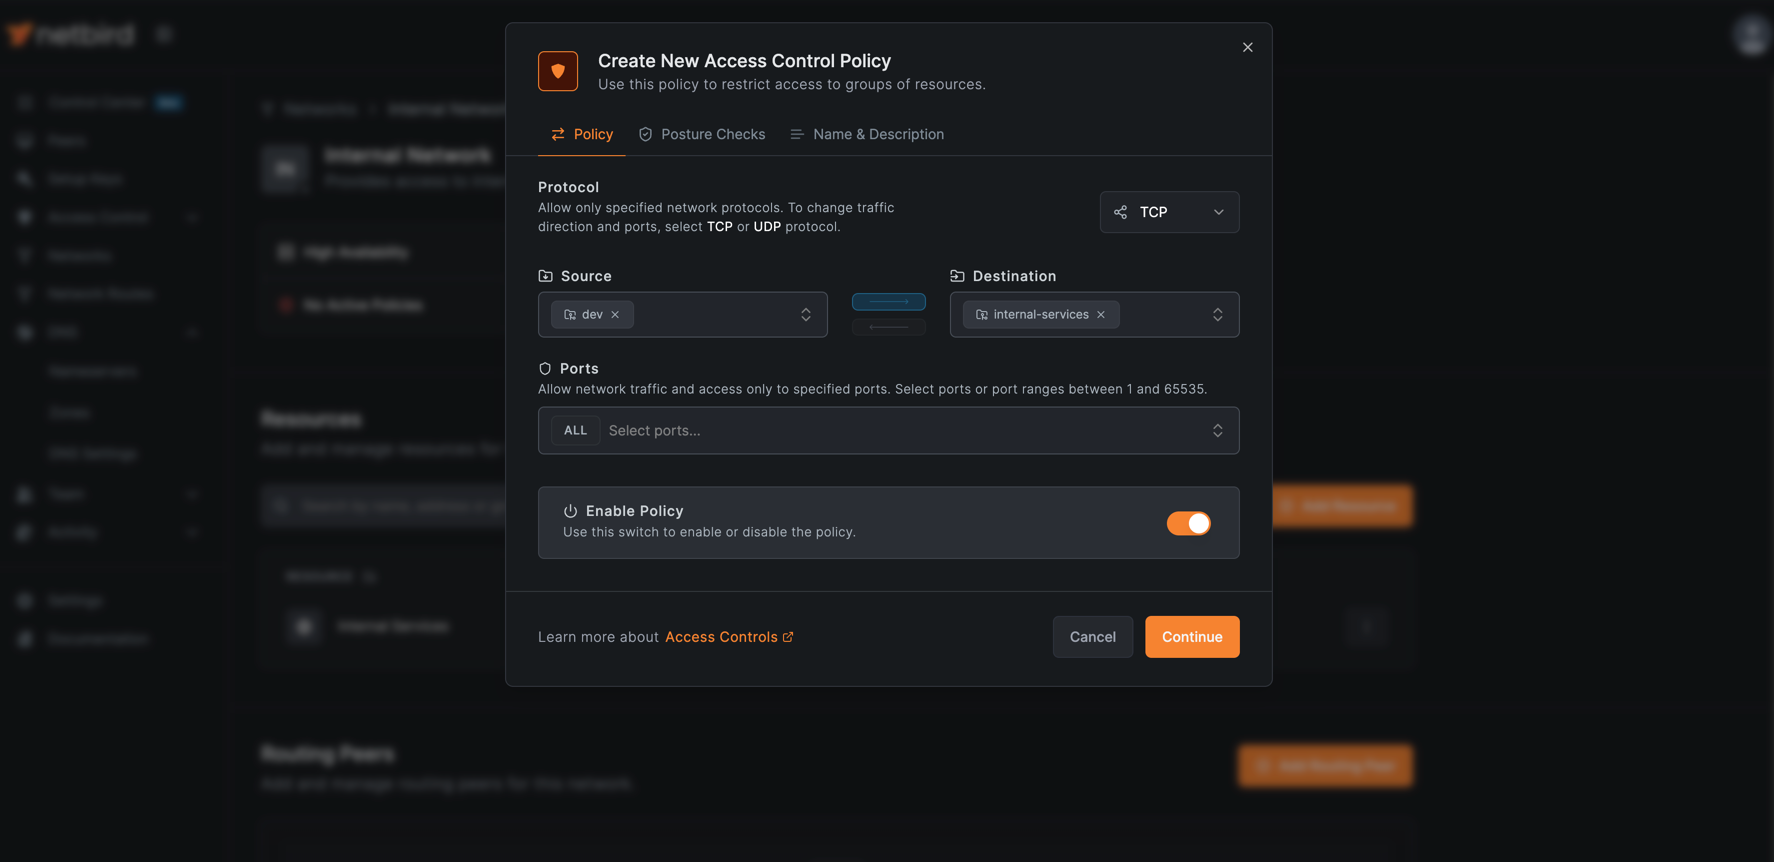
Create Access Control Policy
Create a policy to allow your developers to access these resources.
- Click Add Policy and configure:
- Name:
Internal Services Policy - Source: Select the
devgroup - Destination: Select the
internal-servicesgroup - Protocol:
TCP - Ports:
All
- Name:
- Click Continue twice, then click Add Policy.
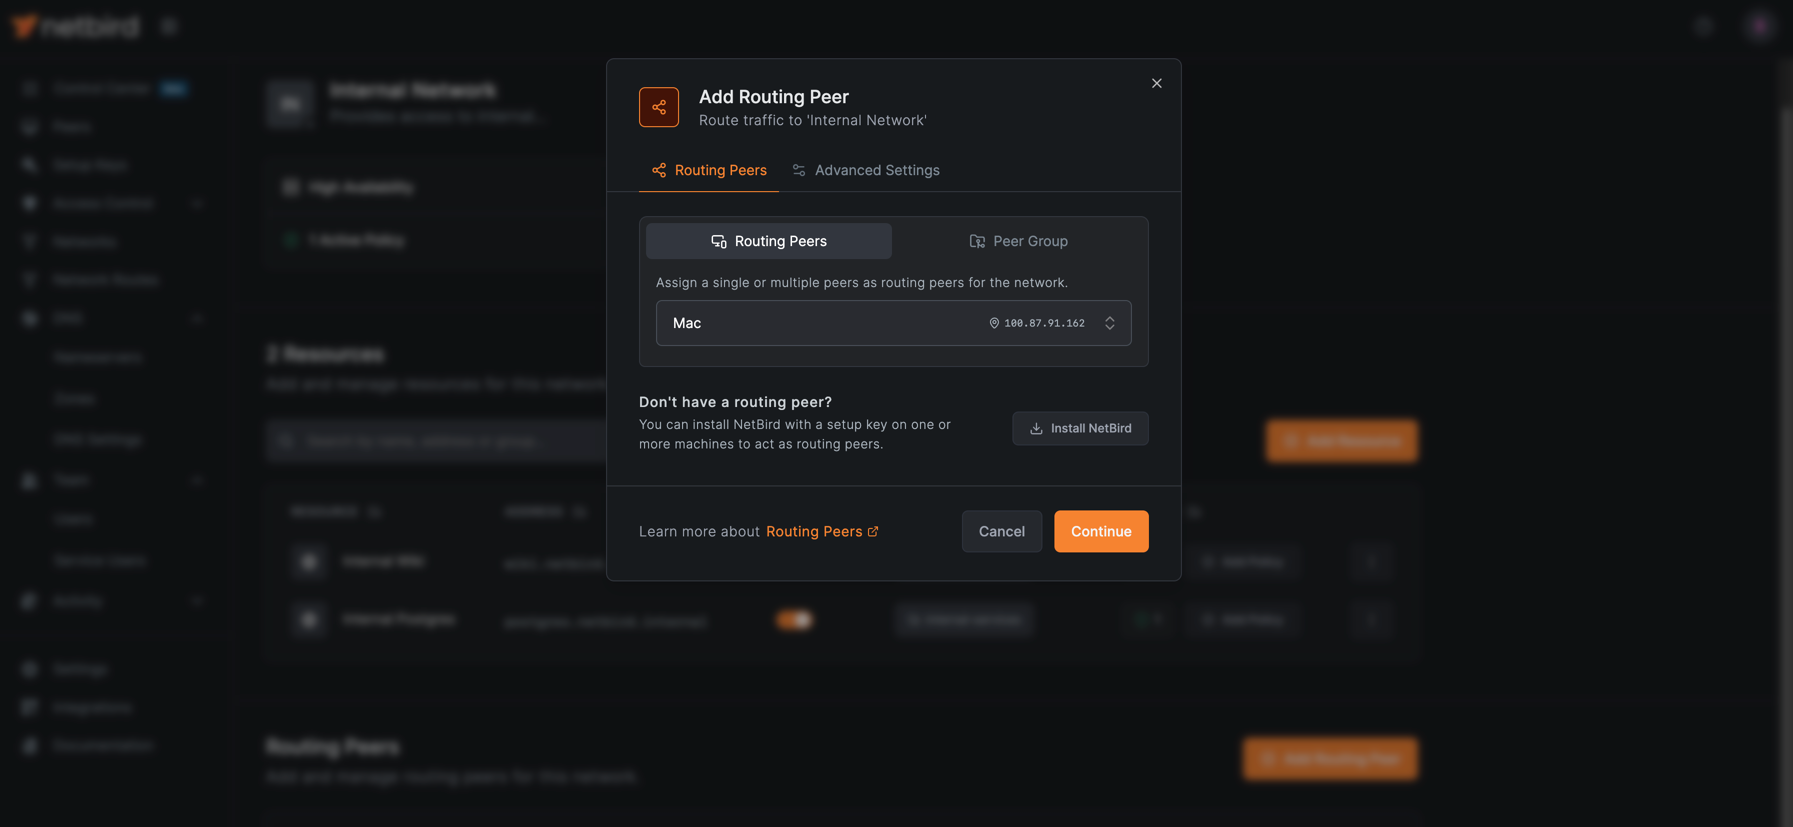
Add a Routing Peer
Next, add a routing peer that has access to your private network.
- Click Add Routing Peer and select the peer that is running in your data center or VPC.
- Click Continue and then Add Routing Peer to confirm.
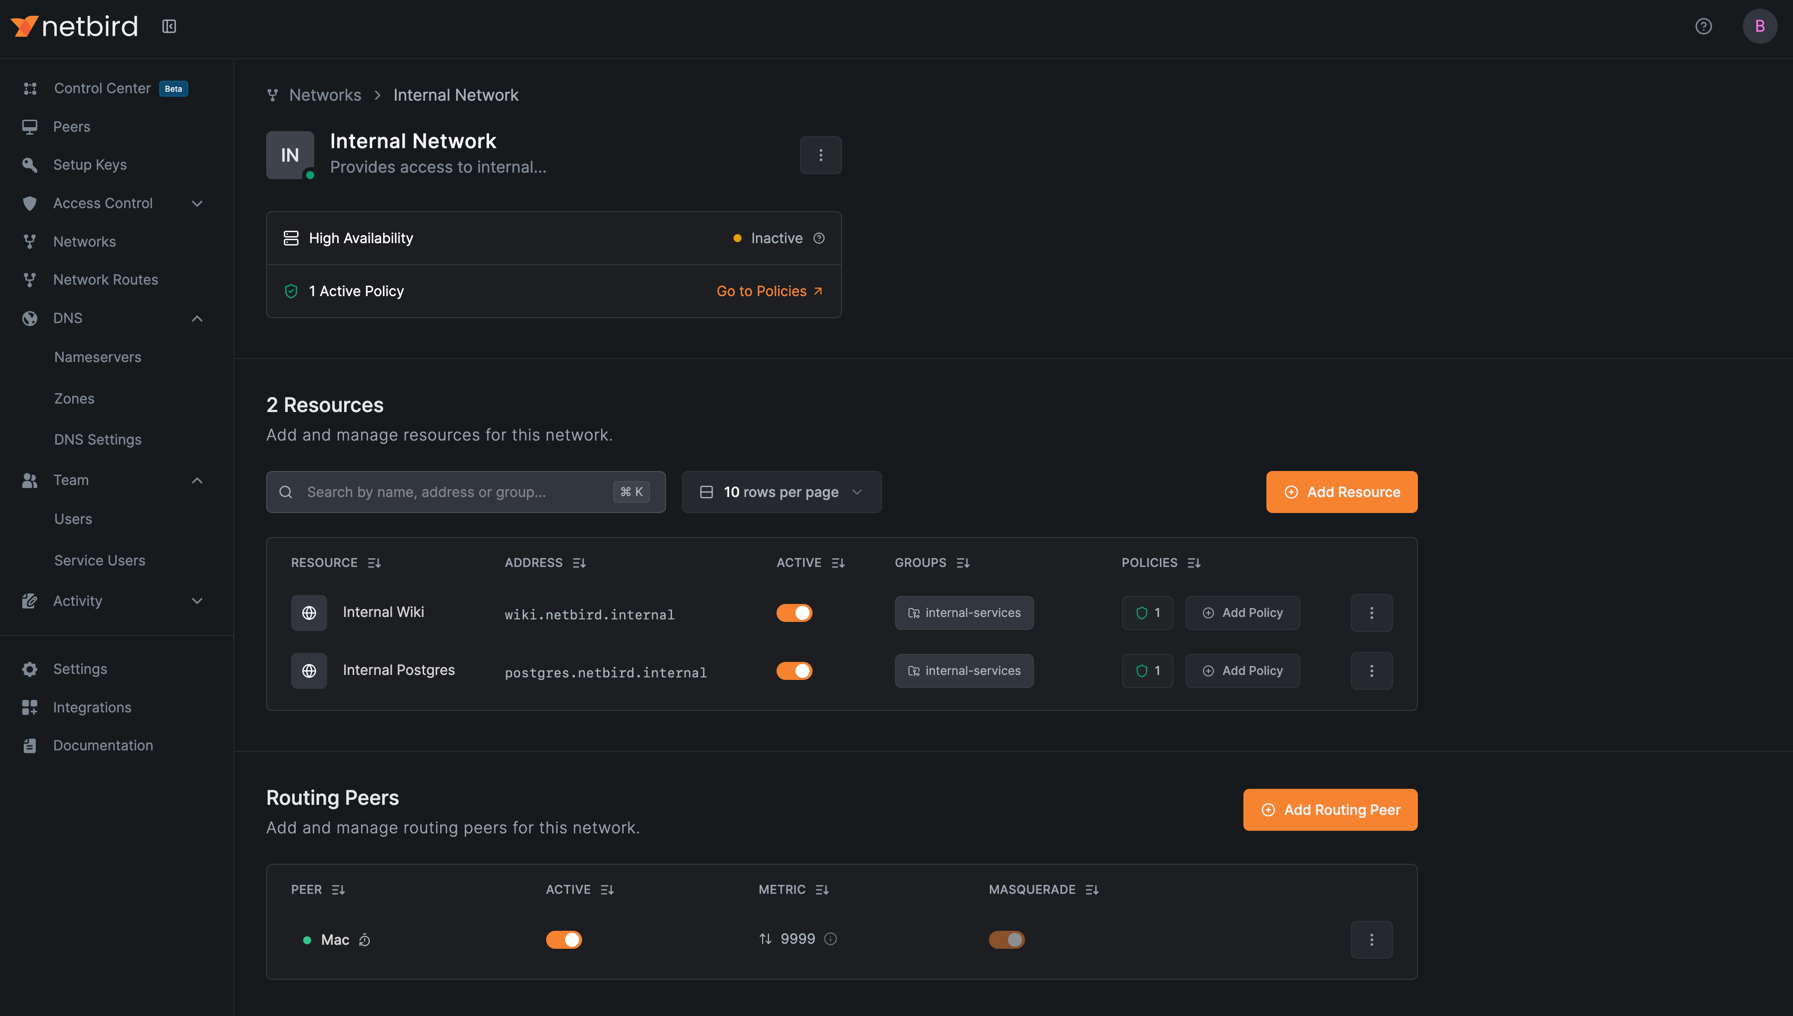
After completing the wizard, your network routing is configured, and the DNS names you created will now work seamlessly with the routes.
You can view your fully configured network in the Networks dashboard:
Step 4: Verify the Setup
With the DNS zone and records configured, your developers can now access the services using the friendly DNS names.
Verify Network Routes
First, confirm that peers in the dev group have received the routes for wiki.netbird.internal and postgres.netbird.internal.
On a peer device in the dev group, run:
netbird networks ls
You should see output similar to:
Available Networks:

  - ID: Internal Wiki
    Domains: wiki.netbird.internal
    Status: Selected
    Resolved IPs: -
    Routes:

  - ID: Internal Postgres
    Domains: postgres.netbird.internal
    Status: Selected
    Resolved IPs: -
Access Your Services
Now your developers can access the services using DNS names:
# Connect to the database using full DNS name
psql -h postgres.netbird.internal -U admin

# Access the internal wiki using full DNS name
curl http://wiki.netbird.internal
With search domain enabled, you can use short names:
# Connect to the database
psql -h postgres -U admin

# Access the internal wiki
curl http://wiki
Benefits
- Simplified Access: No more memorizing IP addresses.
- Centralized Management: Update IP addresses in one place without affecting clients.
- Improved Security: Isolate environments and teams with separate zones and distribution groups.
- Enhanced Productivity: Developers can discover and connect to services faster.
Advanced Use Cases
Environment Separation
You can create separate DNS zones for different environments (e.g., production, staging) to isolate resources.
- Production:
- Network routing to
10.0.1.0/24. - DNS zone
prod.netbird.internaldistributed to theSRE Team.
- Network routing to
- Staging:
- Network routing to
10.0.2.0/24. - DNS zone
staging.netbird.internaldistributed toDevelopersandQA.
- Network routing to
Multi-Site Architecture
For organizations with multiple data centers, you can create separate networks and DNS zones for each location.
- US East:
- Network to
10.1.0.0/16. - DNS zone
us-east.netbird.internalfor theUS Team.
- Network to
- EU West:
- Network to
10.2.0.0/16. - DNS zone
eu-west.netbird.internalfor theEU Team.
- Network to
Failover and Load Balancing
Use CNAME records to create aliases that can be quickly updated during failover scenarios without requiring changes to client configurations.