SSH Access
Updated
NetBird provides SSH access to peers through its built-in SSH server. Unlike traditional SSH setups that require exposing port 22 to the internet, NetBird SSH operates entirely over your private network. You can connect using either the netbird ssh command or native OpenSSH clients.
NetBird SSH supports fine-grained access control, allowing you to specify which NetBird users can access which local OS users on target machines.
SSH Access is disabled by default and must be enabled both on the target peer and in the NetBird Dashboard.
Concepts
SSH Server
Each NetBird peer can run an embedded SSH server by enabling --allow-server-ssh. From the peer's perspective the session arrives on its normal port (TCP 22); internally it's re-routed to the NetBird client on port 22022.
Management may automatically ensure the mesh access policy permits 22022 for a peer when the policy explicitly allows port 22 (or a range containing 22) and the peer advertises native SSH support (NetBird v0.60.0+). That access policy is distributed by the management plane; enforcement and forwarding are performed by the NetBird client on the peer.
Authentication Methods
- JWT Authentication (default): Maps SSH sessions to user identities via your configured Identity Provider (OIDC). Each new session will require completing the OIDC flow to mint the JWT used for SSH authentication (unless JWT caching is enabled, in which case JWT tokens are cached for a configurable duration). Combined with fine-grained access control, this allows you to control exactly which authenticated users can access which local OS users on the target machine.
- Machine Identity (
--disable-ssh-auth): When SSH auth is disabled, SSH access is governed by NetBird network ACLs (machine-level access) rather than per-user JWT identity.
OpenSSH Integration
NetBird can provide configuration so the remote peer's OpenSSH clients behave transparently. The remote peer's NetBird client performs interception and JWT handling; NetBird may install OpenSSH configuration snippets on the client to simplify usage. The interception and forwarding logic lives in the remote peer's NetBird client, not the management server.
Port 22 Redirection
The management server does not edit your host OS firewall or perform OS-level port redirects. The model is:
- 22 - the standard SSH port used by SSH clients and the local SSH daemon.
- 22022 - the NetBird-native endpoint used by the NetBird client on remote peers. When NetBird SSH is enabled for a peer, standard SSH traffic is redirected here.
Behavior:
- A modern NetBird client can intercept an
ssh user@remote(which targets remote:22) and redirect the SSH stream to the NetBird client on port 22022. - Management will auto-add a NetBird access-policy rule for 22022 when a policy allows 22 (or a range containing 22) and the peer supports native SSH (v0.60.0+) and SSH is enabled on the peer in the NetBird dashboard.
Requirements
To use SSH access through NetBird, you need:
- NetBird v0.61.0 or later on all peers using SSH (both clients and servers). For fine-grained access control features, v0.61.0 is required.
- SSH enabled on target peer - the peer must run with
--allow-server-ssh. - Access Control Policy - A
NetBird SSHpolicy configured in the dashboard - (Optional) For JWT authentication: an Identity Provider configured in NetBird.
Management distributes NetBird access-policy objects (FirewallRule) - it does not directly open host OS ports or edit host-level firewalls. Enforcement and forwarding are handled by the NetBird client running on each peer.
Enabling SSH
Step 1: Enable SSH Server on Target Peer
On the machine you want to access via SSH, enable the NetBird SSH server.
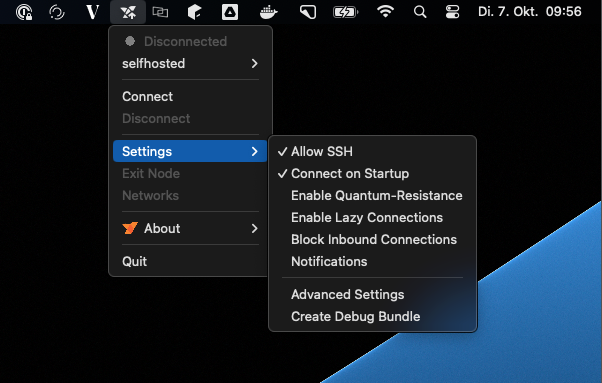
Using the GUI:
- Click on the NetBird tray icon
- Navigate to Settings
- Click on Allow SSH to enable the SSH server
Using the CLI:
netbird down  # if NetBird is already running
netbird up --allow-server-ssh
For additional SSH server features, use these flags:
netbird up --allow-server-ssh \
  --enable-ssh-local-port-forwarding \
  --enable-ssh-remote-port-forwarding \
  --enable-ssh-sftp \
  --enable-ssh-root
Flag Reference:
--allow-server-ssh: Enable the SSH server--enable-ssh-local-port-forwarding: Allow clients to forward local ports through the server--enable-ssh-remote-port-forwarding: Allow clients to request remote port forwarding--enable-ssh-sftp: Enable SFTP subsystem for file transfers--enable-ssh-root: Allow root user login (use with caution)--disable-ssh-auth: Disable JWT authentication (allows any peer with network access)--ssh-jwt-cache-ttl <seconds>: Enable JWT token caching with specified TTL in seconds (default: 0, disabled)
Step 2: Create Access Control Policy
Create an ACL policy to allow SSH access:
- Log in to your NetBird Dashboard
- Navigate to Access Control
- Create a new policy:
- Source: Select the peers or groups that will connect via SSH
- Destination: Select the peers or groups running the SSH server
- Protocol: Select
NetBird SSHfor SSH-specific policies with fine-grained access control, or useTCPwith port 22 for basic network-level SSH access - Authorized Groups (when using NetBird SSH protocol): Configure which user groups can access which local OS users on the destination machines
- Save the policy
Using NetBird SSH
NetBird CLI Client
The simplest way to connect is using the netbird ssh command:
netbird ssh user@100.119.230.104
Execute a single command:
netbird ssh user@100.119.230.104 "uptime"
Port forwarding:
# Local port forwarding: forward local port 8080 to remote port 80
netbird ssh -L 8080:localhost:80 user@100.119.230.104

# Remote port forwarding: forward remote port 8080 to local port 3000
netbird ssh -R 8080:localhost:3000 user@100.119.230.104
For detailed CLI usage, see the CLI documentation.
Native SSH Clients (OpenSSH)
NetBird automatically configures OpenSSH through a drop-in configuration file.
Currently, only OpenSSH clients are supported. Other SSH clients (PuTTY, etc.) are not compatible.
Prerequisites:
NetBird creates /etc/ssh/ssh_config.d/99-netbird.conf (or equivalent on your OS) which automatically:
- Detects if the target is a NetBird SSH server
- Handles JWT authentication transparently
- Handles server host key verification
Using OpenSSH:
# Connect using standard SSH
ssh user@100.119.230.104

# Port forwarding
ssh -L 8080:localhost:80 user@100.119.230.104

# SFTP
sftp user@100.119.230.104

# SCP
scp file.txt user@100.119.230.104:/path/to/destination
How it works:
When you run ssh user@<netbird-peer>:
- OpenSSH reads the NetBird configuration from
99-netbird.conf - NetBird detects if the target is a NetBird SSH server
- If detected, NetBird handles JWT authentication automatically (OIDC flow if needed)
- The SSH connection is established with your user identity
Browser Client
For SSH access directly from your web browser without installing any software, refer to the Browser Client documentation.
Authentication
JWT Authentication (Default)
By default, NetBird SSH uses JWT-based authentication with the configured Identity Provider. This provides user identity verification instead of machine identity.
NetBird supports fine-grained user mapping, allowing you to specify which OIDC users or groups can connect to which local OS users on the target system. See Fine-Grained Access Control for details.
Time synchronization required: The SSH server's system clock must be synchronized with the IdP for JWT validation. Clock skew can cause authentication failures.
How it works:
- When you connect via SSH, the NetBird client requests a JWT token
- If no cached token exists or the token is expired:
- NetBird initiates an OIDC flow
- A URL is displayed that you must open in your browser to authenticate with the IdP
- After successful login, NetBird receives and caches the JWT token
- The client sends the JWT to the SSH server
- The server validates the JWT using the JWKS endpoint configured in the management server
- If valid, the SSH session is established with the user identity from the JWT
Benefits:
- User identity: SSH sessions are associated with actual users, not machines
- Centralized auth: Leverage the configured IdP (Okta, Google, Microsoft, etc.)
- Audit trail: Know exactly which user accessed which machine
- Token expiration: Automatic re-authentication when tokens expire
Token caching:
By default, JWT tokens are not cached, meaning you'll need to authenticate for each new SSH connection. To enable token caching and reduce authentication prompts on the SSH client machine, use the --ssh-jwt-cache-ttl flag:
# On the SSH client: enable caching with 1-hour TTL
netbird up --ssh-jwt-cache-ttl 3600

# On the SSH client: disable caching (default)
netbird up --ssh-jwt-cache-ttl 0
When caching is disabled (default):
- You'll authenticate via OIDC for each new SSH connection
- More secure but less convenient
- Recommended for high-security environments
When caching is enabled:
- JWT tokens are cached on the client for the specified TTL in seconds
- Reduces repeated authentication prompts
- Cached tokens expire after the configured TTL or when the NetBird daemon is restarted
Machine Identity (--disable-ssh-auth)
If you prefer to allow SSH access from any peer with network access (similar to pre-0.60 behavior), you can disable JWT authentication:
netbird up --allow-server-ssh --disable-ssh-auth
Important considerations:
- Less secure: Any peer with network access (ACL policy) can connect
- Machine identity: Connections are identified by peer/machine, not by user
- No audit trail: You cannot track which user accessed the system
- Use cases: Automated scripts, service accounts, environments without IdP
When JWT authentication is disabled, SSH access is controlled solely by network-level ACL policies. Ensure your policies are appropriately restrictive.
Fine-Grained Access Control
NetBird SSH allows you to configure granular access control that maps NetBird users to specific local OS users on target machines. This provides precise control over who can access what on your infrastructure.
How It Works
When you create an SSH policy with the NetBird SSH protocol, you can configure Authorized Groups that define:
- Source User Groups: Which NetBird user groups are allowed to connect
- Local User Mapping: Which local OS users each group can access on the destination machines
For example, you can configure:
- Members of the "Developers" group can SSH as
developerordeployusers - Members of the "DBAs" group can SSH as
postgresuser - Members of the "SysAdmins" group can SSH as
rootuser
Configuring Fine-Grained Access Control
When creating or editing an SSH policy in the Dashboard:
- Navigate to Access Control and click Create Policy
- Select NetBird SSH as the protocol
- Configure the Source - select the user groups that will connect via SSH
- Configure the Destination - select the peers or groups running the SSH server
- Under SSH Access, choose the access level:
- Full Access: Allow SSH as any local user on the destination machines
- Limited Access: Specify which local users each source group can access
- If you selected Limited Access, configure the user mappings:
- For each source group, specify which local OS users they are allowed to SSH as
- Add multiple local users per group as needed (e.g.,
ashley,root)
- Enable the policy and click Continue
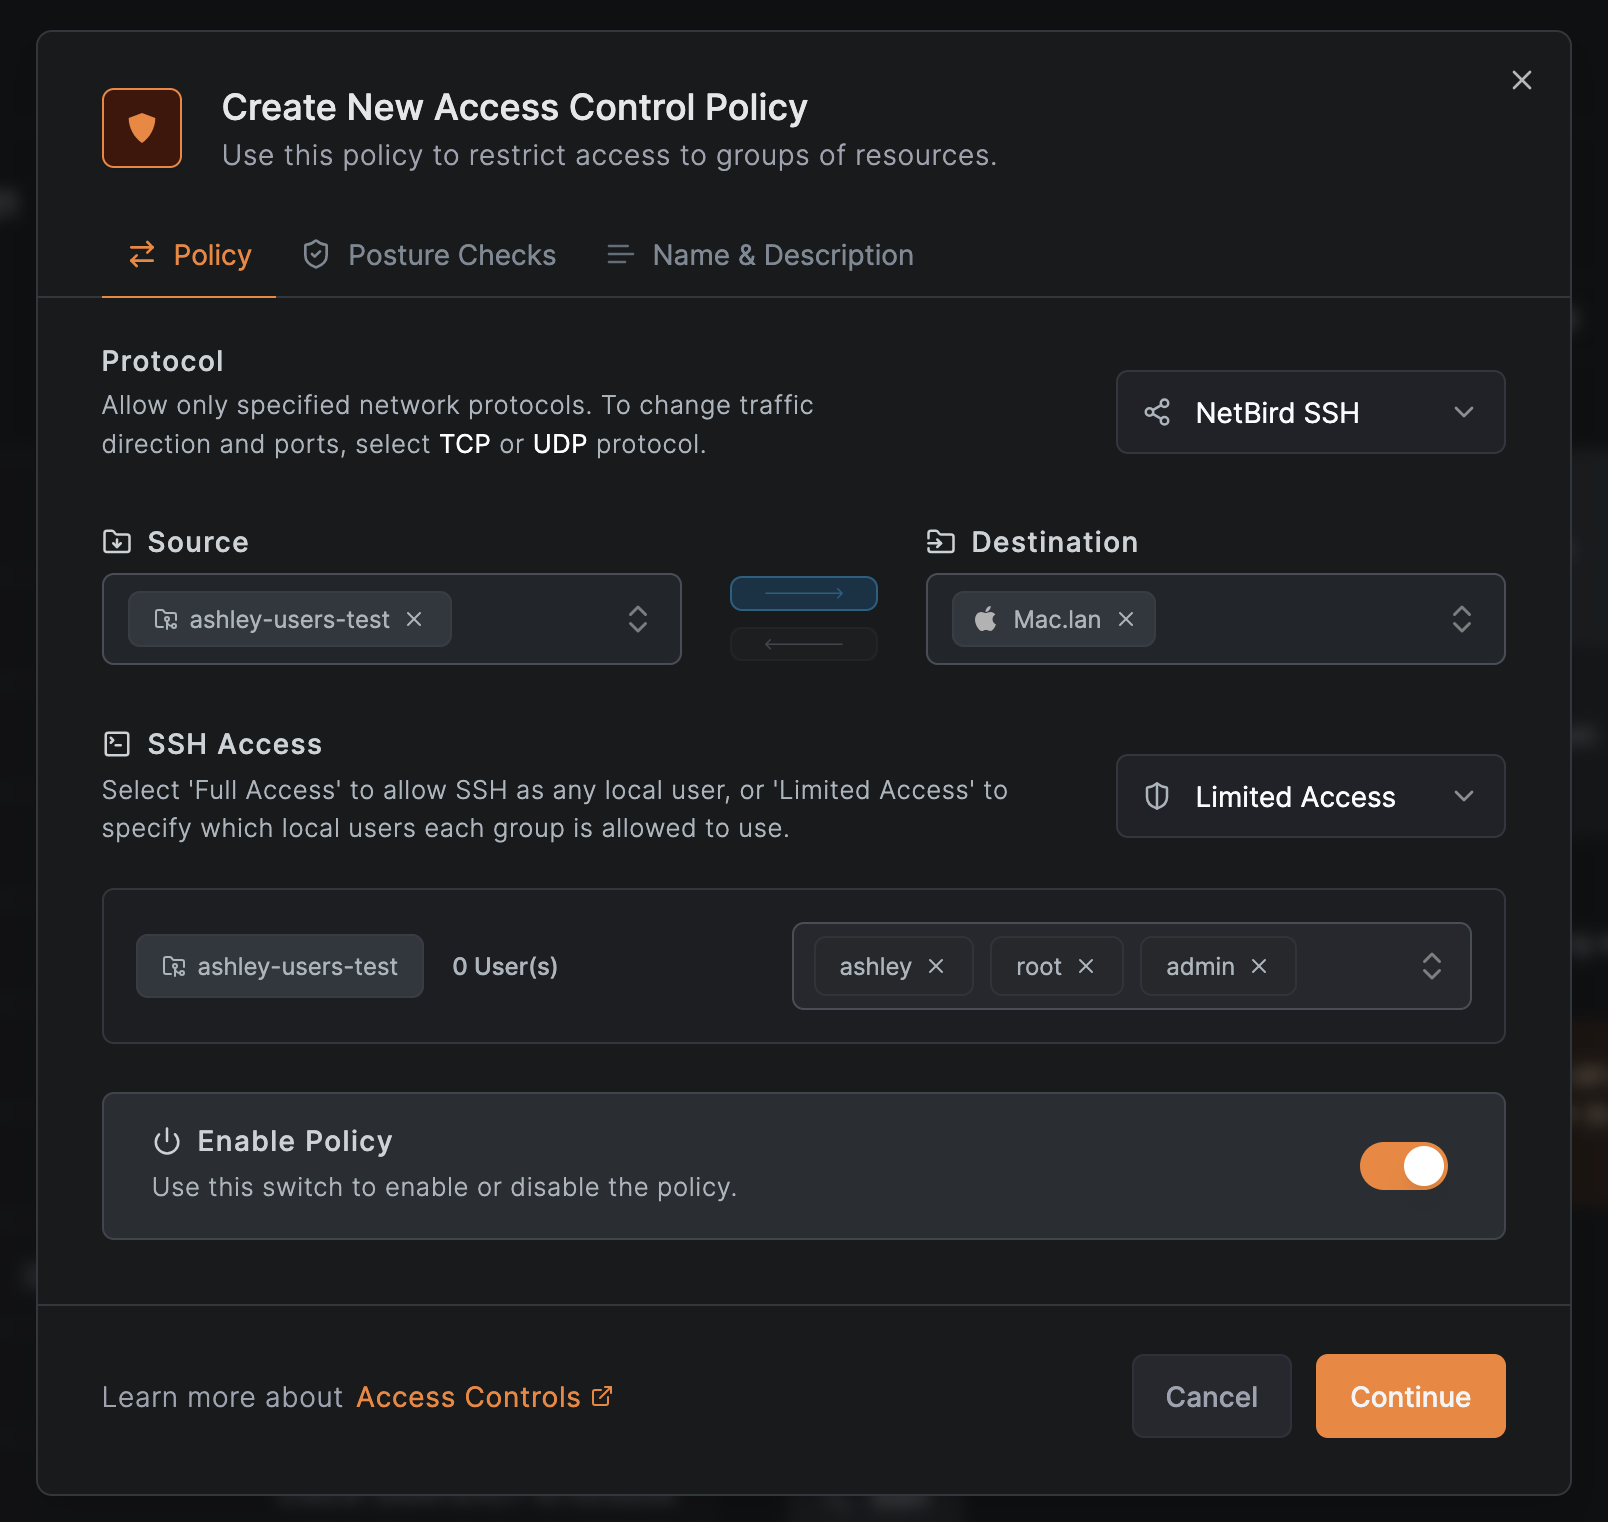
Example configuration:
| Source Group | Allowed Local Users |
|---|---|
| Developers | developer, deploy |
| DBAs | postgres |
| SysAdmins | root, admin |
When Full Access is selected, users in the source groups can SSH as any local user on the destination machines. Use Limited Access to enforce the principle of least privilege.
Authorization Flow
When a user attempts to SSH into a peer:
- The user authenticates via OIDC to obtain a JWT token
- The JWT contains the user's identity (user ID from the
subclaim by default) - NetBird checks if the user's ID is in the list of authorized users for this peer
- NetBird verifies the user is allowed to access the requested local OS user based on the policy's authorized groups configuration
- If authorized, the SSH session is established as the specified local user
Fine-grained access control requires JWT authentication to be enabled (the default). It is not available when using --disable-ssh-auth.
Security Considerations
- Fail-closed: If no mapping exists for an OS user, access is denied by default
- User identity verification: Access decisions are based on the authenticated OIDC user identity
- Audit trail: All SSH access attempts are logged with the authenticated user's identity
- Least privilege: Configure the minimum necessary local user access for each group
Advanced Features
Port Forwarding
NetBird SSH supports both local and remote port forwarding, allowing you to create secure tunnels through the SSH connection.
Local Port Forwarding:
Forward a local port on your machine to a remote address through the SSH server:
# Forward local port 8080 to remote localhost:80
netbird ssh -L 8080:localhost:80 user@100.119.230.104

# Forward local port 5432 to a database accessible from the remote peer
netbird ssh -L 5432:database.internal:5432 user@100.119.230.104
Use case: Access a web service or database running on the remote peer or in its network.
Remote Port Forwarding:
Forward a port on the remote SSH server to your local machine:
# Forward remote port 8080 to local port 3000
netbird ssh -R 8080:localhost:3000 user@100.119.230.104
Use case: Allow the remote peer to access a service running on your local machine.
Port forwarding must be enabled on the SSH server using
--enable-ssh-local-port-forwarding and
--enable-ssh-remote-port-forwarding flags.
SFTP and SCP
Transfer files securely using native SFTP or SCP clients:
SFTP:
sftp user@100.119.230.104
SCP:
# Upload file
scp file.txt user@100.119.230.104:/path/to/destination

# Download file
scp user@100.119.230.104:/path/to/file.txt .

# Copy directory
scp -r directory/ user@100.119.230.104:/path/to/destination
SFTP must be enabled on the SSH server using the --enable-ssh-sftp flag.
SFTP and SCP require native OpenSSH clients.
Non-interactive Command Execution
Execute commands on remote peers without an interactive shell:
netbird ssh user@100.119.230.104 "uptime"
Platform Support & Limitations
Supported Platforms
NetBird SSH is supported on the following platforms:
- Linux: Full support (all features)
- macOS: Full support (all features)
- Windows: Full support with platform-specific considerations (see below)
- FreeBSD: Full support (all features)
- Android: Server-only support (SSH client not available)
Platform-Specific Considerations
Windows
- Port forwarding not supported: SSH servers on Windows cannot accept port forwarding requests
- Other features supported: SFTP, non-interactive commands fully functional
Linux/Unix
- User Switching: Available when running as root
- The SSH server can switch to any user when running with root privileges
- Non-root NetBird (e.g., rootless containers) will run sessions under the given account
- All features supported: Full feature parity across these platforms
Android
- Server-only: SSH client functionality not available
- Server features: Can run NetBird SSH server (configured via GUI)
Known Limitations
Port Forwarding
Port forwarding has the following limitations:
- Not supported with native SSH clients: Port forwarding (both local
-Land remote-R) is only available when using thenetbird sshcommand directly - Native OpenSSH clients cannot use port forwarding
- This is a current implementation limitation
- Use
netbird ssh -Lornetbird ssh -Rinstead ofssh -Lorssh -R - Not supported on Windows servers: SSH servers running on Windows cannot accept port forwarding requests
- No user switching with port forwarding: Port forwarding only works when connecting as the user running the NetBird process
User Mapping
NetBird now supports fine-grained user mapping through the NetBird SSH protocol and Authorized Groups configuration. See Fine-Grained Access Control for details.
Requirements for user switching:
- The NetBird SSH server must run with root/administrator privileges to switch between local users
- Non-root NetBird installations (e.g., rootless containers) will run all sessions under the NetBird process account
- On Windows, sessions connect as Administrator-equivalent users
Feature Availability
Some features require specific flags to be enabled on the SSH server:
- SFTP: Requires
--enable-ssh-sftp - Local port forwarding: Requires
--enable-ssh-local-port-forwarding - Remote port forwarding: Requires
--enable-ssh-remote-port-forwarding - Root login: Requires
--enable-ssh-root(use with caution)
Security Considerations
Access Control
SSH access is controlled by multiple layers:
- Network ACL policies: Control which peers can access SSH with dedicated 'NetBird SSH' protocol policies
- JWT authentication (if enabled): User identity verification via IdP
- Fine-grained access control (when using NetBird SSH protocol): Controls which authenticated users can access which local OS users on the target machine
Disable SSH server
To disable the Netbird SSH server run netbird down && netbird up --allow-server-ssh=false
Troubleshooting
Connection Issues
"SSH server not detected" or "Permission denied (publickey)" or "No more authentication methods available"
- Ensure the target peer is running with
--allow-server-ssh - Verify SSH is enabled in the dashboard for the target peer
- Check that the target peer is online and connected
"Authentication failed" (JWT authentication)
- Complete the OIDC flow when prompted
- Verify the IdP is properly configured
- Check if your JWT token is expired (NetBird will request a new one)
- Ensure the SSH server's system clock is synchronized (time skew causes JWT validation failures)
- For
--disable-ssh-auth: Ensure ACL policy allows access
"Connection timeout"
- Verify ACL policy allows SSH access
- Check if peers are connected to each other:
netbird status -d - Test basic connectivity:
ping <peer-ip>
Port Forwarding Issues
"Port forwarding not available"
- Ensure the SSH server was started with appropriate flags:
--enable-ssh-local-port-forwardingfor local forwarding--enable-ssh-remote-port-forwardingfor remote forwarding
"Cannot bind to port"
- For local forwarding: Ensure the local port is not already in use
- For remote forwarding: Ensure the remote port is available
SFTP Issues
"SFTP subsystem not available"
- Ensure the SSH server was started with
--enable-ssh-sftp
"Permission denied"
- Check file system permissions on the target peer
- Verify you're connecting with the correct user
Fine-Grained Access Control Issues
"User is not authorized to access this peer"
- Verify the user's group is included in the SSH policy's source groups
- Check that the policy uses the
NetBird SSHprotocol - Ensure the user has authenticated via OIDC
"User is not authorized to login as OS user"
- Check the Authorized Groups configuration in the SSH policy
- Verify the user's group is mapped to the requested local OS user
- Ensure the local OS user exists on the target machine
"No authorization mapping for OS user"
- The requested local OS user is not configured in any Authorized Groups mapping
- Add the local OS user to the appropriate group's allowed users list in the policy
CLI Reference
For complete CLI command reference, including all SSH-related commands and flags, see the CLI documentation.
Version History
v0.61.0
Version 0.61.0 introduces fine-grained SSH access control.
Breaking change: Management server v0.61.0 will break NetBird SSH for all peers running versions older than v0.61.0. You must update all peers that use SSH to v0.61.0 or later before upgrading the management server/dashboard.
New Capabilities
- NetBird SSH protocol: New protocol type in policies specifically for SSH access control
- Fine-grained user mapping: Map NetBird user groups to specific local OS users
- Authorized Groups: Configure which users can access which local accounts per policy
- Full Access vs Limited Access: Choose between unrestricted local user access or granular per-group mappings
- Enhanced security: Fail-closed authorization model with granular audit trail
Breaking Changes
- Peers running versions older than v0.61.0 will lose SSH functionality when the management server is upgraded to v0.61.0
Upgrade Steps
-
Update SSH servers (peers running
--allow-server-ssh) -
Update SSH clients (peers using
netbird ssh) -
Update the management server to v0.61.0
-
Update the dashboard to v0.61.0
-
Create NetBird SSH policy:
- Source: SSH client user groups
- Destination: SSH server peers/groups
- Protocol: NetBird SSH
- SSH Access: Full Access or Limited Access
- If Limited Access: configure local user mappings per source group
v0.60.0
Version 0.60.0 is a complete rewrite of NetBird SSH with breaking changes.
This section is only relevant if you're upgrading from NetBird v0.59.x or earlier.
New Capabilities
- OpenSSH client support via automatic proxy configuration
- Windows client and server support
- SFTP subsystem for file transfers
- Local and remote port forwarding (
netbird sshonly) - Non-interactive command execution
- Configurable JWT token caching
Breaking Changes
- Server port changed from 44338 to 22 (22022 internally)
- Authentication changed from machine public keys to JWT tokens (user identity)
- Port 22 automatically redirects to 22022 for NetBird traffic
- Old implicit firewall rule removed - explicit ACL policy required for port 22
- Client no longer requires
sudofor authentication - Not backward compatible: v0.60.0+ clients cannot connect to older servers and vice versa
Upgrade Steps
Update order is important - SSH servers must be updated before SSH clients.
-
Update management server to v0.60.0 or later
- Verify server is running correctly
- Confirm JWKS endpoint is accessible
-
Update dashboard (optional)
- Only needed if you use the browser-based SSH client
-
Create ACL policy for port 22:
- Source: SSH client peers/groups
- Destination: SSH server peers/groups
- Protocol: TCP
- Port: 22
-
Update SSH servers first (peers running
--allow-server-ssh)- Start with non-critical peers for testing
-
Update SSH clients last (peers using
netbird ssh)- Updated clients cannot connect to old servers
Optional Configuration
Disable JWT authentication on SSH servers (allows network-level access without user auth):
netbird up --allow-server-ssh --disable-ssh-auth
Enable JWT token caching on SSH clients (reduces auth prompts):
netbird up --ssh-jwt-cache-ttl 3600 # 1 hour
Get started
- Make sure to star us on GitHub
- Follow us on X
- Join our Slack Channel
- NetBird latest release on GitHub