Route to a Kubernetes service with high availability
This guide walks the whole journey: create the NetBird-side pieces the operator doesn't make (a custom DNS zone, groups, an access policy), deploy a redundant pool of routing peers, expose an in-cluster Service as a NetBird resource, and reach it by name from a NetBird client. Because the routing peers run as a high-availability pool, access keeps working when a routing-peer pod or a node fails.
What you'll achieve
A NetBird client (for example, your laptop) reaches a private Kubernetes ClusterIP Service by a stable DNS name, with traffic flowing through a pool of routing-peer pods spread across your nodes. Lose a pod or a node and clients fail over automatically to a healthy peer.

Prerequisites
- A Kubernetes cluster (multiple nodes recommended, so routing peers can spread across them).
- The NetBird operator installed — see Getting Started.
- A NetBird account and a Personal Access Token.
- A NetBird client (the device that will reach the service) enrolled in your account.
In this guide the example objects are named k8s.company.internal (DNS zone), kubernetes-clients / kubernetes-services (groups), kubernetes (the network), and nginx (the Service). Substitute your own.
Step 1: Create a custom DNS zone
The operator publishes each exposed Service as a DNS record inside a custom zone, so clients reach it by name instead of by its (ephemeral) ClusterIP. The zone must exist before you deploy the routing peers.
In the dashboard, go to DNS > Zones > Add Zone:
- Name:
k8s.company.internal - Distribution Groups:
kubernetes-clients— only peers in these groups can resolve the zone's records.
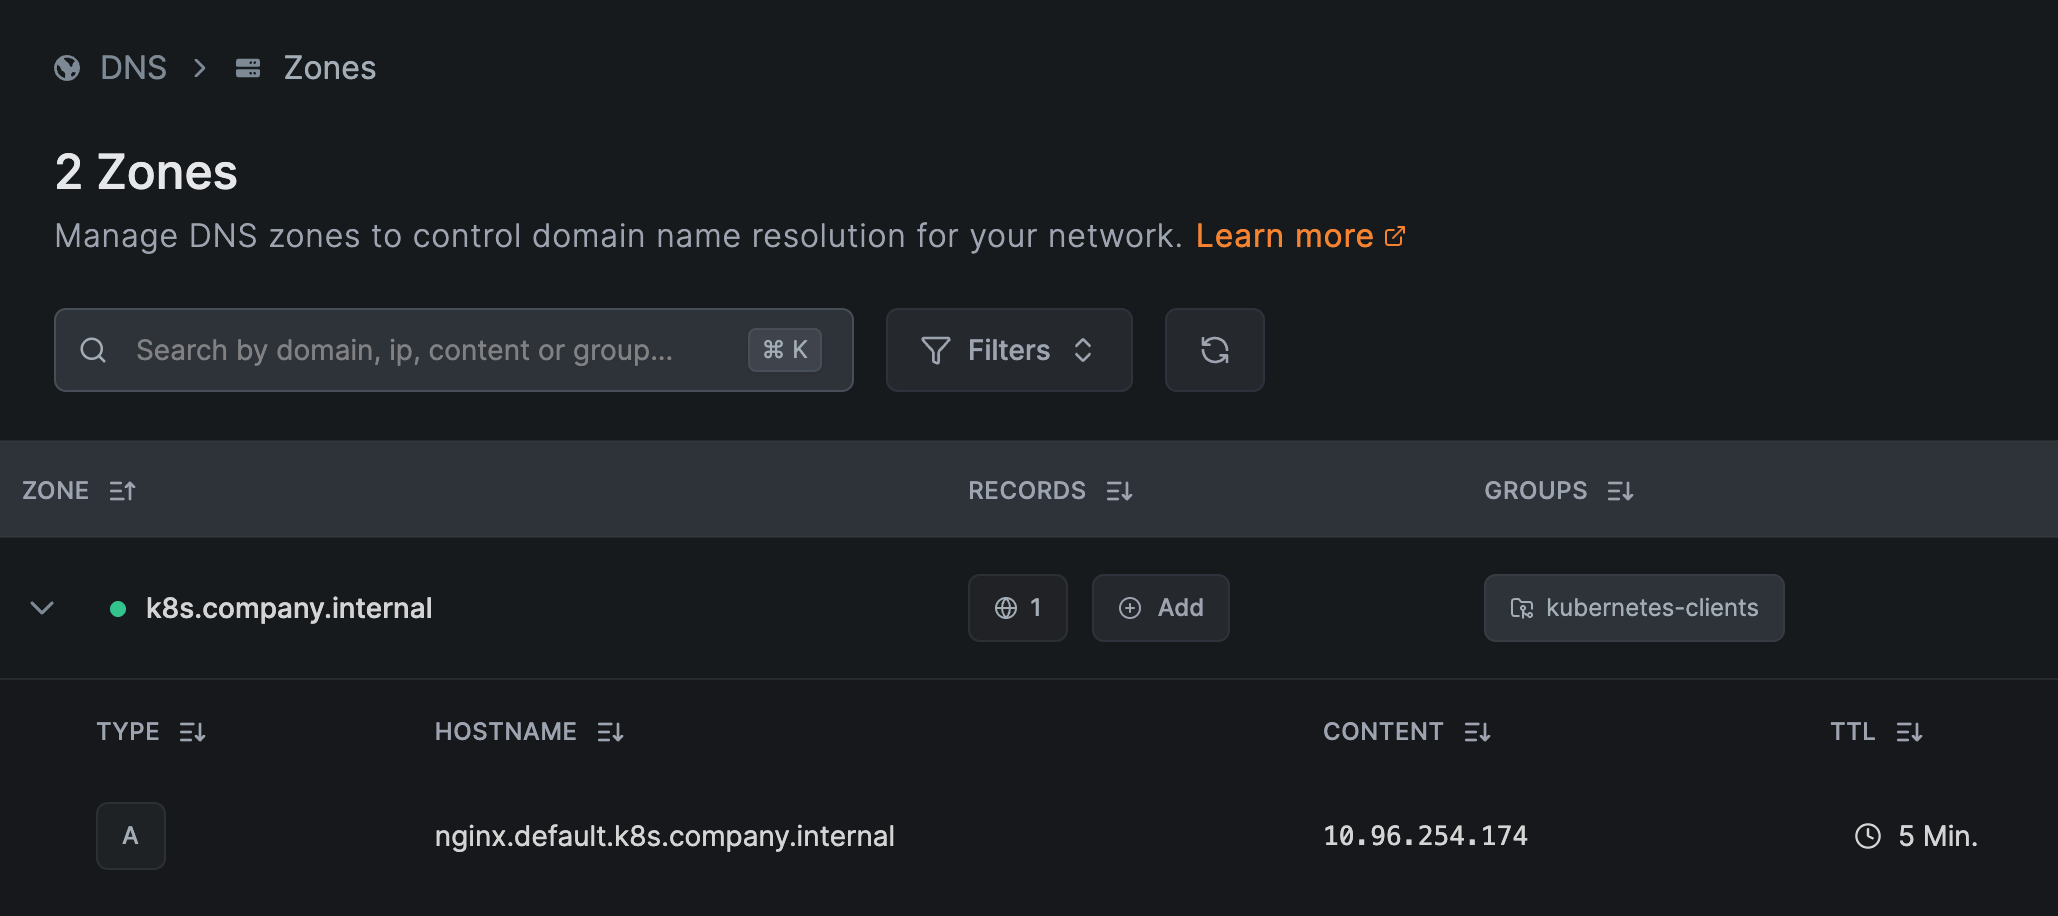
Create only the zone — leave its records empty. You don't enter a hostname, IP, or TTL here. When you expose a Service in Step 4, the operator automatically adds the A record (named <service>.<namespace>.<zone>, e.g. nginx.default.k8s.company.internal, pointing at the Service's ClusterIP, with a 5-minute TTL) — that's the record shown above.
See Custom Zones for details.
Step 2: Create groups and an access policy
NetBird is deny-by-default: nothing is reachable until a policy allows it, and the operator does not create groups or policies for you. Set up two groups and one policy under Access Control.
Create the groups via Access Control > Groups:
kubernetes-clients— the peers that should reach your services (put your client device in it).kubernetes-services— the destination group the exposed Services will be placed in.
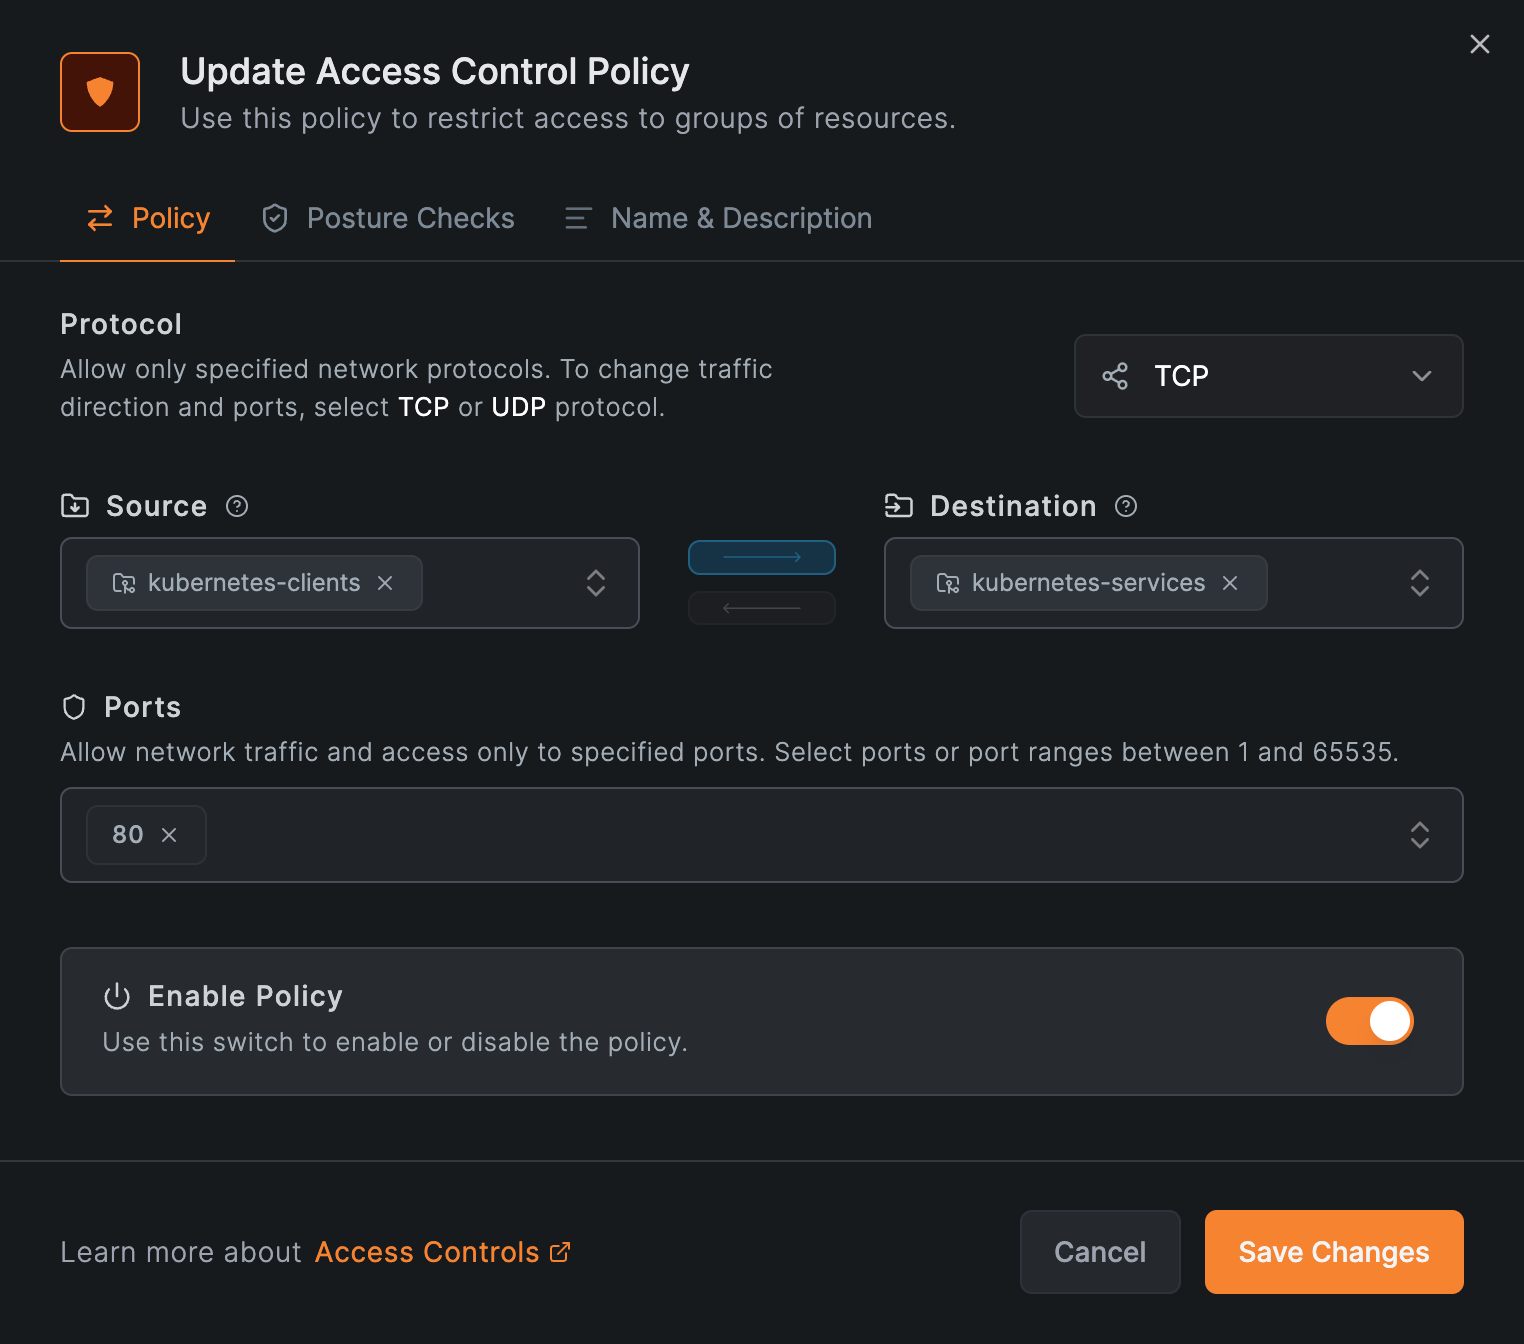
Then create a policy via Access Control > Policies > Add policy:
- Name:
kubernetes-access - Source:
kubernetes-clients - Destination:
kubernetes-services - Protocol/Ports:
TCP80(match your Service's port)
Create the group and the policy before the NetworkResource in Step 4. Until both exist, traffic is denied even though DNS resolves.
Step 3: Deploy the routing peers (HA)
A NetworkRouter creates a NetBird network and deploys routing-peer pods. Set spec.workloadOverride.replicas to run a redundant pool:
apiVersion: netbird.io/v1alpha1
kind: NetworkRouter
metadata:
  name: kubernetes
  namespace: netbird
spec:
  dnsZoneRef:
    name: k8s.company.internal
  workloadOverride:
    replicas: 3
kubectl apply -f networkrouter.yaml
The operator registers all replicas in a single routing-peer group at one metric, so each client connects through its lowest-latency peer and fails over automatically if that peer becomes unreachable (the equal-metric behavior in How Routing Peers Work — High availability). When replicas > 1, it also creates a PodDisruptionBudget with maxUnavailable: 1, so node drains and rolling updates never take down more than one routing peer at a time.
The operator already defaults to 3 replicas — set the field explicitly to be intentional, or raise it for more redundancy. See the Routing Peer page for the full NetworkRouter reference.
On a multi-node cluster, the operator spreads these replicas across nodes by default, so you already have node-level high availability: a node failure takes out only one routing peer and clients fail over to the rest.
Step 4: Expose your Service
A NetworkResource maps a Kubernetes ClusterIP Service to a NetBird resource and creates a DNS record for it in the router's zone. Place it in the kubernetes-services group from Step 2:
apiVersion: apps/v1
kind: Deployment
metadata:
  name: nginx
  namespace: default
  labels: { app: nginx }
spec:
  replicas: 1
  selector: { matchLabels: { app: nginx } }
  template:
    metadata: { labels: { app: nginx } }
    spec:
      containers:
        - name: nginx
          image: nginx:stable
          ports: [{ containerPort: 80 }]
---
apiVersion: v1
kind: Service
metadata:
  name: nginx
  namespace: default
spec:
  type: ClusterIP
  selector: { app: nginx }
  ports:
    - { name: http, port: 80, targetPort: 80, protocol: TCP }
---
apiVersion: netbird.io/v1alpha1
kind: NetworkResource
metadata:
  name: nginx
  namespace: default
spec:
  networkRouterRef:
    name: kubernetes
    namespace: netbird
  serviceRef:
    name: nginx
  groups:
    - name: kubernetes-services
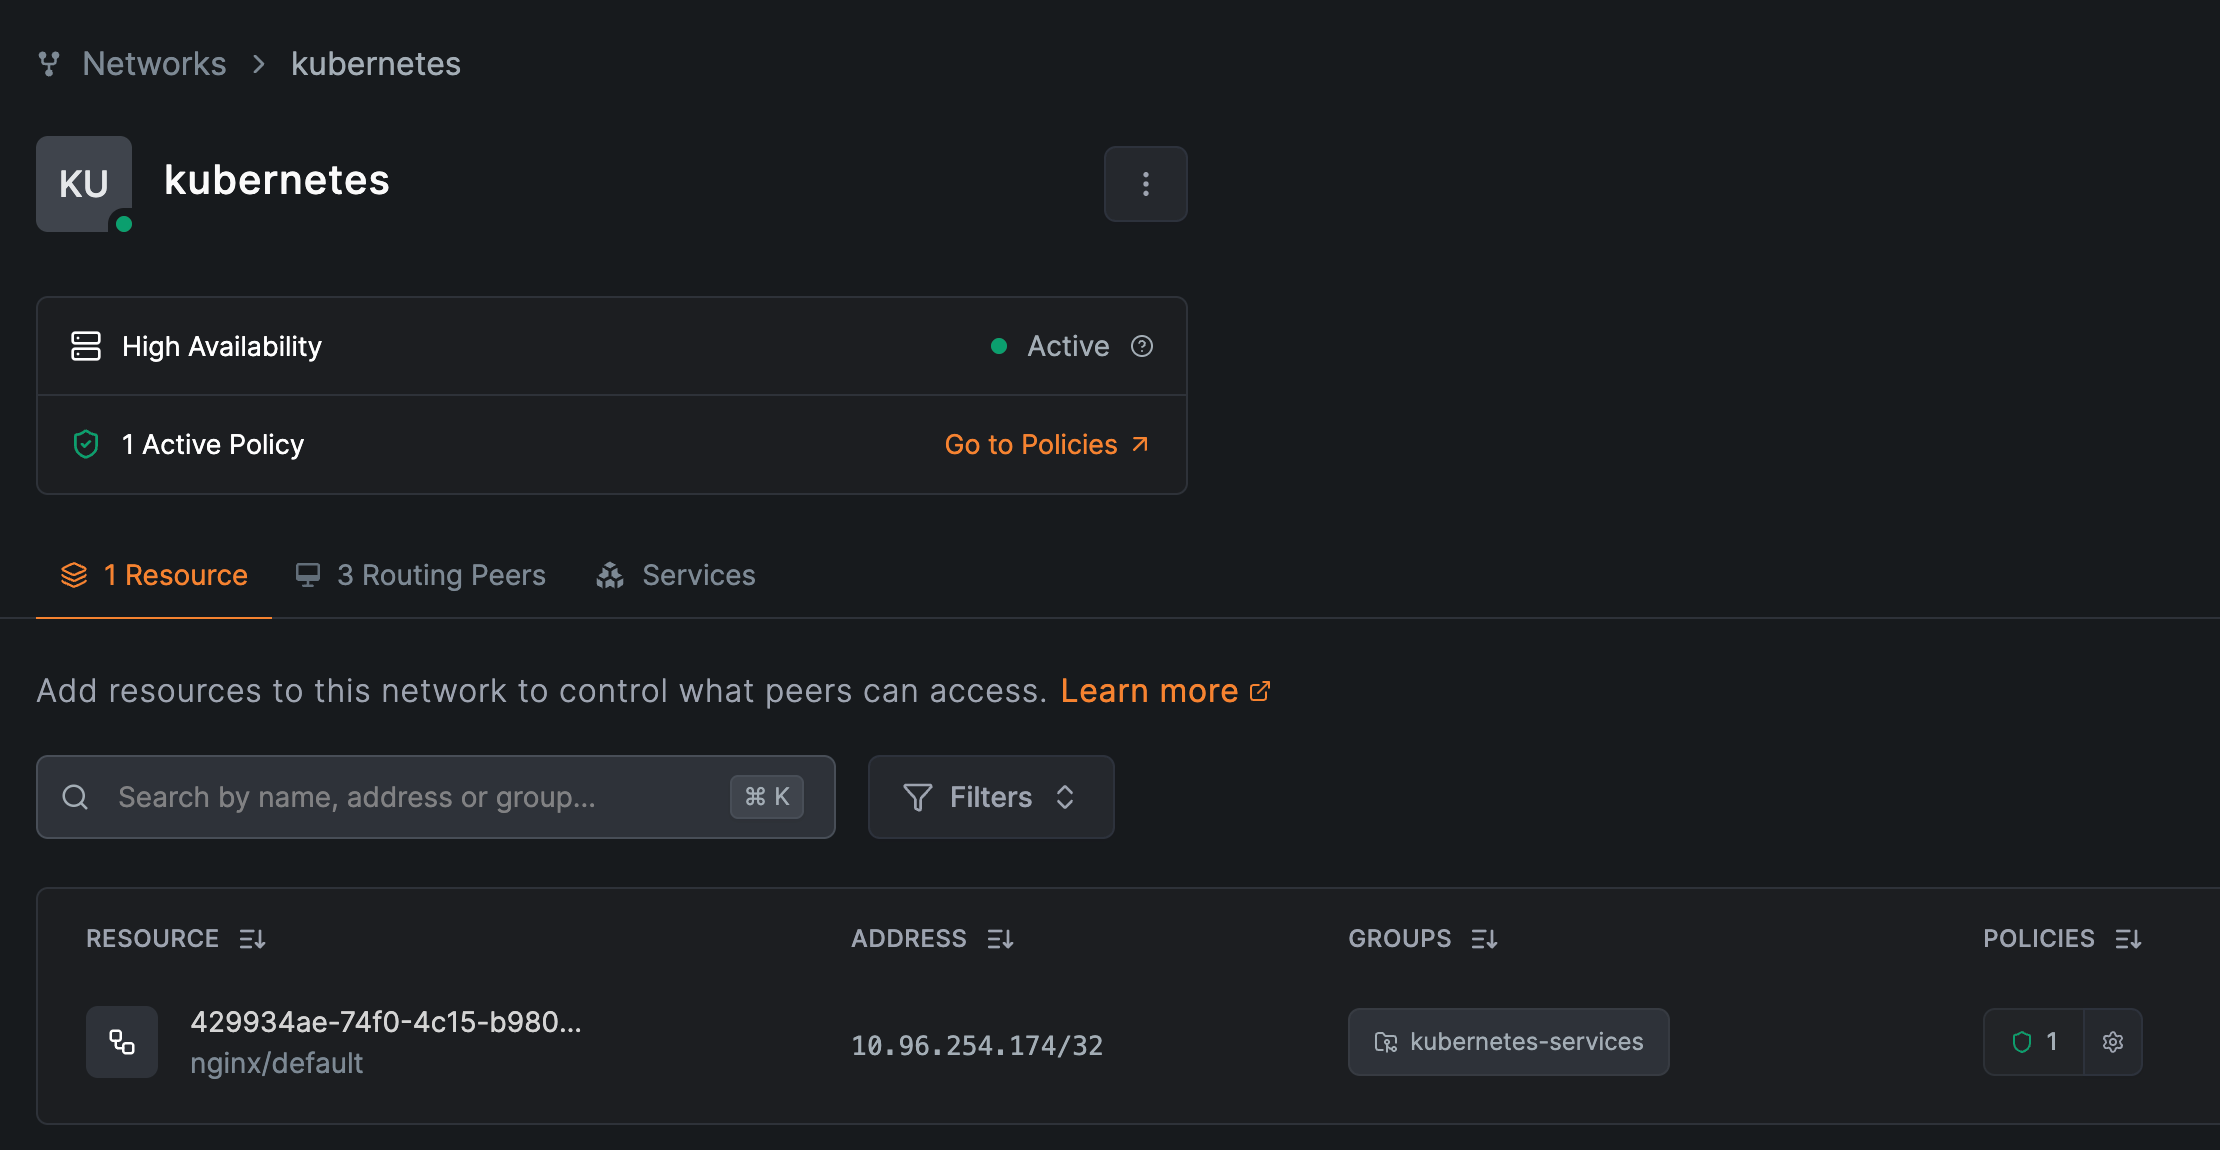
The Service must be type ClusterIP. The operator creates the record nginx.default.k8s.company.internal (<service>.<namespace>.<zone>) pointing at the Service's ClusterIP. The kubernetes network now shows its routing peers and the resource:
Step 5: Verify and test failover
Confirm the routing-peer pods are running, spread across nodes, and protected by a PodDisruptionBudget:
kubectl -n netbird get pods -l app.kubernetes.io/name=networkrouter -o wide
kubectl -n netbird get pdb

From a NetBird client in kubernetes-clients, resolve and reach the service:
curl http://nginx.default.k8s.company.internal/
Then delete one routing-peer pod (or drain its node) while curling in a loop — the connection keeps working as another peer takes over, and the Deployment reschedules the missing pod:
kubectl -n netbird delete pod <routing-peer-pod>
Next Steps
- Routing Peer — the
NetworkRouter/NetworkResourcereference. - How Routing Peers Work — failover, metrics, and access control.
Appendix: Friendly DNS names
Each NetworkResource is published at <service>.<namespace>.<zone> — here, nginx.default.k8s.company.internal. The operator always uses this form and it can't be customized on the NetworkResource.
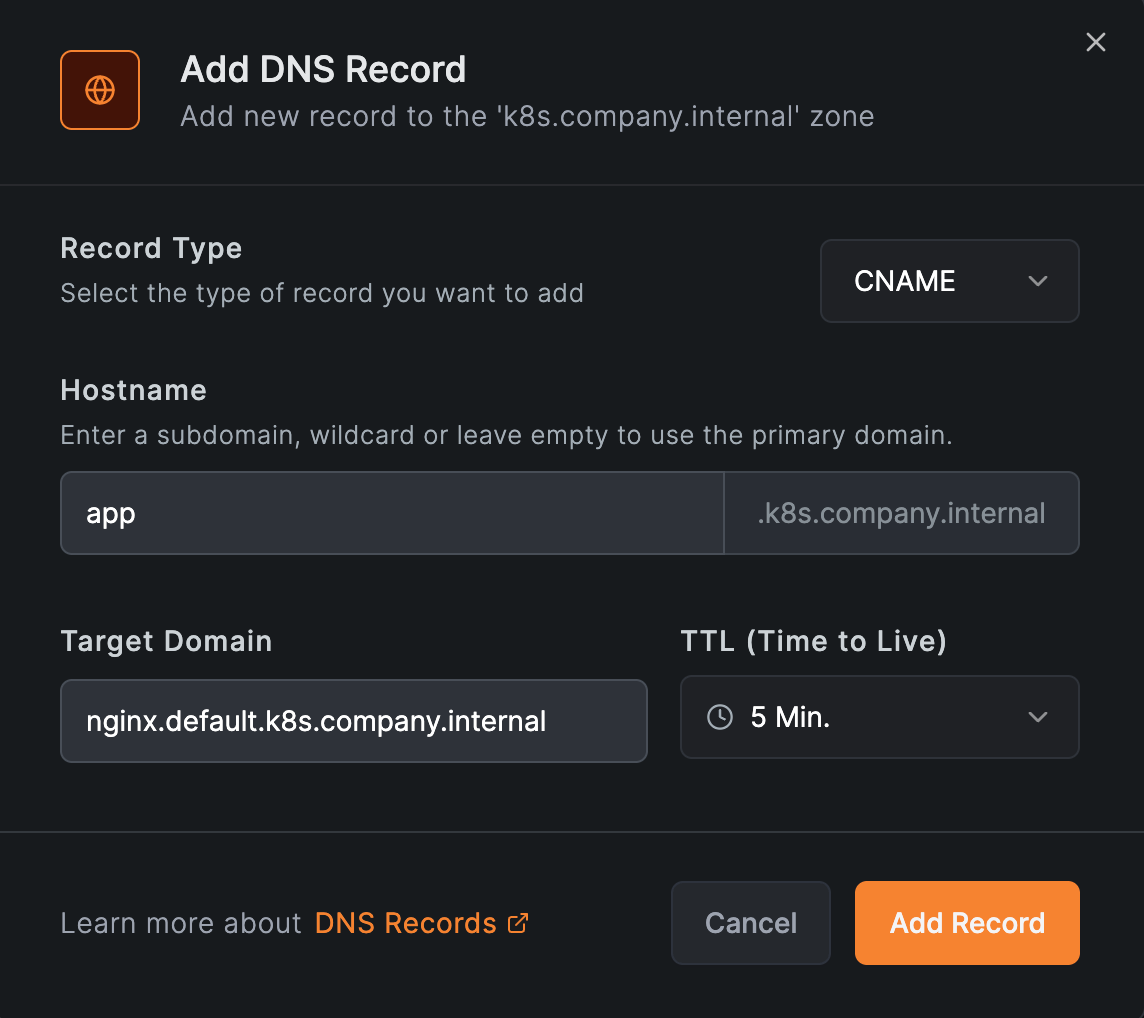
To expose a service under a cleaner name, add a CNAME in a custom DNS zone pointing at the operator's record:
app.k8s.company.internal CNAME nginx.default.k8s.company.internal
In the dashboard, that's DNS > Zones > the zone's Add button: a CNAME record with hostname app and the operator's record as the target.
Because it targets the operator-managed record, the alias keeps resolving if the service's ClusterIP changes. A static A record straight to the ClusterIP also works, but it goes stale when the ClusterIP changes — prefer the CNAME.
The friendly name is only a DNS alias — traffic still routes through the NetworkResource, so keep it in place. NetBird serves only the specific records you add to a zone; other names under the same domain keep resolving through your existing DNS, so reusing a real internal domain is safe — just avoid a name that already exists in your corporate DNS. These manual records are not managed by the operator, so you maintain them yourself.